
Quick Start Guide
Page 5
... Maintenance 46 Replacing an Ink Tank 46 Keeping the Best Printing Results 51 When Printing Becomes Faint or Colors Are Incorrect 52 Printing the Nozzle Check Pattern 53 Examining the Nozzle Check Pattern ...........54 Print Head Cleaning 56 Print Head Deep Cleaning 58 Aligning the Print Head 60 Cleaning Your Machine 64 Troubleshooting 67 Error Message...
... Maintenance 46 Replacing an Ink Tank 46 Keeping the Best Printing Results 51 When Printing Becomes Faint or Colors Are Incorrect 52 Printing the Nozzle Check Pattern 53 Examining the Nozzle Check Pattern ...........54 Print Head Cleaning 56 Print Head Deep Cleaning 58 Aligning the Print Head 60 Cleaning Your Machine 64 Troubleshooting 67 Error Message...
Quick Start Guide
Page 56
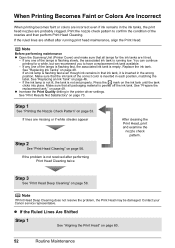
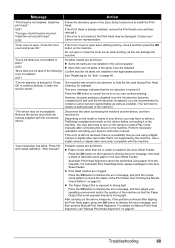
... on the ink tank until the tank clicks into place. Step 3 See "Print Head Deep Cleaning" on page 46. - Contact your Canon service representative. If any one of the correct color is inserted in each position, matching the label. If the problem is peeled off the... after performing Print Head Cleaning twice After cleaning the Print Head, print and examine the nozzle check pattern. See "Replacing Ink Tanks" on page 49. on page 48. Step 1 See "Printing the Nozzle Check Pattern" on page 60. 52 Routine Maintenance If an ink lamp is flashing fast even though...
... on the ink tank until the tank clicks into place. Step 3 See "Print Head Deep Cleaning" on page 46. - Contact your Canon service representative. If any one of the correct color is inserted in each position, matching the label. If the problem is peeled off the... after performing Print Head Cleaning twice After cleaning the Print Head, print and examine the nozzle check pattern. See "Replacing Ink Tanks" on page 49. on page 48. Step 1 See "Printing the Nozzle Check Pattern" on page 60. 52 Routine Maintenance If an ink lamp is flashing fast even though...
Quick Start Guide
Page 57
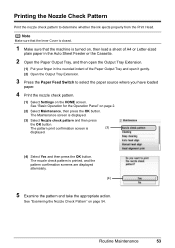
...1 Make sure that the machine is (3) displayed. (4) Select Yes and then press the OK button. The pattern print confirmation screen is turned on, then load a sheet of A4 or Letter-sized plain paper in the ...Nozzle Check Pattern Print the nozzle check pattern to select the paper source where you have loaded paper. 4 Print the nozzle check pattern. (1) Select Settings on the HOME screen. See "Examining the Nozzle Check Pattern" on page 2. (2) Select Maintenance, then press the OK button. Routine Maintenance 53 The nozzle check pattern is displayed. (3) Select Nozzle check pattern...
...1 Make sure that the machine is (3) displayed. (4) Select Yes and then press the OK button. The pattern print confirmation screen is turned on, then load a sheet of A4 or Letter-sized plain paper in the ...Nozzle Check Pattern Print the nozzle check pattern to select the paper source where you have loaded paper. 4 Print the nozzle check pattern. (1) Select Settings on the HOME screen. See "Examining the Nozzle Check Pattern" on page 2. (2) Select Maintenance, then press the OK button. Routine Maintenance 53 The nozzle check pattern is displayed. (3) Select Nozzle check pattern...
Quick Start Guide
Page 58
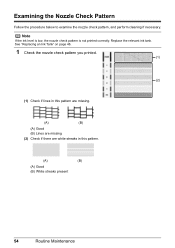
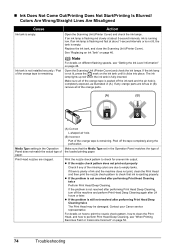
Note If the ink level is low, the nozzle check pattern is not printed correctly. Replace the relevant ink tank. See "Replacing an Ink Tank" on page 46. 1 Check the nozzle check pattern you printed. (1) (2) (1) Check if lines in this pattern are missing. (A) (B) (A) Good (B) Lines are missing (2) Check if there are white streaks in this pattern. (A) (B) (A) Good (B) White streaks present 54 Routine Maintenance Examining the Nozzle Check Pattern Follow the procedure below to examine the nozzle check pattern, and perform cleaning if necessary.
Note If the ink level is low, the nozzle check pattern is not printed correctly. Replace the relevant ink tank. See "Replacing an Ink Tank" on page 46. 1 Check the nozzle check pattern you printed. (1) (2) (1) Check if lines in this pattern are missing. (A) (B) (A) Good (B) Lines are missing (2) Check if there are white streaks in this pattern. (A) (B) (A) Good (B) White streaks present 54 Routine Maintenance Examining the Nozzle Check Pattern Follow the procedure below to examine the nozzle check pattern, and perform cleaning if necessary.
Quick Start Guide
Page 59
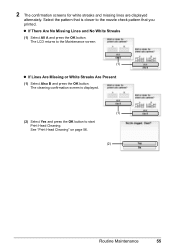
The LCD returns to start Print Head Cleaning. The cleaning confirmation screen is closer to the nozzle check pattern that is displayed. (1) (2) Select Yes and press the OK button to the Maintenance screen. (1) z If Lines Are Missing or White Streaks Are Present (1) Select Also B ..." on page 56. (2) Routine Maintenance 55 z If There Are No Missing Lines and No White Streaks (1) Select All A and press the OK button. Select the pattern that you printed.
The LCD returns to start Print Head Cleaning. The cleaning confirmation screen is closer to the nozzle check pattern that is displayed. (1) (2) Select Yes and press the OK button to the Maintenance screen. (1) z If Lines Are Missing or White Streaks Are Present (1) Select Also B ..." on page 56. (2) Routine Maintenance 55 z If There Are No Missing Lines and No White Streaks (1) Select All A and press the OK button. Select the pattern that you printed.
Quick Start Guide
Page 60
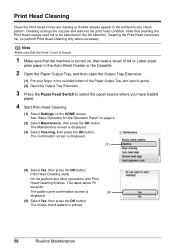
.... The Maintenance screen is (4) displayed. (5) Select Yes, then press the OK button. The nozzle check pattern is displayed. (3) (4) Select Yes, then press the OK button. Cleaning unclogs the nozzles and restores the print head condition. Note that the machine is turned on, then load a sheet... and open it gently. (2) Open the Output Tray Extension. 3 Press the Paper Feed Switch to be absorbed in the printed nozzle check pattern. The confirmation screen is printed. 56 Routine Maintenance Do not perform any other operations until Print Head Cleaning finishes. See "Basic...
.... The Maintenance screen is (4) displayed. (5) Select Yes, then press the OK button. The nozzle check pattern is displayed. (3) (4) Select Yes, then press the OK button. Cleaning unclogs the nozzles and restores the print head condition. Note that the machine is turned on, then load a sheet... and open it gently. (2) Open the Output Tray Extension. 3 Press the Paper Feed Switch to be absorbed in the printed nozzle check pattern. The confirmation screen is printed. 56 Routine Maintenance Do not perform any other operations until Print Head Cleaning finishes. See "Basic...
Quick Start Guide
Page 61
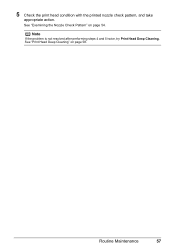
See "Print Head Deep Cleaning" on page 54. Note If the problem is not resolved after performing steps 4 and 5 twice, try Print Head Deep Cleaning. 5 Check the print head condition with the printed nozzle check pattern, and take appropriate action. Routine Maintenance 57 See "Examining the Nozzle Check Pattern" on page 58.
See "Print Head Deep Cleaning" on page 54. Note If the problem is not resolved after performing steps 4 and 5 twice, try Print Head Deep Cleaning. 5 Check the print head condition with the printed nozzle check pattern, and take appropriate action. Routine Maintenance 57 See "Examining the Nozzle Check Pattern" on page 58.
Quick Start Guide
Page 63
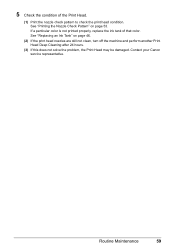
Contact your Canon service representative. 5 Check the condition of that color. Routine Maintenance 59 See "Printing the Nozzle Check Pattern" on page 46. (2) If the print head nozzles are still not clean, turn off the machine and perform another Print Head Deep Cleaning after 24 hours. (3) If this does not solve the problem, the Print Head may be damaged. If a particular color is not printed properly, replace the ink tank of the Print Head. (1) Print the nozzle check pattern to check the print head condition. See "Replacing an Ink Tank" on page 53.
Contact your Canon service representative. 5 Check the condition of that color. Routine Maintenance 59 See "Printing the Nozzle Check Pattern" on page 46. (2) If the print head nozzles are still not clean, turn off the machine and perform another Print Head Deep Cleaning after 24 hours. (3) If this does not solve the problem, the Print Head may be damaged. If a particular color is not printed properly, replace the ink tank of the Print Head. (1) Print the nozzle check pattern to check the print head condition. See "Replacing an Ink Tank" on page 53.
Quick Start Guide
Page 73
.... Press the OK button on the machine to continue printing. Press the OK button to dismiss the error message, and print the nozzle check pattern to hold the ink used during Print Head Cleaning, for example. For details on Manual Print Head Alignment, see "Manual Print Head... See "Replacing an Ink Tank" on page 61. Perform necessary operations according your Canon service representative. For Automatic Print Head Alignment, always load paper in the correct position. See "Printing the Nozzle Check Pattern" on the machine. Press the OK button to dismiss the error message, and then...
.... Press the OK button on the machine to continue printing. Press the OK button to dismiss the error message, and print the nozzle check pattern to hold the ink used during Print Head Cleaning, for example. For details on Manual Print Head Alignment, see "Manual Print Head... See "Replacing an Ink Tank" on page 61. Perform necessary operations according your Canon service representative. For Automatic Print Head Alignment, always load paper in the correct position. See "Printing the Nozzle Check Pattern" on the machine. Press the OK button to dismiss the error message, and then...
Quick Start Guide
Page 78
... Print Head Deep Cleaning. Make sure that ink is empty. Print the nozzle check pattern to perform Print Head Deep Cleaning, see "Getting the Ink Level Information" on page 46. z If the problem is running low. Contact your Canon service representative. If the ink lamp is fully inserted. The ink lamp ...lights up red when the ink tank is not lit, press the mark on how to print the nozzle check pattern, how to clean the Print Head, and how to...
... Print Head Deep Cleaning. Make sure that ink is empty. Print the nozzle check pattern to perform Print Head Deep Cleaning, see "Getting the Ink Level Information" on page 46. z If the problem is running low. Contact your Canon service representative. If the ink lamp is fully inserted. The ink lamp ...lights up red when the ink tank is not lit, press the mark on how to print the nozzle check pattern, how to clean the Print Head, and how to...
Quick Start Guide
Page 106
... 19 recommended paper and requirements 7 M Media cannot use 9 specialty 10 Media Type 7 Memory Card inserting 32 removing 33 supported by this machine 31 N NAVI Button 3 Nozzle Check Pattern examining 54 printing 53 P PGI-5BK Black 46 Photo Printing from Photo 36 scanning a photo 36 select and print 37 Print Head automatic print head... Specifications copy 91 general 91 PictBridge 92 scan 91 System Requirements 92 T Troubleshooting 67 Turning off the Machine 4 Turning on the Machine 4 U Users in the U.S.A. Canon U.S.A., Inc. Limited Warranty - U.S.
... 19 recommended paper and requirements 7 M Media cannot use 9 specialty 10 Media Type 7 Memory Card inserting 32 removing 33 supported by this machine 31 N NAVI Button 3 Nozzle Check Pattern examining 54 printing 53 P PGI-5BK Black 46 Photo Printing from Photo 36 scanning a photo 36 select and print 37 Print Head automatic print head... Specifications copy 91 general 91 PictBridge 92 scan 91 System Requirements 92 T Troubleshooting 67 Turning off the Machine 4 Turning on the Machine 4 U Users in the U.S.A. Canon U.S.A., Inc. Limited Warranty - U.S.


