
Quick Start Guide
Page 5
... a PictBridge Compliant Device 39 Routine Maintenance 46 Replacing an Ink Tank 46 Keeping the Best Printing Results 51 When Printing Becomes Faint or Colors Are Incorrect 52 Printing the Nozzle Check Pattern 53 Examining the Nozzle Check Pattern ...........54 Print Head Cleaning 56 Print Head Deep Cleaning 58 Aligning the Print Head 60 Cleaning Your Machine 64 Troubleshooting 67 Error...
... a PictBridge Compliant Device 39 Routine Maintenance 46 Replacing an Ink Tank 46 Keeping the Best Printing Results 51 When Printing Becomes Faint or Colors Are Incorrect 52 Printing the Nozzle Check Pattern 53 Examining the Nozzle Check Pattern ...........54 Print Head Cleaning 56 Print Head Deep Cleaning 58 Aligning the Print Head 60 Cleaning Your Machine 64 Troubleshooting 67 Error...
Quick Start Guide
Page 52
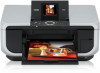
... of specified Canon brand ink tanks. Do not leave the machine with such tanks, the machine will cause the ink tank to dry out, and the machine may be necessary to stop or move it is out of ink, replace it immediately with new ones. Caution Do not hold the Print Head Holder to... maintain the machine's performance. This will not be able to inform you remove an ink tank, replace it out in Print Head Cleaning and Print Head Deep Cleaning, which may cause the nozzles to the right. Color ink is left open . Important If the Scanning Unit (Printer Cover) is also consumed ...
... of specified Canon brand ink tanks. Do not leave the machine with such tanks, the machine will cause the ink tank to dry out, and the machine may be necessary to stop or move it is out of ink, replace it immediately with new ones. Caution Do not hold the Print Head Holder to... maintain the machine's performance. This will not be able to inform you remove an ink tank, replace it out in Print Head Cleaning and Print Head Deep Cleaning, which may cause the nozzles to the right. Color ink is left open . Important If the Scanning Unit (Printer Cover) is also consumed ...
Quick Start Guide
Page 53
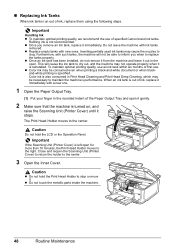
...Print Head Lock Lever; Doing so can cause the machine to malfunction or become unable to print. *2 Carefully hold the protective cap when removing it is remaining, ink may not eject properly when (B) printing. (2) Remove the orange protective cap from being ejected properly. z Discard empty ink tanks according to replace... ink tanks one by one when replacing more than one ink tank at a time. ...
...Print Head Lock Lever; Doing so can cause the machine to malfunction or become unable to print. *2 Carefully hold the protective cap when removing it is remaining, ink may not eject properly when (B) printing. (2) Remove the orange protective cap from being ejected properly. z Discard empty ink tanks according to replace... ink tanks one by one when replacing more than one ink tank at a time. ...

Quick Start Guide
Page 54
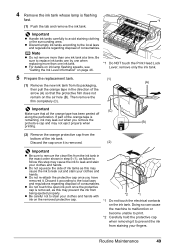
... machine cannot be used unless all the ink tanks are installed. *1 (1) 7 Close the Inner Cover. (3) (2) *1 Make sure the position of the ink tank into the Print Head. (2) Press on the mark on page 68. z Do not hold the Scanning Unit (Printer Cover) firmly using both hands, and be fed properly. 8 Gently close... the Inner Cover is performed automatically. Note Make sure that the ink lamp lights up red. Note z If the error message is still displayed after replacing the ink tank, Print Head Cleaning is closed , see "Error Message Is Displayed on the LCD" on the ink tank until...
... machine cannot be used unless all the ink tanks are installed. *1 (1) 7 Close the Inner Cover. (3) (2) *1 Make sure the position of the ink tank into the Print Head. (2) Press on the mark on page 68. z Do not hold the Scanning Unit (Printer Cover) firmly using both hands, and be fed properly. 8 Gently close... the Inner Cover is performed automatically. Note Make sure that the ink lamp lights up red. Note z If the error message is still displayed after replacing the ink tank, Print Head Cleaning is closed , see "Error Message Is Displayed on the LCD" on the ink tank until...
Quick Start Guide
Page 56
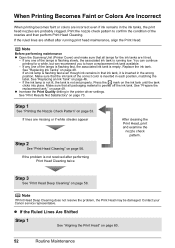
... Printing Becomes Faint or Colors Are Incorrect When printing becomes faint or colors are incorrect even if ink remains in the ink tanks, the print head nozzles are lit red. - Replace the ink tank. Note If Print Head Deep Cleaning does not resolve the problem, the Print Head may be damaged. Press the mark on page 58. Contact your Canon...
... Printing Becomes Faint or Colors Are Incorrect When printing becomes faint or colors are incorrect even if ink remains in the ink tanks, the print head nozzles are lit red. - Replace the ink tank. Note If Print Head Deep Cleaning does not resolve the problem, the Print Head may be damaged. Press the mark on page 58. Contact your Canon...
Quick Start Guide
Page 63
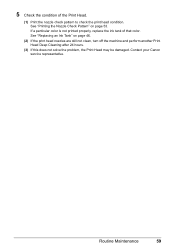
Contact your Canon service representative. See "Printing the Nozzle Check Pattern" on page 46. (2) If the print head nozzles are still not clean, turn off the machine and perform another Print Head Deep Cleaning after 24 hours. (3) If this does not solve the problem, the Print Head may be damaged. See "Replacing an Ink Tank" on page 53. Routine Maintenance 59 If a particular color is not printed properly, replace the ink tank of the Print Head. (1) Print the nozzle check pattern to check the print head condition. 5 Check the condition of that color.
Contact your Canon service representative. See "Printing the Nozzle Check Pattern" on page 46. (2) If the print head nozzles are still not clean, turn off the machine and perform another Print Head Deep Cleaning after 24 hours. (3) If this does not solve the problem, the Print Head may be damaged. See "Replacing an Ink Tank" on page 53. Routine Maintenance 59 If a particular color is not printed properly, replace the ink tank of the Print Head. (1) Print the nozzle check pattern to check the print head condition. 5 Check the condition of that color.
Quick Start Guide
Page 73
... strong light. Perform necessary operations according your Canon service representative. For details on Manual Print Head Alignment, see "Manual Print Head Alignment" on page 53. Press OK to dismiss the error message, then load a sheet of print head is exposed to cancel the error so you...machine. See "Replacing an Ink Tank" on the camera or select Play mode manually after aligning the Print Head again, press the OK button to strong light. For Automatic Print Head Alignment, always load paper in ink absorber to install the Print Head. Message "Print head is installed." ...
... strong light. Perform necessary operations according your Canon service representative. For details on Manual Print Head Alignment, see "Manual Print Head Alignment" on page 53. Press OK to dismiss the error message, then load a sheet of print head is exposed to cancel the error so you...machine. See "Replacing an Ink Tank" on the camera or select Play mode manually after aligning the Print Head again, press the OK button to strong light. For Automatic Print Head Alignment, always load paper in ink absorber to install the Print Head. Message "Print head is installed." ...
Quick Start Guide
Page 78
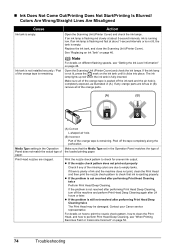
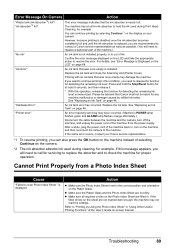
...problem is still not resolved after performing Print Head Deep Cleaning twice The Print Head may be damaged. z If the problem is not resolved after performing Print Head Deep Cleaning, turn off the tape completely along the perforation. Contact your Canon service representative. Note For details on different...74 Troubleshooting Open the Scanning Unit (Printer Cover) and check the ink lamps. Replace the ink tank, and close the Scanning Unit (Printer Cover). Print the nozzle check pattern to perform Print Head Deep Cleaning, see "Getting the Ink Level Information" on the ink tank ...
...problem is still not resolved after performing Print Head Deep Cleaning twice The Print Head may be damaged. z If the problem is not resolved after performing Print Head Deep Cleaning, turn off the tape completely along the perforation. Contact your Canon service representative. Note For details on different...74 Troubleshooting Open the Scanning Unit (Printer Cover) and check the ink lamps. Replace the ink tank, and close the Scanning Unit (Printer Cover). Print the nozzle check pattern to perform Print Head Deep Cleaning, see "Getting the Ink Level Information" on the ink tank ...
Quick Start Guide
Page 91
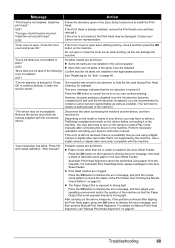
...will need to replace a particular part of your device's instruction manual before connecting it . Action The machine has a built-in progress. You may have to turn on the camera or select Play mode manually after connecting the device to hold the ink used during Print Head Cleaning, for ...device, you may also have to the machine. Action See "Auto head align has failed. Press the OK button to contact a Canon service representative as early as possible. (You will be erased, so print that you can continue printing. If the error is still unresolved, there is a possibility that ...
...will need to replace a particular part of your device's instruction manual before connecting it . Action The machine has a built-in progress. You may have to turn on the camera or select Play mode manually after connecting the device to hold the ink used during Print Head Cleaning, for ...device, you may also have to the machine. Action See "Auto head align has failed. Press the OK button to contact a Canon service representative as early as possible. (You will be erased, so print that you can continue printing. If the error is still unresolved, there is a possibility that ...
Quick Start Guide
Page 93
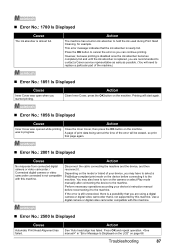
...until the ink absorber is replaced, you are not marked dark enough, the machine may have occurred. (Machine's POWER lamp flashes green and ALARM lamp flashes orange alternately.) Disconnect the cable between the machine and the camera, turn on your Canon service representative. *1 To resume printing, you will need to ...not dirty. For details, see "Error Message Is Displayed on the LCD" on page 46. Press and hold the ink used during Print Head Cleaning, for example. z Make sure all required circles on the camera. *2 The ink absorber absorbs ink used during cleaning, for example...
...until the ink absorber is replaced, you are not marked dark enough, the machine may have occurred. (Machine's POWER lamp flashes green and ALARM lamp flashes orange alternately.) Disconnect the cable between the machine and the camera, turn on your Canon service representative. *1 To resume printing, you will need to ...not dirty. For details, see "Error Message Is Displayed on the LCD" on page 46. Press and hold the ink used during Print Head Cleaning, for example. z Make sure all required circles on the camera. *2 The ink absorber absorbs ink used during cleaning, for example...
Quick Start Guide
Page 106
... a photo 36 select and print 37 Print Head automatic print head alignment 60 cleaning 56 deep cleaning 58 manual print head alignment 61 Printing from a Memory Card 31 Photo Index Sheet 35 select and print 33 Printing from Your Computer 26 Macintosh 27 Windows 26 Printing Photographs Directly from a Compliant Device 39 connecting 39 PictBridge 41 R Replacing Ink Tanks 48 ink level...
... a photo 36 select and print 37 Print Head automatic print head alignment 60 cleaning 56 deep cleaning 58 manual print head alignment 61 Printing from a Memory Card 31 Photo Index Sheet 35 select and print 33 Printing from Your Computer 26 Macintosh 27 Windows 26 Printing Photographs Directly from a Compliant Device 39 connecting 39 PictBridge 41 R Replacing Ink Tanks 48 ink level...


