Quick Start Guide
Page 4
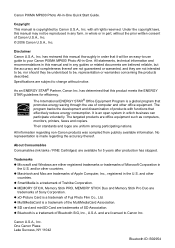
...with all rights reserved. and/or other countries. z xD-Picture Card is a trademark of computer and other office equipment. Canon PIXMA MP600 Photo All-in the U.S. All statements, technical information and recommendations in this product meets the ENERGY STAR guidelines for 5 years ... of Toshiba Corporation. z SD card and miniSD Card are either registered trademarks or trademarks of SD Association. Copyright This manual is an open system in part, without notice. Trademarks z Microsoft and Windows are trademarks of Microsoft Corporation in order that effectively...
...with all rights reserved. and/or other countries. z xD-Picture Card is a trademark of computer and other office equipment. Canon PIXMA MP600 Photo All-in the U.S. All statements, technical information and recommendations in this product meets the ENERGY STAR guidelines for 5 years ... of Toshiba Corporation. z SD card and miniSD Card are either registered trademarks or trademarks of SD Association. Copyright This manual is an open system in part, without notice. Trademarks z Microsoft and Windows are trademarks of Microsoft Corporation in order that effectively...

Quick Start Guide
Page 5
... on the Screen ........ 85 Cannot Print Properly from a Digital Camera 88 Cannot Print Properly from a Photo Index Sheet 89 Appendix 90 Reading the On-screen Manuals 90 Specifications 91 Safety Precautions 94 Legal Limitations on Use of Your Product and Use of Images 97 Users in the U.S.A 98 Index 102 1
... on the Screen ........ 85 Cannot Print Properly from a Digital Camera 88 Cannot Print Properly from a Photo Index Sheet 89 Appendix 90 Reading the On-screen Manuals 90 Specifications 91 Safety Precautions 94 Legal Limitations on Use of Your Product and Use of Images 97 Users in the U.S.A 98 Index 102 1
Quick Start Guide
Page 7
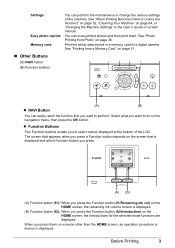
... press the Function button (f1/Remaining ink vol) on the HOME screen, the remaining ink volume screen is displayed. See "Printing from Photo" on -screen manual. Select what you want to select menus displayed at the bottom of the LCD. When you want to do on page 31. „ Other Buttons...
... press the Function button (f1/Remaining ink vol) on the HOME screen, the remaining ink volume screen is displayed. See "Printing from Photo" on -screen manual. Select what you want to select menus displayed at the bottom of the LCD. When you want to do on page 31. „ Other Buttons...

Quick Start Guide
Page 12
... papers depending on your country. *1 Paper is Canon specialty media. Refer to "Printing on Stickers (Sticker Print)" in "Using Other Useful Printing Functions" of the User's Guide on a Sticker (Sticker Print)" in . Refer to "Printing on -screen manual. Note For a detailed description of paper, the printed... Sticker print in "Setting the Page Size, Media Type, and Layout When Printing from a Mobile Phone" of the User's Guide on -screen manual. Load in the Auto Sheet Feeder. *4 When loading a stack of printing media types, refer to "Setting Items" in Easy photo reprint mode...
... papers depending on your country. *1 Paper is Canon specialty media. Refer to "Printing on Stickers (Sticker Print)" in "Using Other Useful Printing Functions" of the User's Guide on a Sticker (Sticker Print)" in . Refer to "Printing on -screen manual. Note For a detailed description of paper, the printed... Sticker print in "Setting the Page Size, Media Type, and Layout When Printing from a Mobile Phone" of the User's Guide on -screen manual. Load in the Auto Sheet Feeder. *4 When loading a stack of printing media types, refer to "Setting Items" in Easy photo reprint mode...
Quick Start Guide
Page 15
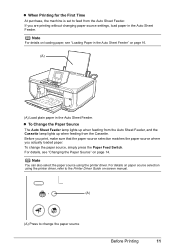
To change the paper source Before Printing 11 For details on -screen manual. (A) (A) Press to feed from the Cassette. z To Change the Paper Source The Auto Sheet Feeder lamp lights up when feeding from the Auto Sheet Feeder, ...
To change the paper source Before Printing 11 For details on -screen manual. (A) (A) Press to feed from the Cassette. z To Change the Paper Source The Auto Sheet Feeder lamp lights up when feeding from the Auto Sheet Feeder, ...
Quick Start Guide
Page 16
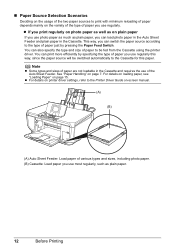
... the printer driver. See "Paper Handling" on page 15. This way, you can switch the paper source according to the Printer Driver Guide on-screen manual. (A) (B) (A) Auto Sheet Feeder: Load paper of the Auto Sheet Feeder. Note z Some types and sizes of paper are not loadable in the Cassette and requires...
... the printer driver. See "Paper Handling" on page 15. This way, you can switch the paper source according to the Printer Driver Guide on-screen manual. (A) (B) (A) Auto Sheet Feeder: Load paper of the Auto Sheet Feeder. Note z Some types and sizes of paper are not loadable in the Cassette and requires...
Quick Start Guide
Page 17
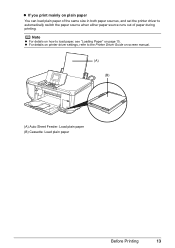
Note z For details on how to load paper, see "Loading Paper" on -screen manual. (A) (B) (A) Auto Sheet Feeder: Load plain paper (B) Cassette: Load plain paper Before Printing 13 z For details on printer driver settings, refer to automatically switch the paper source when either paper source runs out of paper during printing. z If you print mainly on plain paper You can load plain paper of the same size in both paper sources, and set the printer driver to the Printer Driver Guide on page 15.
Note z For details on how to load paper, see "Loading Paper" on -screen manual. (A) (B) (A) Auto Sheet Feeder: Load plain paper (B) Cassette: Load plain paper Before Printing 13 z For details on printer driver settings, refer to automatically switch the paper source when either paper source runs out of paper during printing. z If you print mainly on plain paper You can load plain paper of the same size in both paper sources, and set the printer driver to the Printer Driver Guide on page 15.
Quick Start Guide
Page 18
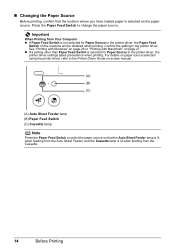
See "Printing with Windows" on page 26 or "Printing with Macintosh" on -screen manual. (A) (B) (C) (A) Auto Sheet Feeder lamp (B) Paper Feed Switch (C) Cassette lamp Note Press the Paper Feed Switch to select the paper source so that the location where ...
See "Printing with Windows" on page 26 or "Printing with Macintosh" on -screen manual. (A) (B) (C) (A) Auto Sheet Feeder lamp (B) Paper Feed Switch (C) Cassette lamp Note Press the Paper Feed Switch to select the paper source so that the location where ...
Quick Start Guide
Page 19
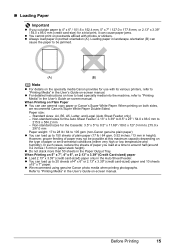
... stack more than 50 sheets in the Auto Sheet Feeder. When printing on -screen manual. However, proper feeding of paper may not be jammed. (A) (B) Note z For details on the specialty media Canon provides for use general copy paper or Canon's Super White Paper. When Printing on 5" x 7", 4" x 6", or 2.13"... printing photographs. In such cases, reduce the sheets of plain paper (17 lb / 64 gsm, 0.52 inches / 13 mm in the User's Guide on-screen manual. z You can load up to 150 sheets of paper you cut plain paper to 4" x 6" / 101.6 x 152.4 mm, 5" x 7" / 127.0 x 177.8 mm, or 2....
... stack more than 50 sheets in the Auto Sheet Feeder. When printing on -screen manual. However, proper feeding of paper may not be jammed. (A) (B) Note z For details on the specialty media Canon provides for use general copy paper or Canon's Super White Paper. When Printing on 5" x 7", 4" x 6", or 2.13"... printing photographs. In such cases, reduce the sheets of plain paper (17 lb / 64 gsm, 0.52 inches / 13 mm in the User's Guide on-screen manual. z You can load up to 150 sheets of paper you cut plain paper to 4" x 6" / 101.6 x 152.4 mm, 5" x 7" / 127.0 x 177.8 mm, or 2....

Quick Start Guide
Page 20
... aligning the edges may cause paper jams. z If paper is curled." Note You can also select the paper source with the printer driver. on -screen manual. (3) (2) 16 Before Printing Put your finger in the Auto Sheet Feeder 1 Flatten the four corners of the paper before loading it gently. (3) Open the Output...
... aligning the edges may cause paper jams. z If paper is curled." Note You can also select the paper source with the printer driver. on -screen manual. (3) (2) 16 Before Printing Put your finger in the Auto Sheet Feeder 1 Flatten the four corners of the paper before loading it gently. (3) Open the Output...
Quick Start Guide
Page 22
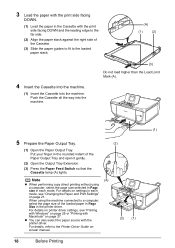
... 21. For details on settings in each mode. For details on printer driver settings, see "Changing the Paper and Print Settings" on page 27. screen manual. (2) (1) 18 Before Printing 3 Load the paper with the print side facing DOWN. (1) Load the paper in the Cassette with the print side facing DOWN and...
... 21. For details on settings in each mode. For details on printer driver settings, see "Changing the Paper and Print Settings" on page 27. screen manual. (2) (1) 18 Before Printing 3 Load the paper with the print side facing DOWN. (1) Load the paper in the Cassette with the print side facing DOWN and...
Quick Start Guide
Page 26
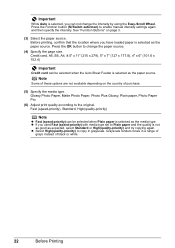
... renders tones in grayscale. Note Some of these options are not available depending on page 3. (3) Select the paper source. z Select High(quality-priority) to enable manual intensity settings again and then specify the intensity. Before printing, confirm that the location where you have loaded paper is selected as the paper source...
... renders tones in grayscale. Note Some of these options are not available depending on page 3. (3) Select the paper source. z Select High(quality-priority) to enable manual intensity settings again and then specify the intensity. Before printing, confirm that the location where you have loaded paper is selected as the paper source...
Quick Start Guide
Page 30
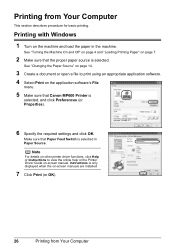
.... 5 Make sure that Paper Feed Switch is selected in the machine. Printing with Windows 1 Turn on -screen manual. See "Turning the Machine On and Off" on page 4 and "Loading Printing Paper" on -screen manuals are installed. 7 Click Print (or OK). 26 Printing from Your Computer This section describes procedure for basic printing... open a file to view the online help or the Printer Driver Guide on the machine and load the paper in Paper Source. Make sure that Canon MP600 Printer is selected. Printing from Your Computer
.... 5 Make sure that Paper Feed Switch is selected in the machine. Printing with Windows 1 Turn on -screen manual. See "Turning the Machine On and Off" on page 4 and "Loading Printing Paper" on -screen manuals are installed. 7 Click Print (or OK). 26 Printing from Your Computer This section describes procedure for basic printing... open a file to view the online help or the Printer Driver Guide on the machine and load the paper in Paper Source. Make sure that Canon MP600 Printer is selected. Printing from Your Computer
Quick Start Guide
Page 31
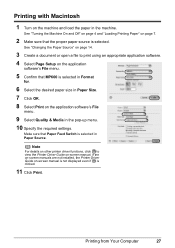
... Paper Source. See "Changing the Paper Source" on page 14. 3 Create a document or open a file to view the Printer Driver Guide on-screen manual. Make sure that the proper paper source is selected in Format for. 6 Select the desired paper size in Paper Size. 7 Click OK. 8 Select...other printer driver functions, click to print using an appropriate application software. 4 Select Page Setup on the application software's File menu. 5 Confirm that MP600 is selected. Printing with Macintosh 1 Turn on the machine and load the paper in the pop-up menu. 10 Specify the required settings. See...
... Paper Source. See "Changing the Paper Source" on page 14. 3 Create a document or open a file to view the Printer Driver Guide on-screen manual. Make sure that the proper paper source is selected in Format for. 6 Select the desired paper size in Paper Size. 7 Click OK. 8 Select...other printer driver functions, click to print using an appropriate application software. 4 Select Page Setup on the application software's File menu. 5 Confirm that MP600 is selected. Printing with Macintosh 1 Turn on the machine and load the paper in the pop-up menu. 10 Specify the required settings. See...
Quick Start Guide
Page 32
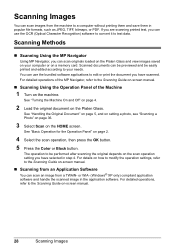
...edit or print the document you have scanned. See "Turning the Machine On and Off" on page 4. 2 Load the original document on -screen manual. „ Scanning from an Application Software You can use the OCR (Optical Character Recognition) software to convert it to the Scanning Guide on the Platen... you are scanning printed text, you can scan images from a TWAIN- You can scan an image from the machine to the Scanning Guide on-screen manual. „ Scanning Using the Operation Panel of the Machine 1 Turn on page 2. 4 Select the scan operation, then press the OK button. 5 Press...
...edit or print the document you have scanned. See "Turning the Machine On and Off" on page 4. 2 Load the original document on -screen manual. „ Scanning from an Application Software You can use the OCR (Optical Character Recognition) software to convert it to the Scanning Guide on the Platen... you are scanning printed text, you can scan images from a TWAIN- You can scan an image from the machine to the Scanning Guide on-screen manual. „ Scanning Using the Operation Panel of the Machine 1 Turn on page 2. 4 Select the scan operation, then press the OK button. 5 Press...

Quick Start Guide
Page 44
...to this machine according to the machine. Perform necessary operations on the device or select Play mode manually after connecting the device to instructions given in the device's instruction manual. (1) Make sure that the PictBridge compliant device is correctly connected. Note If does not appear... LCD of the device (2) when the machine is turned off. (2) Connect the PictBridge compliant device to the machine. will appear on manually. (3) Set up the PictBridge compliant device for direct printing. 3 Connect the PictBridge compliant device to the machine using a USB cable ...
...to this machine according to the machine. Perform necessary operations on the device or select Play mode manually after connecting the device to instructions given in the device's instruction manual. (1) Make sure that the PictBridge compliant device is correctly connected. Note If does not appear... LCD of the device (2) when the machine is turned off. (2) Connect the PictBridge compliant device to the machine. will appear on manually. (3) Set up the PictBridge compliant device for direct printing. 3 Connect the PictBridge compliant device to the machine using a USB cable ...
Quick Start Guide
Page 45
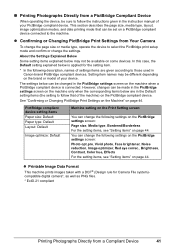
... PictBridge compliant device is applied for the setting item. * In the following description, names of settings items are in the instruction manual of your device. „ Printing Photographs Directly from a Compliant Device 41 In this case, the Default setting explained below may ... printing mode that of your PictBridge compliant device. The settings below are given according to follow that can be changed in Canon-brand PictBridge compliant devices. PictBridge compliant device setting items Paper size: Default Paper type: Default Layout: Default Image optimize: Default...
... PictBridge compliant device is applied for the setting item. * In the following description, names of settings items are in the instruction manual of your device. „ Printing Photographs Directly from a Compliant Device 41 In this case, the Default setting explained below may ... printing mode that of your PictBridge compliant device. The settings below are given according to follow that can be changed in Canon-brand PictBridge compliant devices. PictBridge compliant device setting items Paper size: Default Paper type: Default Layout: Default Image optimize: Default...
Quick Start Guide
Page 47
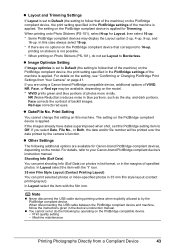
...Style Layout (Contact Printing Layout) You can print shooting Info (Exif Data) on photos in list format, or in the device's instruction manual. The setting on the PictBridge compliant device is applied. NR (Noise Reduction) reduces noise in blue portions, such as the sky, ...and dark portions. Print Setting You cannot change this setting on this PictBridge setting item to your Canon-brand PictBridge compliant device's instruction manual. Note z Never disconnect the USB cable during printing unless when explicitly allowed to by operating on the PictBridge compatible device...
...Style Layout (Contact Printing Layout) You can print shooting Info (Exif Data) on photos in list format, or in the device's instruction manual. The setting on the PictBridge compliant device is applied. NR (Noise Reduction) reduces noise in blue portions, such as the sky, ...and dark portions. Print Setting You cannot change this setting on this PictBridge setting item to your Canon-brand PictBridge compliant device's instruction manual. Note z Never disconnect the USB cable during printing unless when explicitly allowed to by operating on the PictBridge compatible device...
Quick Start Guide
Page 64
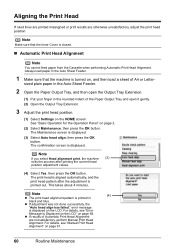
...the machine (3) exits the process after the adjustment is displayed. (3) Select Auto head align, then press the OK button. For details, see "Manual Print Head Alignment" on page 2. (2) Select Maintenance, then press the OK button. sized plain paper in the Auto Sheet Feeder. 2 Open... Yes, then press the OK button. Aligning the Print Head If ruled lines are printed misaligned or print results are not satisfactory, perform Manual Print Head Alignment. This takes about 4 minutes. error message is displayed. The confirmation screen is displayed on , and then load a ...
...the machine (3) exits the process after the adjustment is displayed. (3) Select Auto head align, then press the OK button. For details, see "Manual Print Head Alignment" on page 2. (2) Select Maintenance, then press the OK button. sized plain paper in the Auto Sheet Feeder. 2 Open... Yes, then press the OK button. Aligning the Print Head If ruled lines are printed misaligned or print results are not satisfactory, perform Manual Print Head Alignment. This takes about 4 minutes. error message is displayed. The confirmation screen is displayed on , and then load a ...

Quick Start Guide
Page 65
... Output Tray, and then open it gently. (2) Open the Output Tray Extension. 3 Press the Paper Feed Switch to perform Manual Print Head Alignment. The Maintenance screen is displayed. Routine Maintenance 61 „ Manual Print Head Alignment If the results of Automatic Print Head Alignment are not satisfactory, follow the procedure below to... current head position adjustment values. 7 Select Yes, then press the OK button. 8 When the Print Head alignment pattern is loaded. Confirmation screen is displayed. 6 Select Manual head align, then press the OK button.
... Output Tray, and then open it gently. (2) Open the Output Tray Extension. 3 Press the Paper Feed Switch to perform Manual Print Head Alignment. The Maintenance screen is displayed. Routine Maintenance 61 „ Manual Print Head Alignment If the results of Automatic Print Head Alignment are not satisfactory, follow the procedure below to... current head position adjustment values. 7 Select Yes, then press the OK button. 8 When the Print Head alignment pattern is loaded. Confirmation screen is displayed. 6 Select Manual head align, then press the OK button.


