
Quick Start Guide
Page 5
...An Unintended Language Is Displayed on the LCD 70 Cannot Install the MP Drivers 71 Cannot Connect to Computer Properly ........ 72 Print Results Not Satisfactory 73 Printing Does Not Start 78 Paper Does Not Feed Properly 79 Paper Jams 81 Error Message Appears on the Screen ........ 85 Cannot... Print Properly from a Digital Camera 88 Cannot Print Properly from a Photo Index Sheet 89 Appendix 90 Reading the On-screen Manuals 90 Specifications 91 Safety Precautions 94 ...
...An Unintended Language Is Displayed on the LCD 70 Cannot Install the MP Drivers 71 Cannot Connect to Computer Properly ........ 72 Print Results Not Satisfactory 73 Printing Does Not Start 78 Paper Does Not Feed Properly 79 Paper Jams 81 Error Message Appears on the Screen ........ 85 Cannot... Print Properly from a Digital Camera 88 Cannot Print Properly from a Photo Index Sheet 89 Appendix 90 Reading the On-screen Manuals 90 Specifications 91 Safety Precautions 94 ...
Quick Start Guide
Page 6
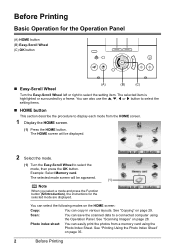
...modes on page 29. See "Copying" on the HOME screen: Copy: You can easily print the photos from the HOME screen. 1 Display the HOME screen. (1) Press the HOME button. See "Printing Using the Photo Index Sheet" on page 28. The selected item is highlighted or surrounded ...by a frame. See "Scanning Images" on page 35. 2 Before Printing Photo index sheet: You can copy in various layouts. Before Printing Basic Operation for the selected mode are displayed. The selected mode screen will be appeared. (1) Note When you select...
...modes on page 29. See "Copying" on the HOME screen: Copy: You can easily print the photos from the HOME screen. 1 Display the HOME screen. (1) Press the HOME button. See "Printing Using the Photo Index Sheet" on page 28. The selected item is highlighted or surrounded ...by a frame. See "Scanning Images" on page 35. 2 Before Printing Photo index sheet: You can copy in various layouts. Before Printing Basic Operation for the selected mode are displayed. The selected mode screen will be appeared. (1) Note When you select...
Quick Start Guide
Page 7
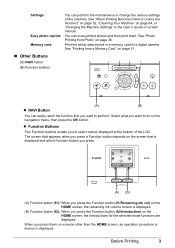
...Settings" in a memory card of the machine. When you press them . The screen that appears when you to do on page 36. Before Printing 3 Settings: Easy photo reprint: Memory card: You can perform the maintenance or change the various settings of a digital camera. z Function Buttons... Two Function buttons enable you press a Function button depends on -screen manual. You can scan printed photos and then print them on screens other than the HOME screen, an operation procedure or menus is displayed. (B) Function button (f2): When you want...
...Settings" in a memory card of the machine. When you press them . The screen that appears when you to do on page 36. Before Printing 3 Settings: Easy photo reprint: Memory card: You can perform the maintenance or change the various settings of a digital camera. z Function Buttons... Two Function buttons enable you press a Function button depends on -screen manual. You can scan printed photos and then print them on screens other than the HOME screen, an operation procedure or menus is displayed. (B) Function button (f2): When you want...

Quick Start Guide
Page 8
... on the machine, confirm the following . Turning the Machine On and Off Turn on the machine before the LCD goes out. 4 Before Printing z The Print Head and ink tanks are installed. Note If preparatory operations above are not complete, follow the Easy Setup Instructions to complete them. 1 Open... computer, confirm also the following . z The Screen-saver Mode The LCD goes out if the machine is turned off. See "Keeping the Best Printing Results" on page 68. 2 If you are using the machine connected to turn off the Machine 1 To turn on the machine. Important About ...
... on the machine, confirm the following . Turning the Machine On and Off Turn on the machine before the LCD goes out. 4 Before Printing z The Print Head and ink tanks are installed. Note If preparatory operations above are not complete, follow the Easy Setup Instructions to complete them. 1 Open... computer, confirm also the following . z The Screen-saver Mode The LCD goes out if the machine is turned off. See "Keeping the Best Printing Results" on page 68. 2 If you are using the machine connected to turn off the Machine 1 To turn on the machine. Important About ...
Quick Start Guide
Page 9
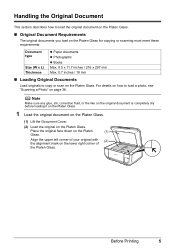
Before Printing 5 For details on how to copy or scan on the Platen Glass. Note Make sure any glue, ink, correction fluid, or the like on the ...
Before Printing 5 For details on how to copy or scan on the Platen Glass. Note Make sure any glue, ink, correction fluid, or the like on the ...
Quick Start Guide
Page 10
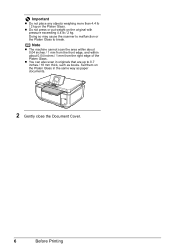
... may cause the scanner to malfunction or the Platen Glass to 0.7 inches / 18 mm thick, such as paper documents. 2 Gently close the Document Cover. 6 Before Printing z You can also scan in the same way as books. Set them on the Platen Glass. Important z Do not place any objects weighing more than...
... may cause the scanner to malfunction or the Platen Glass to 0.7 inches / 18 mm thick, such as paper documents. 2 Gently close the Document Cover. 6 Before Printing z You can also scan in the same way as books. Set them on the Platen Glass. Important z Do not place any objects weighing more than...
Quick Start Guide
Page 11
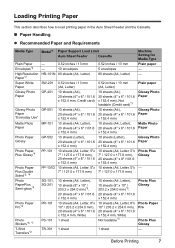
... Glossy Photo Paper Matte Photo Paper Glossy Photo Paper Photo Plus Glossy - Photo Plus Glossy Photo Paper Pro Photo Plus Glossy - Loading Printing Paper This section describes how to load printing paper in the Auto Sheet Feeder and the Cassette. „ Paper Handling z Recommended Paper and Requirements Media Type Plain Paper Envelopes...
... Glossy Photo Paper Matte Photo Paper Glossy Photo Paper Photo Plus Glossy - Photo Plus Glossy Photo Paper Pro Photo Plus Glossy - Loading Printing Paper This section describes how to load printing paper in the Auto Sheet Feeder and the Cassette. „ Paper Handling z Recommended Paper and Requirements Media Type Plain Paper Envelopes...

Quick Start Guide
Page 12
... -screen manual. When printing photos saved on your country. *1 Paper is Canon specialty media. z To specify the page size and media type when printing from a Mobile Phone" of the User's Guide on a Sticker (Sticker Print)" in the User's Guide onscreen manual. 8 Before Printing Load in the Auto ...User's Guide on Stickers (Sticker Print)" in the Memory card mode. When printing photos stored in a memory card to sticker paper, be sure to purchase some Canon genuine papers depending on -screen manual. Purchase paper by using the Easy-Photo Print provided with a Model Number is...
... -screen manual. When printing photos saved on your country. *1 Paper is Canon specialty media. z To specify the page size and media type when printing from a Mobile Phone" of the User's Guide on a Sticker (Sticker Print)" in the User's Guide onscreen manual. 8 Before Printing Load in the Auto ...User's Guide on Stickers (Sticker Print)" in the Memory card mode. When printing photos stored in a memory card to sticker paper, be sure to purchase some Canon genuine papers depending on -screen manual. Purchase paper by using the Easy-Photo Print provided with a Model Number is...
Quick Start Guide
Page 13
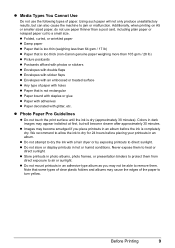
... or glue z Paper with adhesives z Paper decorated with glitter, etc. z Photo Paper Pro Guidelines z Do not touch the print surface until the ink is completely dry. Note that is too thick (non-Canon genuine paper weighing more than a post card, including plain paper or notepad paper cut to a small size. z Images may...
... or glue z Paper with adhesives z Paper decorated with glitter, etc. z Photo Paper Pro Guidelines z Do not touch the print surface until the ink is completely dry. Note that is too thick (non-Canon genuine paper weighing more than a post card, including plain paper or notepad paper cut to a small size. z Images may...

Quick Start Guide
Page 14
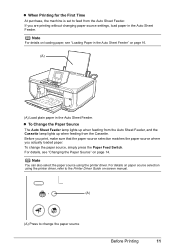
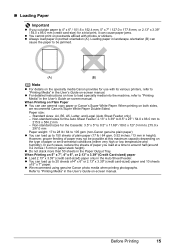
... of the machine, and the Cassette, found at the front of the machine. (A) (B) (A) Auto Sheet Feeder (B) Cassette 10 Before Printing „ Using Specialty Media Canon recommends that you use Canon genuine media to load printing paper; z Photo Quality Media z Glossy Photo Paper z Matte Photo Paper z Photo Paper Plus Double Sided z Photo Paper Plus Glossy... Suited for Business Documents z High Resolution Paper „ Using the Auto Sheet Feeder and the Cassette This machine offers two paper sources to ensure optimal print quality.
... of the machine, and the Cassette, found at the front of the machine. (A) (B) (A) Auto Sheet Feeder (B) Cassette 10 Before Printing „ Using Specialty Media Canon recommends that you use Canon genuine media to load printing paper; z Photo Quality Media z Glossy Photo Paper z Matte Photo Paper z Photo Paper Plus Double Sided z Photo Paper Plus Glossy... Suited for Business Documents z High Resolution Paper „ Using the Auto Sheet Feeder and the Cassette This machine offers two paper sources to ensure optimal print quality.
Quick Start Guide
Page 15
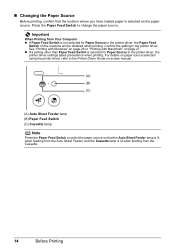
...Auto Sheet Feeder, and the Cassette lamp lights up when feeding from the Auto Sheet Feeder. Before you print, make sure that the paper source selection matches the paper source where you are printing without changing paper source settings, load paper in the Auto Sheet Feeder" on page 14. To change ...the paper source Before Printing 11 z When Printing for the First Time At purchase, the machine is set to change the paper source, simply press the Paper Feed Switch. Note You can also...
...Auto Sheet Feeder, and the Cassette lamp lights up when feeding from the Auto Sheet Feeder. Before you print, make sure that the paper source selection matches the paper source where you are printing without changing paper source settings, load paper in the Auto Sheet Feeder" on page 14. To change ...the paper source Before Printing 11 z When Printing for the First Time At purchase, the machine is set to change the paper source, simply press the Paper Feed Switch. Note You can also...
Quick Start Guide
Page 16
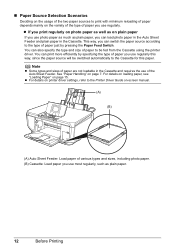
... using the printer driver. See "Paper Handling" on page 15. „ Paper Source Selection Scenarios Deciding on the usage of the two paper sources to print with minimum reloading of paper depends mainly on the variety of the type of paper you can switch the paper source according to the type... paper just by specifying the type of paper you use regularly this paper. For details on loading paper, see "Loading Paper" on page 7. You can print more efficiently by pressing the Paper Feed Switch. Note z Some types and sizes of the Auto Sheet Feeder. z If you...
... using the printer driver. See "Paper Handling" on page 15. „ Paper Source Selection Scenarios Deciding on the usage of the two paper sources to print with minimum reloading of paper depends mainly on the variety of the type of paper you can switch the paper source according to the type... paper just by specifying the type of paper you use regularly this paper. For details on loading paper, see "Loading Paper" on page 7. You can print more efficiently by pressing the Paper Feed Switch. Note z Some types and sizes of the Auto Sheet Feeder. z If you...
Quick Start Guide
Page 17
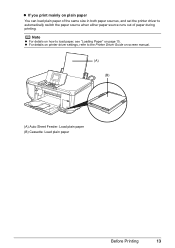
Note z For details on how to load paper, see "Loading Paper" on -screen manual. (A) (B) (A) Auto Sheet Feeder: Load plain paper (B) Cassette: Load plain paper Before Printing 13 z For details on printer driver settings, refer to automatically switch the paper source when either paper source runs out of the same size in both paper sources, and set the printer driver to the Printer Driver Guide on page 15. z If you print mainly on plain paper You can load plain paper of paper during printing.
Note z For details on how to load paper, see "Loading Paper" on -screen manual. (A) (B) (A) Auto Sheet Feeder: Load plain paper (B) Cassette: Load plain paper Before Printing 13 z For details on printer driver settings, refer to automatically switch the paper source when either paper source runs out of the same size in both paper sources, and set the printer driver to the Printer Driver Guide on page 15. z If you print mainly on plain paper You can load plain paper of paper during printing.
Quick Start Guide
Page 18
...for Paper Source in the printer driver. Confirm the setting in the printer driver, the Paper Feed Switch on the machine will be disabled when printing. For details on paper source selection using the printer driver, refer to change the paper source. Press the Paper Feed Switch to the Printer... Driver Guide on page 27. Important When Printing from the Auto Sheet Feeder, and the Cassette lamp is selected as the paper source. z If a setting other than Paper Feed Switch is not...
...for Paper Source in the printer driver. Confirm the setting in the printer driver, the Paper Feed Switch on the machine will be disabled when printing. For details on paper source selection using the printer driver, refer to change the paper source. Press the Paper Feed Switch to the Printer... Driver Guide on page 27. Important When Printing from the Auto Sheet Feeder, and the Cassette lamp is selected as the paper source. z If a setting other than Paper Feed Switch is not...
Quick Start Guide
Page 19
... in the Auto Sheet Feeder. z Do not stack more than 50 sheets in height). z We recommend using genuine Canon photo media when printing photographs. Refer to "Printing Media" in the User's Guide on-screen manual. When printing on 5" x 7", 4" x 6", or 2.13" x 3.39" (Credit Card-sized) paper z Load 2.13" ...of paper may not be jammed. (A) (B) Note z For details on the specialty media Canon provides for use general copy paper or Canon's Super White Paper. When Printing on both sides, we recommend Canon's Super White Paper Double-Sided. Paper size: - However, proper feeding of paper or...
... in the Auto Sheet Feeder. z Do not stack more than 50 sheets in height). z We recommend using genuine Canon photo media when printing photographs. Refer to "Printing Media" in the User's Guide on-screen manual. When printing on 5" x 7", 4" x 6", or 2.13" x 3.39" (Credit Card-sized) paper z Load 2.13" ...of paper may not be jammed. (A) (B) Note z For details on the specialty media Canon provides for use general copy paper or Canon's Super White Paper. When Printing on both sides, we recommend Canon's Super White Paper Double-Sided. Paper size: - However, proper feeding of paper or...

Quick Start Guide
Page 20
z Loading Paper in the Auto Sheet Feeder 1 Flatten the four corners of sheets from the package, just before printing. 2 Prepare to the Printer Driver Guide on page 76. See "Paper is curled, hold the opposing curled corners and gently bend them on a level surface. - ... Tray. z To avoid curling, handle paper as follows. - Note z Align the edges of the Paper Output Tray and open it . on -screen manual. (3) (2) 16 Before Printing
z Loading Paper in the Auto Sheet Feeder 1 Flatten the four corners of sheets from the package, just before printing. 2 Prepare to the Printer Driver Guide on page 76. See "Paper is curled, hold the opposing curled corners and gently bend them on a level surface. - ... Tray. z To avoid curling, handle paper as follows. - Note z Align the edges of the Paper Output Tray and open it . on -screen manual. (3) (2) 16 Before Printing

Quick Start Guide
Page 21
... the right side of the paper before loading it. See "Flatten the four corners of the Paper Support. For details on page 26 or "Printing with the print side facing UP. (2) Align the paper stack against the left side of the loaded paper in Page Size in advance. z If you may... in the printer driver. This may get roller traces on page 21. For details on printer driver settings, see "Changing the Paper and Print Settings" on the print surface. on page 16. 2 Prepare to use of the paper before loading it against the Cover Guide on page 7. Note When performing ...
... the right side of the paper before loading it. See "Flatten the four corners of the Paper Support. For details on page 26 or "Printing with the print side facing UP. (2) Align the paper stack against the left side of the loaded paper in Page Size in advance. z If you may... in the printer driver. This may get roller traces on page 21. For details on printer driver settings, see "Changing the Paper and Print Settings" on the print surface. on page 16. 2 Prepare to use of the paper before loading it against the Cover Guide on page 7. Note When performing ...
Quick Start Guide
Page 22
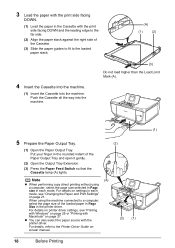
...load higher than the Load Limit Mark (A). (1) 5 Prepare the Paper Output Tray. (3) (1) Open the Paper Output Tray. Note (A) z When performing copy direct printing without using the machine connected to the Printer Driver Guide on page 21. Push the Cassette all the way into the machine. When using a computer..., select the page size selected in Page size in the printer driver. 3 Load the paper with the print side facing DOWN. (1) Load the paper in the rounded indent of the Paper Output Tray and open it gently. (2) Open the Output Tray ...
...load higher than the Load Limit Mark (A). (1) 5 Prepare the Paper Output Tray. (3) (1) Open the Paper Output Tray. Note (A) z When performing copy direct printing without using the machine connected to the Printer Driver Guide on page 21. Push the Cassette all the way into the machine. When using a computer..., select the page size selected in Page size in the printer driver. 3 Load the paper with the print side facing DOWN. (1) Load the paper in the rounded indent of the Paper Output Tray and open it gently. (2) Open the Output Tray ...
Quick Start Guide
Page 23
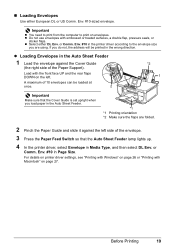
...Switch so that the Auto Sheet Feeder lamp lights up. 4 In the printer driver, select Envelope in the wrong direction. Before Printing 19 Env. #10 in the Auto Sheet Feeder. *1 *1 Printing orientation *2 Make sure the flaps are using. „ Loading Envelopes Use either DL Env. z Do not use envelopes with the... left side of the Paper Support). Load with embossed or treated surfaces, a double flap, pressure seals, or sticker flaps. Important z You need to print from the computer to the envelope size you load paper in Page Size. or Comm. Env. #10-sized envelope.
...Switch so that the Auto Sheet Feeder lamp lights up. 4 In the printer driver, select Envelope in the wrong direction. Before Printing 19 Env. #10 in the Auto Sheet Feeder. *1 *1 Printing orientation *2 Make sure the flaps are using. „ Loading Envelopes Use either DL Env. z Do not use envelopes with the... left side of the Paper Support). Load with embossed or treated surfaces, a double flap, pressure seals, or sticker flaps. Important z You need to print from the computer to the envelope size you load paper in Page Size. or Comm. Env. #10-sized envelope.
Quick Start Guide
Page 24
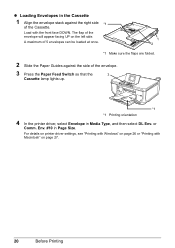
... 4 In the printer driver, select Envelope in Page Size. For details on printer driver settings, see "Printing with Windows" on page 26 or "Printing with the front face DOWN. A maximum of 5 envelopes can be loaded at once. 1 2 *1 Make sure the flaps are folded. 2 Slide the Paper Guides against the ...right side *1 of the envelope will appear facing UP on page 27. 20 Before Printing The flap of the Cassette. or Comm. Load with Macintosh" on the left side. Env. #10 in Media Type, and then select DL Env.
... 4 In the printer driver, select Envelope in Page Size. For details on printer driver settings, see "Printing with Windows" on page 26 or "Printing with the front face DOWN. A maximum of 5 envelopes can be loaded at once. 1 2 *1 Make sure the flaps are folded. 2 Slide the Paper Guides against the ...right side *1 of the envelope will appear facing UP on page 27. 20 Before Printing The flap of the Cassette. or Comm. Load with Macintosh" on the left side. Env. #10 in Media Type, and then select DL Env.


