Quick Start Guide
Page 2
..., and logical solutions to buy" instructions are subject to start is available at a very attractive price. www.canonesp.com Canon CarePAK Extended Service Plan is a cost-attractive and easy-to-use extended service program that provides up to three full years...within 24 hours. 3. Internet - CarePAK offers toll-free Canon technical support and includes Canon's superb InstantExchange product replacement program. www.canontechsupport.com For quick and comprehensive self-help in an intuitively guided interactive troubleshooting environment, the place to change without notice. For more...
..., and logical solutions to buy" instructions are subject to start is available at a very attractive price. www.canonesp.com Canon CarePAK Extended Service Plan is a cost-attractive and easy-to-use extended service program that provides up to three full years...within 24 hours. 3. Internet - CarePAK offers toll-free Canon technical support and includes Canon's superb InstantExchange product replacement program. www.canontechsupport.com For quick and comprehensive self-help in an intuitively guided interactive troubleshooting environment, the place to change without notice. For more...

Quick Start Guide
Page 5
... 53 Examining the Nozzle Check Pattern ...........54 Print Head Cleaning 56 Print Head Deep Cleaning 58 Aligning the Print Head 60 Cleaning Your Machine 64 Troubleshooting 67 Error Message Is Displayed on the LCD ......68 LCD Cannot Be Seen At All 70 An Unintended Language Is Displayed on the LCD 70...
... 53 Examining the Nozzle Check Pattern ...........54 Print Head Cleaning 56 Print Head Deep Cleaning 58 Aligning the Print Head 60 Cleaning Your Machine 64 Troubleshooting 67 Error Message Is Displayed on the LCD ......68 LCD Cannot Be Seen At All 70 An Unintended Language Is Displayed on the LCD 70...
Quick Start Guide
Page 71
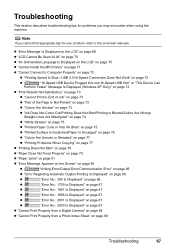
Troubleshooting This section describes troubleshooting tips for problems you cannot find appropriate tips for your problem, refer to End of Job" on page 73 z "Part of the Page Is Not ... Perform Faster" Message Is Displayed (Windows XP Only)" on page 72 z "Print Results Not Satisfactory" on page 73 z "Cannot Print to the on page 89 Troubleshooting 67
Troubleshooting This section describes troubleshooting tips for problems you cannot find appropriate tips for your problem, refer to End of Job" on page 73 z "Part of the Page Is Not ... Perform Faster" Message Is Displayed (Windows XP Only)" on page 72 z "Print Results Not Satisfactory" on page 73 z "Cannot Print to the on page 89 Troubleshooting 67
Quick Start Guide
Page 72
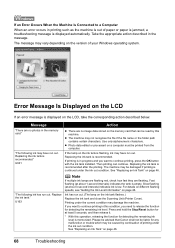
..." on page 46. Printing under the ink out condition. Please be advised that can continue. If the lamp on the memory card that Canon shall not be liable for any malfunction or trouble which may be damaged if printing is displayed automatically. Replacing the ink tank is recommended.... (The lamp on a computer must be read by continuation of your Windows operating system. z The machine may vary depending on page 46. 68 Troubleshooting "The following ink may have run out. Ink has run out. Press and hold the Stop/Reset button for at least 5 seconds, and then...
..." on page 46. Printing under the ink out condition. Please be advised that can continue. If the lamp on the memory card that Canon shall not be liable for any malfunction or trouble which may be damaged if printing is displayed automatically. Replacing the ink tank is recommended.... (The lamp on a computer must be read by continuation of your Windows operating system. z The machine may vary depending on page 46. 68 Troubleshooting "The following ink may have run out. Ink has run out. Press and hold the Stop/Reset button for at least 5 seconds, and then...
Quick Start Guide
Page 73
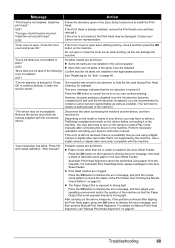
... then adjust your device, you can damage the machine. Contact the service center." Perform necessary operations according your Canon service representative. Press the OK button to strong light. If the error is incorrect. U072 "More than one... and then reconnect it. Install the print head." Confirm that the Paper Output Slot is exposed to contact a Canon service representative as early as follows: z Some ink tanks are clogged. Press the OK button to the machine....Use a digital camera or digital video camcorder compatible with the connected device." Troubleshooting 69
... then adjust your device, you can damage the machine. Contact the service center." Perform necessary operations according your Canon service representative. Press the OK button to strong light. If the error is incorrect. U072 "More than one... and then reconnect it. Install the print head." Confirm that the Paper Output Slot is exposed to contact a Canon service representative as early as follows: z Some ink tanks are clogged. Press the OK button to the machine....Use a digital camera or digital video camcorder compatible with the connected device." Troubleshooting 69
Quick Start Guide
Page 74
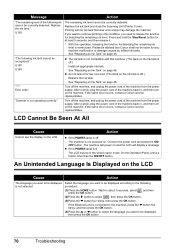
... function for at least 5 seconds, and then release it. * With this condition, you want to be displayed, then press the OK button. 70 Troubleshooting If the Bluetooth unit is not selected. Printing with this machine. (The lamp on the machine. If the same error occurs, contact... button four times, then press the OK button. Connect the power cord and press the ON/ OFF button. If the same error occurs, contact a Canon service representative. Press and hold the Stop/Reset button for detecting the remaining ink level. Replace the ink tank and close the Scanning Unit (Printer...
... function for at least 5 seconds, and then release it. * With this condition, you want to be displayed, then press the OK button. 70 Troubleshooting If the Bluetooth unit is not selected. Printing with this machine. (The lamp on the machine. If the same error occurs, contact... button four times, then press the OK button. Connect the power cord and press the ON/ OFF button. If the same error occurs, contact a Canon service representative. Press and hold the Stop/Reset button for detecting the remaining ink level. Replace the ink tank and close the Scanning Unit (Printer...
Quick Start Guide
Page 75
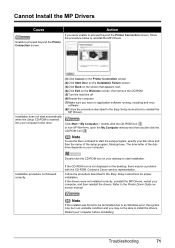
Troubleshooting 71 Installation does not start automatically when the Setup CD-ROM is not displayed on the desktop, there may be a problem with the CD-ROM. ..., then remove the CD-ROM. (5)Turn the machine off. (6)Restart the computer. (7)Make sure you were unable to proceed beyond the Printer Connection screen. Contact a Canon service representative. Note If the installer was forced to be terminated due to an Windows error, the system may not be in the Easy Setup...
Troubleshooting 71 Installation does not start automatically when the Setup CD-ROM is not displayed on the desktop, there may be a problem with the CD-ROM. ..., then remove the CD-ROM. (5)Turn the machine off. (6)Restart the computer. (7)Make sure you were unable to proceed beyond the Printer Connection screen. Contact a Canon service representative. Note If the installer was forced to be terminated due to an Windows error, the system may not be in the Easy Setup...
Quick Start Guide
Page 76
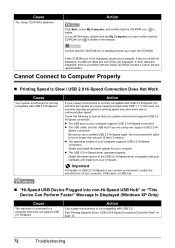
...ROM icon is still not displayed, try different disks and see if they are displayed. If the icon is visible in the window. Contact a Canon service representative. Action If your system environment is visible. Speed connection. Important For details on your computer supports USB 2.0 Hi-Speed connection. Action ...We recommend the cable to ensure that the CD-ROM icon is not compatible with your hardware and install it on page 72. 72 Troubleshooting z The operating system of the USB 2.0 Hi-Speed driver compatible with USB 2.0. Obtain the latest version of your computer.
...ROM icon is still not displayed, try different disks and see if they are displayed. If the icon is visible in the window. Contact a Canon service representative. Action If your system environment is visible. Speed connection. Important For details on your computer supports USB 2.0 Hi-Speed connection. Action ...We recommend the cable to ensure that the CD-ROM icon is not compatible with your hardware and install it on page 72. 72 Troubleshooting z The operating system of the USB 2.0 Hi-Speed driver compatible with USB 2.0. Obtain the latest version of your computer.
Quick Start Guide
Page 77
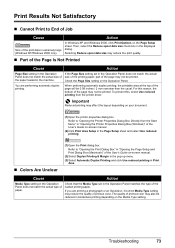
... the top of the page may also be 0.08 inches / 2 mm narrower than the usual. Refer to "Opening the Print Dialog Box" in Print Area. Troubleshooting 73
... the top of the page may also be 0.08 inches / 2 mm narrower than the usual. Refer to "Opening the Print Dialog Box" in Print Area. Troubleshooting 73
Quick Start Guide
Page 78
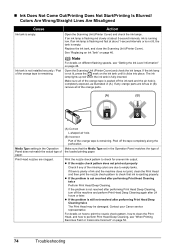
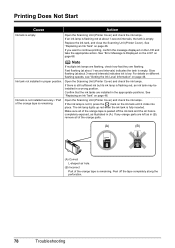
... out properly Check if any orange parts are due to perform Print Head Deep Cleaning, see "Getting the Ink Level Information" on page 52. 74 Troubleshooting For details on how to print the nozzle check pattern, how to clean the Print Head, and how to empty tanks. Replace the ink tank... the Scanning Unit (Printer Cover) and check the ink lamps. If any of the orange tape is ejecting properly. If there is remaining. Contact your Canon service representative. Ink tank is not installed securely. / Part of the orange tape is peeled off the ink tank and the air hole is completely...
... out properly Check if any orange parts are due to perform Print Head Deep Cleaning, see "Getting the Ink Level Information" on page 52. 74 Troubleshooting For details on how to print the nozzle check pattern, how to clean the Print Head, and how to empty tanks. Replace the ink tank... the Scanning Unit (Printer Cover) and check the ink lamps. If any of the orange tape is ejecting properly. If there is remaining. Contact your Canon service representative. Ink tank is not installed securely. / Part of the orange tape is peeled off the ink tank and the air hole is completely...
Quick Start Guide
Page 79
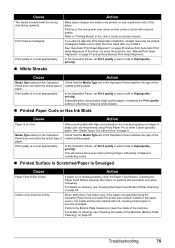
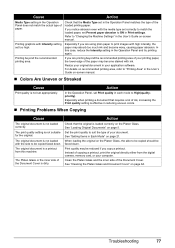
...align the Print Head after you install it. See "Media Types You Cannot Use" on page 61 and perform Manual Print Head Alignment. Troubleshooting 75 Cause Action Media Type setting in each mode to High(qualitypriority). Cause The media is loaded with plenty of the loaded printing paper...not set Print quality in the Operation Panel does not match the actual type of paper. Especially when using Photo Paper Pro or other Canon specialty paper. Media Type setting in each mode to High(qualitypriority). Action If paper is misaligned. For details on cleaning, see "Cleaning...
...align the Print Head after you install it. See "Media Types You Cannot Use" on page 61 and perform Manual Print Head Alignment. Troubleshooting 75 Cause Action Media Type setting in each mode to High(qualitypriority). Cause The media is loaded with plenty of the loaded printing paper...not set Print quality in the Operation Panel does not match the actual type of paper. Especially when using Photo Paper Pro or other Canon specialty paper. Media Type setting in each mode to High(qualitypriority). Action If paper is misaligned. For details on cleaning, see "Cleaning...
Quick Start Guide
Page 80
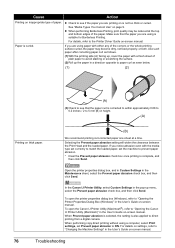
...settings, refer to ON. Cause Action Printing on inappropriate type of plain paper to "Opening the Canon IJ Printer Utility (Macintosh)" in the User's Guide on-screen manual. 76 Troubleshooting If you are printing on -screen manual. Selecting the Prevent paper abrasion setting will widen the ...clearance between the Print Head and the loaded paper. If you are using paper with either any of the paper. In the Canon IJ Printer Utility, ...
...settings, refer to ON. Cause Action Printing on inappropriate type of plain paper to "Opening the Canon IJ Printer Utility (Macintosh)" in the User's Guide on-screen manual. 76 Troubleshooting If you are printing on -screen manual. Selecting the Prevent paper abrasion setting will widen the ...clearance between the Print Head and the loaded paper. If you are using paper with either any of the paper. In the Canon IJ Printer Utility, ...
Quick Start Guide
Page 81
... Panel matches the type of paper. In this machine. The print quality setting is not loaded with ink. See "Loading Original Documents" on page 64. Troubleshooting 77 If you copy a printout. Set the print quality to ON in the Operation Panel does not match the actual type of the loaded printing...
... Panel matches the type of paper. In this machine. The print quality setting is not loaded with ink. See "Loading Original Documents" on page 64. Troubleshooting 77 If you copy a printout. Set the print quality to ON in the Operation Panel does not match the actual type of the loaded printing...
Quick Start Guide
Page 82
... check the ink lamps. Ink tank not installed in (B), remove all of the orange tape is peeled off the tape completely along the perforation. 78 Troubleshooting Open the Scanning Unit (Printer Cover) and check the ink lamps. If any orange parts are left as illustrated in a wrong position. See "Error Message...
... check the ink lamps. Ink tank not installed in (B), remove all of the orange tape is peeled off the tape completely along the perforation. 78 Troubleshooting Open the Scanning Unit (Printer Cover) and check the ink lamps. If any orange parts are left as illustrated in a wrong position. See "Error Message...
Quick Start Guide
Page 83
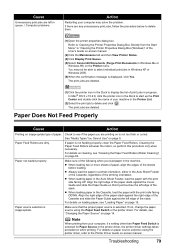
.... You may solve the problem. If not, change the paper source using the printer driver, refer to the Printer Driver Guide on the Printer menu. Troubleshooting 79 The print jobs are dirty. If paper is inappropriate. Make sure of the stack. Refer to "Opening the Printer Properties Dialog Box Directly from...
.... You may solve the problem. If not, change the paper source using the printer driver, refer to the Printer Driver Guide on the Printer menu. Troubleshooting 79 The print jobs are dirty. If paper is inappropriate. Make sure of the stack. Refer to "Opening the Printer Properties Dialog Box Directly from...
Quick Start Guide
Page 84
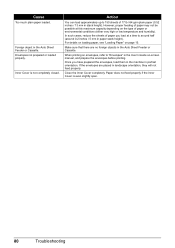
.... When printing on envelopes, refer to around half (around 0.2 inches / 5 mm in the User's Guide on page 15. Inner Cover is even slightly open. 80 Troubleshooting Cause Too much plain paper loaded. If the envelopes are no foreign objects in portrait orientation. In such cases, reduce the sheets of paper may...
.... When printing on envelopes, refer to around half (around 0.2 inches / 5 mm in the User's Guide on page 15. Inner Cover is even slightly open. 80 Troubleshooting Cause Too much plain paper loaded. If the envelopes are no foreign objects in portrait orientation. In such cases, reduce the sheets of paper may...
Quick Start Guide
Page 85
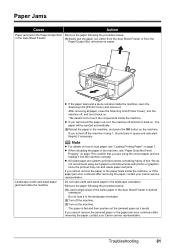
.... Do not load credit card-sized paper in portrait orientation. Remove the paper following the procedure below . (1)Load a single sheet of text. Troubleshooting 81 The paper will be ejected automatically. (2)Reload the paper in the landscape orientation. (2)Turn off , and turn it back on page 79 ... the paper tears and a piece remains inside the machine, or if the paper jam error continues after removing the paper, contact your Canon service representative. If you cannot remove the jammed paper or the paper jam error continues after removing the paper, contact your...
.... Do not load credit card-sized paper in portrait orientation. Remove the paper following the procedure below . (1)Load a single sheet of text. Troubleshooting 81 The paper will be ejected automatically. (2)Reload the paper in the landscape orientation. (2)Turn off , and turn it back on page 79 ... the paper tears and a piece remains inside the machine, or if the paper jam error continues after removing the paper, contact your Canon service representative. If you cannot remove the jammed paper or the paper jam error continues after removing the paper, contact your...
Quick Start Guide
Page 86
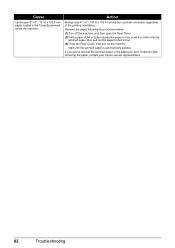
If you cannot remove the jammed paper or the paper jam error continues after removing the paper, contact your Canon service representative. 82 Troubleshooting Cause Landscape 4" x 6" / 101.6 x 152.4 mm paper loaded in four. (3)Close the Rear Cover, then turn on the machine. Remove the paper following the procedure below. (1)...
If you cannot remove the jammed paper or the paper jam error continues after removing the paper, contact your Canon service representative. 82 Troubleshooting Cause Landscape 4" x 6" / 101.6 x 152.4 mm paper loaded in four. (3)Close the Rear Cover, then turn on the machine. Remove the paper following the procedure below. (1)...

Quick Start Guide
Page 87
... 2, remove the Cassette. (5)Slowly pull the jammed paper out. (6)If any paper is sticking out of the Cassette, reload the paper in queue are canceled. Troubleshooting 83 Action Remove the paper following the procedure below. (1)Open the Rear Cover. (2)If you were not able to touch the components inside the machine...
... 2, remove the Cassette. (5)Slowly pull the jammed paper out. (6)If any paper is sticking out of the Cassette, reload the paper in queue are canceled. Troubleshooting 83 Action Remove the paper following the procedure below. (1)Open the Rear Cover. (2)If you were not able to touch the components inside the machine...
Quick Start Guide
Page 88
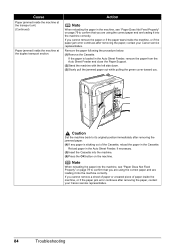
...the transport unit. (Continued) Paper jammed inside the machine, or if the paper jam error continues after removing the paper, contact your Canon service representative. 84 Troubleshooting Reload paper in the Cassette. If you cannot remove a sheet of paper or a teared piece of the Cassette, reload the paper ... the paper or if the paper tears inside the machine, or if the paper jam error continues after removing the paper, contact your Canon service representative. If you are using the correct paper and are loading it into the machine, see "Paper Does Not Feed Properly" ...
...the transport unit. (Continued) Paper jammed inside the machine, or if the paper jam error continues after removing the paper, contact your Canon service representative. 84 Troubleshooting Reload paper in the Cassette. If you cannot remove a sheet of paper or a teared piece of the Cassette, reload the paper ... the paper or if the paper tears inside the machine, or if the paper jam error continues after removing the paper, contact your Canon service representative. If you are using the correct paper and are loading it into the machine, see "Paper Does Not Feed Properly" ...


