
Users Manual - English and Spanish
Page 2
... dealer or service center for examination, repair, electrical or mechanical adjustment. • While the machine is stored or in injuries. 5 Special care is required when sewing: • Always pay close attention to the needle. Plug the machine directly into the electrical outlet. • Never drop or insert any object into the...
... dealer or service center for examination, repair, electrical or mechanical adjustment. • While the machine is stored or in injuries. 5 Special care is required when sewing: • Always pay close attention to the needle. Plug the machine directly into the electrical outlet. • Never drop or insert any object into the...
Users Manual - English and Spanish
Page 3
... do not deflect the needle and cause it could cause the needle to break. • Do not push or pull the fabric when sewing, and follow the troubleshooting table in the back of the operation manual to the danger of the appliance by persons (including children) with this...not intended for their safety. Never allow children to obtain the correct lead. 2 For additional product information, visit our web site at www.brother.com SAVE THESE INSTRUCTIONS This machine is required, first follow careful instruction when freehand stitching so that you should be supervised to ensure that ...
... do not deflect the needle and cause it could cause the needle to break. • Do not push or pull the fabric when sewing, and follow the troubleshooting table in the back of the operation manual to the danger of the appliance by persons (including children) with this...not intended for their safety. Never allow children to obtain the correct lead. 2 For additional product information, visit our web site at www.brother.com SAVE THESE INSTRUCTIONS This machine is required, first follow careful instruction when freehand stitching so that you should be supervised to ensure that ...

Users Manual - English and Spanish
Page 4
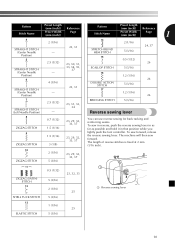
...35 Using the blind stitch foot 37 6. SEWING BASICS 18 Please read before sewing 18 Starting sewing 18 Trial sewing 19 Changing the sewing direction 19 Sewing thick fabrics 19 Sewing thin fabrics 20 Sewing stretch fabrics 20 Stitching cylindrical pieces 20 Sewing with a twin needle (Option 20 Thread ... 7 Replacing the needle 7 Changing the presser foot 8 THE CONTROLS 9 Pattern selection dial 9 Patterns and stitch names 9 Reverse sewing lever 10 THREADING THE MACHINE 11 Winding the bobbin 11 Lower threading 13 Upper threading 14 Drawing up the lower thread 16 FABRIC,...
...35 Using the blind stitch foot 37 6. SEWING BASICS 18 Please read before sewing 18 Starting sewing 18 Trial sewing 19 Changing the sewing direction 19 Sewing thick fabrics 19 Sewing thin fabrics 20 Sewing stretch fabrics 20 Stitching cylindrical pieces 20 Sewing with a twin needle (Option 20 Thread ... 7 Replacing the needle 7 Changing the presser foot 8 THE CONTROLS 9 Pattern selection dial 9 Patterns and stitch names 9 Reverse sewing lever 10 THREADING THE MACHINE 11 Winding the bobbin 11 Lower threading 13 Upper threading 14 Drawing up the lower thread 16 FABRIC,...
Users Manual - English and Spanish
Page 5
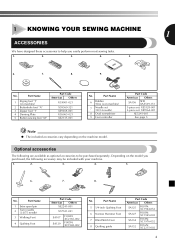
... See page 5 Note ● The included accessories vary depending on machine) 2 Buttonhole foot "A" 3 Zipper foot "I" 4 Darning Plate 5 Button sewing foot "M" Part Code Americas Others XC4901-021 X59369-321 XE9369-001 XC6063-021 XE2137-001 No. No. Part Name 1 Zigzag foot "J" (on ...the machine model. Depending on the model you easily perform most sewing tasks. 1. 2. 3. 4. 5. 6. 7. 8. 9. Part Name 5 1/4-inch Quilting Foot 6 Narrow Hemmer Foot 7 Blind Stitch Foot 8 Quilting guide Part ...
... See page 5 Note ● The included accessories vary depending on machine) 2 Buttonhole foot "A" 3 Zipper foot "I" 4 Darning Plate 5 Button sewing foot "M" Part Code Americas Others XC4901-021 X59369-321 XE9369-001 XC6063-021 XE2137-001 No. No. Part Name 1 Zigzag foot "J" (on ...the machine model. Depending on the model you easily perform most sewing tasks. 1. 2. 3. 4. 5. 6. 7. 8. 9. Part Name 5 1/4-inch Quilting Foot 6 Narrow Hemmer Foot 7 Blind Stitch Foot 8 Quilting guide Part ...

Users Manual - English and Spanish
Page 6
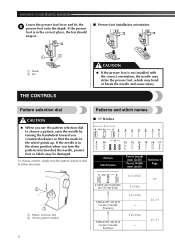
... to stitch in the reverse direction. 0 Pattern selection dial (Page 9) Rotate the dial in either direction to start and stop sewing. Contact your dealer or the nearest authorized service center. KNOWING YOUR SEWING MACHINE THE MAIN PARTS 43 2 1 5 A 6 0 7 9 8 1 Bobbin winder (Page 11) This winds the...flat bed attachment to the left to raise and lower the presser foot. B Buttonhole fine-adjustment screw (Page 28) C Main power and sewing light switch (Page 7) You can be stored in the foot controller plug and connect the machine to manually raise and lower the needle....
... to stitch in the reverse direction. 0 Pattern selection dial (Page 9) Rotate the dial in either direction to start and stop sewing. Contact your dealer or the nearest authorized service center. KNOWING YOUR SEWING MACHINE THE MAIN PARTS 43 2 1 5 A 6 0 7 9 8 1 Bobbin winder (Page 11) This winds the...flat bed attachment to the left to raise and lower the presser foot. B Buttonhole fine-adjustment screw (Page 28) C Main power and sewing light switch (Page 7) You can be stored in the foot controller plug and connect the machine to manually raise and lower the needle....

Users Manual - English and Spanish
Page 7
... the plug. To reduce the risk of time. Connect the power supply plug to a wall 2 outlet. 2 1 Note ● If a power outage occurs while the sewing machine is in poor condition. ● Turn off the main power and remove the plug in the following circumstances: • When you are firmly inserted...in any way. 6 Do not subject the cord to correctly operate the machine. (For U.S.A. Using other appliances plugged in to them. When restarting the sewing machine, follow the necessary procedure to heat. Connecting plugs Connect the foot controller plug to the 1 machine. USING YOUR...
... the plug. To reduce the risk of time. Connect the power supply plug to a wall 2 outlet. 2 1 Note ● If a power outage occurs while the sewing machine is in poor condition. ● Turn off the main power and remove the plug in the following circumstances: • When you are firmly inserted...in any way. 6 Do not subject the cord to correctly operate the machine. (For U.S.A. Using other appliances plugged in to them. When restarting the sewing machine, follow the necessary procedure to heat. Connecting plugs Connect the foot controller plug to the 1 machine. USING YOUR...

Users Manual - English and Spanish
Page 8
... You should make sure that nothing is placed on the foot controller when the machine is accidentally pressed and the machine starts sewing. ● Only use sewing machine needles for smooth sewing. 1 2 1 Turn on (toward the 'I' mark) 2 Turn off (toward you (counterclockwise) so that the mark on the wheel ...; Checking the needle correctly Put the flat side of cloth and dust to build up . KNOWING YOUR SEWING MACHINE Main power and sewing light switch This switch turns the main power and sewing light on or off the machine before you change the needle. CAUTION ● Do not allow pieces...
... You should make sure that nothing is placed on the foot controller when the machine is accidentally pressed and the machine starts sewing. ● Only use sewing machine needles for smooth sewing. 1 2 1 Turn on (toward the 'I' mark) 2 Turn off (toward you (counterclockwise) so that the mark on the wheel ...; Checking the needle correctly Put the flat side of cloth and dust to build up . KNOWING YOUR SEWING MACHINE Main power and sewing light switch This switch turns the main power and sewing light on or off the machine before you change the needle. CAUTION ● Do not allow pieces...

Users Manual - English and Spanish
Page 9
...on the controller, the machine will have to Changing the presser foot remove the needle. Press the black button at the back of the sewing machine may be damaged. ● Always turn the needle clamp screw counterclockwise to change the presser foot. screwdriver, otherwise the needle may ... tighten the needle clamp using an oval screwdriver. 2 3 You will start and you may be injured. ● Always use an oval screwdriver to sew and how. Raise the needle by turning the 2 handwheel toward the 5 back of the needle toward you have been designed to touches the stopper,...
...on the controller, the machine will have to Changing the presser foot remove the needle. Press the black button at the back of the sewing machine may be damaged. ● Always turn the needle clamp screw counterclockwise to change the presser foot. screwdriver, otherwise the needle may ... tighten the needle clamp using an oval screwdriver. 2 3 You will start and you may be injured. ● Always use an oval screwdriver to sew and how. Raise the needle by turning the 2 handwheel toward the 5 back of the needle toward you have been designed to touches the stopper,...
Users Manual - English and Spanish
Page 10
... in the down position when you (counterclockwise) so that the mark on the wheel points up. Reference Page 27 23, 31 23, 31 9 KNOWING YOUR SEWING MACHINE Lower the presser foot lever and fix the 5 presser foot onto the shank.
... in the down position when you (counterclockwise) so that the mark on the wheel points up. Reference Page 27 23, 31 23, 31 9 KNOWING YOUR SEWING MACHINE Lower the presser foot lever and fix the 5 presser foot onto the shank.
Users Manual - English and Spanish
Page 11
...32) 5 (3/16) 1.2 (1/16) 5 (3/16) 1.2 (1/16) 24, 37 26 26 26 7 STRAIGHT STITCH (Left Needle Position) 2.5 (3/32) - 23, 31, 33, 34 BRIDGING STITCH 5 (3/16) Reverse sewing lever 8 ZIGZAG STITCH 9 ZIGZAG STITCH 0.7 (1/32) 1.5 (1/16) 1.5 (1/16) 3 (1/8) 23, 29, 32, 33, 37 23, 29, 32, 33, 37 You can use reverse... sewing for back tacking and reinforcing seams. To sew in reverse, push the reverse sewing lever in as far as possible and hold it in that position while you lightly push the foot controller...
...32) 5 (3/16) 1.2 (1/16) 5 (3/16) 1.2 (1/16) 24, 37 26 26 26 7 STRAIGHT STITCH (Left Needle Position) 2.5 (3/32) - 23, 31, 33, 34 BRIDGING STITCH 5 (3/16) Reverse sewing lever 8 ZIGZAG STITCH 9 ZIGZAG STITCH 0.7 (1/32) 1.5 (1/16) 1.5 (1/16) 3 (1/8) 23, 29, 32, 33, 37 23, 29, 32, 33, 37 You can use reverse... sewing for back tacking and reinforcing seams. To sew in reverse, push the reverse sewing lever in as far as possible and hold it in that position while you lightly push the foot controller...

Users Manual - English and Spanish
Page 12
If you , in the groove on the thread guide. KNOWING YOUR SEWING MACHINE THREADING THE MACHINE Winding the bobbin CAUTION ● We designed the bobbin that comes with this machine or bobbins of 1 thread on the spool ...
If you , in the groove on the thread guide. KNOWING YOUR SEWING MACHINE THREADING THE MACHINE Winding the bobbin CAUTION ● We designed the bobbin that comes with this machine or bobbins of 1 thread on the spool ...
Users Manual - English and Spanish
Page 13
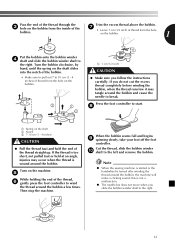
... cause the needle to the right. Cut the thread, slide the bobbin winder 0 shaft to wind the thread around the bobbin. Note ● When the sewing machine is started or the handwheel is wound around the bobbin a few times. on the machine. 5 While holding the end of the thread, 6 gently press...
... cause the needle to the right. Cut the thread, slide the bobbin winder 0 shaft to wind the thread around the bobbin. Note ● When the sewing machine is started or the handwheel is wound around the bobbin a few times. on the machine. 5 While holding the end of the thread, 6 gently press...

Users Manual - English and Spanish
Page 14
...; Make sure you (counterclockwise) and raise the presser foot lever. If you accidentally step on the foot controller and the machine starts to sew, you could be incorrect or break the needle. Put the bobbin in so the thread comes out 4 in the right direction. Raise the...with thread. Prepare the bobbin wound properly 1 before threading the lower thread. • See page 11 for the details about bobbin winding. KNOWING YOUR SEWING MACHINE CAUTION ● Not winding the bobbin properly may cause the thread tension to loosen, and may cause incorrect thread tension. 1 1 1 Tension-...
...; Make sure you (counterclockwise) and raise the presser foot lever. If you accidentally step on the foot controller and the machine starts to sew, you could be incorrect or break the needle. Put the bobbin in so the thread comes out 4 in the right direction. Raise the...with thread. Prepare the bobbin wound properly 1 before threading the lower thread. • See page 11 for the details about bobbin winding. KNOWING YOUR SEWING MACHINE CAUTION ● Not winding the bobbin properly may cause the thread tension to loosen, and may cause incorrect thread tension. 1 1 1 Tension-...
Users Manual - English and Spanish
Page 15
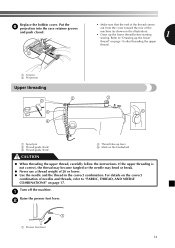
... after threading the upper thread. 1 Groove 2 Projection Upper threading 2 2 3 4 1 5 1 Spool pin 2 Thread guide (back) 3 Thread guide (front) 4 Thread take-up the lower thread before starting 1 sewing. For details on the correct combination of 20 or lower. ● Use the needle and the thread in the illustration). • Draw up lever 5 Mark...
... after threading the upper thread. 1 Groove 2 Projection Upper threading 2 2 3 4 1 5 1 Spool pin 2 Thread guide (back) 3 Thread guide (front) 4 Thread take-up the lower thread before starting 1 sewing. For details on the correct combination of 20 or lower. ● Use the needle and the thread in the illustration). • Draw up lever 5 Mark...
Users Manual - English and Spanish
Page 16
... thread may tangle on the wheel points up. • If the needle is not correctly raised, the sewing machine can not be threaded. While holding the thread from right to break. KNOWING YOUR SEWING MACHINE Raise the needle by turning the handwheel toward you (counterclockwise) so that the mark on the wheel...
... thread may tangle on the wheel points up. • If the needle is not correctly raised, the sewing machine can not be threaded. While holding the thread from right to break. KNOWING YOUR SEWING MACHINE Raise the needle by turning the handwheel toward you (counterclockwise) so that the mark on the wheel...
Users Manual - English and Spanish
Page 17
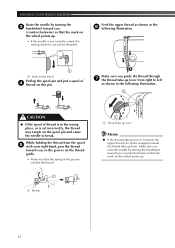
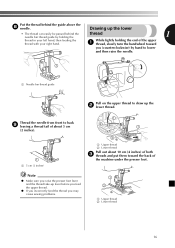
Note ● Make sure you may cause sewing problems. 1 2 1 Upper thread 2 Lower thread 16 Thread the needle from front to draw up lever before you feed the upper thread. ● If you incorrectly ...
Note ● Make sure you may cause sewing problems. 1 2 1 Upper thread 2 Lower thread 16 Thread the needle from front to draw up lever before you feed the upper thread. ● If you incorrectly ...
Users Manual - English and Spanish
Page 18
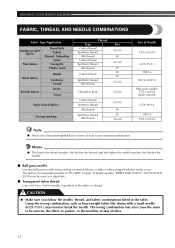
... the higher the needle number, the thicker the needle. ■ Ball point needle Use the ball point needle when sewing on stretch fabrics or fabrics where skipped stitches easily occur. KNOWING YOUR SEWING MACHINE FABRIC, THREAD, AND NEEDLE COMBINATIONS Fabric Type/Application Medium weight fabrics Thin fabrics Broadcloth Taffeta Flannel, Gabardine Lawn...
... the higher the needle number, the thicker the needle. ■ Ball point needle Use the ball point needle when sewing on stretch fabrics or fabrics where skipped stitches easily occur. KNOWING YOUR SEWING MACHINE FABRIC, THREAD, AND NEEDLE COMBINATIONS Fabric Type/Application Medium weight fabrics Thin fabrics Broadcloth Taffeta Flannel, Gabardine Lawn...
Users Manual - English and Spanish
Page 19
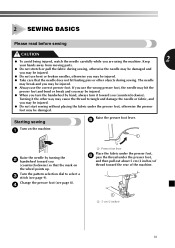
... the machine. 1 1 5 cm (2 inches) 18 Turning it toward you are using the machine. Change the presser foot (see page 9). 2 SEWING BASICS Please read before sewing CAUTION ● To avoid being injured, watch the needle carefully while you (counterclockwise) so that the needle does not hit basting pins or... you (counterclockwise). Turn the pattern selection dial to tangle and damage the needle or fabric, and you may be damaged. Starting sewing Raise the presser foot lever. 5 Turn on the machine. 1 1 Raise the needle by hand, always turn it the other objects during...
... the machine. 1 1 5 cm (2 inches) 18 Turning it toward you are using the machine. Change the presser foot (see page 9). 2 SEWING BASICS Please read before sewing CAUTION ● To avoid being injured, watch the needle carefully while you (counterclockwise) so that the needle does not hit basting pins or... you (counterclockwise). Turn the pattern selection dial to tangle and damage the needle or fabric, and you may be damaged. Starting sewing Raise the presser foot lever. 5 Turn on the machine. 1 1 Raise the needle by hand, always turn it the other objects during...
Users Manual - English and Spanish
Page 20
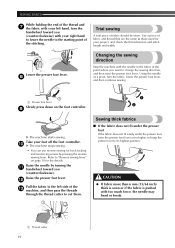
...fabric and thread that are the same as a pivot, turn the handwheel toward you want to change the sewing direction, and then raise the presser foot lever. Raise the needle by pressing the reverse sewing lever. CAUTION ● If fabric more than 6 mm (15/64 inch) thick is sewn or ... force, the needle may bend or break. 1 Thread cutter 19 Take your foot off the foot controller. 0 X The machine stops sewing. • You can use reverse sewing for back tacking and reinforcing seams by turning the a handwheel toward you (counterclockwise) with the needle in the fabric at the point where...
...fabric and thread that are the same as a pivot, turn the handwheel toward you want to change the sewing direction, and then raise the presser foot lever. Raise the needle by pressing the reverse sewing lever. CAUTION ● If fabric more than 6 mm (15/64 inch) thick is sewn or ... force, the needle may bend or break. 1 Thread cutter 19 Take your foot off the foot controller. 0 X The machine stops sewing. • You can use reverse sewing for back tacking and reinforcing seams by turning the a handwheel toward you (counterclockwise) with the needle in the fabric at the point where...
Users Manual - English and Spanish
Page 21
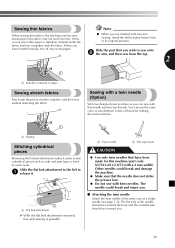
... under the ● When you can use the same color or two different colors of fabric together, and then sew without stretching the fabric. You can sew with free-arm sewing, install the flat bed attachment back in the same way as cuffs and pant legs, or hardto-reach areas. ... part that the needle does not strike the presser foot. ● Do not sew with a 2 mm width). fabric and sew it easier to sew onto 2 the arm, and then sew from the top. 2 1 1 Stabilizer material or paper Sewing stretch fabrics First, baste the pieces of thread for this needle and two top threads...
... under the ● When you can use the same color or two different colors of fabric together, and then sew without stretching the fabric. You can sew with free-arm sewing, install the flat bed attachment back in the same way as cuffs and pant legs, or hardto-reach areas. ... part that the needle does not strike the presser foot. ● Do not sew with a 2 mm width). fabric and sew it easier to sew onto 2 the arm, and then sew from the top. 2 1 1 Stabilizer material or paper Sewing stretch fabrics First, baste the pieces of thread for this needle and two top threads...


