
Users Manual - English and Spanish
Page 3
...local authorized Brother dealer. ...cause the needle to break....required around the machine needle. • Switch the...installing any adjustments in the needle area. • Do ...needle plate, as marked on plug. • Always replace the fuse cover. For additional product information, visit our web site at www.brother....com SAVE THESE INSTRUCTIONS This machine is intended for the plug supplied with reduced physical, sensory or mental capabilities, or lack of experience and knowledge, unless they do not deflect the needle...assemblies, the presser feet, needle, or other hot objects. ...
...local authorized Brother dealer. ...cause the needle to break....required around the machine needle. • Switch the...installing any adjustments in the needle area. • Do ...needle plate, as marked on plug. • Always replace the fuse cover. For additional product information, visit our web site at www.brother....com SAVE THESE INSTRUCTIONS This machine is intended for the plug supplied with reduced physical, sensory or mental capabilities, or lack of experience and knowledge, unless they do not deflect the needle...assemblies, the presser feet, needle, or other hot objects. ...

Users Manual - English and Spanish
Page 4
... 5 Flat bed attachment 5 USING YOUR SEWING MACHINE 6 Connecting plugs 6 Main power and sewing light switch 7 Foot controller 7 Checking the needle 7 Replacing the needle 7 Changing the presser foot 8 THE CONTROLS 9 Pattern selection dial 9 Patterns and stitch names 9 Reverse sewing lever 10 THREADING THE MACHINE 11 Winding... threading 14 Drawing up the lower thread 16 FABRIC, THREAD, AND NEEDLE COMBINATIONS 17 2. SEWING BASICS 18 Please read before sewing 18 Starting sewing 18 Trial sewing 19 Changing the sewing direction 19 Sewing thick fabrics 19 Sewing thin fabrics 20 ...
... 5 Flat bed attachment 5 USING YOUR SEWING MACHINE 6 Connecting plugs 6 Main power and sewing light switch 7 Foot controller 7 Checking the needle 7 Replacing the needle 7 Changing the presser foot 8 THE CONTROLS 9 Pattern selection dial 9 Patterns and stitch names 9 Reverse sewing lever 10 THREADING THE MACHINE 11 Winding... threading 14 Drawing up the lower thread 16 FABRIC, THREAD, AND NEEDLE COMBINATIONS 17 2. SEWING BASICS 18 Please read before sewing 18 Starting sewing 18 Trial sewing 19 Changing the sewing direction 19 Sewing thick fabrics 19 Sewing thin fabrics 20 ...

Users Manual - English and Spanish
Page 8
... 7 The product code is mentioned on the foot controller when the machine is accidentally pressed and the machine starts sewing. ● Only use sewing machine needles for smooth sewing. 1 2 1 Turn on (toward the 'I' mark) 2 Turn off (toward you (counterclockwise) so that nothing is placed on the ... bend or break and cause injury. ● Never sew with product code 885-X11. When you take your foot off the machine before you change the needle. CAUTION ● Always turn off the foot controller, the machine will run at a low speed. Turn off . only) ● Foot ...
... 7 The product code is mentioned on the foot controller when the machine is accidentally pressed and the machine starts sewing. ● Only use sewing machine needles for smooth sewing. 1 2 1 Turn on (toward the 'I' mark) 2 Turn off (toward you (counterclockwise) so that nothing is placed on the ... bend or break and cause injury. ● Never sew with product code 885-X11. When you take your foot off the machine before you change the needle. CAUTION ● Always turn off the foot controller, the machine will run at a low speed. Turn off . only) ● Foot ...

Users Manual - English and Spanish
Page 9
...foot lever. With the flat side of the sewing machine may be damaged. ● Always turn the needle clamp screw counterclockwise to change the presser foot. Next, tighten the needle clamp using an oval screwdriver. 2 3 You will start and you may cause injury. ● Only ... back of the machine, insert the needle until it touches the needle stopper. Turn off the machine before you change the presser foot depending on the controller, the machine will have to Changing the presser foot remove the needle. Raise the needle by turning the 2 handwheel toward the...
...foot lever. With the flat side of the sewing machine may be damaged. ● Always turn the needle clamp screw counterclockwise to change the presser foot. Next, tighten the needle clamp using an oval screwdriver. 2 3 You will start and you may cause injury. ● Only ... back of the machine, insert the needle until it touches the needle stopper. Turn off the machine before you change the presser foot depending on the controller, the machine will have to Changing the presser foot remove the needle. Raise the needle by turning the 2 handwheel toward the...
Users Manual - English and Spanish
Page 19
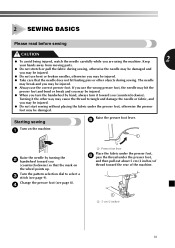
... that the mark on the wheel points up. Keep 2 your hands away from moving parts. ● Do not stretch or pull the fabric during sewing. Change the presser foot (see page 9). Turning it toward you turn the handwheel by turning the 2 handwheel toward the rear of the machine. 1 1 5 cm ... sewing without placing the fabric under the presser foot, and then pull out about 5 cm (2 inches) of thread toward you (counterclockwise) so that the needle does not hit basting pins or other way may cause the thread to select a 3 stitch (see page 8). 4 1 Presser foot lever Place the fabric...
... that the mark on the wheel points up. Keep 2 your hands away from moving parts. ● Do not stretch or pull the fabric during sewing. Change the presser foot (see page 9). Turning it toward you turn the handwheel by turning the 2 handwheel toward the rear of the machine. 1 1 5 cm ... sewing without placing the fabric under the presser foot, and then pull out about 5 cm (2 inches) of thread toward you (counterclockwise) so that the needle does not hit basting pins or other way may cause the thread to select a 3 stitch (see page 8). 4 1 Presser foot lever Place the fabric...
Users Manual - English and Spanish
Page 20
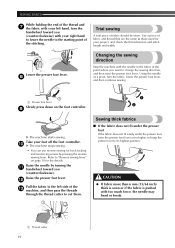
Lower the presser foot lever. 8 Changing the sewing direction Stop the machine with too much force, the needle may bend or break. 1 Thread cutter 19 Refer to "Reverse ...by turning the a handwheel toward you want to change the sewing direction, and then raise the presser foot lever. Raise the presser foot lever. Using the needle as those used for your foot off the ...counterclockwise). Take your project, and check the thread tension and stitch length and width. Raise the needle by pressing the reverse sewing lever. SEWING BASICS While holding the end of the thread and 7...
Lower the presser foot lever. 8 Changing the sewing direction Stop the machine with too much force, the needle may bend or break. 1 Thread cutter 19 Refer to "Reverse ...by turning the a handwheel toward you want to change the sewing direction, and then raise the presser foot lever. Raise the presser foot lever. Using the needle as those used for your foot off the ...counterclockwise). Take your project, and check the thread tension and stitch length and width. Raise the needle by pressing the reverse sewing lever. SEWING BASICS While holding the end of the thread and 7...
Users Manual - English and Spanish
Page 22
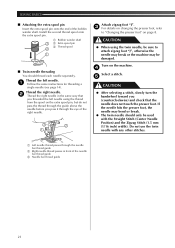
... through the eye of the right needle. 3 2 1 Attach zigzag foot "J". 3 For details on changing the presser foot, refer to attach zigzag foot "J", otherwise the needle may break or the machine may bend or break. ● The twin needle should thread each needle separately. Thread the right needle. 2 Thread the right needle in front of the bobbin winder...
... through the eye of the right needle. 3 2 1 Attach zigzag foot "J". 3 For details on changing the presser foot, refer to attach zigzag foot "J", otherwise the needle may break or the machine may bend or break. ● The twin needle should thread each needle separately. Thread the right needle. 2 Thread the right needle in front of the bobbin winder...
Users Manual - English and Spanish
Page 23
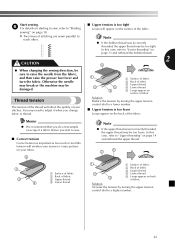
.... X Two lines of stitching are sewn parallel to "Lower threading" on page 13 and rethread the bobbin thread. 2 CAUTION 2 ● When changing the sewing direction, be too tight. Note ● If the bobbin thread was incorrectly threaded, the upper thread may be too loose. Thread tension... Upper tension is too tight Loops will affect the quality of your fabric. 2 1 3 4 1 Surface of fabric 2 Back of the fabric. Otherwise the needle may break or the machine may be damaged. Start sewing. 6 For details on starting to sew, refer to a higher number. 22 Memo ● We ...
.... X Two lines of stitching are sewn parallel to "Lower threading" on page 13 and rethread the bobbin thread. 2 CAUTION 2 ● When changing the sewing direction, be too tight. Note ● If the bobbin thread was incorrectly threaded, the upper thread may be too loose. Thread tension... Upper tension is too tight Loops will affect the quality of your fabric. 2 1 3 4 1 Surface of fabric 2 Back of the fabric. Otherwise the needle may break or the machine may be damaged. Start sewing. 6 For details on starting to sew, refer to a higher number. 22 Memo ● We ...

Users Manual - English and Spanish
Page 30
... sewing foot 3 "M". Turn on the needle 4 plate. Turn off the machine. 2 Change the foot to cut the upper thread and the bobbin thread at the end of the 8 stitching to the Zigzag Stitch with the bobbin thread. If it with the desired width. The needle may break and you may be injured... wrong side of the fabric, and then tie it hits, see step 1. At a slow speed, sew about 10 stitches. 7 CAUTION ● Make sure the needle does not hit the button during sewing. Pull the upper thread at the beginning of the stitching. SEWING BUTTONHOLES AND BUTTONS Sewing buttons Stitch Name...
... sewing foot 3 "M". Turn on the needle 4 plate. Turn off the machine. 2 Change the foot to cut the upper thread and the bobbin thread at the end of the 8 stitching to the Zigzag Stitch with the bobbin thread. If it with the desired width. The needle may break and you may be injured... wrong side of the fabric, and then tie it hits, see step 1. At a slow speed, sew about 10 stitches. 7 CAUTION ● Make sure the needle does not hit the button during sewing. Pull the upper thread at the beginning of the stitching. SEWING BUTTONHOLES AND BUTTONS Sewing buttons Stitch Name...
Users Manual - English and Spanish
Page 39
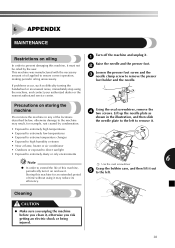
Precautions on storing the machine Do not store the machine in the illustration, and then slide the needle plate to the left . Lift up the needle plate as difficulty turning the handwheel or an unusual noise, immediately stop using it may result, for an extended...to the left to remove it. • Exposed to extremely high temperatures • Exposed to extremely low temperatures 1 • Exposed to extreme temperature changes • Exposed to high humidity or steam • Near a flame, heater or air conditioner • Outdoors or exposed to direct sunlight •...
Precautions on storing the machine Do not store the machine in the illustration, and then slide the needle plate to the left . Lift up the needle plate as difficulty turning the handwheel or an unusual noise, immediately stop using it may result, for an extended...to the left to remove it. • Exposed to extremely high temperatures • Exposed to extremely low temperatures 1 • Exposed to extreme temperature changes • Exposed to high humidity or steam • Near a flame, heater or air conditioner • Outdoors or exposed to direct sunlight •...
Users Manual - English and Spanish
Page 44
... 31 H Handwheel 14 L Light switch 7 Lower threading 13 M Main parts 5 Main power 7 Maintenance 38 N Narrow hemmer foot 35 Needle checking 7 combinations with fabric and thread ......... 17 replacing 7 P Pattern selection dial 9 Patterns 9 Presser foot changing 8 Q Quilting foot 34 R Race cleaning 38 Reverse sewing lever 10 S , Shell tuck stitching 25 Spool pin 11 14...
... 31 H Handwheel 14 L Light switch 7 Lower threading 13 M Main parts 5 Main power 7 Maintenance 38 N Narrow hemmer foot 35 Needle checking 7 combinations with fabric and thread ......... 17 replacing 7 P Pattern selection dial 9 Patterns 9 Presser foot changing 8 Q Quilting foot 34 R Race cleaning 38 Reverse sewing lever 10 S , Shell tuck stitching 25 Spool pin 11 14...


