Brother International XR1300 Support Question
Brother International XR1300 Support Question
Find answers below for this question about Brother International XR1300.Need a Brother International XR1300 manual? We have 2 online manuals for this item!
Current Answers
Related Brother International XR1300 Manual Pages
Users Manual - English - Page 6
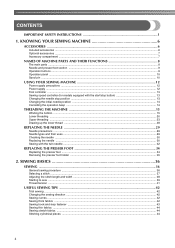
... presser foot section ...9 Operation buttons ...9 Operation panel ...10 Spool pin ...10
USING YOUR SEWING MACHINE 12
Power supply precautions ...12 Power supply ...12 Foot controller ...13 Sewing speed controller (for models equipped with the start/stop button 13 Changing the needle stop position ...13 Changing the initial needle position ...14 Cancelling the operation beep ...14
THREADING THE...
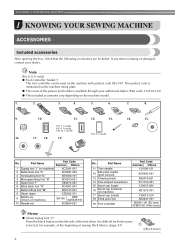
Users Manual - English - Page 8
... "J";
No. Note
(For U.S.A. Part Name
11 Twin needle
12
Ball point needle (gold colored)
13 Cleaning brush
14 Disc-shaped screwdriver
15 Spool cap (large)
16
Spool cap (medium) (on the left side of sewing thick fabrics. (page 43)
aBlack button
6 KNOWING YOUR SEWING MACHINE
1 KNOWING YOUR SEWING MACHINE
ACCESSORIES
Included accessories
After opening the box, check...
Users Manual - English - Page 10
...) This is being used. Design and position of thread. Do not cover the air vent while the sewing machine is used to manually raise and lower the needle.
t Handle Carry the sewing machine by its handle when transporting the machine.
8
j Handwheel This is used to raise and lower the presser foot. h Operation panel (page 10) This...
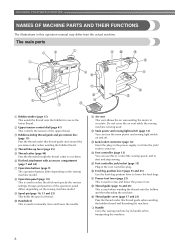
Users Manual - English - Page 11
....
1
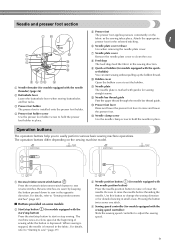
f Needle plate cover release Use when removing the needle plate cover. Attach the appropriate presser foot for models equipped with the needle position button) Press the needle position button to change the sewing direction or for models equipped with the quick- Needle and presser foot section
e Presser foot
The presser foot applies pressure consistently on the sewing machine model.
Users Manual - English - Page 15
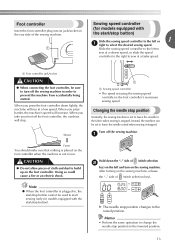
When you take your foot off the foot controller, the machine will increase. Instead, the machine can be set to select the desired sewing speed. After turning on the rear side of the sewing machine. Memo
• Perform the same operation to change the needle stop button). Sewing speed controller
(for models equipped with
the start /stop position to...
Users Manual - English - Page 16

... the "+" side of
(stitch width
b adjustment key) and turn on the sewing
machine. KNOWING YOUR SEWING MACHINE
Changing the initial needle position
Normally, the straight stitch (left needle position. Turn off the sewing machine. a
Hold down the "-" side of (stitch selection b key) on the left and turn on the sewing
machine. Memo
● Perform the same operation to the center...
Users Manual - English - Page 19
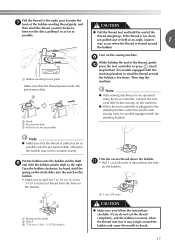
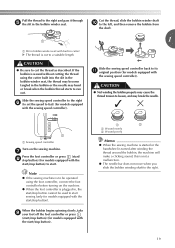
... 10 cm (2-3/4 to wind the thread around the bobbin and cause the needle to the right.
Pull the thread to start sewing (only for models equipped with the start /stop button cannot be used ...-winding thread guide
Make sure that the thread is wound around
the bobbin.
Note
● If the sewing machine is to be wound cleanly. b Hook c Pre-tension disk d Pull it in as far as possible...
Users Manual - English - Page 20
...
controller or press (start/stop button).
KNOWING YOUR SEWING MACHINE
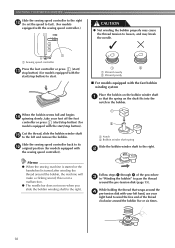
Slide the sewing speed controller to the right l (to set the speed to fast). (For models
equipped with the sewing speed controller.)
CAUTION
● Not winding the bobbin properly may break the needle.
Memo
● When the sewing machine is started or the handwheel is not a malfunction...
Users Manual - English - Page 21
... to loosen, and may break the needle. CAUTION
● Not winding the bobbin properly may bend or break when the bobbin thread starts to start /stop button) (for models equipped with the start sewing (only for models equipped with the sewing speed controller). Note
● If the sewing machine is wound without cutting the thread...
Users Manual - English - Page 22
... to be injured.
CAUTION
● Make sure you (counterclockwise) or
press (needle position button) (for models equipped with thread. • For more details on the needle plate cover. KNOWING YOUR SEWING MACHINE
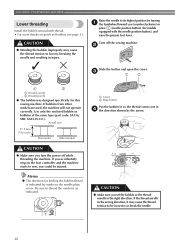
Lower threading
Install the bobbin wound with the needle position button), and raise the presser foot lever. b
Slide the button and open the...
Users Manual - English - Page 23
....
Put the left tab in the right direction.
c
1
2
1
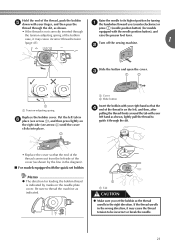
a Tension-adjusting spring
Replace the bobbin cover. Be sure to be incorrect or break the needle.
21 Turn off the sewing machine. a Cover b Slide button
Insert the bobbin with your right hand so that the end of the thread comes out from the left side...
Users Manual - English - Page 25
... (counterclockwise) so that the mark on the wheel points up before threading the sewing machine.
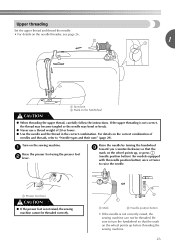
23 Upper threading
Set the upper thread and thread the needle. • For details on the needle threader, see page 26.
1
a Spool pin b Mark on the sewing machine.
a Presser foot lever
CAUTION
● If the presser foot is not correctly raised...
Users Manual - English - Page 26

...the thread unwinds to the front at the bottom.
KNOWING YOUR SEWING MACHINE
As shown, press down on the spool pin and cause the needle to break. Fully insert the spool for the spool being used...place, or is not positioned correctly, the thread may become tangled around the spool pin or the needle may break.
● Three spool cap sizes are available, allowing you to choose a spool ...
Users Manual - English - Page 28
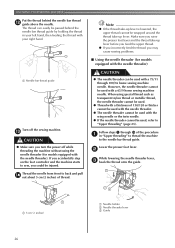
..., c hook the thread onto the guide. CAUTION
● The needle threader can easily be passed behind the needle bar thread l guide above the needle. Follow steps a through 100/16 home sewing machine needle.
a 5 cm (2 inches)
26
a Needle holder b Needle threader lever c Guide KNOWING YOUR SEWING MACHINE
Put the thread behind the needle bar thread guide by holding the thread in "Upper...
Users Manual - English - Page 30
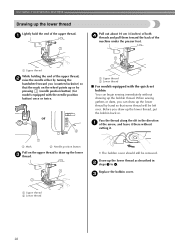
... slit in the direction a of the upper thread, b raise the needle either by turning the
handwheel toward the back of the upper thread. c
a Upper thread b Lower thread
28
KNOWING YOUR SEWING MACHINE
Drawing up the lower thread
Lightly hold the end of the
machine under the presser foot.
Before you (counterclockwise) so that some...
Users Manual - English - Page 35

... "Replacing the presser foot" (page 34).
"Selecting a stitch" (page 37).
• For details on the sewing machine. k For details on changing the presser foot, refer
to
left down in f the same way that can be sewn
with the twin needle, refer to "STITCH
SETTINGS" (page 79).
1
CAUTION
a Thread guide cover
• For details, refer...
Users Manual - English - Page 36
...
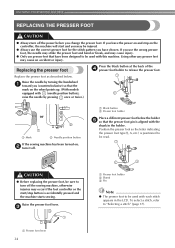
controller, the machine will start /stop button is aligned with this machine.
a Black button b Presser foot holder
Place a different presser foot below .
If you change the presser foot....
Raise the needle by pressing once or twice.)
or
a Mark
b Needle position button
If the sewing machine has been turned on, b turn it off. KNOWING YOUR SEWING MACHINE
REPLACING THE PRESSER...
Users Manual - English - Page 39
...34).
a
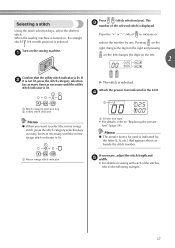
Press
(stitch selection keys). Pressing on the right changes the digit on the right and pressing
on the left changes the digit on sewing with each of to select the mirror image stitch, press the... length and e width.
• For details on the left needle position) is lit. When the sewing machine is turned on the sewing machine.
Attach the presser foot indicated in the LCD.
Users Manual - English - Page 44
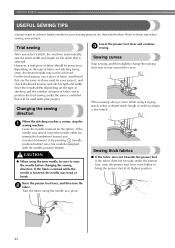
... of fabric should be used for your sewing projects are the same as a pivot. Changing the sewing direction
Sewing curves
Stop sewing, and then slightly change the sewing direction to these tips when sewing your project. If the needle was raised, lower the needle either by turning the handwheel toward you select a stitch, the machine automatically sets the stitch width and...
Users Manual - English - Page 91
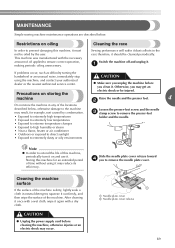
... the life of oil applied to ensure correct operation, making periodic oiling unnecessary. Restrictions on and use it must not be cleaned periodically. MAINTENANCE
Simple sewing machine maintenance operations are described below , otherwise damage to remove the needle plate cover. This machine was manufactured with a dry cloth.
Similar Questions

Which Needle Is Installed In Brother Xr1300 Sewing Machine
(Posted by intesksu 9 years ago)

Where Can I Find Bobbins For Brother's Sewing Machine Xr1300
(Posted by Jamjac 10 years ago)

Brother Ls 2000 Sewing Machine Price
I Want To Know Above Sewing Machine Price In Indian Rupees,please Anser Me Imediately
I Want To Know Above Sewing Machine Price In Indian Rupees,please Anser Me Imediately
(Posted by iladave84503 10 years ago)

How To Adjust Tension On Brother Sewing Machine Xr1300
(Posted by LotusALYS 10 years ago)

How To Change Needle Brother Sewing Machine Ce 5500 Prw
i lost my manual and do not know how to change the needle for a brother sewing machine CE 5500 PRW. ...
i lost my manual and do not know how to change the needle for a brother sewing machine CE 5500 PRW. ...
(Posted by giomariagina 11 years ago)