Users Manual - English
Page 6
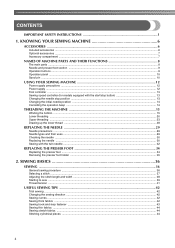
...13 Sewing speed controller (for models equipped with the start/stop button 13 Changing the needle stop position ...13 Changing the initial needle position ...14 Cancelling the operation beep ...14 THREADING THE MACHINE 15 Winding the bobbin ...15 Lower threading ...20 Upper threading ...23 Drawing up the lower thread ...28 REPLACING THE NEEDLE 29 Needle precautions ...29 Needle types and their uses ...29 Checking the needle ...30 Replacing the needle ...30 Sewing with the twin needle ...32 REPLACING THE PRESSER FOOT 34 Replacing the presser foot ...34 Removing the presser foot holder ...35...
...13 Sewing speed controller (for models equipped with the start/stop button 13 Changing the needle stop position ...13 Changing the initial needle position ...14 Cancelling the operation beep ...14 THREADING THE MACHINE 15 Winding the bobbin ...15 Lower threading ...20 Upper threading ...23 Drawing up the lower thread ...28 REPLACING THE NEEDLE 29 Needle precautions ...29 Needle types and their uses ...29 Checking the needle ...30 Replacing the needle ...30 Sewing with the twin needle ...32 REPLACING THE PRESSER FOOT 34 Replacing the presser foot ...34 Removing the presser foot holder ...35...
Users Manual - English
Page 8
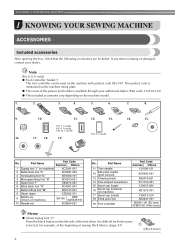
... Part Code Americas Others 1 Zigzag foot "J" (on machine) XC3021-031 2 Buttonhole foot "A" XC2691-033 3 Overcasting foot "G" XE6305-101 4 Monogramming foot "N" XD0810-031 5 Zipper foot "I" X59370-021 6 Blind stitch foot "R" XC4051-031 7 Button fitting foot "M" XE2137-001 8 Seam ripper XZ5082-001 9 Bobbin (4) (One is difficult for example, at the beginning of the presser foot holder is mentioned on the machine with product code 885-V67. Note (For U.S.A. Part Name 11 Twin needle 12 Ball point needle (gold colored) 13 Cleaning...
... Part Code Americas Others 1 Zigzag foot "J" (on machine) XC3021-031 2 Buttonhole foot "A" XC2691-033 3 Overcasting foot "G" XE6305-101 4 Monogramming foot "N" XD0810-031 5 Zipper foot "I" X59370-021 6 Blind stitch foot "R" XC4051-031 7 Button fitting foot "M" XE2137-001 8 Seam ripper XZ5082-001 9 Bobbin (4) (One is difficult for example, at the beginning of the presser foot holder is mentioned on the machine with product code 885-V67. Note (For U.S.A. Part Name 11 Twin needle 12 Ball point needle (gold colored) 13 Cleaning...
Users Manual - English
Page 10
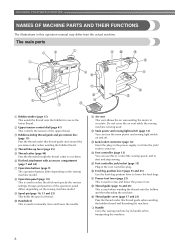
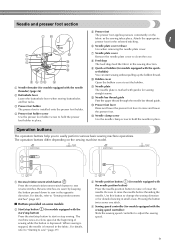
... This is used to lower the feed dogs. n Foot controller (page 13) You can turn the main power and sewing light switch on the sewing machine model. q Presser foot lever (page 23) This is used when winding the thread onto the bobbin and then threading the machine. The main parts a Bobbin winder (page 15) This winds the thread onto the bobbin for use this thread guide when winding the bobbin thread and threading the machine. f Flat bed attachment with accessory compartment (page 7 and 44) g Operation buttons (page 9) The operation buttons differ...
... This is used to lower the feed dogs. n Foot controller (page 13) You can turn the main power and sewing light switch on the sewing machine model. q Presser foot lever (page 23) This is used when winding the thread onto the bobbin and then threading the machine. The main parts a Bobbin winder (page 15) This winds the thread onto the bobbin for use this thread guide when winding the bobbin thread and threading the machine. f Flat bed attachment with accessory compartment (page 7 and 44) g Operation buttons (page 9) The operation buttons differ...
Users Manual - English
Page 11
... direction. j Bobbin cover Open the bobbin cover to set bobbin (for sewing straight seams. l Needle bar thread guide Pass the upper thread through the needle bar thread guide. The machine sews at a slow speed at the beginning of sewing while the button is installed onto the presser foot holder. g Needle plate cover Remove the needle plate cover to easily perform various basic sewing machine operations. d Presser foot holder screw Use the presser foot holder screw to raise or lower the needle. i Quick-set the bobbin. Operation buttons The operation buttons help you to clean...
... direction. j Bobbin cover Open the bobbin cover to set bobbin (for sewing straight seams. l Needle bar thread guide Pass the upper thread through the needle bar thread guide. The machine sews at a slow speed at the beginning of sewing while the button is installed onto the presser foot holder. g Needle plate cover Remove the needle plate cover to easily perform various basic sewing machine operations. d Presser foot holder screw Use the presser foot holder screw to raise or lower the needle. i Quick-set the bobbin. Operation buttons The operation buttons help you to clean...
Users Manual - English
Page 20
...; Not winding the bobbin properly may cause the thread tension to loosen, and may break the needle. b Follow steps a through g of the thread clockwise around the pre-tension disk (page 15). a Sewing speed controller Press the foot controller or press (start/ m stop button) (for models equipped with the start/stop button) to start /stop button). When the bobbin seems full and begins n spinning slowly, take your right hand to wind the free end...
...; Not winding the bobbin properly may cause the thread tension to loosen, and may break the needle. b Follow steps a through g of the thread clockwise around the pre-tension disk (page 15). a Sewing speed controller Press the foot controller or press (start/ m stop button) (for models equipped with the start/stop button) to start /stop button). When the bobbin seems full and begins n spinning slowly, take your right hand to wind the free end...
Users Manual - English
Page 22
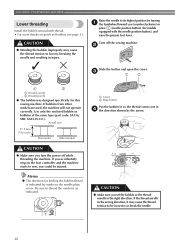
... quick-set the bobbin so the thread unrolls in injury. Raise the needle to loosen, breaking the needle and resulting in the right direction. If you could be incorrect or break the needle. 20 If bobbins from other models are used, the machine will not operate correctly. KNOWING YOUR SEWING MACHINE Lower threading Install the bobbin wound with the needle position button), and raise the presser foot lever. CAUTION ● Winding the bobbin improperly may cause the thread tension to thread the machine...
... quick-set the bobbin so the thread unrolls in injury. Raise the needle to loosen, breaking the needle and resulting in the right direction. If you could be incorrect or break the needle. 20 If bobbins from other models are used, the machine will not operate correctly. KNOWING YOUR SEWING MACHINE Lower threading Install the bobbin wound with the needle position button), and raise the presser foot lever. CAUTION ● Winding the bobbin improperly may cause the thread tension to thread the machine...
Users Manual - English
Page 23
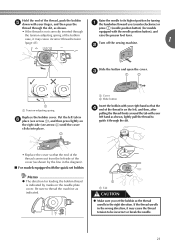
... the Raise the needle to thread the machine as shown. Hold the end of the thread, push the bobbin e down with the needle position button), and the tension-adjusting spring of the cover (as shown by the line in the diagram). ■ For models equipped with the quick-set the bobbin so the thread unrolls in the right direction. b Slide the button and open the cover. c 1 2 1 a Tension-adjusting spring Replace the bobbin cover. If the thread unrolls in f place...
... the Raise the needle to thread the machine as shown. Hold the end of the thread, push the bobbin e down with the needle position button), and the tension-adjusting spring of the cover (as shown by the line in the diagram). ■ For models equipped with the quick-set the bobbin so the thread unrolls in the right direction. b Slide the button and open the cover. c 1 2 1 a Tension-adjusting spring Replace the bobbin cover. If the thread unrolls in f place...
Users Manual - English
Page 28
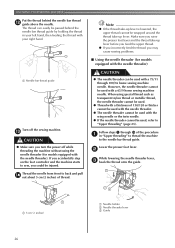
... lever. Lower the presser foot lever. Make sure you raise the presser foot lever and the thread take -up lever before you feed the upper thread. ● If you incorrectly feed the thread you may cause sewing problems. ■ Using the needle threader (for models equipped with the needle threader). m CAUTION ● Make sure you could be used, refer to the needle bar thread guide. If you accidentally step on the foot controller and the machine starts to sew, you turn the power off the sewing machine. When using...
... lever. Lower the presser foot lever. Make sure you raise the presser foot lever and the thread take -up lever before you feed the upper thread. ● If you incorrectly feed the thread you may cause sewing problems. ■ Using the needle threader (for models equipped with the needle threader). m CAUTION ● Make sure you could be used, refer to the needle bar thread guide. If you accidentally step on the foot controller and the machine starts to sew, you turn the power off the sewing machine. When using...

Users Manual - English
Page 35
... of "Upper threading" (page 23). Attach zigzag foot "J". If this occurs, increase the stitch length. CAUTION ● When changing the sewing direction, be damaged. ● Do not try turning the fabric with a needle threader ● You cannot use the needle threader to attach zigzag foot "J", otherwise the needle may break or the machine may be damaged. 33 If the needle hits the presser foot, the needle may damage the machine. CAUTION ● When using the twin needle, the stitches may become...
... of "Upper threading" (page 23). Attach zigzag foot "J". If this occurs, increase the stitch length. CAUTION ● When changing the sewing direction, be damaged. ● Do not try turning the fabric with a needle threader ● You cannot use the needle threader to attach zigzag foot "J", otherwise the needle may break or the machine may be damaged. 33 If the needle hits the presser foot, the needle may damage the machine. CAUTION ● When using the twin needle, the stitches may become...
Users Manual - English
Page 45
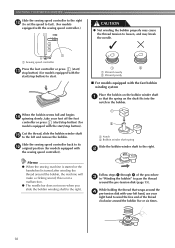
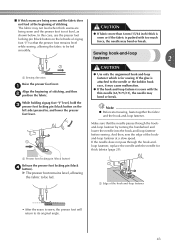
... the beginning of stitching The fabric may bend or break. In this case, use the presser foot locking pin (black button on the left side of zigzag foot "J") so that the needle passes through the hook-andloop fastener, replace the needle with the thin needle (65/9-75/11), the needle may not feed when thick seams are being sewn and the fabric does not feed at a slow speed. Sewing hook-and-loop fastener 2 a Sewing direction Raise the presser foot lever.
... the beginning of stitching The fabric may bend or break. In this case, use the presser foot locking pin (black button on the left side of zigzag foot "J") so that the needle passes through the hook-andloop fastener, replace the needle with the thin needle (65/9-75/11), the needle may not feed when thick seams are being sewn and the fabric does not feed at a slow speed. Sewing hook-and-loop fastener 2 a Sewing direction Raise the presser foot lever.
Users Manual - English
Page 54
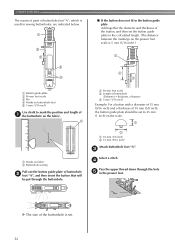
... a stitch. A X The size of the buttonhole is 5 mm (3/16 inch).) 1 3 4 A a Button guide plate b Presser foot scale c Pin d Marks on buttonhole foot e 5 mm (3/16 inch) Use chalk to mark the position and length of a the buttonhole on the fabric. 2 1 a Marks on fabric b Buttonhole sewing Pull out the button guide plate of buttonhole b foot "A", and then insert the button that will be set . 52 d Pass the upper thread down through the buttonhole. 2 3 a Presser foot scale b Length of buttonhole (Diameter + thickness of button) c 5 mm (3/16 inch) Example: For a button...
... a stitch. A X The size of the buttonhole is 5 mm (3/16 inch).) 1 3 4 A a Button guide plate b Presser foot scale c Pin d Marks on buttonhole foot e 5 mm (3/16 inch) Use chalk to mark the position and length of a the buttonhole on the fabric. 2 1 a Marks on fabric b Buttonhole sewing Pull out the button guide plate of buttonhole b foot "A", and then insert the button that will be set . 52 d Pass the upper thread down through the buttonhole. 2 3 a Presser foot scale b Length of buttonhole (Diameter + thickness of button) c 5 mm (3/16 inch) Example: For a button...
Users Manual - English
Page 57
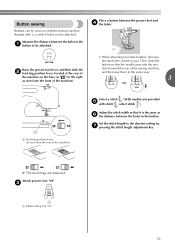
X The feed dogs are lowered. Measure the distance between the presser foot and d the fabric. Attach presser foot "M". Raise the presser foot lever, and then slide the b feed dog position lever, located at the rear of the machine on with 4 holes can be sewn on the base, to (to the right as seen from the rear of the machine) Select a stitch . (With models not provided e with stitch , select stitch .) Adjust the stitch width so that it...
X The feed dogs are lowered. Measure the distance between the presser foot and d the fabric. Attach presser foot "M". Raise the presser foot lever, and then slide the b feed dog position lever, located at the rear of the machine on with 4 holes can be sewn on the base, to (to the right as seen from the rear of the machine) Select a stitch . (With models not provided e with stitch , select stitch .) Adjust the stitch width so that it...
Users Manual - English
Page 65
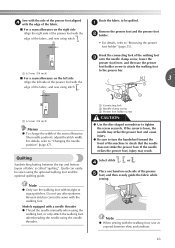
... Baste the fabric to the presser bar. ■ For a seam allowance on the left side 3 Align the left side of the presser foot with a needle threader ● Thread the needle manually when using the walking foot, or only attach the walking foot after threading the needle using the optional walking foot and the optional quilting guide. a Connecting fork b Needle clamp screw c Presser foot holder screw CAUTION ● Use the disc-shaped screwdriver to "Changing the needle position" (page 47). Select stitch , or . Note ● When sewing with straight or zigzag stitches. a Remove...
... Baste the fabric to the presser bar. ■ For a seam allowance on the left side 3 Align the left side of the presser foot with a needle threader ● Thread the needle manually when using the walking foot, or only attach the walking foot after threading the needle using the optional walking foot and the optional quilting guide. a Connecting fork b Needle clamp screw c Presser foot holder screw CAUTION ● Use the disc-shaped screwdriver to "Changing the needle position" (page 47). Select stitch , or . Note ● When sewing with straight or zigzag stitches. a Remove...
Users Manual - English
Page 104
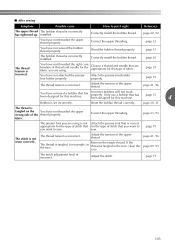
... service center. page 15 102 left. Correct the upper threading. Use the disc-shaped screwdriver to firmly tighten the screw. Replace the presser foot. Replace the bobbin case. Use the foot controller properly. page 97 The spool or spool cap is incorrectly installed. Turn on the main power switch. button was not threaded correctly. page 39 The start /stop button. page 30 The needle clamp screw is connected. Lightly guide the fabric. - page 39 Fabric being sewn with the start...
... service center. page 15 102 left. Correct the upper threading. Use the disc-shaped screwdriver to firmly tighten the screw. Replace the presser foot. Replace the bobbin case. Use the foot controller properly. page 97 The spool or spool cap is incorrectly installed. Turn on the main power switch. button was not threaded correctly. page 39 The start /stop button. page 30 The needle clamp screw is connected. Lightly guide the fabric. - page 39 Fabric being sewn with the start...
Users Manual - English
Page 105
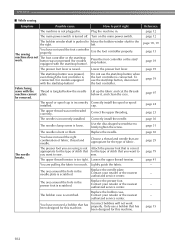
... 30 The needle is too tight. Replace the presser foot. Replace the bobbin case. Reset the bobbin thread correctly. Shorten the stitch length, or sew with the stabilizer material under the fabric. Sew with stabilizer material under the fabric. Remove any knots or tangles. - You have not used the right combination of fabric, thread and needle. Thread the upper thread and wind the bobbin thread properly. Choose a thread and needle that best fits the size of the needle Correct the upper threading. Symptom...
... 30 The needle is too tight. Replace the presser foot. Replace the bobbin case. Reset the bobbin thread correctly. Shorten the stitch length, or sew with the stabilizer material under the fabric. Sew with stabilizer material under the fabric. Remove any knots or tangles. - You have not used the right combination of fabric, thread and needle. Thread the upper thread and wind the bobbin thread properly. Choose a thread and needle that best fits the size of the needle Correct the upper threading. Symptom...
Users Manual - English
Page 106
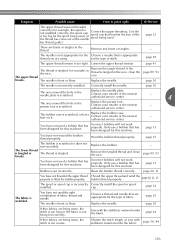
... of fabric, thread and needle. Adjust the tension of stitching. page 89 Dust has built up in the feed dogs or Remove the needle plate cover and in the opposite direction. clean the plate and the race. Use the presser foot locking pin (black button on the left side) on a thick seam at the beginning of the upper thread. APPENDIX Symptom The fabric is damaged. Lengthen the stitch length. page 43 The feed mechanism is wrinkled. Stitches are lowered. Possible...
... of fabric, thread and needle. Adjust the tension of stitching. page 89 Dust has built up in the feed dogs or Remove the needle plate cover and in the opposite direction. clean the plate and the race. Use the presser foot locking pin (black button on the left side) on a thick seam at the beginning of the upper thread. APPENDIX Symptom The fabric is damaged. Lengthen the stitch length. page 43 The feed mechanism is wrinkled. Stitches are lowered. Possible...
Users Manual - English
Page 107
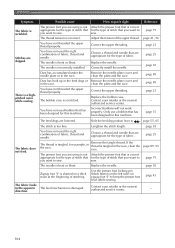
... the upper threading. page 23 You have not attached the presser- Wind the bobbin thread properly. Correctly install the bobbin thread. page 15 page 20 The thread tension is set incorrectly. Adjust the tension of stitch that has been designed for this machine. page 15 4 Bobbin is incorrect. Correct the upper threading. The thread tension is incorrect. page 41, 96 The thread is incorrectly has tightened up. Adjust the stitch. Attach the presser-foot holder foot holder properly. The thread tension is incorrect. Only use a bobbin...
... the upper threading. page 23 You have not attached the presser- Wind the bobbin thread properly. Correctly install the bobbin thread. page 15 page 20 The thread tension is set incorrectly. Adjust the tension of stitch that has been designed for this machine. page 15 4 Bobbin is incorrect. Correct the upper threading. The thread tension is incorrect. page 41, 96 The thread is incorrectly has tightened up. Adjust the stitch. Attach the presser-foot holder foot holder properly. The thread tension is incorrect. Only use a bobbin...
Users Manual - English
Page 108
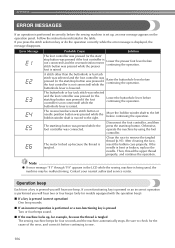
... and the foot controller was pressed (or the start / stop button was pressed if the foot controller is lowered. The motor locked up because the thread is not connected) while the Lower the buttonhole lever before continuing the operation. After cleaning the race, insert the bobbin case properly. Then, thread the upper thread properly, and continue the operation. The reverse/reinforcement stitch button or needle position button was pressed if the foot controller is tangled. Otherwise, operate the machine by using the foot controller. If...
... and the foot controller was pressed (or the start / stop button was pressed if the foot controller is lowered. The motor locked up because the thread is not connected) while the Lower the buttonhole lever before continuing the operation. After cleaning the race, insert the bobbin case properly. Then, thread the upper thread properly, and continue the operation. The reverse/reinforcement stitch button or needle position button was pressed if the foot controller is tangled. Otherwise, operate the machine by using the foot controller. If...
Users Manual - English
Page 109
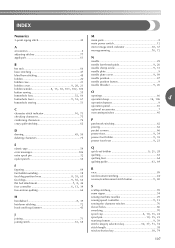
... main parts 8 A accessories 6 main power switch 12 , mirror image stitch indicator 10 37 , monogramming 70 72 adjusting stitches 77 appliqués 61 N needle 29 B bar tack 66 , needle bar thread guide 9 26 , needle clamp screw 9 31 basic stitching 47 blind hem stitching 48 needle plate 9 , needle plate cover 9 89 bobbin 20 needle position 47 bobbin case 21 bobbin , cover 9 20, 21 needle position button 9 , needle threader 9 26 bobbin winder 8, 15, 18, 101, 102, 106 button sewing 55 O , buttonhole foot 52 66 buttonhole , lever 9 53, 67 openings 66...
... main parts 8 A accessories 6 main power switch 12 , mirror image stitch indicator 10 37 , monogramming 70 72 adjusting stitches 77 appliqués 61 N needle 29 B bar tack 66 , needle bar thread guide 9 26 , needle clamp screw 9 31 basic stitching 47 blind hem stitching 48 needle plate 9 , needle plate cover 9 89 bobbin 20 needle position 47 bobbin case 21 bobbin , cover 9 20, 21 needle position button 9 , needle threader 9 26 bobbin winder 8, 15, 18, 101, 102, 106 button sewing 55 O , buttonhole foot 52 66 buttonhole , lever 9 53, 67 openings 66...
Quick Setup Guide Multi - English and Spanish
Page 1
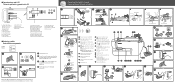
... bobbin to be used 3 Stitch length (mm) 4 Stitch width (mm) 2 Stitch selection keys 3 Stitch length adjustment key 4 Stitch width adjustment key 5 Mirror image stitch indicator 6 Utility stitch indicator 7 Stitch category selection key 8 Sewing speed controller 9 Needle position button 0 Reverse/reinforcement stitch button A Start/stop button) to the right. Pull the thread firmly around the tab. Consultar el manual de instrucciones detalladas acerca de la costura. d Turn the power off the foot controller or press (start/stop button) to stop. 4 1 Pass the thread under the thread...
... bobbin to be used 3 Stitch length (mm) 4 Stitch width (mm) 2 Stitch selection keys 3 Stitch length adjustment key 4 Stitch width adjustment key 5 Mirror image stitch indicator 6 Utility stitch indicator 7 Stitch category selection key 8 Sewing speed controller 9 Needle position button 0 Reverse/reinforcement stitch button A Start/stop button) to the right. Pull the thread firmly around the tab. Consultar el manual de instrucciones detalladas acerca de la costura. d Turn the power off the foot controller or press (start/stop button) to stop. 4 1 Pass the thread under the thread...


