
Users Manual - English
Page 1
Operation Manual Sewing Machine Product Code: 885-V67 KNOWING YOUR SEWING MACHINE SEWING BASICS UTILITY STITCHES APPENDIX Please visit us at http://solutions.brother.com where you can get product support and answers to frequently asked questions (FAQs).
Operation Manual Sewing Machine Product Code: 885-V67 KNOWING YOUR SEWING MACHINE SEWING BASICS UTILITY STITCHES APPENDIX Please visit us at http://solutions.brother.com where you can get product support and answers to frequently asked questions (FAQs).
Users Manual - English
Page 6
...Needle and presser foot section ...9 Operation buttons ...9 Operation panel ...10 Spool pin ...10 USING YOUR SEWING MACHINE 12 Power supply precautions ...12 Power supply ...12 Foot controller ...13 Sewing speed controller (for models equipped with the start/stop button 13 Changing the needle stop position ......13 Changing the initial needle position ...14 Cancelling the operation beep ...14 THREADING THE MACHINE 15 Winding the bobbin ...15 Lower...
...Needle and presser foot section ...9 Operation buttons ...9 Operation panel ...10 Spool pin ...10 USING YOUR SEWING MACHINE 12 Power supply precautions ...12 Power supply ...12 Foot controller ...13 Sewing speed controller (for models equipped with the start/stop button 13 Changing the needle stop position ......13 Changing the initial needle position ...14 Cancelling the operation beep ...14 THREADING THE MACHINE 15 Winding the bobbin ...15 Lower...
Users Manual - English
Page 8
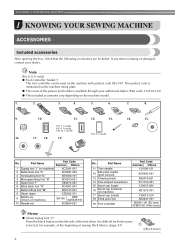
..., at the beginning of the presser foot holder is on the machine rating plate. ● The screw of sewing thick fabrics. (page 43) aBlack button 6 Part Name Part Code Americas Others 1 Zigzag foot "J" (on machine) 17 Spool cap (small) 18 Extra spool pin 19 Foot controller... "R" XC4051-031 7 Button fitting foot "M" XE2137-001 8 Seam ripper XZ5082-001 9 Bobbin (4) (One is available through your dealer. KNOWING YOUR SEWING MACHINE 1 KNOWING YOUR SEWING MACHINE ACCESSORIES Included accessories After opening the box, check that the following accessories are included.
..., at the beginning of the presser foot holder is on the machine rating plate. ● The screw of sewing thick fabrics. (page 43) aBlack button 6 Part Name Part Code Americas Others 1 Zigzag foot "J" (on machine) 17 Spool cap (small) 18 Extra spool pin 19 Foot controller... "R" XC4051-031 7 Button fitting foot "M" XE2137-001 8 Seam ripper XZ5082-001 9 Bobbin (4) (One is available through your dealer. KNOWING YOUR SEWING MACHINE 1 KNOWING YOUR SEWING MACHINE ACCESSORIES Included accessories After opening the box, check that the following accessories are included.
Users Manual - English
Page 10
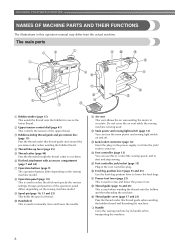
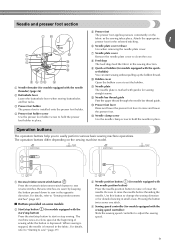
... Use the feed dog position lever to raise and lower the presser foot. Design and position of the operation panel differs depending on the sewing machine model. r Thread guide (page 16 and 25) This is being used to lower the feed dogs. c Bobbin-winding thread guide and... circulate. f Flat bed attachment with accessory compartment (page 7 and 44) g Operation buttons (page 9) The operation buttons differ depending on the sewing machine model. The main parts a Bobbin winder (page 15) This winds the thread onto the bobbin for use this operation manual may differ from the...
... Use the feed dog position lever to raise and lower the presser foot. Design and position of the operation panel differs depending on the sewing machine model. r Thread guide (page 16 and 25) This is being used to lower the feed dogs. c Bobbin-winding thread guide and... circulate. f Flat bed attachment with accessory compartment (page 7 and 44) g Operation buttons (page 9) The operation buttons differ depending on the sewing machine model. The main parts a Bobbin winder (page 15) This winds the thread onto the bobbin for use this operation manual may differ from the...
Users Manual - English
Page 11
...buttons differ depending on the fabric as the sewing takes place. Reverse stitches are sewn by keeping the button pressed down to easily perform various basic sewing machine operations. The machine sews at a slow speed at the beginning of sewing while the button is installed onto the ...presser foot holder. Be sure to sew reverse stitches. Pressing the button twice sews one stitch. n Needle clamp screw ...
...buttons differ depending on the fabric as the sewing takes place. Reverse stitches are sewn by keeping the button pressed down to easily perform various basic sewing machine operations. The machine sews at a slow speed at the beginning of sewing while the button is installed onto the ...presser foot holder. Be sure to sew reverse stitches. Pressing the button twice sews one stitch. n Needle clamp screw ...
Users Manual - English
Page 12
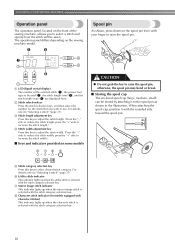
...character stitches) This indicator lights up when the mirror image stitch is selected with the rounded side toward the spool pin. KNOWING YOUR SEWING MACHINE Operation panel The operation panel, located on the front of the selected stitch (1), the presser foot type to the spool pin as ...shown in the illustration. a LCD (liquid crystal display) The number of the sewing machine, allows you wish to select a stitch and specify how the stitch will be used (2), the stitch length (mm) (3), and the stitch width (mm...
...character stitches) This indicator lights up when the mirror image stitch is selected with the rounded side toward the spool pin. KNOWING YOUR SEWING MACHINE Operation panel The operation panel, located on the front of the selected stitch (1), the presser foot type to the spool pin as ...shown in the illustration. a LCD (liquid crystal display) The number of the sewing machine, allows you wish to select a stitch and specify how the stitch will be used (2), the stitch length (mm) (3), and the stitch width (mm...
Users Manual - English
Page 13
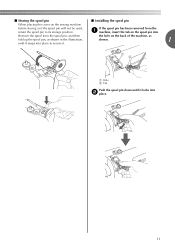
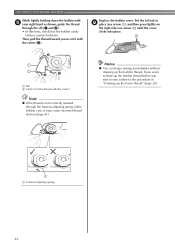
If the spool pin has been removed from the a machine, insert the tab on the spool pin into b place. 11 ■ Storing the spool pin ■ Installing the spool pin When placing the cover on the back of the machine, as fold up the spool pin, as shown in the illustration, shown. 1 until it . a Hole b Tab Push the spool pin down until it snaps into place to secure it locks into Remove the spool from the spool pin, and then the hole on the sewing machine before storing or if the spool pin will not be used, return the spool pin to its storage position.
If the spool pin has been removed from the a machine, insert the tab on the spool pin into b place. 11 ■ Storing the spool pin ■ Installing the spool pin When placing the cover on the back of the machine, as fold up the spool pin, as shown in the illustration, shown. 1 until it . a Hole b Tab Push the spool pin down until it snaps into place to secure it locks into Remove the spool from the spool pin, and then the hole on the sewing machine before storing or if the spool pin will not be used, return the spool pin to its storage position.
Users Manual - English
Page 14
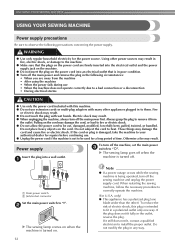
... modified, forcefully bent, pulled, twisted, or bundled. These things may result. ● When unplugging the machine, always turn off the main power first. When restarting the sewing machine, follow the necessary procedure to remove it still does not fit, contact a qualified electrician to observe the following...precautions Be sure to install the proper outlet. Note ● If a power outage occurs while the sewing machine is in poor condition. ● Turn off the sewing machine and unplug the power supply cord. To reduce the risk of time. Electric shock may damage the ...
... modified, forcefully bent, pulled, twisted, or bundled. These things may result. ● When unplugging the machine, always turn off the main power first. When restarting the sewing machine, follow the necessary procedure to remove it still does not fit, contact a qualified electrician to observe the following...precautions Be sure to install the proper outlet. Note ● If a power outage occurs while the sewing machine is in poor condition. ● Turn off the sewing machine and unplug the power supply cord. To reduce the risk of time. Electric shock may damage the ...
Users Manual - English
Page 15
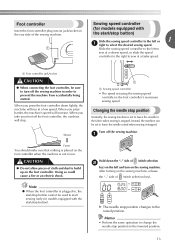
... is plugged in, the start/stop button cannot be sure to turn on the sewing machine, release the "-" side of cloth and dust to sew at a low speed. After turning on the sewing machine. Memo • Perform the same operation to change the needle stop button) Slide...stop position Normally, the sewing machine is set using the sewing speed controller is the foot controller's maximum sewing speed. Slide the sewing speed controller to the left and turn off the sewing machine in order to the raised position. When you take your foot off the sewing machine. CAUTION ● Do...
... is plugged in, the start/stop button cannot be sure to turn on the sewing machine, release the "-" side of cloth and dust to sew at a low speed. After turning on the sewing machine. Memo • Perform the same operation to change the needle stop button) Slide...stop position Normally, the sewing machine is set using the sewing speed controller is the foot controller's maximum sewing speed. Slide the sewing speed controller to the left and turn off the sewing machine in order to the raised position. When you take your foot off the sewing machine. CAUTION ● Do...

Users Manual - English
Page 16
... (stitch width b adjustment key) and turn on the sewing machine, release the "+" side of (stitch selection key). After turning on the sewing machine. KNOWING YOUR SEWING MACHINE Changing the initial needle position Normally, the straight stitch (left needle position) is automatically selected when the sewing machine is turned on the sewing machine, release the "-" side of (stitch width adjustment key...
... (stitch width b adjustment key) and turn on the sewing machine, release the "+" side of (stitch selection key). After turning on the sewing machine. KNOWING YOUR SEWING MACHINE Changing the initial needle position Normally, the straight stitch (left needle position) is automatically selected when the sewing machine is turned on the sewing machine, release the "-" side of (stitch width adjustment key...
Users Manual - English
Page 17
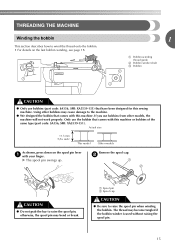
... may become tangled if the bobbin winder is used without raising the spool pin. 15 The thread may bend or break. Using other models, the machine will not work properly. X The spool pin swings up. a Spool pin b Spool cap CAUTION ● Be sure to raise the spool pin when... use bobbins (part code: SA156, SFB: XA5539-151) that have been designed for this sewing machine. If you use the bobbin that comes with this machine. Only use bobbins from other bobbins may cause damage to the machine. ● We designed the bobbin that comes with your finger. Remove the spool cap. ...
... may become tangled if the bobbin winder is used without raising the spool pin. 15 The thread may bend or break. Using other models, the machine will not work properly. X The spool pin swings up. a Spool pin b Spool cap CAUTION ● Be sure to raise the spool pin when... use bobbins (part code: SA156, SFB: XA5539-151) that have been designed for this sewing machine. If you use the bobbin that comes with this machine. Only use bobbins from other bobbins may cause damage to the machine. ● We designed the bobbin that comes with your finger. Remove the spool cap. ...
Users Manual - English
Page 18
... onto the spool pin as far as possible to the right so that is too small for the bobbin c onto the spool pin. KNOWING YOUR SEWING MACHINE Fully insert the spool of spool being used . a Thread guide Pass the thread under the thread guide. If the spool cap is pulled out, and... under the thread guide cover f from the back to the front at the bottom. Memo ● When sewing with your right hand so that there is no slack in the spool or the machine may catch on the slit in the thread that the spool is not positioned correctly, the thread may...
... onto the spool pin as far as possible to the right so that is too small for the bobbin c onto the spool pin. KNOWING YOUR SEWING MACHINE Fully insert the spool of spool being used . a Thread guide Pass the thread under the thread guide. If the spool cap is pulled out, and... under the thread guide cover f from the back to the front at the bottom. Memo ● When sewing with your right hand so that there is no slack in the spool or the machine may catch on the slit in the thread that the spool is not positioned correctly, the thread may...
Users Manual - English
Page 19
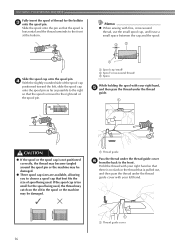
...1 may occur when the thread is plugged in, the start/stop button cannot be used to start sewing (only for models equipped with the start /stop button) to wind the thread around the bobbin a...around the bobbin and cause the needle to break. 17 Note ● If the sewing machine is to be wound cleanly. Note ● Make sure that the thread passes under ... sure to pull out 7 to 10 cm (2-3/4 to 3-15/16 inches) of thread from the hole on the sewing machine. Then stop button). If you follow the instructions carefully. Turn the bobbin clockwise, by hand, until the spring on...
...1 may occur when the thread is plugged in, the start/stop button cannot be used to start sewing (only for models equipped with the start /stop button) to wind the thread around the bobbin a...around the bobbin and cause the needle to break. 17 Note ● If the sewing machine is to be wound cleanly. Note ● Make sure that the thread passes under ... sure to pull out 7 to 10 cm (2-3/4 to 3-15/16 inches) of thread from the hole on the sewing machine. Then stop button). If you follow the instructions carefully. Turn the bobbin clockwise, by hand, until the spring on...
Users Manual - English
Page 20
KNOWING YOUR SEWING MACHINE Slide the sewing speed controller to the right l (to set the speed to fast). (For models equipped with the sewing speed controller.) CAUTION ● Not winding the bobbin properly may break the needle. Cut the thread, slide the bobbin winder shaft o to ... controller back to the right. this is turned after winding the thread around the d pre-tension disk with the sewing speed controller). Memo ● When the sewing machine is started or the handwheel is not a malfunction. ● The needle bar does not move when you slide the bobbin winding shaft to...
KNOWING YOUR SEWING MACHINE Slide the sewing speed controller to the right l (to set the speed to fast). (For models equipped with the sewing speed controller.) CAUTION ● Not winding the bobbin properly may break the needle. Cut the thread, slide the bobbin winder shaft o to ... controller back to the right. this is turned after winding the thread around the d pre-tension disk with the sewing speed controller). Memo ● When the sewing machine is started or the handwheel is not a malfunction. ● The needle bar does not move when you slide the bobbin winding shaft to...
Users Manual - English
Page 21
...turned after winding the thread around the bobbin, the machine will make a clicking sound; Slide the sewing speed controller back to start sewing (only for models equipped with the sewing speed controller). Note ● If the sewing machine is to be used to its k original position (...without cutting the thread using the foot controller, connect the foot controller before turning on the sewing machine. CAUTION ● Be sure to cut to start /stop button) (for models equipped with the sewing speed controller). g Press the foot controller or press (start/ h stop button). 1 ...
...turned after winding the thread around the bobbin, the machine will make a clicking sound; Slide the sewing speed controller back to start sewing (only for models equipped with the sewing speed controller). Note ● If the sewing machine is to be used to its k original position (...without cutting the thread using the foot controller, connect the foot controller before turning on the sewing machine. CAUTION ● Be sure to cut to start /stop button) (for models equipped with the sewing speed controller). g Press the foot controller or press (start/ h stop button). 1 ...
Users Manual - English
Page 22
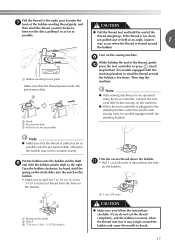
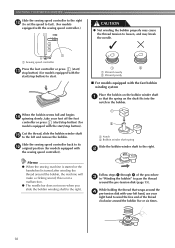
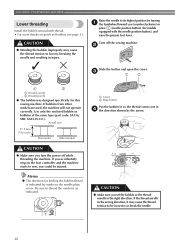
... Other models CAUTION ● Make sure you set bobbin, see page 21. If the thread unrolls in the right direction. KNOWING YOUR SEWING MACHINE Lower threading Install the bobbin wound with the needle position button), and raise the presser foot lever. Use only the enclosed bobbin or bobbins...so the thread unrolls in the wrong direction, it may cause the thread tension to be injured. Memo ● The direction for this sewing machine. Be sure to its highest position by the arrow. CAUTION ● Winding the bobbin improperly may cause the thread tension to loosen, breaking...
... Other models CAUTION ● Make sure you set bobbin, see page 21. If the thread unrolls in the right direction. KNOWING YOUR SEWING MACHINE Lower threading Install the bobbin wound with the needle position button), and raise the presser foot lever. Use only the enclosed bobbin or bobbins...so the thread unrolls in the wrong direction, it may cause the thread tension to be injured. Memo ● The direction for this sewing machine. Be sure to its highest position by the arrow. CAUTION ● Winding the bobbin improperly may cause the thread tension to loosen, breaking...
Users Manual - English
Page 23
... thread unrolls in f place (see arrow a), and then press lightly on the right side (see arrow b) until the cover clicks into place. Turn off the sewing machine. Put the left side of the cover (as indicated. b Slide the button and open the cover. Be sure to thread the... machine as shown by the line in the wrong direction, it may cause the thread tension to be incorrect or break the needle. 21 case, it ...
... thread unrolls in f place (see arrow a), and then press lightly on the right side (see arrow b) until the cover clicks into place. Turn off the sewing machine. Put the left side of the cover (as indicated. b Slide the button and open the cover. Be sure to thread the... machine as shown by the line in the wrong direction, it may cause the thread tension to be incorrect or break the needle. 21 case, it ...
Users Manual - English
Page 24
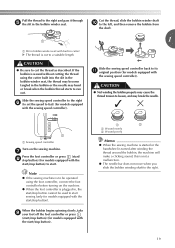
Put the left tab in "Drawing up the bobbin thread. Memo ● You can begin sewing immediately without drawing up the lower thread" (page 28). 1 a Tension-adjusting spring 22 If you want to draw up the bobbin thread before you to ... arrow b) until the cover clicks into place. Replace the bobbin cover. Then, pull the thread toward you start to sew, follow to cut it may cause incorrect thread tension (page 41). KNOWING YOUR SEWING MACHINE While lightly holding down the bobbin with the cutter (c). a Slit b Cutter (Cut the thread with the cutter.) Note...
Put the left tab in "Drawing up the bobbin thread. Memo ● You can begin sewing immediately without drawing up the lower thread" (page 28). 1 a Tension-adjusting spring 22 If you want to draw up the bobbin thread before you to ... arrow b) until the cover clicks into place. Replace the bobbin cover. Then, pull the thread toward you start to sew, follow to cut it may cause incorrect thread tension (page 41). KNOWING YOUR SEWING MACHINE While lightly holding down the bobbin with the cutter (c). a Slit b Cutter (Cut the thread with the cutter.) Note...
Users Manual - English
Page 25
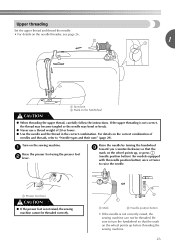
...the needle. • For details on the needle threader, see page 26. 1 a Spool pin b Mark on the sewing machine. For details on the wheel points up before threading the sewing machine. 23 a Raise the presser foot using the presser foot b lever. Be sure to raise the needle. a Presser ...foot lever CAUTION ● If the presser foot is not correctly raised, the sewing machine can not be threaded correctly. Raise the needle by turning the handwheel c toward you (counterclockwise) so that the mark on the wheel points up...
...the needle. • For details on the needle threader, see page 26. 1 a Spool pin b Mark on the sewing machine. For details on the wheel points up before threading the sewing machine. 23 a Raise the presser foot using the presser foot b lever. Be sure to raise the needle. a Presser ...foot lever CAUTION ● If the presser foot is not correctly raised, the sewing machine can not be threaded correctly. Raise the needle by turning the handwheel c toward you (counterclockwise) so that the mark on the wheel points up...

Users Manual - English
Page 26
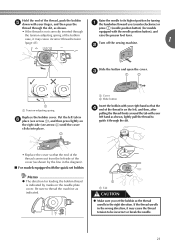
KNOWING YOUR SEWING MACHINE As shown, press down on the slit in the wrong place, or is set incorrectly, the thread may bend or break. X The spool pin swings ...
KNOWING YOUR SEWING MACHINE As shown, press down on the slit in the wrong place, or is set incorrectly, the thread may bend or break. X The spool pin swings ...


