Users Manual - English
Page 6
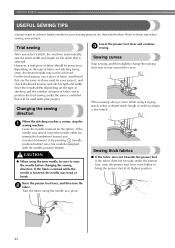
SEWING BASICS 36 SEWING ...36 General sewing procedure ...36 Selecting a stitch ...37 Adjusting the stitch length and width ...38 Starting to sew ...39 Thread tension ...41 USEFUL SEWING TIPS ...42 Trial sewing ...42 Changing the sewing direction ...42 Sewing curves ...42 Sewing thick fabrics ...42 Sewing hook-and-loop fastener ......
SEWING BASICS 36 SEWING ...36 General sewing procedure ...36 Selecting a stitch ...37 Adjusting the stitch length and width ...38 Starting to sew ...39 Thread tension ...41 USEFUL SEWING TIPS ...42 Trial sewing ...42 Changing the sewing direction ...42 Sewing curves ...42 Sewing thick fabrics ...42 Sewing hook-and-loop fastener ......
Users Manual - English
Page 7
... Cleaning the race ...89 TROUBLESHOOTING ...92 Frequent troubleshooting topics ...92 Upper thread tightened up ...92 Tangled thread on wrong side of fabric ...93 Incorrect thread tension ...96 Fabric is caught in the machine and cannot be removed 97 List of symptoms ...101 ERROR MESSAGES ...106 Operation beep ...106 INDEX ...107 5
... Cleaning the race ...89 TROUBLESHOOTING ...92 Frequent troubleshooting topics ...92 Upper thread tightened up ...92 Tangled thread on wrong side of fabric ...93 Incorrect thread tension ...96 Fabric is caught in the machine and cannot be removed 97 List of symptoms ...101 ERROR MESSAGES ...106 Operation beep ...106 INDEX ...107 5
Users Manual - English
Page 10
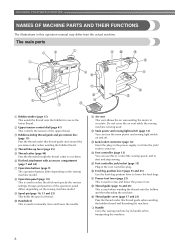
KNOWING YOUR SEWING MACHINE NAMES OF MACHINE PARTS AND THEIR FUNCTIONS The illustrations in the foot controller plug. c Bobbin-winding thread guide and pre-tension disc (page 15) Pass the thread under this to control the sewing speed, and to lower the feed dogs. i Spool pin (page 10,...s Thread guide cover (page 17 and 23) Pass the thread under this operation manual may differ from the actual machine. b Upper tension-control dial (page 41) This controls the tension of the upper thread. h Operation panel (page 10) This is being used to raise and lower the presser foot. j Handwheel ...
KNOWING YOUR SEWING MACHINE NAMES OF MACHINE PARTS AND THEIR FUNCTIONS The illustrations in the foot controller plug. c Bobbin-winding thread guide and pre-tension disc (page 15) Pass the thread under this to control the sewing speed, and to lower the feed dogs. i Spool pin (page 10,...s Thread guide cover (page 17 and 23) Pass the thread under this operation manual may differ from the actual machine. b Upper tension-control dial (page 41) This controls the tension of the upper thread. h Operation panel (page 10) This is being used to raise and lower the presser foot. j Handwheel ...
Users Manual - English
Page 19
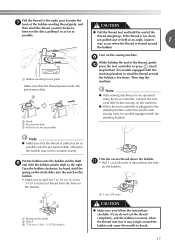
... using the foot controller, connect the foot controller before turning on the bobbin. k • Pull 1 cm (3/8 inch) of the thread straight up. b Hook c Pre-tension disk d Pull it may not be used to break. 17 If the thread is too short, not pulled taut or held at an angle, injuries...far as possible. Put the bobbin onto the bobbin winder shaft h and slide the bobbin winder shaft to the right, pass it under the pre-tension disk. If you follow the instructions carefully. Then stop button). Note ● Make sure that the thread passes under the g hook of thread from...
... using the foot controller, connect the foot controller before turning on the bobbin. k • Pull 1 cm (3/8 inch) of the thread straight up. b Hook c Pre-tension disk d Pull it may not be used to break. 17 If the thread is too short, not pulled taut or held at an angle, injuries...far as possible. Put the bobbin onto the bobbin winder shaft h and slide the bobbin winder shaft to the right, pass it under the pre-tension disk. If you follow the instructions carefully. Then stop button). Note ● Make sure that the thread passes under the g hook of thread from...
Users Manual - English
Page 20
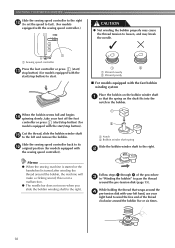
... hand to its p original position (for models equipped with the start /stop button). this is turned after winding the thread around the pre-tension disk (page 15). KNOWING YOUR SEWING MACHINE Slide the sewing speed controller to the right l (to set the speed to fast). (For ...pass the thread around the bobbin, the machine will make a clicking sound; b Follow steps a through g of the thread clockwise around the d pre-tension disk with your foot off the foot controller or press (start /stop button) (for models equipped with the fast bobbin winding system Place the bobbin...
... hand to its p original position (for models equipped with the start /stop button). this is turned after winding the thread around the pre-tension disk (page 15). KNOWING YOUR SEWING MACHINE Slide the sewing speed controller to the right l (to set the speed to fast). (For ...pass the thread around the bobbin, the machine will make a clicking sound; b Follow steps a through g of the thread clockwise around the d pre-tension disk with your foot off the foot controller or press (start /stop button) (for models equipped with the fast bobbin winding system Place the bobbin...
Users Manual - English
Page 21
... it through e the slit in the bobbin or the needle may break the needle. CAUTION ● Not winding the bobbin properly may cause the thread tension to loosen, and may bend or break when the bobbin thread starts to start /stop button) (for models equipped with the start/stop button) to...
... it through e the slit in the bobbin or the needle may break the needle. CAUTION ● Not winding the bobbin properly may cause the thread tension to loosen, and may bend or break when the bobbin thread starts to start /stop button) (for models equipped with the start/stop button) to...
Users Manual - English
Page 22
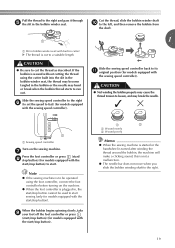
... machine as indicated. a Cover b Slide button Put the bobbin in so the thread comes out in the wrong direction, it may cause the thread tension to loosen, breaking the needle and resulting in the right direction. Be sure to sew, you (counterclockwise) or press (needle position button) (for...turn the power off the sewing machine. Turn off while threading the machine. CAUTION ● Winding the bobbin improperly may cause the thread tension to its highest position by turning a the handwheel toward you could be incorrect or break the needle. 20 If bobbins from other models are...
... machine as indicated. a Cover b Slide button Put the bobbin in so the thread comes out in the wrong direction, it may cause the thread tension to loosen, breaking the needle and resulting in the right direction. Be sure to sew, you (counterclockwise) or press (needle position button) (for...turn the power off the sewing machine. Turn off while threading the machine. CAUTION ● Winding the bobbin improperly may cause the thread tension to its highest position by turning a the handwheel toward you could be incorrect or break the needle. 20 If bobbins from other models are...
Users Manual - English
Page 23
... position button) (for feeding the bobbin thread is not correctly inserted through the slit, as indicated. case, it may cause the thread tension to be incorrect or break the needle. 21 Put the left side of the cover (as shown by marks on the left, and...; Make sure you (counterclockwise) or thread through equipped with the needle position button), and the tension-adjusting spring of the bobbin raise the presser foot lever. Turn off the sewing machine. c 1 2 1 a Tension-adjusting spring Replace the bobbin cover. a Cover b Slide button Insert the bobbin with your right...
... position button) (for feeding the bobbin thread is not correctly inserted through the slit, as indicated. case, it may cause the thread tension to be incorrect or break the needle. 21 Put the left side of the cover (as shown by marks on the left, and...; Make sure you (counterclockwise) or thread through equipped with the needle position button), and the tension-adjusting spring of the bobbin raise the presser foot lever. Turn off the sewing machine. c 1 2 1 a Tension-adjusting spring Replace the bobbin cover. a Cover b Slide button Insert the bobbin with your right...
Users Manual - English
Page 24
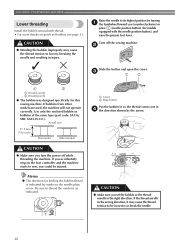
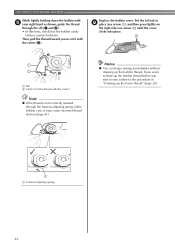
... in "Drawing up the bobbin thread. a Slit b Cutter (Cut the thread with the cutter.) Note ● If the thread is not correctly inserted through the tension-adjusting spring of the bobbin case, it with e your right hand as shown, guide the thread through the slit (a and b). • At this time, check... that the bobbin easily rotates counterclockwise. Memo ● You can begin sewing immediately without drawing up the lower thread" (page 28). 1 a Tension-adjusting spring 22 Then, pull the thread toward you start to sew, follow to cut it may cause incorrect thread...
... in "Drawing up the bobbin thread. a Slit b Cutter (Cut the thread with the cutter.) Note ● If the thread is not correctly inserted through the tension-adjusting spring of the bobbin case, it with e your right hand as shown, guide the thread through the slit (a and b). • At this time, check... that the bobbin easily rotates counterclockwise. Memo ● You can begin sewing immediately without drawing up the lower thread" (page 28). 1 a Tension-adjusting spring 22 Then, pull the thread toward you start to sew, follow to cut it may cause incorrect thread...
Users Manual - English
Page 37
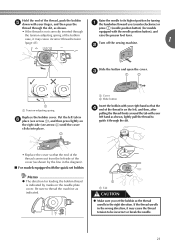
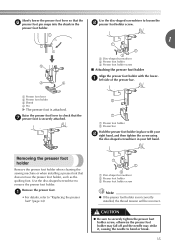
... screwdriver to "Replacing the presser foot" (page 34). a Presser foot lever b Presser foot holder c Shank d Pin X The presser foot is not correctly installed, the thread tension will be incorrect. a Presser foot holder b Presser bar Hold the presser foot holder in place with the lowera left hand. a • For details, refer to...
... screwdriver to "Replacing the presser foot" (page 34). a Presser foot lever b Presser foot holder c Shank d Pin X The presser foot is not correctly installed, the thread tension will be incorrect. a Presser foot holder b Presser bar Hold the presser foot holder in place with the lowera left hand. a • For details, refer to...
Users Manual - English
Page 43
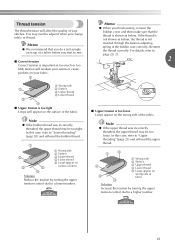
... Surface c Upper thread d Lower thread e Loops appear on surface of fabric Solution Reduce the tension by turning the upper tension-control dial to sew. ■ Correct tension Correct tension is important as too much or too little tension will weaken your seams or cause puckers on the wrong side of the fabric. If the... spring of the bobbin case correctly. Memo ● We recommend that the thread is shown as below . Thread tension The thread tension will affect the quality of your fabric. 1 Memo ● When you finish sewing, remove the bobbin cover and then make sure that you do ...
... Surface c Upper thread d Lower thread e Loops appear on surface of fabric Solution Reduce the tension by turning the upper tension-control dial to sew. ■ Correct tension Correct tension is important as too much or too little tension will weaken your seams or cause puckers on the wrong side of the fabric. If the... spring of the bobbin case correctly. Memo ● We recommend that the thread is shown as below . Thread tension The thread tension will affect the quality of your fabric. 1 Memo ● When you finish sewing, remove the bobbin cover and then make sure that you do ...
Users Manual - English
Page 44
... easily under the same conditions that is lowered, the needle may not be sure to these tips when sewing your project, and check the thread tension and stitch length and width. Since the results differ depending on the type of fabric and thread that are described below. CAUTION ● When using...
... easily under the same conditions that is lowered, the needle may not be sure to these tips when sewing your project, and check the thread tension and stitch length and width. Since the results differ depending on the type of fabric and thread that are described below. CAUTION ● When using...
Users Manual - English
Page 72
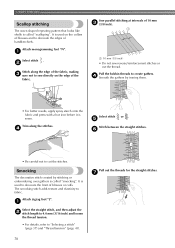
... over gathers is called "scalloping". a Select the straight stitch, and then adjust the b stitch length to 4.0 mm (3/16 inch) and loosen the thread tension. • For details, refer to fabric. The smocking stitch adds texture and elasticity to "Selecting a stitch" (page 37) and "Thread... tension" (page 41). a Select stitch . Sew parallel stitching at intervals of handkerchiefs. f • Be careful not to decorate the front of the fabric, making c ...
... over gathers is called "scalloping". a Select the straight stitch, and then adjust the b stitch length to 4.0 mm (3/16 inch) and loosen the thread tension. • For details, refer to fabric. The smocking stitch adds texture and elasticity to "Selecting a stitch" (page 37) and "Thread... tension" (page 41). a Select stitch . Sew parallel stitching at intervals of handkerchiefs. f • Be careful not to decorate the front of the fabric, making c ...

Users Manual - English
Page 73
... foot "J". a Needle drop point Unfold the fabric, and then iron the tucks e down to "Selecting a stitch" (page 37). b Select stitch , and then increase the thread c tension. • For details, refer to one side. a Sew together the right sides of the two pieces b of fabric, and then open up , and then sew...
... foot "J". a Needle drop point Unfold the fabric, and then iron the tucks e down to "Selecting a stitch" (page 37). b Select stitch , and then increase the thread c tension. • For details, refer to one side. a Sew together the right sides of the two pieces b of fabric, and then open up , and then sew...
Users Manual - English
Page 94
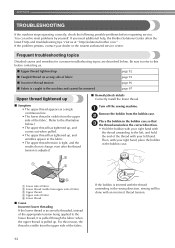
...If you need additional help, the Brother Solutions Center offers the latest FAQs and troubleshooting tips. Turn off the sewing machine. b Place the bobbin in the bobbin case so that c the thread unwinds in the fabric. • The upper thread tension is tight, and the results do... the bobbin case. a Lower side of fabric b Lower thread visible from the upper side of fabric page 93 ■ Incorrect thread tension page 96 ■ Fabric is adjusted. For this before requesting service. You can solve most problems by yourself. Frequent troubleshooting topics Detailed ...
...If you need additional help, the Brother Solutions Center offers the latest FAQs and troubleshooting tips. Turn off the sewing machine. b Place the bobbin in the bobbin case so that c the thread unwinds in the fabric. • The upper thread tension is tight, and the results do... the bobbin case. a Lower side of fabric b Lower thread visible from the upper side of fabric page 93 ■ Incorrect thread tension page 96 ■ Fabric is adjusted. For this before requesting service. You can solve most problems by yourself. Frequent troubleshooting topics Detailed ...

Users Manual - English
Page 95
... made and sewing cannot continue. • Looking under the fabric, there is tangled thread in the bobbin case. 4 c Slit d Cutter Sewing with the correct thread tension is possible after the bobbin has been correctly installed in the bobbin case. ■ Cause Incorrect upper threading If the upper thread is incorrectly threaded...
... made and sewing cannot continue. • Looking under the fabric, there is tangled thread in the bobbin case. 4 c Slit d Cutter Sewing with the correct thread tension is possible after the bobbin has been correctly installed in the bobbin case. ■ Cause Incorrect upper threading If the upper thread is incorrectly threaded...

Users Manual - English
Page 98
... dial to "4", and then refer to "Upper thread tightened up" (page 92) to select an appropriate thread tension. Return the upper tension-control dial to "4", and then refer to correct the upper threading. † Cause 2 A needle and thread appropriate for the fabric are ... f Upper thread visible from lower side of fabric ■ Cause/remedy/check details † Cause 1 The machine is not correctly threaded. APPENDIX Incorrect thread tension ■ Symptoms • Symptom 1: The lower thread is visible from the upper side of the fabric. • Symptom 2: The upper thread appears as...
... dial to "4", and then refer to "Upper thread tightened up" (page 92) to select an appropriate thread tension. Return the upper tension-control dial to "4", and then refer to correct the upper threading. † Cause 2 A needle and thread appropriate for the fabric are ... f Upper thread visible from lower side of fabric ■ Cause/remedy/check details † Cause 1 The machine is not correctly threaded. APPENDIX Incorrect thread tension ■ Symptoms • Symptom 1: The lower thread is visible from the upper side of the fabric. • Symptom 2: The upper thread appears as...
Users Manual - English
Page 104
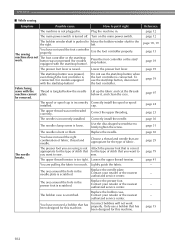
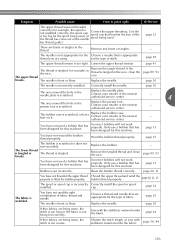
... Correct the upper threading. Correctly install the needle. Replace the needle. The presser foot you want to sew. sew. Loosen the upper thread tension. The area around the hole in the needle plate is connected. authorized service center. Incorrect bobbins will not work . APPENDIX ■ While sewing... combination of fabric. Use the foot controller properly. page 13 page 39 The presser foot lever is too tight. The upper thread tension is raised. The area around the hole in the presser foot is pushed to Move the bobbin winder shaft to firmly tighten the ...
... Correct the upper threading. Correctly install the needle. Replace the needle. The presser foot you want to sew. sew. Loosen the upper thread tension. The area around the hole in the needle plate is connected. authorized service center. Incorrect bobbins will not work . APPENDIX ■ While sewing... combination of fabric. Use the foot controller properly. page 13 page 39 The presser foot lever is too tight. The upper thread tension is raised. The area around the hole in the presser foot is pushed to Move the bobbin winder shaft to firmly tighten the ...
Users Manual - English
Page 105
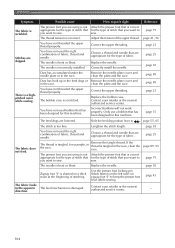
...the bobbin thread properly. cap. The needle is incorrectly installed. Replace the needle. Remove any knots or tangles. - Loosen the upper thread tension. breaks. Correctly install the needle. The lower thread is tangled or The thread is not being sewn, the stitch is too long or...is bent or blunt. Replace the bobbin. Replace the presser foot. breaks. Reset the bobbin thread correctly. page 29 The upper thread tension is incorrectly Correctly install the spool or spool installed. Replace the bobbin case. Thread the upper thread and wind the bobbin thread properly...
...the bobbin thread properly. cap. The needle is incorrectly installed. Replace the needle. Remove any knots or tangles. - Loosen the upper thread tension. breaks. Correctly install the needle. The lower thread is tangled or The thread is not being sewn, the stitch is too long or...is bent or blunt. Replace the bobbin. Replace the presser foot. breaks. Reset the bobbin thread correctly. page 29 The upper thread tension is incorrectly Correctly install the spool or spool installed. Replace the bobbin case. Thread the upper thread and wind the bobbin thread properly...
Users Manual - English
Page 106
... incorrect. Remove the needle plate cover and clean the plate and the race. Correct the upper threading. page 79 The thread tension is a highpitched noise while sewing. Adjust the tension of stitch that has been designed for the type of stitching. You have not used the right combination of fabric. page 15...
... incorrect. Remove the needle plate cover and clean the plate and the race. Correct the upper threading. page 79 The thread tension is a highpitched noise while sewing. Adjust the tension of stitch that has been designed for the type of stitching. You have not used the right combination of fabric. page 15...


