
Users Manual - English
Page 1
Operation Manual Sewing Machine Product Code: 885-V67 KNOWING YOUR SEWING MACHINE SEWING BASICS UTILITY STITCHES APPENDIX Please visit us at http://solutions.brother.com where you can get product support and answers to frequently asked questions (FAQs).
Operation Manual Sewing Machine Product Code: 885-V67 KNOWING YOUR SEWING MACHINE SEWING BASICS UTILITY STITCHES APPENDIX Please visit us at http://solutions.brother.com where you can get product support and answers to frequently asked questions (FAQs).

Users Manual - English
Page 4
... operate where aerosol (spray) products are being used or where oxygen is being sewn may fall, resulting in injuries. 6 Special care is required when sewing: • Always pay close attention is necessary when the machine is used . • Always consult the operation manual when replacing or installing any assemblies... the machine near a heat source, such as it could cause the needle to break. • Do not push or pull the fabric when sewing, and follow careful instruction when freehand stitching so that you do not deflect the needle and cause it to break. 7 This machine is required ...
... operate where aerosol (spray) products are being used or where oxygen is being sewn may fall, resulting in injuries. 6 Special care is required when sewing: • Always pay close attention is necessary when the machine is used . • Always consult the operation manual when replacing or installing any assemblies... the machine near a heat source, such as it could cause the needle to break. • Do not push or pull the fabric when sewing, and follow careful instruction when freehand stitching so that you do not deflect the needle and cause it to break. 7 This machine is required ...
Users Manual - English
Page 6
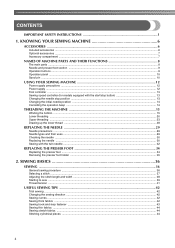
...stitch length and width ...38 Starting to sew ...39 Thread tension ...41 USEFUL SEWING TIPS ...42 Trial sewing ...42 Changing the sewing direction ...42 Sewing curves ...42 Sewing thick fabrics ...42 Sewing hook-and-loop fastener ...43 Sewing thin fabrics ...44 Sewing stretch fabrics ...44 Stitching cylindrical pieces ...44... section ...9 Operation buttons ...9 Operation panel ...10 Spool pin ...10 USING YOUR SEWING MACHINE 12 Power supply precautions ...12 Power supply ...12 Foot controller ...13 Sewing speed controller (for models equipped with the start/stop button 13 Changing the needle...
...stitch length and width ...38 Starting to sew ...39 Thread tension ...41 USEFUL SEWING TIPS ...42 Trial sewing ...42 Changing the sewing direction ...42 Sewing curves ...42 Sewing thick fabrics ...42 Sewing hook-and-loop fastener ...43 Sewing thin fabrics ...44 Sewing stretch fabrics ...44 Stitching cylindrical pieces ...44... section ...9 Operation buttons ...9 Operation panel ...10 Spool pin ...10 USING YOUR SEWING MACHINE 12 Power supply precautions ...12 Power supply ...12 Foot controller ...13 Sewing speed controller (for models equipped with the start/stop button 13 Changing the needle...
Users Manual - English
Page 7
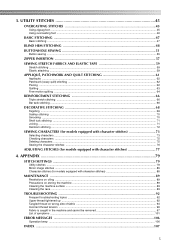
...45 Using overcasting foot ...46 BASIC STITCHING ...47 Basic stitching ...47 BLIND HEM STITCHING 48 BUTTONHOLE SEWING 51 Button sewing ...55 ZIPPER INSERTION ...57 SEWING STRETCH FABRICS AND ELASTIC TAPE 59 Stretch stitching ...59 Elastic attaching ...59 APPLIQUÉ, PATCHWORK AND ... ...70 Shell tuck stitching ...71 Joining ...71 Heirloom stitching ...72 SEWING CHARACTERS (for models equipped with character stitches 73 Selecting characters ...73 Checking characters ...75 Deleting characters ...75 Sewing the character stitches ...76 ADJUSTING STITCHES (for models equipped with character ...
...45 Using overcasting foot ...46 BASIC STITCHING ...47 Basic stitching ...47 BLIND HEM STITCHING 48 BUTTONHOLE SEWING 51 Button sewing ...55 ZIPPER INSERTION ...57 SEWING STRETCH FABRICS AND ELASTIC TAPE 59 Stretch stitching ...59 Elastic attaching ...59 APPLIQUÉ, PATCHWORK AND ... ...70 Shell tuck stitching ...71 Joining ...71 Heirloom stitching ...72 SEWING CHARACTERS (for models equipped with character stitches 73 Selecting characters ...73 Checking characters ...75 Deleting characters ...75 Sewing the character stitches ...76 ADJUSTING STITCHES (for models equipped with character ...
Users Manual - English
Page 8
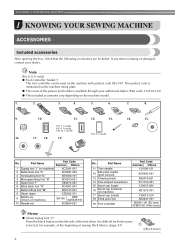
... 16. 17. 18. 19. 90/14 1 needle 14. 15. No. The product code is mentioned on the machine rating plate. ● The screw of sewing thick fabrics. (page 43) aBlack button 6 Press the black button on machine.) SA156 SFB: XA5539-151 10 Needle set XC8834-021 No. If any item... 130012-024 XE1372-001 130013-124 XE2241-001 XD0501-121 (EU area) XC8816-021 (Other areas) Memo ● About zigzag foot "J"; KNOWING YOUR SEWING MACHINE 1 KNOWING YOUR SEWING MACHINE ACCESSORIES Included accessories After opening the box, check that the following accessories are included.
... 16. 17. 18. 19. 90/14 1 needle 14. 15. No. The product code is mentioned on the machine rating plate. ● The screw of sewing thick fabrics. (page 43) aBlack button 6 Press the black button on machine.) SA156 SFB: XA5539-151 10 Needle set XC8834-021 No. If any item... 130012-024 XE1372-001 130013-124 XE2241-001 XD0501-121 (EU area) XC8816-021 (Other areas) Memo ● About zigzag foot "J"; KNOWING YOUR SEWING MACHINE 1 KNOWING YOUR SEWING MACHINE ACCESSORIES Included accessories After opening the box, check that the following accessories are included.
Users Manual - English
Page 10
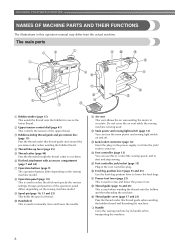
...depending on and off. p Feed dog position lever (page 55 and 65) Use the feed dog position lever to circulate. t Handle Carry the sewing machine by its handle when transporting the machine. 8 k Air vent This vent allows the air surrounding the motor to lower the feed dogs. ...j Handwheel This is used . Design and position of thread. Do not cover the air vent while the sewing machine is used to raise and lower the presser foot. KNOWING YOUR SEWING MACHINE NAMES OF MACHINE PARTS AND THEIR FUNCTIONS The illustrations in the foot controller plug. n Foot controller (...
...depending on and off. p Feed dog position lever (page 55 and 65) Use the feed dog position lever to circulate. t Handle Carry the sewing machine by its handle when transporting the machine. 8 k Air vent This vent allows the air surrounding the motor to lower the feed dogs. ...j Handwheel This is used . Design and position of thread. Do not cover the air vent while the sewing machine is used to raise and lower the presser foot. KNOWING YOUR SEWING MACHINE NAMES OF MACHINE PARTS AND THEIR FUNCTIONS The illustrations in the foot controller plug. n Foot controller (...
Users Manual - English
Page 11
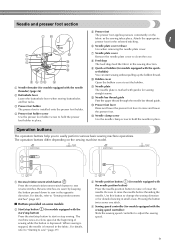
... the fabric in the fabric. Reverse stitches are sewn by keeping the button pressed down to clean the race. For details, refer to "Sewing reinforcement stitches" (page 40). ■ Buttons provided on some models b Start/stop button (for models equipped with guides for models equipped with the... position button to hold the presser foot holder in place. set bobbin) You can start or stop button to easily perform various basic sewing machine operations. j Bobbin cover Open the bobbin cover to hold the needle in place. The operation buttons differ depending on the fabric as the...
... the fabric in the fabric. Reverse stitches are sewn by keeping the button pressed down to clean the race. For details, refer to "Sewing reinforcement stitches" (page 40). ■ Buttons provided on some models b Start/stop button (for models equipped with guides for models equipped with the... position button to hold the presser foot holder in place. set bobbin) You can start or stop button to easily perform various basic sewing machine operations. j Bobbin cover Open the bobbin cover to hold the needle in place. The operation buttons differ depending on the fabric as the...
Users Manual - English
Page 12
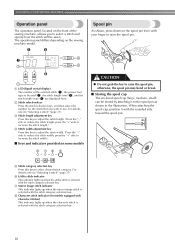
... adjust the stitch width. (Press the "-" side to "Selecting a stitch" (page 37). For details, refer to use. a LCD (liquid crystal display) The number of the sewing machine, allows you wish to "Selecting a stitch" (page 37) . The operation panel differs depending on the front of the selected stitch (1), the presser foot type...
... adjust the stitch width. (Press the "-" side to "Selecting a stitch" (page 37). For details, refer to use. a LCD (liquid crystal display) The number of the sewing machine, allows you wish to "Selecting a stitch" (page 37) . The operation panel differs depending on the front of the selected stitch (1), the presser foot type...
Users Manual - English
Page 13
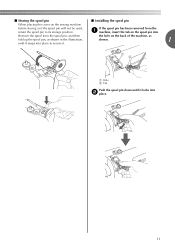
If the spool pin has been removed from the a machine, insert the tab on the spool pin into b place. 11 ■ Storing the spool pin ■ Installing the spool pin When placing the cover on the back of the machine, as fold up the spool pin, as shown in the illustration, shown. 1 until it . a Hole b Tab Push the spool pin down until it snaps into place to secure it locks into Remove the spool from the spool pin, and then the hole on the sewing machine before storing or if the spool pin will not be used, return the spool pin to its storage position.
If the spool pin has been removed from the a machine, insert the tab on the spool pin into b place. 11 ■ Storing the spool pin ■ Installing the spool pin When placing the cover on the back of the machine, as fold up the spool pin, as shown in the illustration, shown. 1 until it . a Hole b Tab Push the spool pin down until it snaps into place to secure it locks into Remove the spool from the spool pin, and then the hole on the sewing machine before storing or if the spool pin will not be used, return the spool pin to its storage position.
Users Manual - English
Page 14
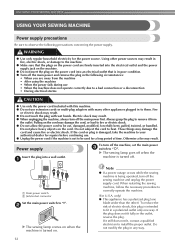
...forcefully bent, pulled, twisted, or bundled. Do not subject the cord to correctly operate the machine. (For U.S.A. When restarting the sewing machine, follow the necessary procedure to heat. Always grasp the plug to remove it still does not fit, contact a qualified electrician ... a disconnection • During electrical storms CAUTION ● Use only the power cord included with wet hands. KNOWING YOUR SEWING MACHINE USING YOUR SEWING MACHINE Power supply precautions Be sure to observe the following circumstances: • When you are firmly inserted into the electrical ...
...forcefully bent, pulled, twisted, or bundled. Do not subject the cord to correctly operate the machine. (For U.S.A. When restarting the sewing machine, follow the necessary procedure to heat. Always grasp the plug to remove it still does not fit, contact a qualified electrician ... a disconnection • During electrical storms CAUTION ● Use only the power cord included with wet hands. KNOWING YOUR SEWING MACHINE USING YOUR SEWING MACHINE Power supply precautions Be sure to observe the following circumstances: • When you are firmly inserted into the electrical ...
Users Manual - English
Page 15
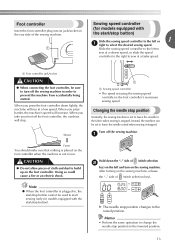
... down the "-" side of cloth and dust to build up on the foot controller. Changing the needle stop position Normally, the sewing machine is set to start sewing (only for models equipped with the start/stop . a Faster You should make sure that nothing is placed on the foot controller... when the machine is stopped. After turning on the sewing machine, release the "-" side of the sewing machine. a Foot controller jack/socket CAUTION ● When connecting the foot controller, be used to leave the needle in the ...
... down the "-" side of cloth and dust to build up on the foot controller. Changing the needle stop position Normally, the sewing machine is set to start sewing (only for models equipped with the start/stop . a Faster You should make sure that nothing is placed on the foot controller... when the machine is stopped. After turning on the sewing machine, release the "-" side of the sewing machine. a Foot controller jack/socket CAUTION ● When connecting the foot controller, be used to leave the needle in the ...

Users Manual - English
Page 16
...center needle position) is automatically selected when it will not beep. a Cancelling the operation beep When the sewing machine is purchased, it is set so that it is turned on the sewing machine. Hold down the "+" side of (stitch width adjustment key). X The initial needle position changes... Changing the initial needle position Normally, the straight stitch (left needle position) is automatically selected when the sewing machine is turned on the sewing machine. The machine can be set to the center needle position. This setting can be changed so that machine beeps....
...center needle position) is automatically selected when it will not beep. a Cancelling the operation beep When the sewing machine is purchased, it is set so that it is turned on the sewing machine. Hold down the "+" side of (stitch width adjustment key). X The initial needle position changes... Changing the initial needle position Normally, the straight stitch (left needle position) is automatically selected when the sewing machine is turned on the sewing machine. The machine can be set to the center needle position. This setting can be changed so that machine beeps....
Users Manual - English
Page 17
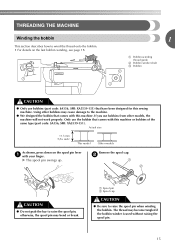
... may cause damage to the machine. ● We designed the bobbin that comes with your finger. If you use the bobbin that comes with this sewing machine.
... may cause damage to the machine. ● We designed the bobbin that comes with your finger. If you use the bobbin that comes with this sewing machine.
Users Manual - English
Page 18
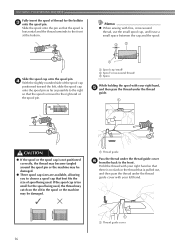
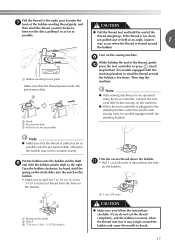
KNOWING YOUR SEWING MACHINE Fully insert the spool of spool being used . cb Slide the spool cap onto the spool pin. a a Spool cap (small) b Spool (cross-wound thread) c ... spool is horizontal and the thread unwinds to choose a spool cap that is too small for the bobbin c onto the spool pin. Memo ● When sewing with your right hand, e and then pass the thread under the thread guide cover f from the back to the right end of the spool pin.
KNOWING YOUR SEWING MACHINE Fully insert the spool of spool being used . cb Slide the spool cap onto the spool pin. a a Spool cap (small) b Spool (cross-wound thread) c ... spool is horizontal and the thread unwinds to choose a spool cap that is too small for the bobbin c onto the spool pin. Memo ● When sewing with your right hand, e and then pass the thread under the thread guide cover f from the back to the right end of the spool pin.
Users Manual - English
Page 19
... the foot controller or press (start/ stop button) (for models equipped with the start/stop button) to start sewing (only for models equipped with the start /stop the machine. Note ● If the sewing machine is to be used to wind the thread around the bobbin a few times. Then stop button cannot... discs, pulling it in as far as possible. ● Pull the thread taut and hold the end of the thread straight up. a Spring on the sewing machine. k • Pull 1 cm (3/8 inch) of thread from the hole on the bobbin. Pull the thread to 3-15/16 inches) of thread from the hole...
... the foot controller or press (start/ stop button) (for models equipped with the start/stop button) to start sewing (only for models equipped with the start /stop the machine. Note ● If the sewing machine is to be used to wind the thread around the bobbin a few times. Then stop button cannot... discs, pulling it in as far as possible. ● Pull the thread taut and hold the end of the thread straight up. a Spring on the sewing machine. k • Pull 1 cm (3/8 inch) of thread from the hole on the bobbin. Pull the thread to 3-15/16 inches) of thread from the hole...
Users Manual - English
Page 20
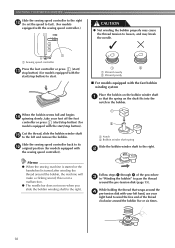
... the bobbin on the bobbin winder shaft a so that wraps around the bobbin, the machine will make a clicking sound; Memo ● When the sewing machine is started or the handwheel is not a malfunction. ● The needle bar does not move when you slide the bobbin winding shaft to pass... the right. When the bobbin seems full and begins n spinning slowly, take your right hand to its p original position (for models equipped with the sewing speed controller). Cut the thread, slide the bobbin winder shaft o to the left hand, use your foot off the foot controller or press (start /...
... the bobbin on the bobbin winder shaft a so that wraps around the bobbin, the machine will make a clicking sound; Memo ● When the sewing machine is started or the handwheel is not a malfunction. ● The needle bar does not move when you slide the bobbin winding shaft to pass... the right. When the bobbin seems full and begins n spinning slowly, take your right hand to its p original position (for models equipped with the sewing speed controller). Cut the thread, slide the bobbin winder shaft o to the left hand, use your foot off the foot controller or press (start /...
Users Manual - English
Page 21
...the foot controller or press (start/stop button) (for models equipped with the start/stop button). 1 2 a Wound evenly b Wound poorly Memo ● When the sewing machine is started or the handwheel is not a malfunction. ● The needle bar does not move when you slide the bobbin winding shaft to the... right. 19 If the bobbin is wound without cutting the thread using the foot controller, connect the foot controller before turning on the sewing machine. CAUTION ● Not winding the bobbin properly may cause the thread tension to loosen, and may bend or break when the bobbin ...
...the foot controller or press (start/stop button) (for models equipped with the start/stop button). 1 2 a Wound evenly b Wound poorly Memo ● When the sewing machine is started or the handwheel is not a malfunction. ● The needle bar does not move when you slide the bobbin winding shaft to the... right. 19 If the bobbin is wound without cutting the thread using the foot controller, connect the foot controller before turning on the sewing machine. CAUTION ● Not winding the bobbin properly may cause the thread tension to loosen, and may bend or break when the bobbin ...
Users Manual - English
Page 22
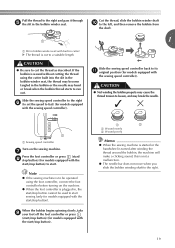
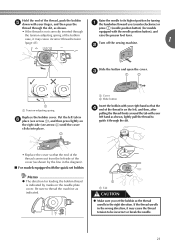
...machine starts to its highest position by turning a the handwheel toward you turn the power off the sewing machine. Turn off while threading the machine. Be sure to be injured. Raise the needle to sew, you set bobbin, see page 21. b Slide the button and open the cover. Memo ... size 11.5 mm (7/16 inch) This model Other models CAUTION ● Make sure you (counterclockwise) or press (needle position button) (for this sewing machine. Use only the enclosed bobbin or bobbins of the same type (part code: SA156, SFB: XA5539-151). If bobbins from other models are ...
...machine starts to its highest position by turning a the handwheel toward you turn the power off the sewing machine. Turn off while threading the machine. Be sure to be injured. Raise the needle to sew, you set bobbin, see page 21. b Slide the button and open the cover. Memo ... size 11.5 mm (7/16 inch) This model Other models CAUTION ● Make sure you (counterclockwise) or press (needle position button) (for this sewing machine. Use only the enclosed bobbin or bobbins of the same type (part code: SA156, SFB: XA5539-151). If bobbins from other models are ...
Users Manual - English
Page 23
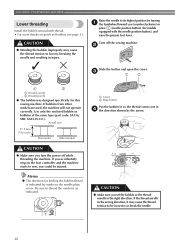
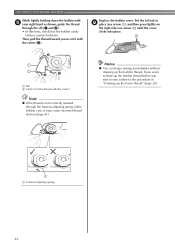
... the line in f place (see arrow a), and then press lightly on the right side (see arrow b) until the cover clicks into place. Turn off the sewing machine. c 1 2 1 a Tension-adjusting spring Replace the bobbin cover. Put the left side of the cover (as indicated. If the thread unrolls in the right direction...
... the line in f place (see arrow a), and then press lightly on the right side (see arrow b) until the cover clicks into place. Turn off the sewing machine. c 1 2 1 a Tension-adjusting spring Replace the bobbin cover. Put the left side of the cover (as indicated. If the thread unrolls in the right direction...
Users Manual - English
Page 24
... and b). • At this time, check that the bobbin easily rotates counterclockwise. If you want to draw up the bobbin thread. KNOWING YOUR SEWING MACHINE While lightly holding down the bobbin with e your right hand as shown, guide the thread through the tension-adjusting spring of the bobbin case..., it with the cutter (c). Memo ● You can begin sewing immediately without drawing up the bobbin thread before you to the procedure in f place (see arrow a), and then press lightly on the right side...
... and b). • At this time, check that the bobbin easily rotates counterclockwise. If you want to draw up the bobbin thread. KNOWING YOUR SEWING MACHINE While lightly holding down the bobbin with e your right hand as shown, guide the thread through the tension-adjusting spring of the bobbin case..., it with the cutter (c). Memo ● You can begin sewing immediately without drawing up the bobbin thread before you to the procedure in f place (see arrow a), and then press lightly on the right side...


