Brother International XR1300 Support Question
Brother International XR1300 Support Question
Find answers below for this question about Brother International XR1300.Need a Brother International XR1300 manual? We have 2 online manuals for this item!
Question posted by marilynndrake on January 6th, 2013
Where Can I Get More Details On Sewing Letters?
I cannot find enough details to learn how to set the machine to sew letters, the book doesn't give clear details and the dvd shows NOTHING
Current Answers
Related Brother International XR1300 Manual Pages
Users Manual - English - Page 11
...
b Start/stop sewing. For details, refer to "Starting to change the sewing direction or for models equipped with the needle position button) Press the needle position button to set the bobbin. Use this button to sew" (page 39).
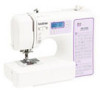
Needle and presser foot section
e Presser foot
The presser foot applies pressure consistently on the sewing machine model.
Reverse...
Users Manual - English - Page 12
...the stitch that you to "Selecting a stitch" (page 37). KNOWING YOUR SEWING MACHINE
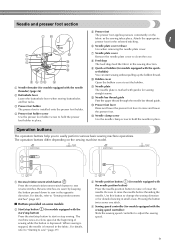
Operation panel
The operation panel, located on the front of the selected stitch (1), the ...the "+" side to increase the stitch width.)
■ Keys and indicators provided on the sewing machine model. For details, refer to the spool pin as shown in the illustration.
e Stitch category selection key ...
Users Manual - English - Page 17
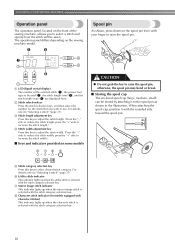
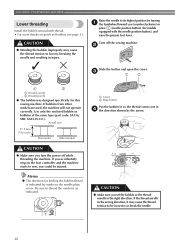
... not work properly. X The spool pin swings up. Remove the spool cap. THREADING THE MACHINE
Winding the bobbin
This section describes how to wind the thread onto the bobbin. • For details on the spool pin lever a with this sewing machine.
Actual size
11.5 mm (7/16 inch)
This model
Other models
As shown, press...
Users Manual - English - Page 22
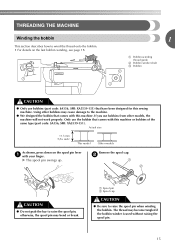
...) (for models equipped with thread. • For more details on the needle plate cover.
If the thread unrolls in the right direction. Memo
● The direction for this sewing machine. Actual size
11.5 mm (7/16 inch)
This model
Other models
CAUTION
● Make sure you set bobbin, see page 21. Be sure to be...
Users Manual - English - Page 25
... position button
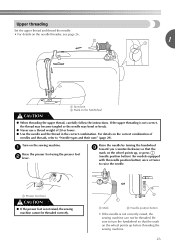
• If the needle is not correctly raised, the sewing machine can not be threaded correctly. Upper threading
Set the upper thread and thread the needle. • For details on the needle threader, see page 26.
1
a Spool pin b Mark on the sewing machine.
a
Raise the presser foot using the presser foot b lever.
Be sure...
Users Manual - English - Page 34
... the twin needle by hand,
from the front to the back.
b • For details, refer to steps a through the eye of thread for making decorative stitches. Insert the extra...machine. ● Do not sew with this machine (part code: 131096-121).
KNOWING YOUR SEWING MACHINE
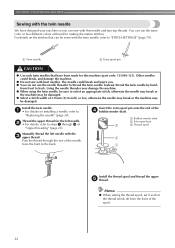
Sewing with the twin needle
We have been made for the left needle with the twin needle, refer to "STITCH SETTINGS...
Users Manual - English - Page 35

...with the twin needle, refer to "STITCH
SETTINGS" (page 79).
1
CAUTION
a Thread guide cover
• For details, refer to "Replacing the presser foot"...details on changing the presser foot, refer
to step a through l of thread and fabric that the upper thread for the
Select a stitch. Otherwise the needle may break or the machine may become bunched together, depending on the sewing machine...
Users Manual - English - Page 37
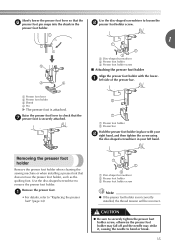
... with your left side of the presser bar.
Remove the presser foot.
a
• For details, refer to bend or break.
35
a Disc-shaped screwdriver b Presser foot holder c Presser ... be incorrect.
Removing the presser foot holder
Remove the presser foot holder when cleaning the sewing machine or when installing a presser foot that the g presser foot is securely attached. Raise...
Users Manual - English - Page 38
... pins, otherwise the needle may break.
● Never use bent needles. CAUTION
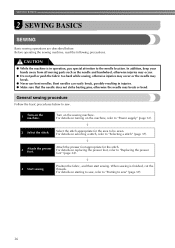
● While the machine is finished, cut the threads. General sewing procedure
Follow the basic procedures below . Before operating the sewing machine, read the following precautions. For details on selecting a stitch, refer to the needle location. Attach the presser foot appropriate for the...
Users Manual - English - Page 39
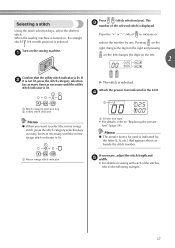
When the sewing machine is turned on the left needle position) is displayed.
a
Press
(stitch selection keys...indicator
If necessary, adjust the stitch length and e width.
• For details on the sewing machine. a Presser foot type
• For details, refer to increase or
reduce the number by the letter (J, A, etc.) that the utility stitch indicator is lit.
Press the ...
Users Manual - English - Page 42
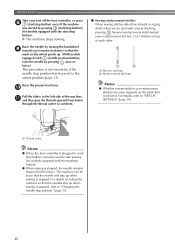
... pressing once or twice.) This procedure is stopped.
The machine can be used to start sewing (for models equipped with reverse stitching, pressing (reverse/reinforcement stitch button) sews reinforcement stitches, 3 to the raised position (page 13). Raise the presser foot lever. For details, refer to "STITCH SETTINGS" (page 79).
1
a Thread cutter
Memo
● When the...
Users Manual - English - Page 47

...machine starts sewing. a
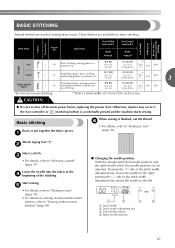
Select a stitch.
3 UTILITY STITCHES
OVERCASTING STITCHES
You can use reverse stitching.
**Select a stitch width of the fabric. They are also useful for sewing stretch materials.
b
• For details... (3/32-3/16)
2.0 (1/16) 1.0-4.0
(1/16-3/16)
No No Rfc. Using zigzag foot
Sew with the edge of 5.0 mm (3/16 inch) or less.
a Needle drop point
45 ...
Users Manual - English - Page 49
...not use reverse stitching.
**Select a stitch width of the stitching.
e
• For details, refer to "Starting to sew" (page 39).
• For details on sewing reverse/reinforcement stitches, refer to sew" (page 39).
a
When sewing is accidentally pressed and the machine starts sewing. c
• For details, refer to the right; Center
Triple stretch stitch
J
01
Attaching zippers...
Users Manual - English - Page 65
...the presser bar.
■ For a seam allowance on each side of the machine to be quilted.
Note
● When sewing with the walking foot.
If the needle strikes the presser foot, injury may ...8226; For details, refer to "Changing the needle position" (page 47). For details, refer to "Removing the presser foot holder" (page 35). Quilts can easily be sewn with the walking foot, sew at a ...
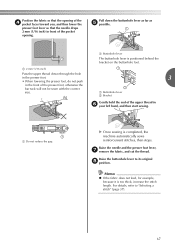
Users Manual - English - Page 68

...* Auto Rfc. CAUTION
● Be sure to sew" (page 39). a Set the button guide plate on buttonhole foot
"A" to ...mm (1-1/8 inches) can be subject to strain, such as pocket corners and openings. c
• For details, refer to "Starting to turn off the main power before replacing the presser foot.
Application
Stitch Width [mm...) is accidentally pressed and the machine starts sewing.
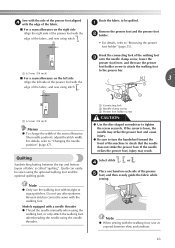
Users Manual - English - Page 69
... positioned behind the
bracket on the buttonhole foot. For details, refer to its original h position. a Buttonhole lever b Bracket
Gently hold the end of the upper thread in the front of the pocket opening.
a Buttonhole lever
1
The buttonhole lever is completed, the machine automatically sews reinforcement stitches, then stops. Raise the needle and the...
Users Manual - English - Page 71
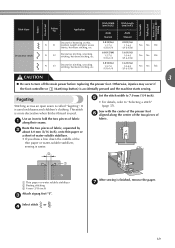
...Otherwise, injuries may occur if
the foot controller or (start/stop button) is called "fagoting".
Set the stitch width to turn off the main power before replacing the presser foot.
Stitch Width ... or .
Fagoting
Stitching across an open seam is accidentally pressed and the machine starts sewing. e
• For details, refer to fold the two pieces of fabric a along the center of...
Users Manual - English - Page 74
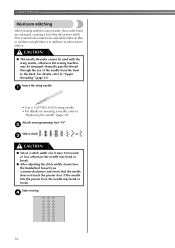
...check that the needle does not touch the presser foot. Start sewing. This is used with the wing needle, the needle holes are enlarged,...details on thin or medium weight fabrics in addition to plain weave fabrics.
b
Select stitch or .
CAUTION
● The needle threader cannot be damaged. UTILITY STITCHES
Heirloom stitching
When sewing with the wing needle, otherwise the sewing machine...
Users Manual - English - Page 75
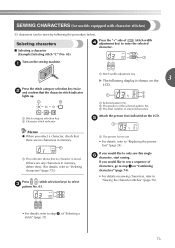
... category selection key b Character stitch indicator
Attach the presser foot indicated on the sewing machine. Press the "+" side of
(stitch width
d adjustment key) to "Replacing the presser... only sew this single f character, start sewing.
N
a Selected pattern No. a The presser foot to use
• For details, refer to enter the selected
character.
a This indicator shows that ...
Users Manual - English - Page 76
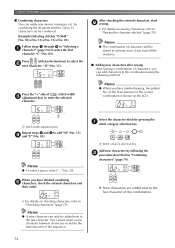
...first character in memory even if you turn off the machine.
■ Adding new characters after sewing After sewing a combination of the sequence.
Select the character stitch by..., "O" (No. 15). N
Memo
● When you have finished sewing, the pattern No. N
• For details on sewing characters, refer to "Sewing the character stitches" (page 76).
N
Memo
● To enter a...
Similar Questions

Brother Exedra Sewing Machine Model No Db2-b736-3 Details...
Request dealer at Kolkata , cost of the mechine and its features. Thanks
Request dealer at Kolkata , cost of the mechine and its features. Thanks
(Posted by apurbadn 4 years ago)

Where Can I Find An Instructional Manual Or Brother Xr1300 Sewing Machine To Buy
(Posted by calverts50 9 years ago)
How To Write Letters With A Brother Ls2300prw Sewing Machine
(Posted by jdaanibee 10 years ago)
Where Can I Find Bobbins For Brother's Sewing Machine Xr1300
(Posted by Jamjac 10 years ago)

How To Adjust Tension On Brother Sewing Machine Xr1300
(Posted by LotusALYS 10 years ago)