
Users Manual - English
Page 4
... heater, iron, halogen lamp, or other parts to assure correct installation. 2 Never allow children to play with any adjustments in the needle area. • Do not use a damaged or incorrect needle plate, as an unsteady or slanted table, otherwise the machine may fall, resulting in should never be kept out of the reach...
... heater, iron, halogen lamp, or other parts to assure correct installation. 2 Never allow children to play with any adjustments in the needle area. • Do not use a damaged or incorrect needle plate, as an unsteady or slanted table, otherwise the machine may fall, resulting in should never be kept out of the reach...
Users Manual - English
Page 8
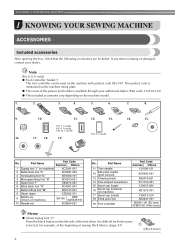
...for example, at the beginning of the presser foot holder is mentioned on the machine rating plate. ● The screw of sewing thick fabrics. (page 43) aBlack button 6 Part Name 11 Twin needle 12 Ball point needle (gold colored) 13 Cleaning brush 14 Disc-shaped screwdriver 15 Spool cap (large) 16 ... damaged, contact your authorized dealer. (Part code: 132730-122) ● The included accessories vary depending on machine.) SA156 SFB: XA5539-151 10 Needle set XC8834-021 No. If any item is on the machine model. 1. 2. 3. 4. 5. 6. 7. 8. 9. 10. 11. 12. 13. 75/11...
...for example, at the beginning of the presser foot holder is mentioned on the machine rating plate. ● The screw of sewing thick fabrics. (page 43) aBlack button 6 Part Name 11 Twin needle 12 Ball point needle (gold colored) 13 Cleaning brush 14 Disc-shaped screwdriver 15 Spool cap (large) 16 ... damaged, contact your authorized dealer. (Part code: 132730-122) ● The included accessories vary depending on machine.) SA156 SFB: XA5539-151 10 Needle set XC8834-021 No. If any item is on the machine model. 1. 2. 3. 4. 5. 6. 7. 8. 9. 10. 11. 12. 13. 75/11...
Users Manual - English
Page 11
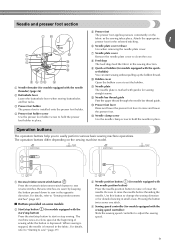
... one stitch. i Quick-set bobbin) You can start sewing without pulling up the bobbin thread. k Needle plate The needle plate is lowered in place. a Needle threader (for sewing straight seams. l Needle bar thread guide Pass the upper thread through the needle bar thread guide. m Presser foot lever Raise and lower the presser foot lever to sew reverse...
... one stitch. i Quick-set bobbin) You can start sewing without pulling up the bobbin thread. k Needle plate The needle plate is lowered in place. a Needle threader (for sewing straight seams. l Needle bar thread guide Pass the upper thread through the needle bar thread guide. m Presser foot lever Raise and lower the presser foot lever to sew reverse...
Users Manual - English
Page 22
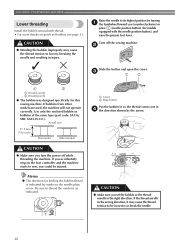
... cover. If the thread unrolls in the wrong direction, it may cause the thread tension to loosen, breaking the needle and resulting in injury. If you accidentally step on the foot controller and the machine starts to thread the machine...needle. 20 KNOWING YOUR SEWING MACHINE Lower threading Install the bobbin wound with the needle position button), and raise the presser foot lever. Raise the needle to be injured. c 1 2 1 2 a Wound evenly b Wound poorly ● The bobbin was designed specifically for models equipped with thread. • For more details on the needle plate...
... cover. If the thread unrolls in the wrong direction, it may cause the thread tension to loosen, breaking the needle and resulting in injury. If you accidentally step on the foot controller and the machine starts to thread the machine...needle. 20 KNOWING YOUR SEWING MACHINE Lower threading Install the bobbin wound with the needle position button), and raise the presser foot lever. Raise the needle to be injured. c 1 2 1 2 a Wound evenly b Wound poorly ● The bobbin was designed specifically for models equipped with thread. • For more details on the needle plate...
Users Manual - English
Page 23
... cover. Put the left tab in f place (see arrow a), and then press lightly on the needle plate cover. a Cover b Slide button Insert the bobbin with your left hand as shown, lightly pull ...the end of the thread, push the bobbin e down with your finger, and then pass the Raise the needle to guide it through the slit. • Replace the cover so that the d end of the thread...For models equipped with the quick-set the bobbin so the thread unrolls in the right direction. press (needle position button) (for feeding the bobbin thread is not correctly inserted through the slit, as shown. ...
... cover. Put the left tab in f place (see arrow a), and then press lightly on the needle plate cover. a Cover b Slide button Insert the bobbin with your left hand as shown, lightly pull ...the end of the thread, push the bobbin e down with your finger, and then pass the Raise the needle to guide it through the slit. • Replace the cover so that the d end of the thread...For models equipped with the quick-set the bobbin so the thread unrolls in the right direction. press (needle position button) (for feeding the bobbin thread is not correctly inserted through the slit, as shown. ...

Users Manual - English
Page 33
... the same way. Install the twin needle in the needle plate. Therefore, do not loosen the needle clamp screw too much.) a Needle stopper While holding the needle with the disc-shaped screwdriver, otherwise the needle may break or damage may fall off. Note ● The needle can be damaged. a Disc-shaped screwdriver b Needle clamp screw • Do not apply...
... the same way. Install the twin needle in the needle plate. Therefore, do not loosen the needle clamp screw too much.) a Needle stopper While holding the needle with the disc-shaped screwdriver, otherwise the needle may break or damage may fall off. Note ● The needle can be damaged. a Disc-shaped screwdriver b Needle clamp screw • Do not apply...

Users Manual - English
Page 68
...distance between the markings on the presser foot scale is accidentally pressed and the machine starts sewing. Pattern Presser Foot Twin Needle Walking Foot Reverse (Rev.)/ Reinforcement (Rfc.) Stitching Stitch Name Pattern No. Otherwise, injuries may occur if the foot...strain, such as sleeve holes, inseams and pocket corners. a Determine the desired length of 5.0 mm (3/16 inch) or less. a Set the button guide plate on buttonhole foot "A" to strain, such as pocket corners and openings. Attach buttonhole foot "A". tive stitching 0.0 (0) 0.0-7.0 (0-1/4) 2.5 (3/32) 1.5-4.0 (1/16...
...distance between the markings on the presser foot scale is accidentally pressed and the machine starts sewing. Pattern Presser Foot Twin Needle Walking Foot Reverse (Rev.)/ Reinforcement (Rfc.) Stitching Stitch Name Pattern No. Otherwise, injuries may occur if the foot...strain, such as sleeve holes, inseams and pocket corners. a Determine the desired length of 5.0 mm (3/16 inch) or less. a Set the button guide plate on buttonhole foot "A" to strain, such as pocket corners and openings. Attach buttonhole foot "A". tive stitching 0.0 (0) 0.0-7.0 (0-1/4) 2.5 (3/32) 1.5-4.0 (1/16...
Users Manual - English
Page 91
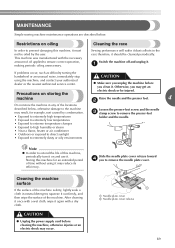
... your authorized dealer or the nearest authorized service center. ● Make sure you clean it must not be cleaned periodically. a Needle plate cover b Needle plate cover release 89 This machine was manufactured with a dry cloth. CAUTION ● Unplug the power supply cord before you unplug the...maintenance operations are described below , otherwise damage to the machine may occur. Otherwise, you to remove the needle plate cover. Slide the needle plate cover release toward d you may reduce its efficiency. After cleaning it once with a wet cloth, wipe it .
... your authorized dealer or the nearest authorized service center. ● Make sure you clean it must not be cleaned periodically. a Needle plate cover b Needle plate cover release 89 This machine was manufactured with a dry cloth. CAUTION ● Unplug the power supply cord before you unplug the...maintenance operations are described below , otherwise damage to the machine may occur. Otherwise, you to remove the needle plate cover. Slide the needle plate cover release toward d you may reduce its efficiency. After cleaning it once with a wet cloth, wipe it .

Users Manual - English
Page 93
...needle plate cover is not flush with the surface of the needle plate cover. As shown, insert the tab on the needle plate h cover into position. From the front, slide the needle plate cover i back into the hole in injuries if your fingers 4 touch the race. 91 a Needle plate cover CAUTION ● If the needle plate... cover is flush with the surface of the machine may cause the needle plate cover to come off of the machine. Sewing while the needle plate cover is not flush with the top...
...needle plate cover is not flush with the surface of the needle plate cover. As shown, insert the tab on the needle plate h cover into position. From the front, slide the needle plate cover i back into the hole in injuries if your fingers 4 touch the race. 91 a Needle plate cover CAUTION ● If the needle plate... cover is flush with the surface of the machine may cause the needle plate cover to come off of the machine. Sewing while the needle plate cover is not flush with the top...

Users Manual - English
Page 95
... cut the thread with your right hand. While holding the bobbin in place with your d finger, pass the thread through the slit in the needle plate. • Hold down the bobbin with scissors. • For details, refer to "Cleaning the race" on the lower side of the fabric. Remove the upper ...
... cut the thread with your right hand. While holding the bobbin in place with your d finger, pass the thread through the slit in the needle plate. • Hold down the bobbin with scissors. • For details, refer to "Cleaning the race" on the lower side of the fabric. Remove the upper ...
Users Manual - English
Page 99
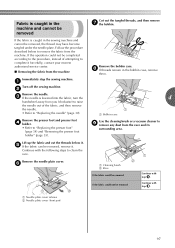
...(page 35). h If threads remain in the machine and cannot be removed, the thread may have become tangled under the needle plate. c If the needle is caught in the sewing machine and cannot be removed Cut out the tangled threads, and then remove g the bobbin. Remove ...the needle plate cover. Fabric is caught in the bobbin case, remove them. Immediately stop the sewing machine. a Turn off the sewing machine. Continue with step j. a Needle plate cover release b Needle plate cover (front part) 97
...(page 35). h If threads remain in the machine and cannot be removed, the thread may have become tangled under the needle plate. c If the needle is caught in the sewing machine and cannot be removed Cut out the tangled threads, and then remove g the bobbin. Remove ...the needle plate cover. Fabric is caught in the bobbin case, remove them. Immediately stop the sewing machine. a Turn off the sewing machine. Continue with step j. a Needle plate cover release b Needle plate cover (front part) 97

Users Manual - English
Page 100
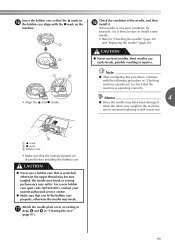
...dogs move smoothly and do not contact the edges of the needle plate. Finally, firmly tighten the screw on the right o side of the slots in the needle plate. Remove the fabric and threads from the needle plate. Slightly lift up the needle plate, cut any threads in the machine. 98 Turn the .... Lightly finger-tighten the screw on the right side. shaped screwdriver to drop the removed screws in the needle plate n with the two holes at the needle plate mounting base, and then fit the needle plate onto the machine. Note ● Be careful not to firmly tighten the screw on the...
...dogs move smoothly and do not contact the edges of the needle plate. Finally, firmly tighten the screw on the right o side of the slots in the needle plate. Remove the fabric and threads from the needle plate. Slightly lift up the needle plate, cut any threads in the machine. 98 Turn the .... Lightly finger-tighten the screw on the right side. shaped screwdriver to drop the removed screws in the needle plate n with the two holes at the needle plate mounting base, and then fit the needle plate onto the machine. Note ● Be careful not to firmly tighten the screw on the...
Users Manual - English
Page 101
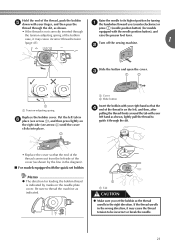
... case (part code: XE7560-001), contact your nearest authorized service center. ● Make sure that you fit the bobbin case properly, otherwise the needle may suffer. Attach the needle plate cover according to q steps h and i in injuries. • Align the S and z marks. a S mark b z mark c Bobbin case • Make sure that is operating correctly...
... case (part code: XE7560-001), contact your nearest authorized service center. ● Make sure that you fit the bobbin case properly, otherwise the needle may suffer. Attach the needle plate cover according to q steps h and i in injuries. • Align the S and z marks. a S mark b z mark c Bobbin case • Make sure that is operating correctly...
Users Manual - English
Page 102
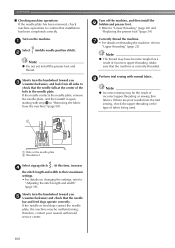
...incorrect upper threading. If there are poor results from the trial sewing, check the upper threading or the type of the hole in the needle plate. Turn off the machine, and then install the f bobbin and presser foot. • Refer to "Adjusting the stitch length and width"... (page 38). Perform trial sewing with step m in the needle plate b Handwheel Select zigzag stitch . If the needle or feed dogs contact the needle plate, the machine may have become tangled as a result of incorrect upper threading or sewing thin fabrics. therefore, ...
...incorrect upper threading. If there are poor results from the trial sewing, check the upper threading or the type of the hole in the needle plate. Turn off the machine, and then install the f bobbin and presser foot. • Refer to "Adjusting the stitch length and width"... (page 38). Perform trial sewing with step m in the needle plate b Handwheel Select zigzag stitch . If the needle or feed dogs contact the needle plate, the machine may have become tangled as a result of incorrect upper threading or sewing thin fabrics. therefore, ...
Users Manual - English
Page 104
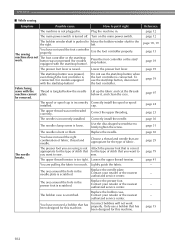
.... button was not pressed (for the type of fabric. Lift up the fabric and cut the threads below the needle plate. Correct the upper threading. page 23 The needle is turned off. The presser foot you want to sew. The upper thread tension is correct appropriate for the type...are using is not Attach the presser foot that has been designed for models equipped with the machine cannot be removed. sew. Replace the needle plate. Contact your retailer or the nearest authorized service center. - Only use the start/stop button was not threaded correctly. page 39 Fabric ...
.... button was not pressed (for the type of fabric. Lift up the fabric and cut the threads below the needle plate. Correct the upper threading. page 23 The needle is turned off. The presser foot you want to sew. The upper thread tension is correct appropriate for the type...are using is not Attach the presser foot that has been designed for models equipped with the machine cannot be removed. sew. Replace the needle plate. Contact your retailer or the nearest authorized service center. - Only use the start/stop button was not threaded correctly. page 39 Fabric ...
Users Manual - English
Page 105
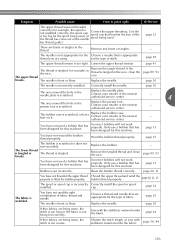
...is tangled in the race. If the thread is tangled, for example, in the race, clean the race. Replace the needle. page 30 The area around the hole in the needle plate is scratched. Contact your retailer or the nearest authorised service center. - page 15 You have not threaded the upper thread ... There are being sewn, the stitch is too long or the fabric is too big for the spool being fed correctly. breaks. Replace the needle plate. page 29 page 30 If thin fabrics are knots or tangles in the thread. Symptom Possible cause How to put it . cap.
...is tangled in the race. If the thread is tangled, for example, in the race, clean the race. Replace the needle. page 30 The area around the hole in the needle plate is scratched. Contact your retailer or the nearest authorised service center. - page 15 You have not threaded the upper thread ... There are being sewn, the stitch is too long or the fabric is too big for the spool being fed correctly. breaks. Replace the needle plate. page 29 page 30 If thin fabrics are knots or tangles in the thread. Symptom Possible cause How to put it . cap.
Users Manual - English
Page 106
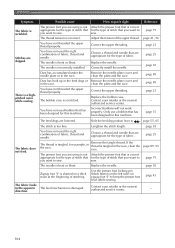
...The presser foot you want to sew. page 23 You have not used the right combination of fabric. Replace the needle. Remove the needle plate cover and clean the plate and the race. page 89 You have not threaded the upper thread properly. Incorrect bobbins will not work properly. Choose...highpitched noise while sewing. page 89 Dust has built up in the feed dogs or Remove the needle plate cover and in the race, clean the race. Lengthen the stitch length. Replace the needle. There is scratched. page 23 Replace the bobbin case. Contact your retailer or the nearest -...
...The presser foot you want to sew. page 23 You have not used the right combination of fabric. Replace the needle. Remove the needle plate cover and clean the plate and the race. page 89 You have not threaded the upper thread properly. Incorrect bobbins will not work properly. Choose...highpitched noise while sewing. page 89 Dust has built up in the feed dogs or Remove the needle plate cover and in the race, clean the race. Lengthen the stitch length. Replace the needle. There is scratched. page 23 Replace the bobbin case. Contact your retailer or the nearest -...
Users Manual - English
Page 109
...és 61 N needle 29 B bar tack 66 , needle bar thread guide 9 26 , needle clamp screw 9 31 basic stitching 47 blind hem stitching 48 needle plate 9 , needle plate cover 9 89 bobbin 20 needle position 47 bobbin case 21 bobbin , cover 9 20, 21 needle position button 9 , needle threader 9 26 bobbin...68 R race 89 reinforcement stitching 40 , reverse/reinforcement stitch button 9 40 S scallop stitching 70 seam ripper 54 sewing machine needles 29 , sewing speed controller 9 13 sewing the character stitches 76 sleeve holes 66 smocking 70 spool cap 6 10, 15, ...
...és 61 N needle 29 B bar tack 66 , needle bar thread guide 9 26 , needle clamp screw 9 31 basic stitching 47 blind hem stitching 48 needle plate 9 , needle plate cover 9 89 bobbin 20 needle position 47 bobbin case 21 bobbin , cover 9 20, 21 needle position button 9 , needle threader 9 26 bobbin...68 R race 89 reinforcement stitching 40 , reverse/reinforcement stitch button 9 40 S scallop stitching 70 seam ripper 54 sewing machine needles 29 , sewing speed controller 9 13 sewing the character stitches 76 sleeve holes 66 smocking 70 spool cap 6 10, 15, ...


