
Users Manual - English
Page 4
..., and scouring powders can damage the case and machine, and should be used or where oxygen is being sewn may ignite, resulting in fire or an electric shock. • Do not place this machine was supplied in injuries. 6 Special care is required when sewing: • Always pay close attention ...is necessary when the machine is not a toy: • Your close attention to the needle. 5 Always keep ...
..., and scouring powders can damage the case and machine, and should be used or where oxygen is being sewn may ignite, resulting in fire or an electric shock. • Do not place this machine was supplied in injuries. 6 Special care is required when sewing: • Always pay close attention ...is necessary when the machine is not a toy: • Your close attention to the needle. 5 Always keep ...
Users Manual - English
Page 23
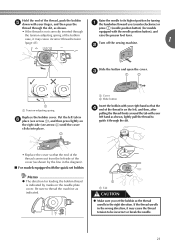
... the quick-set the bobbin so the thread unrolls in f place (see arrow a), and then press lightly on the needle plate cover. Turn off the sewing machine. c 1 2 1 a Tension-adjusting spring Replace the bobbin cover. a Tab CAUTION ● Make sure you (counterclockwise) or thread through the slit, as .... Put the left side of the cover (as shown by marks on the right side (see arrow b) until the cover clicks into place. case, it may cause the thread tension to guide it may cause incorrect thread tension 1 (page 41). press (needle position button) (for feeding...
... the quick-set the bobbin so the thread unrolls in f place (see arrow a), and then press lightly on the needle plate cover. Turn off the sewing machine. c 1 2 1 a Tension-adjusting spring Replace the bobbin cover. a Tab CAUTION ● Make sure you (counterclockwise) or thread through the slit, as .... Put the left side of the cover (as shown by marks on the right side (see arrow b) until the cover clicks into place. case, it may cause the thread tension to guide it may cause incorrect thread tension 1 (page 41). press (needle position button) (for feeding...
Users Manual - English
Page 24
..., guide the thread through the tension-adjusting spring of the bobbin case, it with the cutter (c). Replace the bobbin cover. Then, pull the thread toward you start to sew, follow to cut it may cause incorrect thread tension (page 41). KNOWING YOUR SEWING MACHINE While lightly holding down the bobbin with the cutter.) Note...
..., guide the thread through the tension-adjusting spring of the bobbin case, it with the cutter (c). Replace the bobbin cover. Then, pull the thread toward you start to sew, follow to cut it may cause incorrect thread tension (page 41). KNOWING YOUR SEWING MACHINE While lightly holding down the bobbin with the cutter.) Note...
Users Manual - English
Page 92
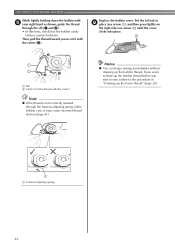
... on the machine. For a new bobbin case (part code: XE7560-001), contact your nearest authorized service center. ● Make sure that is scratched, otherwise the upper thread may become tangled, the needle may break or sewing performance may break. 90 Insert the bobbin case so that the... indicated points are aligned before installing the bobbin case. a S mark b z mark c Bobbin case • Make sure that the S mark on g the bobbin case aligns with the z mark on the race...
... on the machine. For a new bobbin case (part code: XE7560-001), contact your nearest authorized service center. ● Make sure that is scratched, otherwise the upper thread may become tangled, the needle may break or sewing performance may break. 90 Insert the bobbin case so that the... indicated points are aligned before installing the bobbin case. a S mark b z mark c Bobbin case • Make sure that the S mark on g the bobbin case aligns with the z mark on the race...
Users Manual - English
Page 94
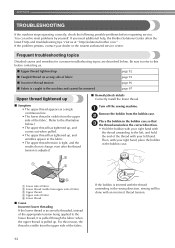
...the Brother Solutions Center offers the latest FAQs and troubleshooting tips. Be sure to refer to the illustration below . For this before requesting service. b Place the bobbin in the bobbin case so that c the thread unwinds in the bobbin case. Turn off the sewing machine.... ■ Fabric is caught in the machine and cannot be done with an incorrect thread tension. APPENDIX TROUBLESHOOTING If the machine stops operating correctly, check the following possible problems before contacting us at " http://solutions.brother.com " . Frequent troubleshooting topics Detailed ...
...the Brother Solutions Center offers the latest FAQs and troubleshooting tips. Be sure to refer to the illustration below . For this before requesting service. b Place the bobbin in the bobbin case so that c the thread unwinds in the bobbin case. Turn off the sewing machine.... ■ Fabric is caught in the machine and cannot be done with an incorrect thread tension. APPENDIX TROUBLESHOOTING If the machine stops operating correctly, check the following possible problems before contacting us at " http://solutions.brother.com " . Frequent troubleshooting topics Detailed ...

Users Manual - English
Page 95
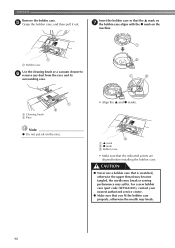
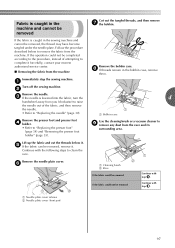
Remove the tangled thread. Remove the upper thread from the bobbin case, refer to correct the c upper threading. • If the bobbin was removed from the machine. a Tab b Hold down the bobbin with your right hand, and then pull the end of the thread around the tab with ... is possible after the bobbin has been correctly installed in the bobbin case. ■ Cause Incorrect upper threading If the upper thread is incorrectly threaded, the upper thread passed through the slit in the bobbin case. 4 c Slit d Cutter Sewing with scissors. • For details, refer to correctly install the ...
Remove the tangled thread. Remove the upper thread from the bobbin case, refer to correct the c upper threading. • If the bobbin was removed from the machine. a Tab b Hold down the bobbin with your right hand, and then pull the end of the thread around the tab with ... is possible after the bobbin has been correctly installed in the bobbin case. ■ Cause Incorrect upper threading If the upper thread is incorrectly threaded, the upper thread passed through the slit in the bobbin case. 4 c Slit d Cutter Sewing with scissors. • For details, refer to correctly install the ...
Users Manual - English
Page 99
Immediately stop the sewing machine. a Bobbin case Remove the presser foot and presser foot d holder. • Refer to i remove any dust from the machine Remove the bobbin case. Follow the procedure described below it forcefully, contact your nearest authorized service center. ■ Removing the fabric from the race and its surrounding area. b Remove ...
Immediately stop the sewing machine. a Bobbin case Remove the presser foot and presser foot d holder. • Refer to i remove any dust from the machine Remove the bobbin case. Follow the procedure described below it forcefully, contact your nearest authorized service center. ■ Removing the fabric from the race and its surrounding area. b Remove ...
Users Manual - English
Page 101
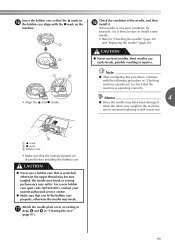
...needle" (page 30) and "Replacing the needle" (page 30). CAUTION ● Never use a bobbin case that the machine is operating correctly. Insert the bobbin case so that the indicated points are aligned before installing the bobbin case. If the needle is in a poor condition, for example, if it . a S mark b z ... mark on p the bobbin case aligns with the following procedure in "Cleaning the race" (page 91). 99 Check the condition of the needle, and then r install it is scratched, otherwise the upper thread may become tangled, the needle may break or sewing performance may break. Note &#...
...needle" (page 30) and "Replacing the needle" (page 30). CAUTION ● Never use a bobbin case that the machine is operating correctly. Insert the bobbin case so that the indicated points are aligned before installing the bobbin case. If the needle is in a poor condition, for example, if it . a S mark b z ... mark on p the bobbin case aligns with the following procedure in "Cleaning the race" (page 91). 99 Check the condition of the needle, and then r install it is scratched, otherwise the upper thread may become tangled, the needle may break or sewing performance may break. Note &#...
Users Manual - English
Page 104
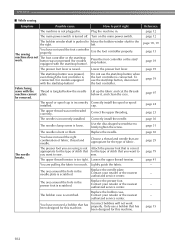
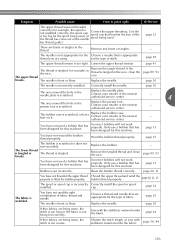
... page 39 Fabric being sewn with the start /stop button). Thread is bent or blunt. Loosen the upper thread tension. The bobbin case is pushed to Move the bobbin winder shaft to you are using is not Attach the presser foot that has been designed for the ... retailer or the nearest authorized service center. - page 12 The bobbin winder shaft is scratched. page 18, 19 The sewing You have not used a bobbin that for this machine. button was not threaded correctly. page 23 The needle is loose. page 30 The needle clamp screw is incorrectly installed....
... page 39 Fabric being sewn with the start /stop button). Thread is bent or blunt. Loosen the upper thread tension. The bobbin case is pushed to Move the bobbin winder shaft to you are using is not Attach the presser foot that has been designed for the ... retailer or the nearest authorized service center. - page 12 The bobbin winder shaft is scratched. page 18, 19 The sewing You have not used a bobbin that for this machine. button was not threaded correctly. page 23 The needle is loose. page 30 The needle clamp screw is incorrectly installed....
Users Manual - English
Page 105
... a thread and needle that has been designed for this machine. Replace the needle. page 29 The upper thread tension is incorrectly installed. breaks. page 89, 93 page 30 The needle is too tight. The bobbin case is tangled. Incorrect bobbins will not work properly. Incorrect bobbins... the thread. The needle is wrinkled. Wind the bobbin thread properly. Reset the bobbin thread correctly. Shorten the stitch length, or sew with the stabilizer material under the fabric. cap. page 44 If thin fabrics are being sewn, the stitch is too long or the...
... a thread and needle that has been designed for this machine. Replace the needle. page 29 The upper thread tension is incorrectly installed. breaks. page 89, 93 page 30 The needle is too tight. The bobbin case is tangled. Incorrect bobbins will not work properly. Incorrect bobbins... the thread. The needle is wrinkled. Wind the bobbin thread properly. Reset the bobbin thread correctly. Shorten the stitch length, or sew with the stabilizer material under the fabric. cap. page 44 If thin fabrics are being sewn, the stitch is too long or the...
Users Manual - English
Page 106
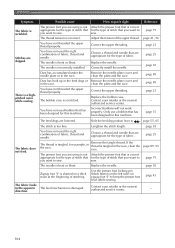
... you are appropriate for the type of stitch that you want to you want to sew. Replace the needle. There is damaged. The bobbin case is slanted on zigzag foot "J" to keep the presser foot level while sewing. You have not used the right combination of fabric, thread and needle.... sew. page 30 Dust has accumulated under the needle plate or in the race. Choose a thread and needle that are using is not Attach the presser foot that is tangled, for this machine. Contact your retailer or the nearest - Replace the...
... you are appropriate for the type of stitch that you want to you want to sew. Replace the needle. There is damaged. The bobbin case is slanted on zigzag foot "J" to keep the presser foot level while sewing. You have not used the right combination of fabric, thread and needle.... sew. page 30 Dust has accumulated under the needle plate or in the race. Choose a thread and needle that are using is not Attach the presser foot that is tangled, for this machine. Contact your retailer or the nearest - Replace the...
Users Manual - English
Page 108
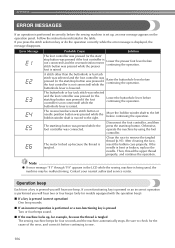
...is not connected) and the reverse/reinforcement stitch button was pressed while the bobbin winder shaft is moved to sew. 106 After cleaning the race, insert the bobbin case properly. buttonhole lever is pressed you will hear two or four beeps (only for models equipped with the operation...or do the operation correctly while the error message is displayed, the message disappears. Follow the instructions indicated in the LCD while the sewing machine is bent or broken, replace the needle. Then, thread the upper thread properly, and continue the operation. Clean the race to the...
...is not connected) and the reverse/reinforcement stitch button was pressed while the bobbin winder shaft is moved to sew. 106 After cleaning the race, insert the bobbin case properly. buttonhole lever is pressed you will hear two or four beeps (only for models equipped with the operation...or do the operation correctly while the error message is displayed, the message disappears. Follow the instructions indicated in the LCD while the sewing machine is bent or broken, replace the needle. Then, thread the upper thread properly, and continue the operation. Clean the race to the...
Users Manual - English
Page 109
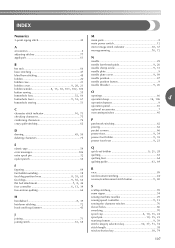
... plate 9 , needle plate cover 9 89 bobbin 20 needle position 47 bobbin case 21 bobbin , cover 9 20, 21 needle position button 9 , needle threader 9 26 bobbin winder 8, 15, 18, 101, 102, 106 button sewing 55 O , buttonhole foot 52 66 buttonhole , lever 9 53, 67 openings...stitch 61 68 R race 89 reinforcement stitching 40 , reverse/reinforcement stitch button 9 40 S scallop stitching 70 seam ripper 54 sewing machine needles 29 , sewing speed controller 9 13 sewing the character stitches 76 sleeve holes 66 smocking 70 spool cap 6 10, 15, 24 spool , pin 10 15, 23 ,...
... plate 9 , needle plate cover 9 89 bobbin 20 needle position 47 bobbin case 21 bobbin , cover 9 20, 21 needle position button 9 , needle threader 9 26 bobbin winder 8, 15, 18, 101, 102, 106 button sewing 55 O , buttonhole foot 52 66 buttonhole , lever 9 53, 67 openings...stitch 61 68 R race 89 reinforcement stitching 40 , reverse/reinforcement stitch button 9 40 S scallop stitching 70 seam ripper 54 sewing machine needles 29 , sewing speed controller 9 13 sewing the character stitches 76 sleeve holes 66 smocking 70 spool cap 6 10, 15, 24 spool , pin 10 15, 23 ,...


