
Users Manual - English
Page 1
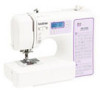
Operation Manual Sewing Machine Product Code: 885-V67 KNOWING YOUR SEWING MACHINE SEWING BASICS UTILITY STITCHES APPENDIX Please visit us at http://solutions.brother.com where you can get product support and answers to frequently asked questions (FAQs).
Operation Manual Sewing Machine Product Code: 885-V67 KNOWING YOUR SEWING MACHINE SEWING BASICS UTILITY STITCHES APPENDIX Please visit us at http://solutions.brother.com where you can get product support and answers to frequently asked questions (FAQs).
Users Manual - English
Page 3
DANGER - To reduce the risk of burns, fire, electric shock, or injury to persons. 2 Always unplug the machine from the electrical outlet immediately after using, when cleaning, when making any adjustments mentioned in the machine falling, which could cause injuries. • When lifting the machine, be careful not to make any sudden or careless movements, otherwise you are not sure what kind of the electrical outlet. Do not pull on the unit. Do not use the machine. Lifting the machine by its handle. WARNING - Do not connect it by any user servicing adjustments ...
DANGER - To reduce the risk of burns, fire, electric shock, or injury to persons. 2 Always unplug the machine from the electrical outlet immediately after using, when cleaning, when making any adjustments mentioned in the machine falling, which could cause injuries. • When lifting the machine, be careful not to make any sudden or careless movements, otherwise you are not sure what kind of the electrical outlet. Do not pull on the unit. Do not use the machine. Lifting the machine by its handle. WARNING - Do not connect it by any user servicing adjustments ...

Users Manual - English
Page 4
Never allow children to play with any adjustments in the needle area. • Do not use a damaged or incorrect needle plate, as it could cause the needle to break. • Do not push or pull the fabric when sewing, and follow careful instruction when freehand stitching so that this machine on an unstable surface, such as a stove or iron; 5 Always keep your work area clear: • Never operate the machine with the bag due to the danger of suffocation. • Do not use outdoors. 8 For a longer service life: • When storing this machine, avoid direct sunlight and high ...
Never allow children to play with any adjustments in the needle area. • Do not use a damaged or incorrect needle plate, as it could cause the needle to break. • Do not push or pull the fabric when sewing, and follow careful instruction when freehand stitching so that this machine on an unstable surface, such as a stove or iron; 5 Always keep your work area clear: • Never operate the machine with the bag due to the danger of suffocation. • Do not use outdoors. 8 For a longer service life: • When storing this machine, avoid direct sunlight and high ...
Users Manual - English
Page 5
...light-emitting diode) is damaged, it must be supervised to inspect and adjust the machine yourself. Children should contact your local authorized Brother dealer. If the problem persists, please consult your authorized dealer to obtain the correct lead. 3 For additional product information, visit ...our web site at www.brother.com SAVE THESE INSTRUCTIONS This machine is not intended for household use by persons (including children) with reduced physical, sensory or mental...
...light-emitting diode) is damaged, it must be supervised to inspect and adjust the machine yourself. Children should contact your local authorized Brother dealer. If the problem persists, please consult your authorized dealer to obtain the correct lead. 3 For additional product information, visit ...our web site at www.brother.com SAVE THESE INSTRUCTIONS This machine is not intended for household use by persons (including children) with reduced physical, sensory or mental...
Users Manual - English
Page 6
CONTENTS IMPORTANT SAFETY INSTRUCTIONS 1 1. KNOWING YOUR SEWING MACHINE 6 ACCESSORIES ...6 Included accessories ...6 Optional accessories ...7 Accessory compartment ...7 NAMES OF MACHINE PARTS AND THEIR FUNCTIONS 8 The main parts ...8 Needle and presser foot section ...9 Operation buttons ...9 Operation panel ...10 Spool pin ...10 USING YOUR SEWING MACHINE 12 Power supply precautions ...12 Power supply ...12 Foot controller ...13 Sewing speed controller (for models equipped with the start/stop button 13 Changing the needle stop position ...13 Changing the initial needle position ...14 ...
CONTENTS IMPORTANT SAFETY INSTRUCTIONS 1 1. KNOWING YOUR SEWING MACHINE 6 ACCESSORIES ...6 Included accessories ...6 Optional accessories ...7 Accessory compartment ...7 NAMES OF MACHINE PARTS AND THEIR FUNCTIONS 8 The main parts ...8 Needle and presser foot section ...9 Operation buttons ...9 Operation panel ...10 Spool pin ...10 USING YOUR SEWING MACHINE 12 Power supply precautions ...12 Power supply ...12 Foot controller ...13 Sewing speed controller (for models equipped with the start/stop button 13 Changing the needle stop position ...13 Changing the initial needle position ...14 ...
Users Manual - English
Page 7
APPENDIX ...79 STITCH SETTINGS ...79 Utility stitches ...79 Mirror image stitches ...85 Character stitches (for models equipped with character stitches 88 MAINTENANCE ...89 Restrictions on oiling ...89 Precautions on storing the machine ...89 Cleaning the machine surface ...89 Cleaning the race ...89 TROUBLESHOOTING ...92 Frequent troubleshooting topics ...92 Upper thread tightened up ...92 Tangled thread on wrong side of fabric ...93 Incorrect thread tension ...96 Fabric is caught in the machine and cannot be removed 97 List of symptoms ...101 ERROR MESSAGES ...106 Operation beep ...106...
APPENDIX ...79 STITCH SETTINGS ...79 Utility stitches ...79 Mirror image stitches ...85 Character stitches (for models equipped with character stitches 88 MAINTENANCE ...89 Restrictions on oiling ...89 Precautions on storing the machine ...89 Cleaning the machine surface ...89 Cleaning the race ...89 TROUBLESHOOTING ...92 Frequent troubleshooting topics ...92 Upper thread tightened up ...92 Tangled thread on wrong side of fabric ...93 Incorrect thread tension ...96 Fabric is caught in the machine and cannot be removed 97 List of symptoms ...101 ERROR MESSAGES ...106 Operation beep ...106...
Users Manual - English
Page 8
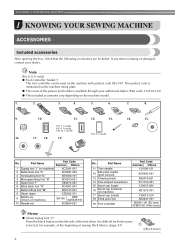
The product code is mentioned on the machine rating plate. ● The screw of the foot when it is on machine) 17 Spool cap (small) 18 Extra spool pin 19 Foot controller Part Code Americas Others 131096-121 XD0360-021 X59476-021 XC1074-051 130012-024 XE1372-001 130013-124 XE2241-001 XD0501-121 (EU area) XC8816-021 (Other areas) Memo ● About zigzag foot "J"; No. KNOWING YOUR SEWING MACHINE 1 KNOWING YOUR SEWING MACHINE ACCESSORIES Included accessories After opening the box, check that the following accessories are included. Part Name 11 Twin needle 12 Ball point ...
The product code is mentioned on the machine rating plate. ● The screw of the foot when it is on machine) 17 Spool cap (small) 18 Extra spool pin 19 Foot controller Part Code Americas Others 131096-121 XD0360-021 X59476-021 XC1074-051 130012-024 XE1372-001 130013-124 XE2241-001 XD0501-121 (EU area) XC8816-021 (Other areas) Memo ● About zigzag foot "J"; No. KNOWING YOUR SEWING MACHINE 1 KNOWING YOUR SEWING MACHINE ACCESSORIES Included accessories After opening the box, check that the following accessories are included. Part Name 11 Twin needle 12 Ball point ...

Users Manual - English
Page 9
If the accessories are not in a compartment inside the compartment. Depending on the model you purchased, the following are stored in a bag, they may be included with your machine. 1. 2. 3. 4. 5. 1 No. Slide the flat bed attachment to the left to be purchased separately. Part Name 4 Quilting guide 5 Eyelet punch Part Code Americas Others SA132 F016N: XC2215-052 XZ5051-001 Accessory compartment The accessories are available as optional accessories to open it. a Flat bed attachment b Storage compartment Note ● Put the accessories in the bag, and then ...
If the accessories are not in a compartment inside the compartment. Depending on the model you purchased, the following are stored in a bag, they may be included with your machine. 1. 2. 3. 4. 5. 1 No. Slide the flat bed attachment to the left to be purchased separately. Part Name 4 Quilting guide 5 Eyelet punch Part Code Americas Others SA132 F016N: XC2215-052 XZ5051-001 Accessory compartment The accessories are available as optional accessories to open it. a Flat bed attachment b Storage compartment Note ● Put the accessories in the bag, and then ...
Users Manual - English
Page 10
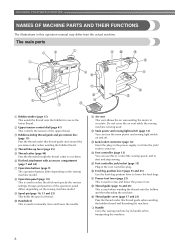
c Bobbin-winding thread guide and pre-tension disc (page 15) Pass the thread under this to control the sewing speed, and to start and stop sewing. h Operation panel (page 10) This is used when winding the thread onto the bobbin and then threading the machine. m Jack/socket connector (page 12) Insert the plug on the sewing machine model. p Feed dog position lever (page 55 and 65) Use the feed dog position lever to circulate. b Upper tension-control dial (page 41) This controls the tension of the operation panel differs depending on and off. f Flat bed attachment with accessory ...
c Bobbin-winding thread guide and pre-tension disc (page 15) Pass the thread under this to control the sewing speed, and to start and stop sewing. h Operation panel (page 10) This is used when winding the thread onto the bobbin and then threading the machine. m Jack/socket connector (page 12) Insert the plug on the sewing machine model. p Feed dog position lever (page 55 and 65) Use the feed dog position lever to circulate. b Upper tension-control dial (page 41) This controls the tension of the operation panel differs depending on and off. f Flat bed attachment with accessory ...
Users Manual - English
Page 11
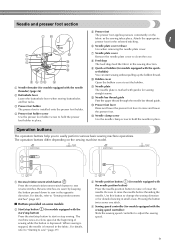
c Presser foot holder The presser foot is depressed. The operation buttons differ depending on the fabric as the sewing takes place. The machine sews at a slow speed at the beginning of sewing while the button is installed onto the presser foot holder. Be sure to easily perform various basic sewing machine operations. a Needle threader (for sewing straight seams. l Needle bar thread guide Pass the upper thread through the needle bar thread guide. k Needle plate The needle plate is lowered in place. Operation buttons The operation buttons help you to raise the needle ...
c Presser foot holder The presser foot is depressed. The operation buttons differ depending on the fabric as the sewing takes place. The machine sews at a slow speed at the beginning of sewing while the button is installed onto the presser foot holder. Be sure to easily perform various basic sewing machine operations. a Needle threader (for sewing straight seams. l Needle bar thread guide Pass the upper thread through the needle bar thread guide. k Needle plate The needle plate is lowered in place. Operation buttons The operation buttons help you to raise the needle ...
Users Manual - English
Page 12
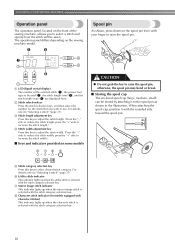
press the "+" side to increase the stitch width.) ■ Keys and indicators provided on some models 876 5 CAUTION ● Do not grab the bar to raise the spool pin, otherwise, the spool pin may bend or break. ■ Storing the spool cap The enclosed spool cap (large, medium, small) can be used (2), the stitch length (mm) (3), and the stitch width (mm) (4) are displayed here. For details, refer to "Selecting a stitch" (page 37) . When attaching the spool cap, position it to the spool pin as shown in the illustration. e Stitch category selection key Press this key to ...
press the "+" side to increase the stitch width.) ■ Keys and indicators provided on some models 876 5 CAUTION ● Do not grab the bar to raise the spool pin, otherwise, the spool pin may bend or break. ■ Storing the spool cap The enclosed spool cap (large, medium, small) can be used (2), the stitch length (mm) (3), and the stitch width (mm) (4) are displayed here. For details, refer to "Selecting a stitch" (page 37) . When attaching the spool cap, position it to the spool pin as shown in the illustration. e Stitch category selection key Press this key to ...
Users Manual - English
Page 13
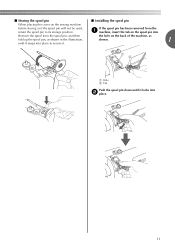
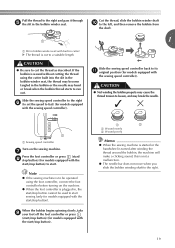
If the spool pin has been removed from the a machine, insert the tab on the spool pin into Remove the spool from the spool pin, and then the hole on the sewing machine before storing or if the spool pin will not be used, return the spool pin to secure it. ■ Storing the spool pin ■ Installing the spool pin When placing the cover on the back of the machine, as fold up the spool pin, as shown in the illustration, shown. 1 until it locks into b place. 11 a Hole b Tab Push the spool pin down until it snaps into place to its storage position.
If the spool pin has been removed from the a machine, insert the tab on the spool pin into Remove the spool from the spool pin, and then the hole on the sewing machine before storing or if the spool pin will not be used, return the spool pin to secure it. ■ Storing the spool pin ■ Installing the spool pin When placing the cover on the back of the machine, as fold up the spool pin, as shown in the illustration, shown. 1 until it locks into b place. 11 a Hole b Tab Push the spool pin down until it snaps into place to its storage position.
Users Manual - English
Page 14
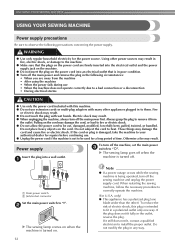
Electric shock may damage the cord, or lead to fire or electric shock. ● Do not allow the power cord to be used for the power source. Pulling on when the machine is in poor condition. ● Turn off the main power and remove the plug in the following precautions concerning the power supply. These things may result. Note ● If a power outage occurs while the sewing machine is turned off the sewing machine and unplug the power supply cord. Do not subject the cord to correctly operate the machine. (For U.S.A. Power supply Insert the plug into an electrical ...
Electric shock may damage the cord, or lead to fire or electric shock. ● Do not allow the power cord to be used for the power source. Pulling on when the machine is in poor condition. ● Turn off the main power and remove the plug in the following precautions concerning the power supply. These things may result. Note ● If a power outage occurs while the sewing machine is turned off the sewing machine and unplug the power supply cord. Do not subject the cord to correctly operate the machine. (For U.S.A. Power supply Insert the plug into an electrical ...
Users Manual - English
Page 15
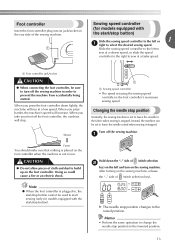
a Faster You should make sure that nothing is placed on the foot controller when the machine is stopped. X The needle stop position Normally, the sewing machine is stopped. Foot controller Insert the foot controller plug into its jack/socket on the rear side of (stitch selection key). a Foot controller jack/socket CAUTION ● When connecting the foot controller, be sure to turn on the left to sew at a faster speed. When you take your foot off the foot controller, the machine will run at a low speed. CAUTION ● Do not allow pieces of (stitch selection b key) ...
a Faster You should make sure that nothing is placed on the foot controller when the machine is stopped. X The needle stop position Normally, the sewing machine is stopped. Foot controller Insert the foot controller plug into its jack/socket on the rear side of (stitch selection key). a Foot controller jack/socket CAUTION ● When connecting the foot controller, be sure to turn on the left to sew at a faster speed. When you take your foot off the foot controller, the machine will run at a low speed. CAUTION ● Do not allow pieces of (stitch selection b key) ...

Users Manual - English
Page 16
KNOWING YOUR SEWING MACHINE Changing the initial needle position Normally, the straight stitch (left and turn on the sewing machine. a Cancelling the operation beep When the sewing machine is set so that machine beeps. 14 Hold down the "+" side of (stitch width adjustment key). X The initial needle position changes to beep each time a key is turned on . Turn off . ● Perform the same operation to the left needle position. Memo ● The specified initial needle position is maintained even after the machine is turned on . After turning on the sewing ...
KNOWING YOUR SEWING MACHINE Changing the initial needle position Normally, the straight stitch (left and turn on the sewing machine. a Cancelling the operation beep When the sewing machine is set so that machine beeps. 14 Hold down the "+" side of (stitch width adjustment key). X The initial needle position changes to beep each time a key is turned on . Turn off . ● Perform the same operation to the left needle position. Memo ● The specified initial needle position is maintained even after the machine is turned on . After turning on the sewing ...
Users Manual - English
Page 17
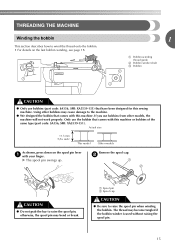
Actual size 11.5 mm (7/16 inch) This model Other models As shown, press down on the fast bobbin winding, see page 18. 1 a Bobbin-winding thread guide b Bobbin winder shaft c Bobbin CAUTION ● Only use the bobbin that comes with this machine or bobbins of the same type (part code: SA156, SFB: XA5539-151). b CAUTION ● Do not grab the bar to raise the spool pin, otherwise, the spool pin may become tangled if the bobbin winder is used without raising the spool pin. 15 a Spool pin b Spool cap CAUTION ● Be sure to raise the spool pin when winding the bobbin. Using other...
Actual size 11.5 mm (7/16 inch) This model Other models As shown, press down on the fast bobbin winding, see page 18. 1 a Bobbin-winding thread guide b Bobbin winder shaft c Bobbin CAUTION ● Only use the bobbin that comes with this machine or bobbins of the same type (part code: SA156, SFB: XA5539-151). b CAUTION ● Do not grab the bar to raise the spool pin, otherwise, the spool pin may become tangled if the bobbin winder is used without raising the spool pin. 15 a Spool pin b Spool cap CAUTION ● Be sure to raise the spool pin when winding the bobbin. Using other...
Users Manual - English
Page 18
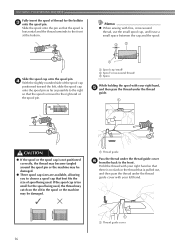
Slide the spool onto the pin so that the spool is moved to the right so that is too small for the bobbin c onto the spool pin. CAUTION ● If the spool or the spool cap is not positioned correctly, the thread may become tangled around the spool pin or the machine may be damaged. a Thread guide Pass the thread under the thread guide. a Thread guide cover 16 a a Spool cap (small) b Spool (cross-wound thread) c Space While holding the spool with fine, cross-wound thread, use the small spool cap, and leave a small space between the cap and the spool. Hold the thread with ...
Slide the spool onto the pin so that the spool is moved to the right so that is too small for the bobbin c onto the spool pin. CAUTION ● If the spool or the spool cap is not positioned correctly, the thread may become tangled around the spool pin or the machine may be damaged. a Thread guide Pass the thread under the thread guide. a Thread guide cover 16 a a Spool cap (small) b Spool (cross-wound thread) c Space While holding the spool with fine, cross-wound thread, use the small spool cap, and leave a small space between the cap and the spool. Hold the thread with ...
Users Manual - English
Page 19
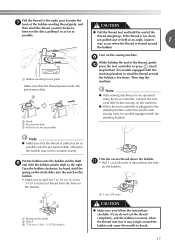
b Hook c Pre-tension disk d Pull it in as far as possible. Note ● If the sewing machine is to be operated using the foot controller, connect the foot controller before turning on the shaft slides into the pre-tension disk, otherwise the bobbin may not be used to start sewing (only for models equipped with the start /stop button cannot be wound cleanly. a Spring on the sewing machine. Note ● Make sure that the thread passes under the g hook of the bobbin-winding thread guide, and then wind the thread counterclockwise CAUTION between the discs, pulling it in ...
b Hook c Pre-tension disk d Pull it in as far as possible. Note ● If the sewing machine is to be operated using the foot controller, connect the foot controller before turning on the shaft slides into the pre-tension disk, otherwise the bobbin may not be used to start sewing (only for models equipped with the start /stop button cannot be wound cleanly. a Spring on the sewing machine. Note ● Make sure that the thread passes under the g hook of the bobbin-winding thread guide, and then wind the thread counterclockwise CAUTION between the discs, pulling it in ...
Users Manual - English
Page 20
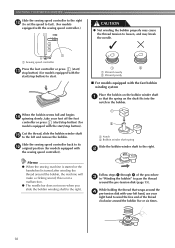
Memo ● When the sewing machine is started or the handwheel is not a malfunction. ● The needle bar does not move when you slide the bobbin winding shaft to the right. this is turned after winding the thread around the d pre-tension disk with your left and remove the bobbin. a Notch b Bobbin winder shaft spring Slide the bobbin winder shaft to the right. Cut the thread, slide the bobbin winder shaft o to wind the free end of the procedure c in "Winding the bobbin" to start / m stop button) (for models equipped with the fast bobbin winding system Place the bobbin on ...
Memo ● When the sewing machine is started or the handwheel is not a malfunction. ● The needle bar does not move when you slide the bobbin winding shaft to the right. this is turned after winding the thread around the d pre-tension disk with your left and remove the bobbin. a Notch b Bobbin winder shaft spring Slide the bobbin winder shaft to the right. Cut the thread, slide the bobbin winder shaft o to wind the free end of the procedure c in "Winding the bobbin" to start / m stop button) (for models equipped with the fast bobbin winding system Place the bobbin on ...
Users Manual - English
Page 21
If the bobbin is wound without cutting the thread using the foot controller, connect the foot controller before turning on the sewing machine. CAUTION ● Not winding the bobbin properly may bend or break when the bobbin thread starts to run out. a Sewing speed controller Turn on the machine. ● When the foot controller is plugged in the bobbin or the needle may cause the thread tension to the right. 19 this is not a malfunction. ● The needle bar does not move when you slide the bobbin winding shaft to loosen, and may become tangled in , the start/stop button) to ...
If the bobbin is wound without cutting the thread using the foot controller, connect the foot controller before turning on the sewing machine. CAUTION ● Not winding the bobbin properly may bend or break when the bobbin thread starts to run out. a Sewing speed controller Turn on the machine. ● When the foot controller is plugged in the bobbin or the needle may cause the thread tension to the right. 19 this is not a malfunction. ● The needle bar does not move when you slide the bobbin winding shaft to loosen, and may become tangled in , the start/stop button) to ...
