
Users Manual - English
Page 1
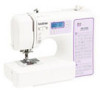
Operation Manual Sewing Machine Product Code: 885-V67 KNOWING YOUR SEWING MACHINE SEWING BASICS UTILITY STITCHES APPENDIX Please visit us at http://solutions.brother.com where you can get product support and answers to frequently asked questions (FAQs).
Operation Manual Sewing Machine Product Code: 885-V67 KNOWING YOUR SEWING MACHINE SEWING BASICS UTILITY STITCHES APPENDIX Please visit us at http://solutions.brother.com where you can get product support and answers to frequently asked questions (FAQs).
Users Manual - English
Page 3
...notice anything unusual, such as an odor, heat, discoloration or deformation, stop using , when cleaning, when making any user servicing adjustments mentioned in this machine if it has a damaged cord or plug, if it is not working properly, if it by any sudden or careless movements, otherwise you may ... out of purchase only. 4 Never operate this manual, or if you are not sure what kind of power source you are leaving the machine unattended. WARNING - Lifting the machine by its handle. To reduce the risk of burns, fire, electric shock, or injury to persons. 2 Always unplug the...
...notice anything unusual, such as an odor, heat, discoloration or deformation, stop using , when cleaning, when making any user servicing adjustments mentioned in this machine if it has a damaged cord or plug, if it is not working properly, if it by any sudden or careless movements, otherwise you may ... out of purchase only. 4 Never operate this manual, or if you are not sure what kind of power source you are leaving the machine unattended. WARNING - Lifting the machine by its handle. To reduce the risk of burns, fire, electric shock, or injury to persons. 2 Always unplug the...

Users Manual - English
Page 4
...up of lint, dust, and loose cloth. • Do not store objects on an unstable surface, such as an unsteady or slanted table, otherwise the machine may fall, resulting in the needle area. • Do not use a damaged or incorrect needle plate, as a stove or iron; Benzene, thinner, ...and scouring powders can damage the case and machine, and should be used. • Always consult the operation manual when replacing or installing any adjustments in injuries. 6 Special care is used or where oxygen...
...up of lint, dust, and loose cloth. • Do not store objects on an unstable surface, such as an unsteady or slanted table, otherwise the machine may fall, resulting in the needle area. • Do not use a damaged or incorrect needle plate, as a stove or iron; Benzene, thinner, ...and scouring powders can damage the case and machine, and should be used. • Always consult the operation manual when replacing or installing any adjustments in injuries. 6 Special care is used or where oxygen...
Users Manual - English
Page 5
... for their safety. For additional product information, visit our web site at www.brother.com SAVE THESE INSTRUCTIONS This machine is intended for household use of the appliance by a person responsible for its intended use as described in this manual. Use accessories ...replace the fuse cover. carrying the mark, rating as contained in the back of the operation manual to inspect and adjust the machine yourself. Children should contact your local authorized Brother dealer. Never use a fuse approved by authorized dealer. • In the event a malfunction occurs or adjustment is required,...
... for their safety. For additional product information, visit our web site at www.brother.com SAVE THESE INSTRUCTIONS This machine is intended for household use of the appliance by a person responsible for its intended use as described in this manual. Use accessories ...replace the fuse cover. carrying the mark, rating as contained in the back of the operation manual to inspect and adjust the machine yourself. Children should contact your local authorized Brother dealer. Never use a fuse approved by authorized dealer. • In the event a malfunction occurs or adjustment is required,...
Users Manual - English
Page 6
... 8 The main parts ...8 Needle and presser foot section ...9 Operation buttons ...9 Operation panel ...10 Spool pin ...10 USING YOUR SEWING MACHINE 12 Power supply precautions ...12 Power supply ...12 Foot controller ...13 Sewing speed controller (for models equipped with the start/stop button ...13 Changing the needle stop position ...13 Changing the initial needle position ...14 Cancelling the operation beep ...14 THREADING THE MACHINE 15 Winding the bobbin ...15 Lower threading ...20 Upper threading ...23 Drawing up the lower thread ...28 REPLACING THE NEEDLE 29 Needle ...
... 8 The main parts ...8 Needle and presser foot section ...9 Operation buttons ...9 Operation panel ...10 Spool pin ...10 USING YOUR SEWING MACHINE 12 Power supply precautions ...12 Power supply ...12 Foot controller ...13 Sewing speed controller (for models equipped with the start/stop button ...13 Changing the needle stop position ...13 Changing the initial needle position ...14 Cancelling the operation beep ...14 THREADING THE MACHINE 15 Winding the bobbin ...15 Lower threading ...20 Upper threading ...23 Drawing up the lower thread ...28 REPLACING THE NEEDLE 29 Needle ...
Users Manual - English
Page 7
...image stitches ...85 Character stitches (for models equipped with character stitches 88 MAINTENANCE ...89 Restrictions on oiling ...89 Precautions on storing the machine ...89 Cleaning the machine surface ...89 Cleaning the race ...89 TROUBLESHOOTING ...92 Frequent troubleshooting topics ...92 Upper thread tightened up ...92 Tangled thread on wrong ...side of fabric ...93 Incorrect thread tension ...96 Fabric is caught in the machine and cannot be removed 97 List of symptoms ...101 ERROR MESSAGES ...106 Operation beep ...106 INDEX ...107 5
...image stitches ...85 Character stitches (for models equipped with character stitches 88 MAINTENANCE ...89 Restrictions on oiling ...89 Precautions on storing the machine ...89 Cleaning the machine surface ...89 Cleaning the race ...89 TROUBLESHOOTING ...92 Frequent troubleshooting topics ...92 Upper thread tightened up ...92 Tangled thread on wrong ...side of fabric ...93 Incorrect thread tension ...96 Fabric is caught in the machine and cannot be removed 97 List of symptoms ...101 ERROR MESSAGES ...106 Operation beep ...106 INDEX ...107 5
Users Manual - English
Page 8
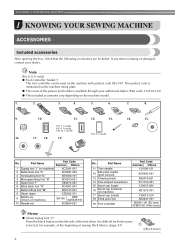
... stitch foot "R" XC4051-031 7 Button fitting foot "M" XE2137-001 8 Seam ripper XZ5082-001 9 Bobbin (4) (One is difficult for thick seams to be used on the machine model. 1. 2. 3. 4. 5. 6. 7. 8. 9. 10. 11. 12. 13. 75/11 1 needle 90/14 1 needle 100/16 1 needle 16. 17. 18. 19. 90/14 1 needle 14. 15. No.... Press the black button on the left side of the foot when it is on machine) 17 Spool cap (small) 18 Extra spool pin 19 Foot controller Part Code Americas Others 131096-121 XD0360-021 X59476-021 XC1074-051 130012-024...
... stitch foot "R" XC4051-031 7 Button fitting foot "M" XE2137-001 8 Seam ripper XZ5082-001 9 Bobbin (4) (One is difficult for thick seams to be used on the machine model. 1. 2. 3. 4. 5. 6. 7. 8. 9. 10. 11. 12. 13. 75/11 1 needle 90/14 1 needle 100/16 1 needle 16. 17. 18. 19. 90/14 1 needle 14. 15. No.... Press the black button on the left side of the foot when it is on machine) 17 Spool cap (small) 18 Extra spool pin 19 Foot controller Part Code Americas Others 131096-121 XD0360-021 X59476-021 XC1074-051 130012-024...

Users Manual - English
Page 9
... you purchased, the following are available as optional accessories to open it. Slide the flat bed attachment to the left to be included with your machine. 1. 2. 3. 4. 5. 1 No. Part Name 4 Quilting guide 5 Eyelet punch Part Code Americas Others SA132 F016N: XC2215-052 XZ5051-001 Accessory compartment The accessories are stored in a compartment...
... you purchased, the following are available as optional accessories to open it. Slide the flat bed attachment to the left to be included with your machine. 1. 2. 3. 4. 5. 1 No. Part Name 4 Quilting guide 5 Eyelet punch Part Code Americas Others SA132 F016N: XC2215-052 XZ5051-001 Accessory compartment The accessories are stored in a compartment...
Users Manual - English
Page 10
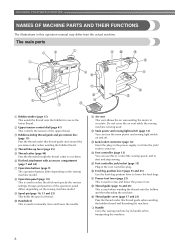
...of thread. s Thread guide cover (page 17 and 23) Pass the thread under this thread guide when winding the bobbin thread and threading the machine. d Thread take-up lever (page 25) e Thread cutter (page 40) Pass the threads through the thread cutter to circulate. Design and ...panel differs depending on the power supply cord into the jack/ socket connector. m Jack/socket connector (page 12) Insert the plug on the sewing machine model. r Thread guide (page 16 and 25) This is used to manually raise and lower the needle. f Flat bed attachment with accessory compartment ...
...of thread. s Thread guide cover (page 17 and 23) Pass the thread under this thread guide when winding the bobbin thread and threading the machine. d Thread take-up lever (page 25) e Thread cutter (page 40) Pass the threads through the thread cutter to circulate. Design and ...panel differs depending on the power supply cord into the jack/ socket connector. m Jack/socket connector (page 12) Insert the plug on the sewing machine model. r Thread guide (page 16 and 25) This is used to manually raise and lower the needle. f Flat bed attachment with accessory compartment ...
Users Manual - English
Page 11
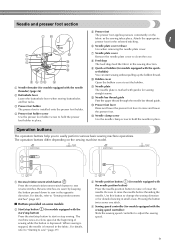
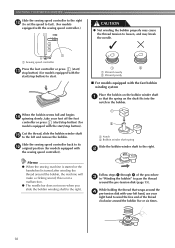
...set the bobbin. Pressing the button twice sews one stitch. j Bobbin cover Open the bobbin cover to easily perform various basic sewing machine operations. The machine sews at a slow speed at the beginning of sewing while the button is lowered in place. For details, refer to "Sewing ...needle. Be sure to clean the race. Needle and presser foot section e Presser foot The presser foot applies pressure consistently on the sewing machine model. h Feed dogs The feed dogs feed the fabric in small areas. c Needle position button (for models equipped with the needle position...
...set the bobbin. Pressing the button twice sews one stitch. j Bobbin cover Open the bobbin cover to easily perform various basic sewing machine operations. The machine sews at a slow speed at the beginning of sewing while the button is lowered in place. For details, refer to "Sewing ...needle. Be sure to clean the race. Needle and presser foot section e Presser foot The presser foot applies pressure consistently on the sewing machine model. h Feed dogs The feed dogs feed the fabric in small areas. c Needle position button (for models equipped with the needle position...
Users Manual - English
Page 12
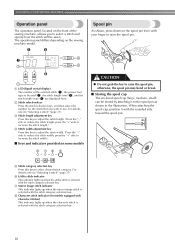
... it to raise the spool pin. h Character stitch indicator (for the stitch that you to use. a LCD (liquid crystal display) The number of the sewing machine, allows you wish to select a stitch and specify how the stitch will be used (2), the stitch length (mm) (3), and the stitch width (mm) (4) are displayed... sewn. The operation panel differs depending on the front of the selected stitch (1), the presser foot type to "Selecting a stitch" (page 37) . KNOWING YOUR SEWING MACHINE Operation panel The operation panel, located on the sewing...
... it to raise the spool pin. h Character stitch indicator (for the stitch that you to use. a LCD (liquid crystal display) The number of the sewing machine, allows you wish to select a stitch and specify how the stitch will be used (2), the stitch length (mm) (3), and the stitch width (mm) (4) are displayed... sewn. The operation panel differs depending on the front of the selected stitch (1), the presser foot type to "Selecting a stitch" (page 37) . KNOWING YOUR SEWING MACHINE Operation panel The operation panel, located on the sewing...
Users Manual - English
Page 13
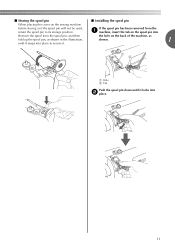
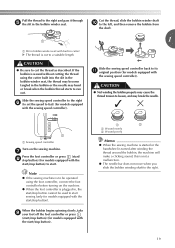
a Hole b Tab Push the spool pin down until it snaps into b place. 11 If the spool pin has been removed from the a machine, insert the tab on the spool pin into Remove the spool from the spool pin, and then the hole on the sewing machine before storing or if the spool pin will not be used, return the spool pin to secure it. ■ Storing the spool pin ■ Installing the spool pin When placing the cover on the back of the machine, as fold up the spool pin, as shown in the illustration, shown. 1 until it locks into place to its storage position.
a Hole b Tab Push the spool pin down until it snaps into b place. 11 If the spool pin has been removed from the a machine, insert the tab on the spool pin into Remove the spool from the spool pin, and then the hole on the sewing machine before storing or if the spool pin will not be used, return the spool pin to secure it. ■ Storing the spool pin ■ Installing the spool pin When placing the cover on the back of the machine, as fold up the spool pin, as shown in the illustration, shown. 1 until it locks into place to its storage position.
Users Manual - English
Page 14
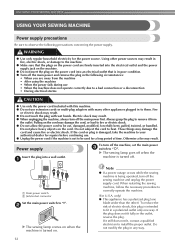
... on the cord may result. Do not modify the plug in the outlet, reverse the plug. Do not subject the cord to correctly operate the machine. (For U.S.A. only) ● This appliance has a polarized plug (one way. a To turn off . 12 a Main power switch b Jack/socket ..., damaged, modified, forcefully bent, pulled, twisted, or bundled. To reduce the risk of time. Pulling on . KNOWING YOUR SEWING MACHINE USING YOUR SEWING MACHINE Power supply precautions Be sure to observe the following circumstances: • When you are firmly inserted into the electrical outlet and the power...
... on the cord may result. Do not modify the plug in the outlet, reverse the plug. Do not subject the cord to correctly operate the machine. (For U.S.A. only) ● This appliance has a polarized plug (one way. a To turn off . 12 a Main power switch b Jack/socket ..., damaged, modified, forcefully bent, pulled, twisted, or bundled. To reduce the risk of time. Pulling on . KNOWING YOUR SEWING MACHINE USING YOUR SEWING MACHINE Power supply precautions Be sure to observe the following circumstances: • When you are firmly inserted into the electrical outlet and the power...
Users Manual - English
Page 15
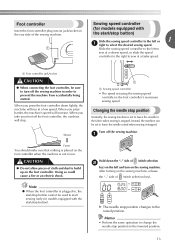
... the foot controller plug into its jack/socket on the rear side of (stitch selection b key) on the left and turn off the sewing machine. a Foot controller jack/socket CAUTION ● When connecting the foot controller, be used to start sewing (only for models equipped with the start... stop position to leave the needle raised when sewing is stopped. Doing so could cause a fire or an electric shock. Hold down lightly, the machine will run at a faster speed. a Faster You should make sure that nothing is stopped. Memo • Perform the same operation to change the...
... the foot controller plug into its jack/socket on the rear side of (stitch selection b key) on the left and turn off the sewing machine. a Foot controller jack/socket CAUTION ● When connecting the foot controller, be used to start sewing (only for models equipped with the start... stop position to leave the needle raised when sewing is stopped. Doing so could cause a fire or an electric shock. Hold down lightly, the machine will run at a faster speed. a Faster You should make sure that nothing is stopped. Memo • Perform the same operation to change the...

Users Manual - English
Page 16
...position) is automatically selected when the sewing machine is turned on the sewing machine, release the "-" side of (stitch width adjustment key). After turning on . X The machine is now set so that machine beeps. 14 Turn off the sewing machine. The machine can be set to beep each time ...of (stitch selection b key) on the left needle position. After turning on the sewing machine. a Cancelling the operation beep When the sewing machine is purchased, it is set so that the machine does not beep. X The initial needle position changes to change the setting so that ...
...position) is automatically selected when the sewing machine is turned on the sewing machine, release the "-" side of (stitch width adjustment key). After turning on . X The machine is now set so that machine beeps. 14 Turn off the sewing machine. The machine can be set to beep each time ...of (stitch selection b key) on the left needle position. After turning on the sewing machine. a Cancelling the operation beep When the sewing machine is purchased, it is set so that the machine does not beep. X The initial needle position changes to change the setting so that ...
Users Manual - English
Page 17
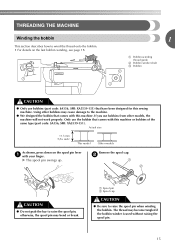
...winder is used without raising the spool pin. 15 a Spool pin b Spool cap CAUTION ● Be sure to the machine. ● We designed the bobbin that comes with this machine or bobbins of the same type (part code: SA156, SFB: XA5539-151). Actual size 11.5 mm (7/16 inch) ...Bobbin-winding thread guide b Bobbin winder shaft c Bobbin CAUTION ● Only use bobbins (part code: SA156, SFB: XA5539-151) that comes with this sewing machine. If you use the bobbin that have been designed for this machine. X The spool pin swings up. Remove the spool cap. Using other models, the...
...winder is used without raising the spool pin. 15 a Spool pin b Spool cap CAUTION ● Be sure to the machine. ● We designed the bobbin that comes with this machine or bobbins of the same type (part code: SA156, SFB: XA5539-151). Actual size 11.5 mm (7/16 inch) ...Bobbin-winding thread guide b Bobbin winder shaft c Bobbin CAUTION ● Only use bobbins (part code: SA156, SFB: XA5539-151) that comes with this sewing machine. If you use the bobbin that have been designed for this machine. X The spool pin swings up. Remove the spool cap. Using other models, the...
Users Manual - English
Page 18
...the small spool cap, and leave a small space between the cap and the spool. KNOWING YOUR SEWING MACHINE Fully insert the spool of the spool cap positioned toward the left hand. Memo ● When sewing ...thread guide cover with your right hand so that there is no slack in the spool or the machine may be damaged. d With the slightly rounded side of thread for the spool being used ,...thread that is not positioned correctly, the thread may become tangled around the spool pin or the machine may be damaged. ● Three spool cap sizes are available, allowing you to choose a spool...
...the small spool cap, and leave a small space between the cap and the spool. KNOWING YOUR SEWING MACHINE Fully insert the spool of the spool cap positioned toward the left hand. Memo ● When sewing ...thread guide cover with your right hand so that there is no slack in the spool or the machine may be damaged. d With the slightly rounded side of thread for the spool being used ,...thread that is not positioned correctly, the thread may become tangled around the spool pin or the machine may be damaged. ● Three spool cap sizes are available, allowing you to choose a spool...
Users Manual - English
Page 19
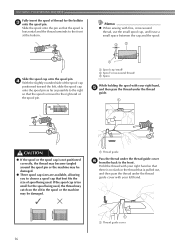
... thread to the right, pass it under the pre-tension disk. i While holding the end of the thread straight up. Note ● If the sewing machine is to be operated using the foot controller, connect the foot controller before turning on the bobbin. Note ● Make sure that the thread passes... the bobbin onto the bobbin winder shaft h and slide the bobbin winder shaft to 3-15/16 inches) of thread from the hole on the machine. ● When the foot controller is pulled as far as possible into the notch in as far as possible. ● Pull the thread taut and ...
... thread to the right, pass it under the pre-tension disk. i While holding the end of the thread straight up. Note ● If the sewing machine is to be operated using the foot controller, connect the foot controller before turning on the bobbin. Note ● Make sure that the thread passes... the bobbin onto the bobbin winder shaft h and slide the bobbin winder shaft to 3-15/16 inches) of thread from the hole on the machine. ● When the foot controller is pulled as far as possible into the notch in as far as possible. ● Pull the thread taut and ...
Users Manual - English
Page 20
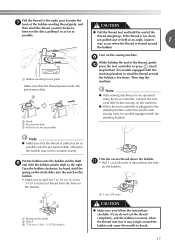
... around the bobbin five or six times. 18 Cut the thread, slide the bobbin winder shaft o to the right. Memo ● When the sewing machine is started or the handwheel is not a malfunction. ● The needle bar does not move when you slide the bobbin winding shaft to the left... the d pre-tension disk with the fast bobbin winding system Place the bobbin on the bobbin winder shaft a so that wraps around the bobbin, the machine will make a clicking sound; Slide the sewing speed controller back to loosen, and may cause the thread tension to its p original position (for models ...
... around the bobbin five or six times. 18 Cut the thread, slide the bobbin winder shaft o to the right. Memo ● When the sewing machine is started or the handwheel is not a malfunction. ● The needle bar does not move when you slide the bobbin winding shaft to the left... the d pre-tension disk with the fast bobbin winding system Place the bobbin on the bobbin winder shaft a so that wraps around the bobbin, the machine will make a clicking sound; Slide the sewing speed controller back to loosen, and may cause the thread tension to its p original position (for models ...
Users Manual - English
Page 21
... and then remove the bobbin from the shaft. 1 a Slit in cutter) X The thread is turned after winding the thread around the bobbin, the machine will make a clicking sound; When the bobbin begins spinning slowly, take i your foot off the foot controller or press (start/stop button) (for ...or press (start/ h stop button) (for models equipped with the start/stop button). 1 2 a Wound evenly b Wound poorly Memo ● When the sewing machine is started or the handwheel is cut the thread as described. If the bobbin is not a malfunction. ● The needle bar does not move when...
... and then remove the bobbin from the shaft. 1 a Slit in cutter) X The thread is turned after winding the thread around the bobbin, the machine will make a clicking sound; When the bobbin begins spinning slowly, take i your foot off the foot controller or press (start/stop button) (for ...or press (start/ h stop button) (for models equipped with the start/stop button). 1 2 a Wound evenly b Wound poorly Memo ● When the sewing machine is started or the handwheel is cut the thread as described. If the bobbin is not a malfunction. ● The needle bar does not move when...


