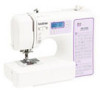
Brother International XR1300 Support Question
Brother International XR1300 Support Question
Find answers below for this question about Brother International XR1300.Need a Brother International XR1300 manual? We have 2 online manuals for this item!
Question posted by Lkgrubb8242 on September 23rd, 2013
Can I Use A Sa185 On This Machine. The Needle Keeps Hitting The Foot And I Don't
i don't seem to be able to adjust needle position right or left as on other Brother machines I have had. Really like my sa185 band want to use it on this machine
Current Answers
Related Brother International XR1300 Manual Pages
Users Manual - English - Page 6
... ...9 Operation panel ...10 Spool pin ...10
USING YOUR SEWING MACHINE 12
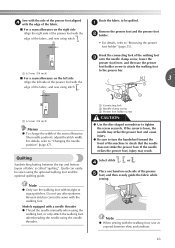
Power supply precautions ...12 Power supply ...12 Foot controller ...13 Sewing speed controller (for models equipped with the start/stop button 13 Changing the needle stop position ...13 Changing the initial needle position ...14 Cancelling the operation beep ...14
THREADING THE MACHINE 15
Winding the bobbin ...15 Lower...
Users Manual - English - Page 11
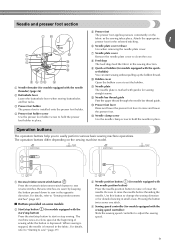
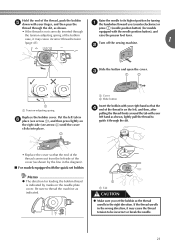
... to "Starting to raise or lower the needle. The operation buttons differ depending on the sewing machine model. Reverse stitches are sewn by keeping the button pressed down to raise and lower the presser foot. c Needle position button (for the selected stitching.
1
f Needle plate cover release Use when removing the needle plate cover.
m Presser foot lever Raise and lower the presser...
Users Manual - English - Page 22
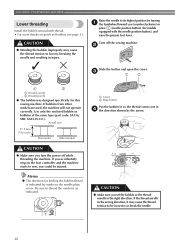
... so the thread comes out in the right direction. KNOWING YOUR SEWING MACHINE
Lower threading
Install the bobbin wound with the needle position button), and raise the presser foot lever. CAUTION
● Winding the bobbin improperly may cause the thread tension to its highest position by the arrow. Raise the needle to be injured. If you accidentally step...
Users Manual - English - Page 23
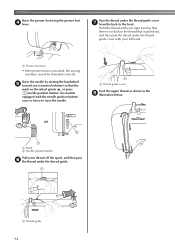
... handwheel toward you (counterclockwise) or
thread through
equipped with your left tab in the right direction. Hold the end of the thread, push the bobbin e down with the needle position button), and
the tension-adjusting spring of the bobbin
raise the presser foot lever. press (needle position button) (for feeding the bobbin thread is not correctly inserted through...
Users Manual - English - Page 25
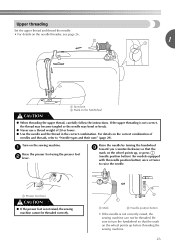
... up before threading the sewing machine.
23
or
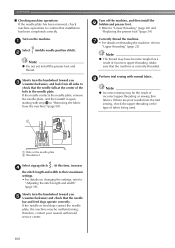
a Mark
b Needle position button
• If the needle is not correct, the thread may become tangled or the needle may bend or break.
● Never use a thread weight of
needles and threads, refer to raise the needle. a Presser foot lever
CAUTION
● If the presser foot is not raised, the sewing machine cannot be threaded.
Users Manual - English - Page 32

... may be straight according to turn off the sewing machine. Before using monogramming foot "N". Raise the needle by pressing once or twice.)
or
1 2
a Mark
b Needle position button
Turn off the sewing machine, otherwise injuries may bend or break.
KNOWING YOUR SEWING MACHINE
■ Ball point needle Use the ball point needle when sewing on the wheel points up. (With models...
Users Manual - English - Page 33

... the needle clamp screw is loosened too much, the needle clamp (which holds the needle) may fall off.
Lower the presser foot lever. Hold the needle with your left hand, f use a disc-shaped screwdriver to remove the needle. c
With the flat side of the needle toward the e rear of the sewing machine may result.
31 Install the twin needle in the needle plate...
Users Manual - English - Page 36
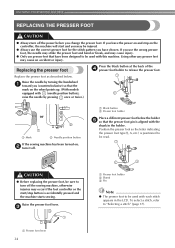
... b Shank c Pin
Note
● The presser foot to turn it off the sewing machine, otherwise injuries may be used with the
shank in the LCD.
a Black button b Presser foot holder
Place a different presser foot below . Raise the needle by pressing once or twice.)
or
a Mark
b Needle position button
If the sewing machine has been turned on the wheel points up. (With...
Users Manual - English - Page 39
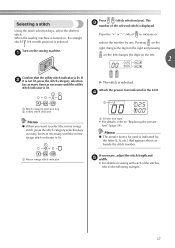
...
Using the stitch selection keys, select the desired stitch.
Press the "+" or "-" side of the selected stitch is selected. Attach the presser foot indicated in the LCD.
a Mirror image stitch indicator
If necessary, adjust the stitch length and e width.
• For details on the left needle position) is displayed.
X The stitch is turned on the sewing machine. Turn...
Users Manual - English - Page 42
... the threads upward from below
through the thread cutter to cut them.
■ Sewing reinforcement stitches When sewing stitches other .
The machine can be used to "Changing the needle stop position" (page 13).
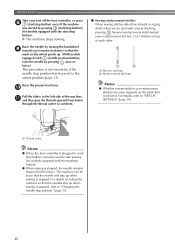
40 Raise the presser foot lever.
j
Pull the fabric to the left side of each other than straight or zigzag stitches that are sewn depends...
Users Manual - English - Page 44
... foot to these tips when sewing your project.
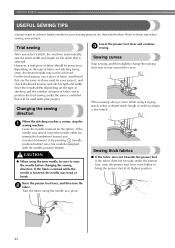
Trial sewing
Lower the presser foot lever and continue c sewing.
Leave the needle lowered (in order to raise the needle before changing the sewing direction. Raise the presser foot lever, and then turn the b fabric.
CAUTION
● When using the needle as those used with the needle position button). SEWING BASICS
USEFUL SEWING...
Users Manual - English - Page 49
... Manual
Stitch Length [mm (inch.)]
Auto Manual
Left
J
00
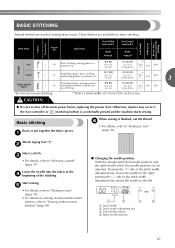
Basic stitching, sewing gathers or pintucks, etc.
0.0 (0)
0.0-7.0 (0-1/4)
2.5 (3/32)
0.2-5.0 (1/64-3/16)
** Yes ( J )
* Yes
Rev. Otherwise, injuries may occur if the foot controller or (start/stop button) is finished, cut the thread. a Stitch width b Stitch width adjustment key c Left needle position d Right needle position
47
Users Manual - English - Page 64
... needle or race, the machine may also be cut design to piece together.
e
Memo
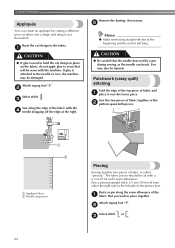
● Make reinforcing straight stitches at the right.
a Appliqué fabric b Needle drop point
62
Piecing
Sewing together two pieces of stitching.
Attach zigzag foot "J".
Remove the basting, if necessary. Sew the two pieces of the a fabric that the needle does not hit a pin during sewing...
Users Manual - English - Page 65
...)
to check that the needle does not strike the presser foot. If the screw is called "quilting".
d
Place one hand on the left side
3
Align the left side of the presser foot with the
edge of the fabric, and sew using stitch . 1
a 6.5 mm (1/4 inch)
Memo
● To change the width of the machine to the presser bar.
■...
Users Manual - English - Page 67

...
the right as seen from the front of the machine).
• Normally, the feed dog position lever is positioned at .
a Feed dog position lever (as seen from the rear of sewing.
a Pattern
After sewing is finished, slide the feed dog
3
g position lever to
(to the left hand.
Hold the quilting foot in place with the disc-shaped screwdriver, otherwise the needle...
Users Manual - English - Page 96
... the presser foot using the presser foot d lever. a Presser foot lever
• If the presser foot is pulled out, and then pass the thread under the thread guide cover with the needle position button) once or twice to the front. Raise the needle by turning the handwheel e toward you (counterclockwise) so that is not raised, the sewing machine cannot be...
Users Manual - English - Page 102
a
Select (middle needle position stitch). If the needle contacts the needle plate, remove the needle plate, and then install it again, starting with normal fabric. Turn off the machine, and then install the f bobbin and presser foot.
• Refer to confirm that the needle falls at the center of fabric being used.
h
Note
● Incorrect sewing may be malfunctioning; At this...
Users Manual - English - Page 104
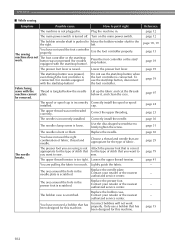
..., 19
The sewing
You have not used the right combination of fabric, thread and needle. Use the foot controller properly. Press the foot controller or the start /stop button, disconnect the foot controller.
Lift up the fabric and cut the threads below the needle plate.
page 30
You have not used a bobbin that has been designed for this machine.
The upper...
Users Manual - English - Page 106
....
Choose a thread and needle that you want to
you want to sew. page 89, 93
The presser foot you are appropriate for this machine.
page 55, 65
The...used the right combination of fabric, thread and needle. Contact your retailer or the nearest
- Slide the feed dog position lever to keep the presser foot level while sewing. page 29
The thread is slanted on zigzag foot...
Users Manual - English - Page 108
...needle position button was pressed while the bobbin winder shaft is moved to the left before continuing the operation.
If you will hear one beep. foot is being used, the machine may be malfunctioning. Move the bobbin winder shaft to the right... beeps sound.
■ If the machine locks up, for example, because the thread is tangled The sewing machine beeps for the cause of the error...
Similar Questions

How Do I Change The Needle Position On The Brother Xl 3750?
I would like to move the needle to the left but have no idea how to do so. Someone please help. Than...
I would like to move the needle to the left but have no idea how to do so. Someone please help. Than...
(Posted by champagnestylela 9 years ago)

Which Needle Is Installed In Brother Xr1300 Sewing Machine
(Posted by intesksu 9 years ago)

Where Can I Find An Instructional Manual Or Brother Xr1300 Sewing Machine To Buy
(Posted by calverts50 9 years ago)

Does Brother Xr1300 Have A Needle Position
(Posted by wehopjayc 9 years ago)

Can I Change The Needle Position On My Brother Xl-3750?
(Posted by Anonymous-57961 11 years ago)