
Users Manual - English and Spanish
Page 2
...• Do not use if you are being used or where oxygen is required when sewing: • Always pay close attention to the needle. To reduce the risk of electric shock: 1 Always unplug the machine from the electrical outlet immediately after using the machine and immediately unplug... object into the electrical outlet. IMPORTANT SAFETY INSTRUCTIONS Please read these safety instructions before attempting to use bent or damaged needles. 1 DANGER - Keep ventilation openings of the machine and foot control free from the electrical outlet when making any air openings blocked.
...• Do not use if you are being used or where oxygen is required when sewing: • Always pay close attention to the needle. To reduce the risk of electric shock: 1 Always unplug the machine from the electrical outlet immediately after using the machine and immediately unplug... object into the electrical outlet. IMPORTANT SAFETY INSTRUCTIONS Please read these safety instructions before attempting to use bent or damaged needles. 1 DANGER - Keep ventilation openings of the machine and foot control free from the electrical outlet when making any air openings blocked.
Users Manual - English and Spanish
Page 3
... by persons (including children) with this machine, avoid direct sunlight and high humidity locations. carrying the mark, rating as it could cause the needle to the danger of suffocation. • Do not use outdoors. 7 For a longer service life: • When storing this equipment, you... the fuse cover. The contents of this manual and specifications of . For additional product information, visit our web site at www.brother.com SAVE THESE INSTRUCTIONS This machine is required, first follow careful instruction when freehand stitching so that this manual. • Keep fingers...
... by persons (including children) with this machine, avoid direct sunlight and high humidity locations. carrying the mark, rating as it could cause the needle to the danger of suffocation. • Do not use outdoors. 7 For a longer service life: • When storing this equipment, you... the fuse cover. The contents of this manual and specifications of . For additional product information, visit our web site at www.brother.com SAVE THESE INSTRUCTIONS This machine is required, first follow careful instruction when freehand stitching so that this manual. • Keep fingers...

Users Manual - English and Spanish
Page 4
...19 Sewing thick fabrics 19 Sewing thin fabrics 20 Sewing stretch fabrics 20 Stitching cylindrical pieces 20 Sewing with a twin needle (Option 20 Thread tension 22 3. APPENDIX 38 MAINTENANCE 38 Restrictions on oiling 38 Precautions on storing the machine 38 ... 5 Flat bed attachment 5 USING YOUR SEWING MACHINE 6 Connecting plugs 6 Main power and sewing light switch 7 Foot controller 7 Checking the needle 7 Replacing the needle 7 Changing the presser foot 8 THE CONTROLS 9 Pattern selection dial 9 Patterns and stitch names 9 Reverse sewing lever 10 THREADING THE MACHINE ...
...19 Sewing thick fabrics 19 Sewing thin fabrics 20 Sewing stretch fabrics 20 Stitching cylindrical pieces 20 Sewing with a twin needle (Option 20 Thread tension 22 3. APPENDIX 38 MAINTENANCE 38 Restrictions on oiling 38 Precautions on storing the machine 38 ... 5 Flat bed attachment 5 USING YOUR SEWING MACHINE 6 Connecting plugs 6 Main power and sewing light switch 7 Foot controller 7 Checking the needle 7 Replacing the needle 7 Changing the presser foot 8 THE CONTROLS 9 Pattern selection dial 9 Patterns and stitch names 9 Reverse sewing lever 10 THREADING THE MACHINE ...
Users Manual - English and Spanish
Page 5
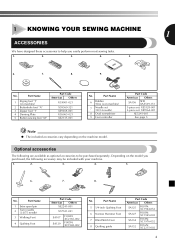
...may be purchased separately. Part Name 1 Zigzag foot "J" (on the machine model. Part Name 6 Bobbin (One is on machine) 7 Needle set (90/14 needle) 8 Oval screwdriver 9 Foot controller Part Code Americas Others SA156 SFB: XA5539-151 3-piece set: XE5328-001 2-piece set: XE7064-001 ... foot "M" Part Code Americas Others XC4901-021 X59369-321 XE9369-001 XC6063-021 XE2137-001 No. Part Name 1 Extra spool pin 2 Twin needle (2.0/75 needle) 3 Walking Foot 4 Quilting Foot Part Code Americas Others XE2241-001 X57521-021 SA107 SA129 F034N: XC2165-002 F005N: XC1948-002 No. Part...
...may be purchased separately. Part Name 1 Zigzag foot "J" (on the machine model. Part Name 6 Bobbin (One is on machine) 7 Needle set (90/14 needle) 8 Oval screwdriver 9 Foot controller Part Code Americas Others SA156 SFB: XA5539-151 3-piece set: XE5328-001 2-piece set: XE7064-001 ... foot "M" Part Code Americas Others XC4901-021 X59369-321 XE9369-001 XC6063-021 XE2137-001 No. Part Name 1 Extra spool pin 2 Twin needle (2.0/75 needle) 3 Walking Foot 4 Quilting Foot Part Code Americas Others XE2241-001 X57521-021 SA107 SA129 F034N: XC2165-002 F005N: XC1948-002 No. Part...

Users Manual - English and Spanish
Page 6
... presser foot. B FC D E F Foot controller (Page 7) You can be stored in the foot controller plug and connect the machine to manually raise and lower the needle. B Buttonhole fine-adjustment screw (Page 28) C Main power and sewing light switch (Page 7) You can turn the main power and sewing light switch on the...
... presser foot. B FC D E F Foot controller (Page 7) You can be stored in the foot controller plug and connect the machine to manually raise and lower the needle. B Buttonhole fine-adjustment screw (Page 28) C Main power and sewing light switch (Page 7) You can turn the main power and sewing light switch on the...

Users Manual - English and Spanish
Page 8
... on the machine rating plate. When you press harder, the machine's speed will stop. ■ Checking the needle correctly Put the flat side of cloth and dust to build up . Check the needle from the top and the sides. Doing so could cause a fire or an electric shock. Note (For U.S.A.... power and sewing light switch This switch turns the main power and sewing light on or off the machine. 1 Raise the needle by turning the 2 handwheel toward you change the needle. CAUTION ● Always turn off (toward the 'O' mark) Foot controller When you press the foot controller down lightly, the ...
... on the machine rating plate. When you press harder, the machine's speed will stop. ■ Checking the needle correctly Put the flat side of cloth and dust to build up . Check the needle from the top and the sides. Doing so could cause a fire or an electric shock. Note (For U.S.A.... power and sewing light switch This switch turns the main power and sewing light on or off the machine. 1 Raise the needle by turning the 2 handwheel toward you change the needle. CAUTION ● Always turn off (toward the 'O' mark) Foot controller When you press the foot controller down lightly, the ...

Users Manual - English and Spanish
Page 9
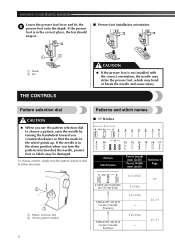
... been designed to be used with this machine. Using any other presser foot may be damaged. Press the black button at the back of the needle toward you (counterclockwise) so that have chosen. If you leave the power on and step on the shank. 8 Turn off the machine before ... on the wheel points up. With the flat side of the 3 presser foot holder to release the presser foot. 1 1 Use an oval screwdriver 2 Needle stopper 3 Needle Install the twin needle in the same way. 1 2 3 1 Black button 2 Presser foot holder 3 Presser foot Put a different presser foot on the...
... been designed to be used with this machine. Using any other presser foot may be damaged. Press the black button at the back of the needle toward you (counterclockwise) so that have chosen. If you leave the power on and step on the shank. 8 Turn off the machine before ... on the wheel points up. With the flat side of the 3 presser foot holder to release the presser foot. 1 1 Use an oval screwdriver 2 Needle stopper 3 Needle Install the twin needle in the same way. 1 2 3 1 Black button 2 Presser foot holder 3 Presser foot Put a different presser foot on the...
Users Manual - English and Spanish
Page 10
.... Pattern selection dial Patterns and stitch names CAUTION ● When you use the pattern selection dial to choose a pattern, raise the needle by turning the handwheel toward you turn the pattern selection dial in . ■ Presser foot installation orientation 1 2 1 Shank 2 ...17 Stitches 1 2 3 4 5 6 78 9 10 11 12 13 14 15 16 17 Pattern Stitch Name 1 4-STEP AUTOMATIC BUTTONHOLE 2 STRAIGHT STITCH (Center Needle Position) 3 STRAIGHT STITCH (Center Needle Position) Preset Length (mm (inch)) Preset Width (mm (inch)) 0.5 (1/32) 5 (3/16) 1.6 (1/16) - 1.8 (1/16) - If the presser ...
.... Pattern selection dial Patterns and stitch names CAUTION ● When you use the pattern selection dial to choose a pattern, raise the needle by turning the handwheel toward you turn the pattern selection dial in . ■ Presser foot installation orientation 1 2 1 Shank 2 ...17 Stitches 1 2 3 4 5 6 78 9 10 11 12 13 14 15 16 17 Pattern Stitch Name 1 4-STEP AUTOMATIC BUTTONHOLE 2 STRAIGHT STITCH (Center Needle Position) 3 STRAIGHT STITCH (Center Needle Position) Preset Length (mm (inch)) Preset Width (mm (inch)) 0.5 (1/32) 5 (3/16) 1.6 (1/16) - 1.8 (1/16) - If the presser ...
Users Manual - English and Spanish
Page 11
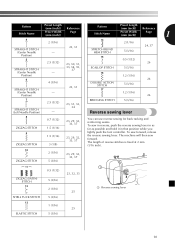
...Reference Page Pattern Preset Length (mm (inch)) Reference Stitch Name Preset Width (mm (inch)) Page 1 4 STRAIGHT STITCH (Center Needle Position) 5 STRAIGHT STITCH (Center Needle Position) 6 STRAIGHT STITCH (Center Needle Position) 2 (1/16) - 23, 31 2.5 (3/32) - 23, 30, 31, 33, 34, 35, 37 4 ... ACTION STITCH 17 2 (1/16) 5 (3/16) 0.5 (1/32) 5 (3/16) 1.2 (1/16) 5 (3/16) 1.2 (1/16) 24, 37 26 26 26 7 STRAIGHT STITCH (Left Needle Position) 2.5 (3/32) - 23, 31, 33, 34 BRIDGING STITCH 5 (3/16) Reverse sewing lever 8 ZIGZAG STITCH 9 ZIGZAG STITCH 0.7 (1/32) 1.5 (1/16) 1.5 (1/16) ...
...Reference Page Pattern Preset Length (mm (inch)) Reference Stitch Name Preset Width (mm (inch)) Page 1 4 STRAIGHT STITCH (Center Needle Position) 5 STRAIGHT STITCH (Center Needle Position) 6 STRAIGHT STITCH (Center Needle Position) 2 (1/16) - 23, 31 2.5 (3/32) - 23, 30, 31, 33, 34, 35, 37 4 ... ACTION STITCH 17 2 (1/16) 5 (3/16) 0.5 (1/32) 5 (3/16) 1.2 (1/16) 5 (3/16) 1.2 (1/16) 24, 37 26 26 26 7 STRAIGHT STITCH (Left Needle Position) 2.5 (3/32) - 23, 31, 33, 34 BRIDGING STITCH 5 (3/16) Reverse sewing lever 8 ZIGZAG STITCH 9 ZIGZAG STITCH 0.7 (1/32) 1.5 (1/16) 1.5 (1/16) ...
Users Manual - English and Spanish
Page 13
... cut the excess thread completely before winding the bobbin, when the thread runs low it may occur when the thread is not a malfunction. ● The needle bar does not move when you slide the bobbin winder shaft to 10 cm (3 - 4 inches) of thread from the hole bobbin. When the bobbin seems... the machine. Note ● When the sewing machine is started or the handwheel is turned after winding the thread around the bobbin and cause the needle to the left and remove the bobbin.
... cut the excess thread completely before winding the bobbin, when the thread runs low it may occur when the thread is not a malfunction. ● The needle bar does not move when you slide the bobbin winder shaft to 10 cm (3 - 4 inches) of thread from the hole bobbin. When the bobbin seems... the machine. Note ● When the sewing machine is started or the handwheel is turned after winding the thread around the bobbin and cause the needle to the left and remove the bobbin.

Users Manual - English and Spanish
Page 14
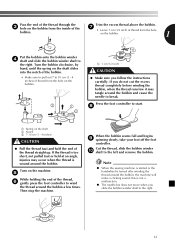
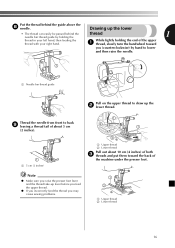
Prepare the bobbin wound properly 1 before threading the lower thread. • See page 11 for the details about bobbin winding. Raise the needle by turning the 2 handwheel toward you. Remove the bobbin cover by the arrow. 1 2 1 Wound evenly 2 Wound poorly Lower threading Install the bobbin ...the slit, as shown. • If the thread is not correctly inserted through the tension-adjusting spring of the bobbin case, it may break the needle. CAUTION ● Make sure you (counterclockwise) and raise the presser foot lever. If the thread unrolls in the wrong direction, it and 3 lift...
Prepare the bobbin wound properly 1 before threading the lower thread. • See page 11 for the details about bobbin winding. Raise the needle by turning the 2 handwheel toward you. Remove the bobbin cover by the arrow. 1 2 1 Wound evenly 2 Wound poorly Lower threading Install the bobbin ...the slit, as shown. • If the thread is not correctly inserted through the tension-adjusting spring of the bobbin case, it may break the needle. CAUTION ● Make sure you (counterclockwise) and raise the presser foot lever. If the thread unrolls in the wrong direction, it and 3 lift...
Users Manual - English and Spanish
Page 15
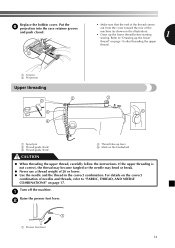
If the upper threading is not correct, the thread may become tangled or the needle may bend or break. ● Never use a thread weight of needles and threads, refer to "Drawing up the lower thread" on the handwheel CAUTION ● When threading the upper thread, carefully follow the ...cover toward the rear of the machine (as shown in the correct combination. Refer to "FABRIC, THREAD, AND NEEDLE COMBINATIONS" on the correct combination of 20 or lower. ● Use the needle and the thread in the illustration). • Draw up lever 5 Mark on page 16 after threading the ...
If the upper threading is not correct, the thread may become tangled or the needle may bend or break. ● Never use a thread weight of needles and threads, refer to "Drawing up the lower thread" on the handwheel CAUTION ● When threading the upper thread, carefully follow the ...cover toward the rear of the machine (as shown in the correct combination. Refer to "FABRIC, THREAD, AND NEEDLE COMBINATIONS" on the correct combination of 20 or lower. ● Use the needle and the thread in the illustration). • Draw up lever 5 Mark on page 16 after threading the ...
Users Manual - English and Spanish
Page 16
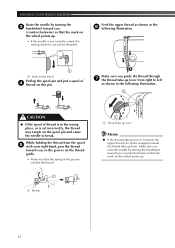
...spool 5 with your right hand, pass the thread toward you guide the thread through 7 the thread take -up . 15 Make sure you raise the needle by turning the 3 handwheel toward you, in the groove on the thread guide. • Make sure that the spring in the following illustration. 1 CAUTION... ● If the spool of 4 thread on the wheel points up. • If the needle is lowered, the upper thread can not be threaded. Make sure you (counterclockwise) so that the mark on the wheel points up lever. While holding...
...spool 5 with your right hand, pass the thread toward you guide the thread through 7 the thread take -up . 15 Make sure you raise the needle by turning the 3 handwheel toward you, in the groove on the thread guide. • Make sure that the spring in the following illustration. 1 CAUTION... ● If the spool of 4 thread on the wheel points up. • If the needle is lowered, the upper thread can not be threaded. Make sure you (counterclockwise) so that the mark on the wheel points up lever. While holding...
Users Manual - English and Spanish
Page 17
...3 threads and put them toward you may cause sewing problems. 1 2 1 Upper thread 2 Lower thread 16 Put the thread behind the needle bar thread guide by hand to lower and then raise the needle. 1 1 Needle bar thread guide Pull on the upper thread to back 9 leaving a thread tail of about 5 cm (2 inches). 1 1 5 cm... (2 inches) 1 2 1 2 1 Upper thread 2 Lower thread Pull out about 10 cm (4 inches) of the machine under the presser foot. Thread the needle from front to draw up the lower • The thread can easily be passed behind the guide above the...
...3 threads and put them toward you may cause sewing problems. 1 2 1 Upper thread 2 Lower thread 16 Put the thread behind the needle bar thread guide by hand to lower and then raise the needle. 1 1 Needle bar thread guide Pull on the upper thread to back 9 leaving a thread tail of about 5 cm (2 inches). 1 1 5 cm... (2 inches) 1 2 1 2 1 Upper thread 2 Lower thread Pull out about 10 cm (4 inches) of the machine under the presser foot. Thread the needle from front to draw up the lower • The thread can easily be passed behind the guide above the...
Users Manual - English and Spanish
Page 18
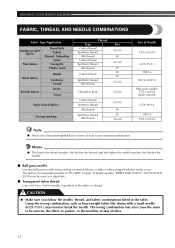
...a substitute. ■ Transparent nylon thread Use a 90/14 to skip stitches. 17 and the higher the needle number, the thicker the needle. ■ Ball point needle Use the ball point needle when sewing on stretch fabrics or fabrics where skipped stitches easily occur. CAUTION ● Make sure you follow ...the needle, thread, and fabric combinations listed in the table. The factory recommended needle is "HG-4BR" (Organ). Schmetz needles "JERSEY BALL POINT" 130/705H SUK 90/14 may also cause the seam to ...
...a substitute. ■ Transparent nylon thread Use a 90/14 to skip stitches. 17 and the higher the needle number, the thicker the needle. ■ Ball point needle Use the ball point needle when sewing on stretch fabrics or fabrics where skipped stitches easily occur. CAUTION ● Make sure you follow ...the needle, thread, and fabric combinations listed in the table. The factory recommended needle is "HG-4BR" (Organ). Schmetz needles "JERSEY BALL POINT" 130/705H SUK 90/14 may also cause the seam to ...
Users Manual - English and Spanish
Page 19
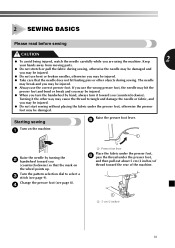
... and bend or break and you may be injured. ● When you turn the handwheel by turning the 2 handwheel toward you (counterclockwise) so that the needle does not hit basting pins or other way may cause the thread to select a 3 stitch (see page 8). 4 1 Presser foot lever Place the fabric under... be damaged. Starting sewing Raise the presser foot lever. 5 Turn on the wheel points up. Turn the pattern selection dial to tangle and damage the needle or fabric, and you may be injured. ● Do not use the correct presser foot. Keep 2 your hands away from moving parts. ● ...
... and bend or break and you may be injured. ● When you turn the handwheel by turning the 2 handwheel toward you (counterclockwise) so that the needle does not hit basting pins or other way may cause the thread to select a 3 stitch (see page 8). 4 1 Presser foot lever Place the fabric under... be damaged. Starting sewing Raise the presser foot lever. 5 Turn on the wheel points up. Turn the pattern selection dial to tangle and damage the needle or fabric, and you may be injured. ● Do not use the correct presser foot. Keep 2 your hands away from moving parts. ● ...
Users Manual - English and Spanish
Page 20
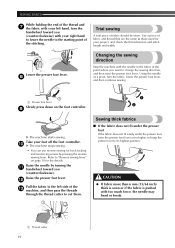
... width. CAUTION ● If fabric more than 6 mm (15/64 inch) thick is sewn or if the fabric is pushed with too much force, the needle may bend or break. 1 Thread cutter 19 Take your foot off the foot controller. 0 X The machine stops sewing. • You can use reverse sewing for... not fit easily under the presser foot, raise the presser foot lever even higher to bring the presser foot to its highest position. Raise the needle by pressing the reverse sewing lever. b Pull the fabric to "Reverse sewing lever" on the foot controller. 9 1 2 X The machine starts sewing...
... width. CAUTION ● If fabric more than 6 mm (15/64 inch) thick is sewn or if the fabric is pushed with too much force, the needle may bend or break. 1 Thread cutter 19 Take your foot off the foot controller. 0 X The machine stops sewing. • You can use reverse sewing for... not fit easily under the presser foot, raise the presser foot lever even higher to bring the presser foot to its highest position. Raise the needle by pressing the reverse sewing lever. b Pull the fabric to "Reverse sewing lever" on the foot controller. 9 1 2 X The machine starts sewing...
Users Manual - English and Spanish
Page 21
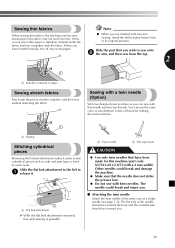
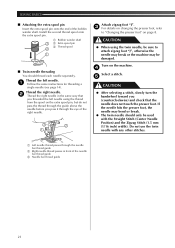
... threads. When you wish to 1 release it together with this occurs, place thin paper or stabilizer material under the ● When you . 20 The needle could break and damage the machine. ● Make sure that have finished sewing, tear off any excess paper. Slide the flat bed attachment to the...-arm sewing, install the flat bed attachment back in the same way as cuffs and pant legs, or hardto-reach areas. Sewing with a twin needle (Option) We have designed your machine so you can use the same color or two different colors of fabric together, and then sew without stretching...
... threads. When you wish to 1 release it together with this occurs, place thin paper or stabilizer material under the ● When you . 20 The needle could break and damage the machine. ● Make sure that have finished sewing, tear off any excess paper. Slide the flat bed attachment to the...-arm sewing, install the flat bed attachment back in the same way as cuffs and pant legs, or hardto-reach areas. Sewing with a twin needle (Option) We have designed your machine so you can use the same color or two different colors of fabric together, and then sew without stretching...
Users Manual - English and Spanish
Page 22
...; After selecting a stitch, slowly turn the handwheel toward you (counterclockwise) and check that you threaded the left needle. 1 Follow the same instructions for threading a single needle (see page 14). Thread the left needle using the twin needle, be sure to "Changing the presser foot" on page 8. CAUTION ● When using the thread from the...
...; After selecting a stitch, slowly turn the handwheel toward you (counterclockwise) and check that you threaded the left needle. 1 Follow the same instructions for threading a single needle (see page 14). Thread the left needle using the twin needle, be sure to "Changing the presser foot" on page 8. CAUTION ● When using the thread from the...
Users Manual - English and Spanish
Page 23
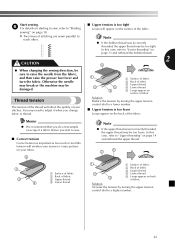
... surface of fabric Solution Reduce the tension by turning the upper tension control dial to a higher number. 22 Otherwise the needle may break or the machine may be sure to raise the needle from the fabric, and then raise the presser foot lever and turn the fabric. X Two lines of stitching are...
... surface of fabric Solution Reduce the tension by turning the upper tension control dial to a higher number. 22 Otherwise the needle may break or the machine may be sure to raise the needle from the fabric, and then raise the presser foot lever and turn the fabric. X Two lines of stitching are...


