

Users Manual - English and Spanish
Page 4
... the needle 7 Changing the presser foot 8 THE CONTROLS 9 Pattern selection dial 9 Patterns and stitch names 9 Reverse sewing lever 10 THREADING THE MACHINE 11 Winding the bobbin 11 Lower threading 13 Upper threading 14 Drawing up the lower thread 16 FABRIC, THREAD, AND NEEDLE COMBINATIONS 17 2. APPENDIX 38 MAINTENANCE 38 Restrictions on...
... the needle 7 Changing the presser foot 8 THE CONTROLS 9 Pattern selection dial 9 Patterns and stitch names 9 Reverse sewing lever 10 THREADING THE MACHINE 11 Winding the bobbin 11 Lower threading 13 Upper threading 14 Drawing up the lower thread 16 FABRIC, THREAD, AND NEEDLE COMBINATIONS 17 2. APPENDIX 38 MAINTENANCE 38 Restrictions on...
Users Manual - English and Spanish
Page 5
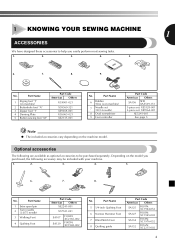
... F018N: XC1976-052 SA132 F016N: XC2215-002 4 1 KNOWING YOUR SEWING MACHINE 1 ACCESSORIES We have designed these accessories to be included with your machine. 1. 2. 3. 4. 5. 6. 7. 8. Part Name 6 Bobbin (One is on machine) 7 Needle set (90/14 needle) 8 Oval screwdriver 9 Foot controller Part Code Americas Others SA156 SFB: XA5539-151 3-piece set: XE5328-001...
... F018N: XC1976-052 SA132 F016N: XC2215-002 4 1 KNOWING YOUR SEWING MACHINE 1 ACCESSORIES We have designed these accessories to be included with your machine. 1. 2. 3. 4. 5. 6. 7. 8. Part Name 6 Bobbin (One is on machine) 7 Needle set (90/14 needle) 8 Oval screwdriver 9 Foot controller Part Code Americas Others SA156 SFB: XA5539-151 3-piece set: XE5328-001...

Users Manual - English and Spanish
Page 6
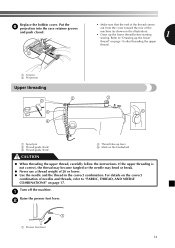
... 22) This controls the tension of the upper thread. 4 Thread guide (Page 11, 14) This is used when winding the thread onto the bobbin and then threading the machine. 5 Thread take-up lever (Page 15) 6 Thread cutter (Page 19) Pass the threads through the thread cutter to.... A Handwheel Used to start and stop sewing. KNOWING YOUR SEWING MACHINE THE MAIN PARTS 43 2 1 5 A 6 0 7 9 8 1 Bobbin winder (Page 11) This winds the thread onto the bobbin for 220/240V area The foot controller part code differs depending on and off. Contact your dealer or the nearest authorized...
... 22) This controls the tension of the upper thread. 4 Thread guide (Page 11, 14) This is used when winding the thread onto the bobbin and then threading the machine. 5 Thread take-up lever (Page 15) 6 Thread cutter (Page 19) Pass the threads through the thread cutter to.... A Handwheel Used to start and stop sewing. KNOWING YOUR SEWING MACHINE THE MAIN PARTS 43 2 1 5 A 6 0 7 9 8 1 Bobbin winder (Page 11) This winds the thread onto the bobbin for 220/240V area The foot controller part code differs depending on and off. Contact your dealer or the nearest authorized...

Users Manual - English and Spanish
Page 8
... a flat surface. Dispose of cloth and dust to build up . CAUTION ● Do not allow pieces of any bent needles safely. 1 2 1 Parallel space 2 Level surface (bobbin cover, glass, etc.) Replacing the needle 1 2 1 Slower 2 Faster You should make sure that nothing is placed on the foot controller when the machine is accidentally...
... a flat surface. Dispose of cloth and dust to build up . CAUTION ● Do not allow pieces of any bent needles safely. 1 2 1 Parallel space 2 Level surface (bobbin cover, glass, etc.) Replacing the needle 1 2 1 Slower 2 Faster You should make sure that nothing is placed on the foot controller when the machine is accidentally...

Users Manual - English and Spanish
Page 12
... the spool 2 with your right hand, pass the thread toward you use the bobbin that comes with this machine or bobbins of the same type (part code: SA156, SFB: XA5539-151). Then, pass the thread around the pre-tension disk and pull the thread in completely. ... disk CAUTION ● If the spool of thread is in completely. 2 3 1 Pre-tension disk 2 Bobbin winder shaft Pull up the spool pin and put a spool of 1 thread on this pin. 3 Bobbin While holding the thread from other bobbins may tangle on the thread guide. Actual size 11.5 mm (7/16 inch) This model Other...
... the spool 2 with your right hand, pass the thread toward you use the bobbin that comes with this machine or bobbins of the same type (part code: SA156, SFB: XA5539-151). Then, pass the thread around the pre-tension disk and pull the thread in completely. ... disk CAUTION ● If the spool of thread is in completely. 2 3 1 Pre-tension disk 2 Bobbin winder shaft Pull up the spool pin and put a spool of 1 thread on this pin. 3 Bobbin While holding the thread from other bobbins may tangle on the thread guide. Actual size 11.5 mm (7/16 inch) This model Other...
Users Manual - English and Spanish
Page 13
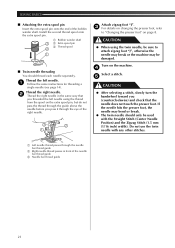
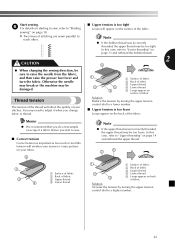
... full and begins 9 spinning slowly, take your foot off the foot controller. Press the foot controller to the left and remove the bobbin. Cut the thread, slide the bobbin winder 0 shaft to start. 8 1 Spring on the shaft 2 Notch 3 7-10 cm (3 - 4 inches) CAUTION ● Pull the ... hold the end of the thread straight up. on the bobbin. 1 Put the bobbin onto the bobbin winder 4 shaft and slide the bobbin winder shaft to 10 cm (3 - 4 inches) of thread from the hole bobbin. Turn the bobbin clockwise, by hand, until the spring on the bobbin. 3 1 2 1 1 1 cm (1/2 inch) CAUTION ●...
... full and begins 9 spinning slowly, take your foot off the foot controller. Press the foot controller to the left and remove the bobbin. Cut the thread, slide the bobbin winder 0 shaft to start. 8 1 Spring on the shaft 2 Notch 3 7-10 cm (3 - 4 inches) CAUTION ● Pull the ... hold the end of the thread straight up. on the bobbin. 1 Put the bobbin onto the bobbin winder 4 shaft and slide the bobbin winder shaft to 10 cm (3 - 4 inches) of thread from the hole bobbin. Turn the bobbin clockwise, by hand, until the spring on the bobbin. 3 1 2 1 1 1 cm (1/2 inch) CAUTION ●...

Users Manual - English and Spanish
Page 14
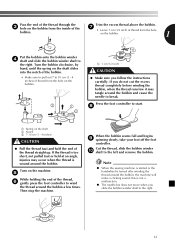
... then pass the thread through the slit, as shown. • If the thread is not correctly inserted through the tension-adjusting spring of the bobbin case, it may break the needle. CAUTION ● Make sure you turn off the machine while threading. Hold the end of the thread, push... injured. If you could be incorrect or break the needle. If the thread unrolls in the right direction. CAUTION ● Make sure you set the bobbin so the thread unrolls in the wrong direction, it and 3 lift toward you . Raise the needle by turning the 2 handwheel toward you (counterclockwise)...
... then pass the thread through the slit, as shown. • If the thread is not correctly inserted through the tension-adjusting spring of the bobbin case, it may break the needle. CAUTION ● Make sure you turn off the machine while threading. Hold the end of the thread, push... injured. If you could be incorrect or break the needle. If the thread unrolls in the right direction. CAUTION ● Make sure you set the bobbin so the thread unrolls in the wrong direction, it and 3 lift toward you . Raise the needle by turning the 2 handwheel toward you (counterclockwise)...
Users Manual - English and Spanish
Page 15
... become tangled or the needle may bend or break. ● Never use a thread weight of the machine (as shown in the correct combination. Replace the bobbin cover.
... become tangled or the needle may bend or break. ● Never use a thread weight of the machine (as shown in the correct combination. Replace the bobbin cover.
Users Manual - English and Spanish
Page 22
...the Straight Stitch (Center Needle Position) and the Zigzag Stitch (1.5 mm (1/16 inch) width). Install the second thread spool onto the extra spool pin. 1 Bobbin winder shaft 3 2 Extra spool pin 2 3 Thread spool 1 ■ Twin needle threading You should only be damaged. Thread the left needle using the... If the needle hits the presser foot, the needle may be used with any other stitches. 1 Left needle thread passes through the eye of the bobbin winder shaft. CAUTION ● When using the thread from the spool on the machine. 4 Select a stitch. 5 CAUTION ● After selecting a...
...the Straight Stitch (Center Needle Position) and the Zigzag Stitch (1.5 mm (1/16 inch) width). Install the second thread spool onto the extra spool pin. 1 Bobbin winder shaft 3 2 Extra spool pin 2 3 Thread spool 1 ■ Twin needle threading You should only be damaged. Thread the left needle using the... If the needle hits the presser foot, the needle may be used with any other stitches. 1 Left needle thread passes through the eye of the bobbin winder shaft. CAUTION ● When using the thread from the spool on the machine. 4 Select a stitch. 5 CAUTION ● After selecting a...
Users Manual - English and Spanish
Page 23
...when you start to a lower number. ■ Upper tension is too loose Loops appear on the back of the fabric. Note ● If the bobbin thread was incorrectly threaded, the upper thread may be damaged. Thread tension The tension of the thread will affect the quality of your fabric. 2 1 ... little tension will weaken your seams or cause puckers on your stitches. In this case, refer to "Lower threading" on page 13 and rethread the bobbin thread. 2 CAUTION 2 ● When changing the sewing direction, be too loose. Start sewing. 6 For details on starting to sew, refer to each...
...when you start to a lower number. ■ Upper tension is too loose Loops appear on the back of the fabric. Note ● If the bobbin thread was incorrectly threaded, the upper thread may be damaged. Thread tension The tension of the thread will affect the quality of your fabric. 2 1 ... little tension will weaken your seams or cause puckers on your stitches. In this case, refer to "Lower threading" on page 13 and rethread the bobbin thread. 2 CAUTION 2 ● When changing the sewing direction, be too loose. Start sewing. 6 For details on starting to sew, refer to each...

Users Manual - English and Spanish
Page 30
... the darning plate on the machine. 5 29 The needle may break and you may be injured. X Use scissors to cut the upper thread and the bobbin thread at the end of the 8 stitching to the button sewing foot 3 "M". Turn off the machine. 2 Change the foot to the wrong side of the... stitching. Turn on the needle 4 plate. Put a button between the 1 buttonholes and set the pattern selection dial to the Zigzag Stitch with the bobbin thread. If it with the desired width. Pull the upper thread at the beginning of the fabric, and then tie it hits, see step 1.
... the darning plate on the machine. 5 29 The needle may break and you may be injured. X Use scissors to cut the upper thread and the bobbin thread at the end of the 8 stitching to the button sewing foot 3 "M". Turn off the machine. 2 Change the foot to the wrong side of the... stitching. Turn on the needle 4 plate. Put a button between the 1 buttonholes and set the pattern selection dial to the Zigzag Stitch with the bobbin thread. If it with the desired width. Pull the upper thread at the beginning of the fabric, and then tie it hits, see step 1.
Users Manual - English and Spanish
Page 39
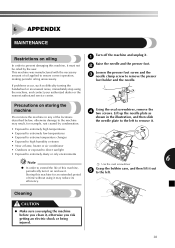
... needle and the presser foot. 2 Loosen the presser foot screw and the 3 needle clamp screw to ensure correct operation, making periodic oiling unnecessary. Grasp the bobbin case, and then lift it , otherwise you risk getting an electric shock or being injured. 38 Storing this machine, periodically turn it on storing the...
... needle and the presser foot. 2 Loosen the presser foot screw and the 3 needle clamp screw to ensure correct operation, making periodic oiling unnecessary. Grasp the bobbin case, and then lift it , otherwise you risk getting an electric shock or being injured. 38 Storing this machine, periodically turn it on storing the...
Users Manual - English and Spanish
Page 40
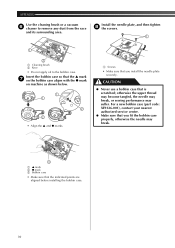
... 1 1 2 2 • Align the ▲ and ● marks. 1 Screws • Make sure that is scratched; CAUTION ● Never use a bobbin case that you fit the bobbin case properly, otherwise the needle may suffer. Install the needle plate, and then tighten 8 the screws. 1 1 2 1 Cleaning brush 2 Race • Do not... otherwise the upper thread may become tangled, the needle may break, or sewing performance may break. 3 1 ▲ mark 2 ● mark 3 Bobbin case • Make sure that you install the needle plate securely. APPENDIX Use the cleaning brush or a vacuum 6 cleaner to the...
... 1 1 2 2 • Align the ▲ and ● marks. 1 Screws • Make sure that is scratched; CAUTION ● Never use a bobbin case that you fit the bobbin case properly, otherwise the needle may suffer. Install the needle plate, and then tighten 8 the screws. 1 1 2 1 Cleaning brush 2 Race • Do not... otherwise the upper thread may become tangled, the needle may break, or sewing performance may break. 3 1 ▲ mark 2 ● mark 3 Bobbin case • Make sure that you install the needle plate securely. APPENDIX Use the cleaning brush or a vacuum 6 cleaner to the...

Users Manual - English and Spanish
Page 41
... the type of the guide above the needle.) thread breaks. Replace the bobbin case. Remove any knots or tangles. - You have not used a bobbin that has been Use a bobbin that you need additional help, the Brother Solutions Center offers the latest FAQs and troubleshooting tips. You have not fitted... If the problem persists, contact your retailer or the nearest - You can solve most problems by yourself. Visit us at " http://solutions.brother.com ". Contact your retailer or the nearest authorized service center. - There are knots or tangles in the needle plate or the presser foot...
... the type of the guide above the needle.) thread breaks. Replace the bobbin case. Remove any knots or tangles. - You have not used a bobbin that has been Use a bobbin that you need additional help, the Brother Solutions Center offers the latest FAQs and troubleshooting tips. You have not fitted... If the problem persists, contact your retailer or the nearest - You can solve most problems by yourself. Visit us at " http://solutions.brother.com ". Contact your retailer or the nearest authorized service center. - There are knots or tangles in the needle plate or the presser foot...
Users Manual - English and Spanish
Page 42
...that has been designed for this machine. Contact your retailer or the nearest authorized service center. Replace the bobbin case. The thread tension is incorrect. You have not used a bobbin that you are being fed correctly. You have not threaded the upper thread properly. You have not ...used the right combination of fabric. The thread tension is incorrect. If thin fabrics are using . Replace the needle plate. Use a bobbin that are using is not being sewn, the fabric is not appropriate for the type of fabric, thread and needle. Choose a thread and ...
...that has been designed for this machine. Contact your retailer or the nearest authorized service center. Replace the bobbin case. The thread tension is incorrect. You have not used a bobbin that you are being fed correctly. You have not threaded the upper thread properly. You have not ...used the right combination of fabric. The thread tension is incorrect. If thin fabrics are using . Replace the needle plate. Use a bobbin that are using is not being sewn, the fabric is not appropriate for the type of fabric, thread and needle. Choose a thread and ...
Users Manual - English and Spanish
Page 43
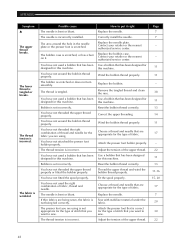
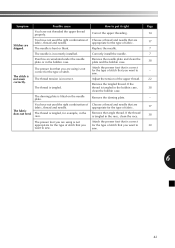
Possible cause You have not used the right combination of fabric, thread and needle. The presser foot you are using is tangled in the bobbin case. Correctly install the needle. Adjust the tension of stitch that are using is tangled in the race. If the thread is not correct for ... 38 - 17 38 30 6 42 The stitch is fitted on the needle plate. Dust has accumulated under the needle plate or in the bobbin case, clean the bobbin case. The darning plate is not sewn correctly. The thread is correct for the type of stitch that you want to sew. Attach the...
Possible cause You have not used the right combination of fabric, thread and needle. The presser foot you are using is tangled in the bobbin case. Correctly install the needle. Adjust the tension of stitch that are using is tangled in the race. If the thread is not correct for ... 38 - 17 38 30 6 42 The stitch is fitted on the needle plate. Dust has accumulated under the needle plate or in the bobbin case, clean the bobbin case. The darning plate is not sewn correctly. The thread is correct for the type of stitch that you want to sew. Attach the...
Users Manual - English and Spanish
Page 44
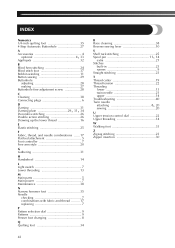
INDEX Numerics 1/4-inch quilting foot 35 4-Step Automatic Buttonhole 27 A , Accessories 4 optional 4 33 Appliqués 32 B Blind hem stitching 24 Blind stitch foot 37 Bobbin winding 11 Button sewing 29 Buttonhole adjusting 28 making 27 Buttonhole fine-adjustment screw 28 C Cleaning 38 Connecting plugs 6 D , , Darning 31 Darning plate 29 31 ...
INDEX Numerics 1/4-inch quilting foot 35 4-Step Automatic Buttonhole 27 A , Accessories 4 optional 4 33 Appliqués 32 B Blind hem stitching 24 Blind stitch foot 37 Bobbin winding 11 Button sewing 29 Buttonhole adjusting 28 making 27 Buttonhole fine-adjustment screw 28 C Cleaning 38 Connecting plugs 6 D , , Darning 31 Darning plate 29 31 ...


