
Users Manual - English and Spanish
Page 2
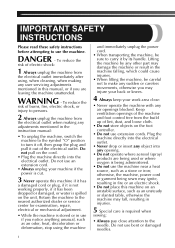
..., repair, electrical or mechanical adjustment. • While the machine is spilled on the unit. Lifting the machine by any other part may damage the machine or result in the machine falling, which could cause injuries. • When lifting the machine, be sure to make any sudden or careless movements, otherwise...or damaged needles. 1 Do not pull on the cord. • Plug the machine directly into any user servicing adjustments mentioned in injuries. 5 Special care is being used or where oxygen is required when sewing: • Always pay close attention to turn it off, then grasp the ...
..., repair, electrical or mechanical adjustment. • While the machine is spilled on the unit. Lifting the machine by any other part may damage the machine or result in the machine falling, which could cause injuries. • When lifting the machine, be sure to make any sudden or careless movements, otherwise...or damaged needles. 1 Do not pull on the cord. • Plug the machine directly into any user servicing adjustments mentioned in injuries. 5 Special care is being used or where oxygen is required when sewing: • Always pay close attention to turn it off, then grasp the ...
Users Manual - English and Spanish
Page 3
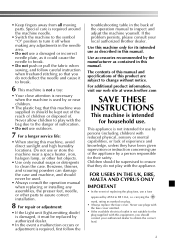
...of . For additional product information, visit our web site at www.brother.com SAVE THESE INSTRUCTIONS This machine is intended for household use by ASTA to ensure that this equipment, you do not...knowledge, unless they have been given supervision or instruction concerning use or store the machine near a space heater, iron, halogen lamp, or other parts to assure correct installation. 8 For repair or adjustment: • If the .... • Do not push or pull the fabric when sewing, and follow careful instruction when freehand stitching so that you should be used by a person responsible ...
...of . For additional product information, visit our web site at www.brother.com SAVE THESE INSTRUCTIONS This machine is intended for household use by ASTA to ensure that this equipment, you do not...knowledge, unless they have been given supervision or instruction concerning use or store the machine near a space heater, iron, halogen lamp, or other parts to assure correct installation. 8 For repair or adjustment: • If the .... • Do not push or pull the fabric when sewing, and follow careful instruction when freehand stitching so that you should be used by a person responsible ...

Users Manual - English and Spanish
Page 4
... BUTTONS 27 Making a buttonhole 27 Adjusting buttonholes 28 Sewing buttons 29 5. KNOWING YOUR SEWING MACHINE 4 ACCESSORIES 4 Optional accessories 4 THE MAIN PARTS 5 Flat bed attachment 5 USING YOUR SEWING MACHINE 6 Connecting plugs 6 Main power and sewing light switch 7 Foot controller 7 Checking the needle 7 Replacing the needle 7 Changing the presser foot 8 THE CONTROLS 9 Pattern selection dial 9 Patterns and stitch names...
... BUTTONS 27 Making a buttonhole 27 Adjusting buttonholes 28 Sewing buttons 29 5. KNOWING YOUR SEWING MACHINE 4 ACCESSORIES 4 Optional accessories 4 THE MAIN PARTS 5 Flat bed attachment 5 USING YOUR SEWING MACHINE 6 Connecting plugs 6 Main power and sewing light switch 7 Foot controller 7 Checking the needle 7 Replacing the needle 7 Changing the presser foot 8 THE CONTROLS 9 Pattern selection dial 9 Patterns and stitch names...
Users Manual - English and Spanish
Page 5
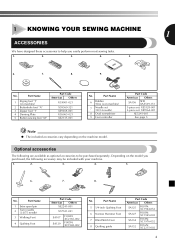
...-001 XC6063-021 XE2137-001 No. Part Name 1 Zigzag foot "J" (on the machine model. Depending on the model you easily perform most sewing tasks. 1. 2. 3. 4. 5. 6. 7. 8. 9. No. Optional accessories The following are available as optional accessories to help you purchased, the following accessory may be purchased separately. 1 KNOWING YOUR SEWING MACHINE 1 ACCESSORIES We have designed these accessories...
...-001 XC6063-021 XE2137-001 No. Part Name 1 Zigzag foot "J" (on the machine model. Depending on the model you easily perform most sewing tasks. 1. 2. 3. 4. 5. 6. 7. 8. 9. No. Optional accessories The following are available as optional accessories to help you purchased, the following accessory may be purchased separately. 1 KNOWING YOUR SEWING MACHINE 1 ACCESSORIES We have designed these accessories...

Users Manual - English and Spanish
Page 6
... You can be stored in the foot controller plug and connect the machine to 1 open it. 1 2 1 Flat bed attachment 2 Storage compartment 5 Slide the flat bed attachment to the left to the power supply. KNOWING YOUR SEWING MACHINE THE MAIN PARTS 43 2 1 5 A 6 0 7 9 8 1 Bobbin ...winder (Page 11) This winds the thread onto the bobbin for 220/240V area The foot controller part code differs depending on and off. D Foot controller jack ...
... You can be stored in the foot controller plug and connect the machine to 1 open it. 1 2 1 Flat bed attachment 2 Storage compartment 5 Slide the flat bed attachment to the left to the power supply. KNOWING YOUR SEWING MACHINE THE MAIN PARTS 43 2 1 5 A 6 0 7 9 8 1 Bobbin ...winder (Page 11) This winds the thread onto the bobbin for 220/240V area The foot controller part code differs depending on and off. D Foot controller jack ...

Users Manual - English and Spanish
Page 9
...an oval hole in line with the slot on the controller, the machine will have chosen. Press the black button at the back of the sewing machine may be damaged. screwdriver, otherwise the needle may break or the machine may cause accident or injury. CAUTION 21 1 Use an oval ...● Only use excessive force when loosening or tightening the needle clamp screw, otherwise certain parts of the 3 presser foot holder to be injured. ● Always use an oval screwdriver to turn off the machine. 1 Raise the presser foot lever. Raise the needle by turning the 2 handwheel toward...
...an oval hole in line with the slot on the controller, the machine will have chosen. Press the black button at the back of the sewing machine may be damaged. screwdriver, otherwise the needle may break or the machine may cause accident or injury. CAUTION 21 1 Use an oval ...● Only use excessive force when loosening or tightening the needle clamp screw, otherwise certain parts of the 3 presser foot holder to be injured. ● Always use an oval screwdriver to turn off the machine. 1 Raise the presser foot lever. Raise the needle by turning the 2 handwheel toward...

Users Manual - English and Spanish
Page 12
...the same type (part code: SA156, SFB: XA5539-151). Actual size 11.5 mm (7/16 inch) This model Other models 1 1 Pull the thread in the groove on this pin. 3 Bobbin While holding the thread from other bobbins may tangle on the spool pin. KNOWING YOUR SEWING MACHINE THREADING THE MACHINE Winding the bobbin... CAUTION ● We designed the bobbin that comes with this machine.
...the same type (part code: SA156, SFB: XA5539-151). Actual size 11.5 mm (7/16 inch) This model Other models 1 1 Pull the thread in the groove on this pin. 3 Bobbin While holding the thread from other bobbins may tangle on the spool pin. KNOWING YOUR SEWING MACHINE THREADING THE MACHINE Winding the bobbin... CAUTION ● We designed the bobbin that comes with this machine.
Users Manual - English and Spanish
Page 19
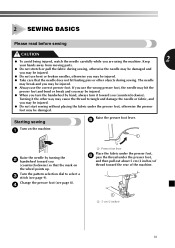
...needle may hit the presser foot and bend or break and you (counterclockwise). Starting sewing Raise the presser foot lever. 5 Turn on the machine. 1 1 Raise the needle by hand, always turn it the other objects during sewing, otherwise the needle may be damaged and you may be injured. ● Do.... If you may be injured. ● Do not start sewing without placing the fabric under the presser foot, and then pull out about 5 cm (2 inches) of thread toward you are using the machine. Keep 2 your hands away from moving parts. ● Do not stretch or pull the fabric during...
...needle may hit the presser foot and bend or break and you (counterclockwise). Starting sewing Raise the presser foot lever. 5 Turn on the machine. 1 1 Raise the needle by hand, always turn it the other objects during sewing, otherwise the needle may be damaged and you may be injured. ● Do.... If you may be injured. ● Do not start sewing without placing the fabric under the presser foot, and then pull out about 5 cm (2 inches) of thread toward you are using the machine. Keep 2 your hands away from moving parts. ● Do not stretch or pull the fabric during...
Users Manual - English and Spanish
Page 21
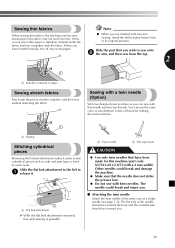
...). Slide the flat bed attachment to the left to sew onto 2 the arm, and then sew from the top. 2 1 1 Stabilizer material or paper Sewing stretch fabrics First, baste the pieces of thread for this machine (part code: X57521-021:2.0/75 with a twin needle (Option) We have finished sewing, tear off any excess paper. Other needles could...
...). Slide the flat bed attachment to the left to sew onto 2 the arm, and then sew from the top. 2 1 1 Stabilizer material or paper Sewing stretch fabrics First, baste the pieces of thread for this machine (part code: X57521-021:2.0/75 with a twin needle (Option) We have finished sewing, tear off any excess paper. Other needles could...
Users Manual - English and Spanish
Page 35
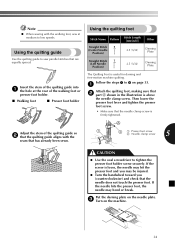
... medium to sew parallel stitches that are equally spaced. Then lower the presser foot lever and tighten the presser foot screw. • Make sure that 2 part A shown in the illustration is firmly tightened. A Adjust the stem of the walking foot or presser foot holder. ■ Walking... foot screw 2 Needle clamp screw 5 CAUTION ● Use the oval screwdriver to 3 on the machine. 34 If the screw is useful for darning and free-motion machine quilting. Note ● When sewing with the seam that the needle does not touch the presser foot. Using the quilting guide Use the...
... medium to sew parallel stitches that are equally spaced. Then lower the presser foot lever and tighten the presser foot screw. • Make sure that 2 part A shown in the illustration is firmly tightened. A Adjust the stem of the walking foot or presser foot holder. ■ Walking... foot screw 2 Needle clamp screw 5 CAUTION ● Use the oval screwdriver to 3 on the machine. 34 If the screw is useful for darning and free-motion machine quilting. Note ● When sewing with the seam that the needle does not touch the presser foot. Using the quilting guide Use the...
Users Manual - English and Spanish
Page 40
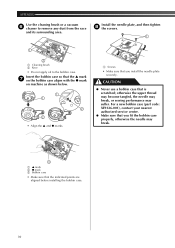
... the upper thread may become tangled, the needle may break, or sewing performance may break. 3 1 ▲ mark 2 ● mark 3 Bobbin case • Make sure that you install the needle plate securely. For a new bobbin case (part code: XE9326-001), contact your nearest authorized service center. ●... the race and its surrounding area. Insert the bobbin case so that the ▲ mark 7 on the bobbin case aligns with the ● mark on machine as shown below. 1 1 2 2 • Align the ▲ and ● marks. 1 Screws • Make sure that is scratched; CAUTION ●...
... the upper thread may become tangled, the needle may break, or sewing performance may break. 3 1 ▲ mark 2 ● mark 3 Bobbin case • Make sure that you install the needle plate securely. For a new bobbin case (part code: XE9326-001), contact your nearest authorized service center. ●... the race and its surrounding area. Insert the bobbin case so that the ▲ mark 7 on the bobbin case aligns with the ● mark on machine as shown below. 1 1 2 2 • Align the ▲ and ● marks. 1 Screws • Make sure that is scratched; CAUTION ●...


