

Users Manual - English and Spanish
Page 8
... surface. Doing so could cause a fire or an electric shock. CAUTION ● Do not allow pieces of any bent needles safely. 1 2 1 Parallel space 2 Level surface (bobbin cover, glass, etc.) Replacing the needle 1 2 1 Slower 2 Faster You should make sure that the mark on the wheel points up on the foot controller. KNOWING YOUR...
... surface. Doing so could cause a fire or an electric shock. CAUTION ● Do not allow pieces of any bent needles safely. 1 2 1 Parallel space 2 Level surface (bobbin cover, glass, etc.) Replacing the needle 1 2 1 Slower 2 Faster You should make sure that the mark on the wheel points up on the foot controller. KNOWING YOUR...

Users Manual - English and Spanish
Page 14
... lower thread. • See page 11 for the details about bobbin winding. Remove the bobbin cover by sliding it and 3 lift toward you . Raise the needle by the arrow. 1 2 1 Wound evenly 2 Wound poorly Lower threading Install the bobbin wound with your finger, and then pass the thread through the ...on the foot controller and the machine starts to be injured. Put the bobbin in so the thread comes out 4 in the wrong direction, it may cause incorrect thread tension. 1 1 1 Tension-adjusting spring 1 Bobbin cover 13 If the thread unrolls in the direction shown by turning the 2 ...
... lower thread. • See page 11 for the details about bobbin winding. Remove the bobbin cover by sliding it and 3 lift toward you . Raise the needle by the arrow. 1 2 1 Wound evenly 2 Wound poorly Lower threading Install the bobbin wound with your finger, and then pass the thread through the ...on the foot controller and the machine starts to be injured. Put the bobbin in so the thread comes out 4 in the wrong direction, it may cause incorrect thread tension. 1 1 1 Tension-adjusting spring 1 Bobbin cover 13 If the thread unrolls in the direction shown by turning the 2 ...
Users Manual - English and Spanish
Page 15
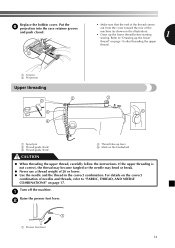
Replace the bobbin cover. For details on the correct combination of needles and threads, refer to "Drawing up the lower thread" on page 16 after threading the upper thread. 1 ... instructions. Put the 6 projection into the race retainer groove and push closed. 1 2 • Make sure that the end of the thread comes out from the cover toward the rear of 20 or lower. ● Use the needle and the thread in the illustration). • Draw up lever 5 Mark on page 17.
Replace the bobbin cover. For details on the correct combination of needles and threads, refer to "Drawing up the lower thread" on page 16 after threading the upper thread. 1 ... instructions. Put the 6 projection into the race retainer groove and push closed. 1 2 • Make sure that the end of the thread comes out from the cover toward the rear of 20 or lower. ● Use the needle and the thread in the illustration). • Draw up lever 5 Mark on page 17.


