

Users Manual - English and Spanish
Page 4
...19 Sewing thick fabrics 19 Sewing thin fabrics 20 Sewing stretch fabrics 20 Stitching cylindrical pieces 20 Sewing with a twin needle (Option 20 Thread tension 22 3. KNOWING YOUR SEWING MACHINE 4 ACCESSORIES 4 Optional accessories 4 THE MAIN PARTS 5 Flat bed attachment 5 USING YOUR SEWING...9 Pattern selection dial 9 Patterns and stitch names 9 Reverse sewing lever 10 THREADING THE MACHINE 11 Winding the bobbin 11 Lower threading 13 Upper threading 14 Drawing up the lower thread 16 FABRIC, THREAD, AND NEEDLE COMBINATIONS 17 2. BUILT-IN STITCHES 23 4. USING ATTACHMENTS AND ...
...19 Sewing thick fabrics 19 Sewing thin fabrics 20 Sewing stretch fabrics 20 Stitching cylindrical pieces 20 Sewing with a twin needle (Option 20 Thread tension 22 3. KNOWING YOUR SEWING MACHINE 4 ACCESSORIES 4 Optional accessories 4 THE MAIN PARTS 5 Flat bed attachment 5 USING YOUR SEWING...9 Pattern selection dial 9 Patterns and stitch names 9 Reverse sewing lever 10 THREADING THE MACHINE 11 Winding the bobbin 11 Lower threading 13 Upper threading 14 Drawing up the lower thread 16 FABRIC, THREAD, AND NEEDLE COMBINATIONS 17 2. BUILT-IN STITCHES 23 4. USING ATTACHMENTS AND ...

Users Manual - English and Spanish
Page 6
...-control dial (Page 22) This controls the tension of the upper thread. 4 Thread guide (Page 11, 14) This is used when winding the thread onto the bobbin and then threading the machine. 5 Thread take-up lever (Page 15) 6 Thread cutter (Page 19) Pass the threads through the thread cutter to cut them. 7 Flat bed attachment with accessory compartment...
...-control dial (Page 22) This controls the tension of the upper thread. 4 Thread guide (Page 11, 14) This is used when winding the thread onto the bobbin and then threading the machine. 5 Thread take-up lever (Page 15) 6 Thread cutter (Page 19) Pass the threads through the thread cutter to cut them. 7 Flat bed attachment with accessory compartment...

Users Manual - English and Spanish
Page 12
... or bobbins of the same type (part code: SA156, SFB: XA5539-151). Then, pass the thread around the pre-tension disk and pull the thread in completely. 11 1 1 Pre-tension disk CAUTION ● If the spool of 1 thread on the spool pin. Actual size 11.5 mm (7/16 inch) This model Other models 1 1.... 2 3 1 Pre-tension disk 2 Bobbin winder shaft Pull up the spool pin and put a spool of thread is in the groove on the thread guide. If you , in the wrong place, or is set incorrectly, the thread may tangle on this machine. Only use the bobbin that comes with your right hand, pass...
... or bobbins of the same type (part code: SA156, SFB: XA5539-151). Then, pass the thread around the pre-tension disk and pull the thread in completely. 11 1 1 Pre-tension disk CAUTION ● If the spool of 1 thread on the spool pin. Actual size 11.5 mm (7/16 inch) This model Other models 1 1.... 2 3 1 Pre-tension disk 2 Bobbin winder shaft Pull up the spool pin and put a spool of thread is in the groove on the thread guide. If you , in the wrong place, or is set incorrectly, the thread may tangle on this machine. Only use the bobbin that comes with your right hand, pass...
Users Manual - English and Spanish
Page 13
..., until the spring on the shaft slides into the notch of the bobbin. • Make sure to pull out 7 to wind the thread around the bobbin. If the thread is too short, not pulled taut or held at an angle, injuries may tangle around the bobbin, the machine will make a clicking sound...; Cut the thread, slide the bobbin winder 0 shaft to the right. 12 on the bobbin. 1 Put the bobbin onto the bobbin winder 4 shaft and slide the bobbin winder ...
..., until the spring on the shaft slides into the notch of the bobbin. • Make sure to pull out 7 to wind the thread around the bobbin. If the thread is too short, not pulled taut or held at an angle, injuries may tangle around the bobbin, the machine will make a clicking sound...; Cut the thread, slide the bobbin winder 0 shaft to the right. 12 on the bobbin. 1 Put the bobbin onto the bobbin winder 4 shaft and slide the bobbin winder ...

Users Manual - English and Spanish
Page 14
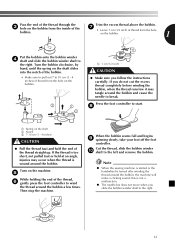
...not correctly inserted through the tension-adjusting spring of the bobbin case, it and 3 lift toward you set the bobbin so the thread unrolls in the right direction. Remove the bobbin cover by turning the 2 handwheel toward you. If you accidentally step on the foot... controller and the machine starts to loosen, and may cause incorrect thread tension. 1 1 1 Tension-adjusting spring 1 Bobbin cover 13 CAUTION ● Make sure you could be incorrect or break the needle. CAUTION ● ...
...not correctly inserted through the tension-adjusting spring of the bobbin case, it and 3 lift toward you set the bobbin so the thread unrolls in the right direction. Remove the bobbin cover by turning the 2 handwheel toward you. If you accidentally step on the foot... controller and the machine starts to loosen, and may cause incorrect thread tension. 1 1 1 Tension-adjusting spring 1 Bobbin cover 13 CAUTION ● Make sure you could be incorrect or break the needle. CAUTION ● ...
Users Manual - English and Spanish
Page 15
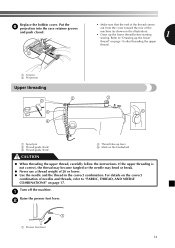
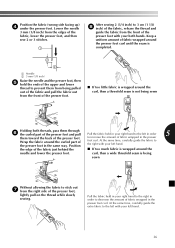
...toward the rear of needles and threads, refer to "Drawing up the lower thread" on page 16 after threading the upper thread. 1 Groove 2 Projection Upper threading 2 2 3 4 1 5 1 Spool pin 2 Thread guide (back) 3 Thread guide (front) 4 Thread take-up the lower thread before starting 1 sewing. Replace the... 1 Presser foot lever 14 Refer to "FABRIC, THREAD, AND NEEDLE COMBINATIONS" on the handwheel CAUTION ● When threading the upper thread, carefully follow the instructions. If the upper threading is not correct, the thread may become tangled or the needle may bend or ...
...toward the rear of needles and threads, refer to "Drawing up the lower thread" on page 16 after threading the upper thread. 1 Groove 2 Projection Upper threading 2 2 3 4 1 5 1 Spool pin 2 Thread guide (back) 3 Thread guide (front) 4 Thread take-up the lower thread before starting 1 sewing. Replace the... 1 Presser foot lever 14 Refer to "FABRIC, THREAD, AND NEEDLE COMBINATIONS" on the handwheel CAUTION ● When threading the upper thread, carefully follow the instructions. If the upper threading is not correct, the thread may become tangled or the needle may bend or ...
Users Manual - English and Spanish
Page 16
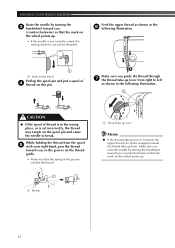
... needle is not correctly raised, the sewing machine can not be threaded. Make sure you guide the thread through 7 the thread take-up lever from the spool 5 with your right hand, pass the thread toward you, in the groove on the thread guide. • Make sure that the spring in the wrong ...place, or is lowered, the upper thread can not be wrapped around the thread take -up lever. While holding the thread from right to break. Feed the upper thread as shown in the 6 following illustration. 1 CAUTION ● If the spool of 4 thread on the spool pin and cause the needle ...
... needle is not correctly raised, the sewing machine can not be threaded. Make sure you guide the thread through 7 the thread take-up lever from the spool 5 with your right hand, pass the thread toward you, in the groove on the thread guide. • Make sure that the spring in the wrong ...place, or is lowered, the upper thread can not be wrapped around the thread take -up lever. While holding the thread from right to break. Feed the upper thread as shown in the 6 following illustration. 1 CAUTION ● If the spool of 4 thread on the spool pin and cause the needle ...
Users Manual - English and Spanish
Page 17
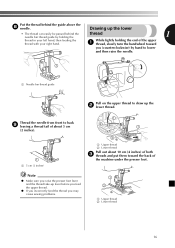
... raise the presser foot lever and the thread take-up lever before you feed the upper thread. ● If you incorrectly feed the thread you (counterclockwise) by holding the thread 1 thread in your right hand. 1 thread, slowly turn the handwheel toward you may cause sewing problems. 1 2 1 Upper thread 2 Lower thread 16 Thread the needle from front to draw up...
... raise the presser foot lever and the thread take-up lever before you feed the upper thread. ● If you incorrectly feed the thread you (counterclockwise) by holding the thread 1 thread in your right hand. 1 thread, slowly turn the handwheel toward you may cause sewing problems. 1 2 1 Upper thread 2 Lower thread 16 Thread the needle from front to draw up...
Users Manual - English and Spanish
Page 18
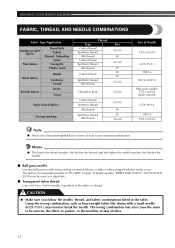
... Corduroy Tweed Jersey Tricot Easily frayed fabrics For top-stitching Thread Type Cotton thread Synthetic thread Silk thread Cotton thread Synthetic thread Silk thread Cotton thread Synthetic thread Silk thread Size 60-90 50 60-90 50 30 50 50-60 Thread for knits 50-60 Cotton thread Synthetic thread Silk thread Synthetic thread Silk thread 50-90 50 30 50-60 Size of the fabric...
... Corduroy Tweed Jersey Tricot Easily frayed fabrics For top-stitching Thread Type Cotton thread Synthetic thread Silk thread Cotton thread Synthetic thread Silk thread Cotton thread Synthetic thread Silk thread Size 60-90 50 60-90 50 30 50 50-60 Thread for knits 50-60 Cotton thread Synthetic thread Silk thread Synthetic thread Silk thread 50-90 50 30 50-60 Size of the fabric...
Users Manual - English and Spanish
Page 19
.... The needle may break and you may be injured. ● When you turn the handwheel by turning the 2 handwheel toward the rear of thread toward you (counterclockwise). Change the presser foot (see page 8). 4 1 Presser foot lever Place the fabric under the presser foot, 6 pass the... thread under the presser foot, otherwise the presser foot may cause the thread to select a 3 stitch (see page 9). If you use the wrong presser foot, the needle may hit the presser foot and...
.... The needle may break and you may be injured. ● When you turn the handwheel by turning the 2 handwheel toward the rear of thread toward you (counterclockwise). Change the presser foot (see page 8). 4 1 Presser foot lever Place the fabric under the presser foot, 6 pass the... thread under the presser foot, otherwise the presser foot may cause the thread to select a 3 stitch (see page 9). If you use the wrong presser foot, the needle may hit the presser foot and...
Users Manual - English and Spanish
Page 20
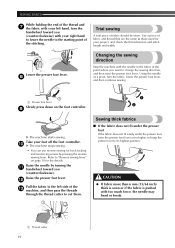
...are the same as a pivot, turn the handwheel toward you (counterclockwise). Using the needle as those used for your project, and check the thread tension and stitch length and width. Raise the presser foot lever. b Pull the fabric to the left hand, turn the fabric, lower the ... be sewn. Lower the presser foot lever. 8 Changing the sewing direction Stop the machine with too much force, the needle may bend or break. 1 Thread cutter 19 Take your foot off the foot controller. 0 X The machine stops sewing. • You can use reverse sewing for the details. CAUTION ●...
...are the same as a pivot, turn the handwheel toward you (counterclockwise). Using the needle as those used for your project, and check the thread tension and stitch length and width. Raise the presser foot lever. b Pull the fabric to the left hand, turn the fabric, lower the ... be sewn. Lower the presser foot lever. 8 Changing the sewing direction Stop the machine with too much force, the needle may bend or break. 1 Thread cutter 19 Take your foot off the foot controller. 0 X The machine stops sewing. • You can use reverse sewing for the details. CAUTION ●...
Users Manual - English and Spanish
Page 21
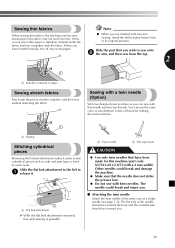
...stitches. 1 1 Basting Stitching cylindrical pieces Removing the flat bed attachment makes it easier to 1 release it together with this needle and two top threads. Slide the flat bed attachment to the left to sew cylindrical pieces such as a single needle (see page 7-8). When you have designed your...sew onto 2 the arm, and then sew from the top. 2 1 1 Stabilizer material or paper Sewing stretch fabrics First, baste the pieces of thread for this occurs, place thin paper or stabilizer material under the ● When you . ■ Attaching the twin needle Attach the twin needle ...
...stitches. 1 1 Basting Stitching cylindrical pieces Removing the flat bed attachment makes it easier to 1 release it together with this needle and two top threads. Slide the flat bed attachment to the left to sew cylindrical pieces such as a single needle (see page 7-8). When you have designed your...sew onto 2 the arm, and then sew from the top. 2 1 1 Stabilizer material or paper Sewing stretch fabrics First, baste the pieces of thread for this occurs, place thin paper or stabilizer material under the ● When you . ■ Attaching the twin needle Attach the twin needle ...
Users Manual - English and Spanish
Page 22
.... If the needle hits the presser foot, the needle may be sure to "Changing the presser foot" on page 8. CAUTION ● When using the thread from the spool on the machine. 4 Select a stitch. 5 CAUTION ● After selecting a stitch, slowly turn the handwheel toward you pass it through... the needle bar thread guide 2 Right needle thread passes in the same way that the needle does not touch the presser foot. Do not use the twin needle with the Straight Stitch...
.... If the needle hits the presser foot, the needle may be sure to "Changing the presser foot" on page 8. CAUTION ● When using the thread from the spool on the machine. 4 Select a stitch. 5 CAUTION ● After selecting a stitch, slowly turn the handwheel toward you pass it through... the needle bar thread guide 2 Right needle thread passes in the same way that the needle does not touch the presser foot. Do not use the twin needle with the Straight Stitch...
Users Manual - English and Spanish
Page 23
...● We recommend that you do a test sample on scrap of a fabric before you change fabric or thread. 1 3 5 4 1 Surface of fabric 2 Back of fabric 3 Upper thread 4 Lower thread 5 Loops appear on surface of fabric Solution Reduce the tension by turning the upper tension control dial to a ...cause puckers on page 13 and rethread the bobbin thread. 2 CAUTION 2 ● When changing the sewing direction, be too loose. X Two lines of fabric 3 Upper thread 4 Lower thread Note ● If the upper thread was incorrectly threaded, the upper thread may need to adjust it when you start to...
...● We recommend that you do a test sample on scrap of a fabric before you change fabric or thread. 1 3 5 4 1 Surface of fabric 2 Back of fabric 3 Upper thread 4 Lower thread 5 Loops appear on surface of fabric Solution Reduce the tension by turning the upper tension control dial to a ...cause puckers on page 13 and rethread the bobbin thread. 2 CAUTION 2 ● When changing the sewing direction, be too loose. X Two lines of fabric 3 Upper thread 4 Lower thread Note ● If the upper thread was incorrectly threaded, the upper thread may need to adjust it when you start to...
Users Manual - English and Spanish
Page 24
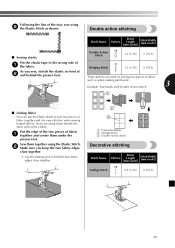
When sewing a Zigzag (Satin) Stitch, use a slightly looser upper-thread tension to the Zigzag Stitch, and then start sewing. With the pattern selection dial, the Zigzag (Satin) Stitch (number 11) can use the Zigzag (Satin) ...
When sewing a Zigzag (Satin) Stitch, use a slightly looser upper-thread tension to the Zigzag Stitch, and then start sewing. With the pattern selection dial, the Zigzag (Satin) Stitch (number 11) can use the Zigzag (Satin) ...
Users Manual - English and Spanish
Page 26
... Each is 1 tighter than normal. Position the fabric under the 1 area you want to mend. • Use the basting pins to the left . Adjust the thread tension so that the needle slightly catches the fold of hem 3 Needle drop point The Shell Tuck Stitch can use the Elastic Stitch for mending...
... Each is 1 tighter than normal. Position the fabric under the 1 area you want to mend. • Use the basting pins to the left . Adjust the thread tension so that the needle slightly catches the fold of hem 3 Needle drop point The Shell Tuck Stitch can use the Elastic Stitch for mending...
Users Manual - English and Spanish
Page 27
... of the two pieces of fabric together and it is very effective when sewing knitted fabrics. Following the line of the tear, sew using nylon thread, the stitch will not be visible. Sew them under the presser foot. If you keep the two fabric edges close together. • Use the basting...
... of the two pieces of fabric together and it is very effective when sewing knitted fabrics. Following the line of the tear, sew using nylon thread, the stitch will not be visible. Sew them under the presser foot. If you keep the two fabric edges close together. • Use the basting...

Users Manual - English and Spanish
Page 30
... stitches. 7 CAUTION ● Make sure the needle does not hit the button during sewing. Pull the upper thread at the end of the 8 stitching to cut the upper thread and the bobbin thread at the beginning of the fabric, and then tie it hits, see step 1. SEWING BUTTONHOLES AND BUTTONS Sewing ... break and you may be injured. Turn on the needle 4 plate. Turn off the machine. 2 Change the foot to the Zigzag Stitch with the bobbin thread. Put a button between the 1 buttonholes and set the pattern selection dial to the button sewing foot 3 "M". X Use scissors to the wrong side of ...
... stitches. 7 CAUTION ● Make sure the needle does not hit the button during sewing. Pull the upper thread at the end of the 8 stitching to cut the upper thread and the bobbin thread at the beginning of the fabric, and then tie it hits, see step 1. SEWING BUTTONHOLES AND BUTTONS Sewing ... break and you may be injured. Turn on the needle 4 plate. Turn off the machine. 2 Change the foot to the Zigzag Stitch with the bobbin thread. Put a button between the 1 buttonholes and set the pattern selection dial to the button sewing foot 3 "M". X Use scissors to the wrong side of ...
Users Manual - English and Spanish
Page 32
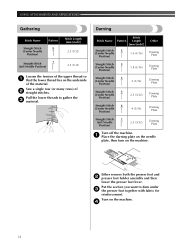
Pull the lower threads to darn under 3 the presser foot together with fabric for reinforcement. Stitch Name Stitch Pattern Length [mm (inch)] Straight Stitch 2 (Center Needle Position) 1.6 (1/16) Other ... Pattern Straight Stitch 5 (Center Needle Position) Straight Stitch 7 (Left Needle Position) Stitch Length [mm (inch)] 2.5 (3/32) 2.5 (3/32) Loosen the tension of the upper thread so 1 that the lower thread lies on the machine. Put the section you want to gather the 3 material. Turn on the machine. 4 31 Sew a single row (or many...
Pull the lower threads to darn under 3 the presser foot together with fabric for reinforcement. Stitch Name Stitch Pattern Length [mm (inch)] Straight Stitch 2 (Center Needle Position) 1.6 (1/16) Other ... Pattern Straight Stitch 5 (Center Needle Position) Straight Stitch 7 (Left Needle Position) Stitch Length [mm (inch)] 2.5 (3/32) 2.5 (3/32) Loosen the tension of the upper thread so 1 that the lower thread lies on the machine. Put the section you want to gather the 3 material. Turn on the machine. 4 31 Sew a single row (or many...
Users Manual - English and Spanish
Page 37
...) from the front of the fabric just behind the ■ If too much fabric is wrapped around the curled part of the upper and lower thread to the left hand. At the same time, carefully guide the fabric to 3 cm (1 1/8 8 inch) of the fabric, release the... thread and guide the fabric from the edges of the fabric, lower the presser foot, and then sew 2 or 3 stitches. 1 After sewing 2 (3/4 inch) to the right ...
...) from the front of the fabric just behind the ■ If too much fabric is wrapped around the curled part of the upper and lower thread to the left hand. At the same time, carefully guide the fabric to 3 cm (1 1/8 8 inch) of the fabric, release the... thread and guide the fabric from the edges of the fabric, lower the presser foot, and then sew 2 or 3 stitches. 1 After sewing 2 (3/4 inch) to the right ...


