
Users Manual - English and Spanish
Page 2
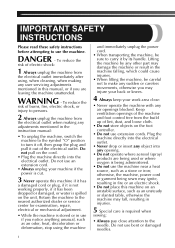
... making any sudden or careless movements, otherwise you are being used or where oxygen is required when sewing: • Always pay close attention to the needle. Lifting the machine by its handle. Do not pull on the foot controller. • Do not use the... use an extension cord. • Always unplug your work area clear: • Never operate the machine with any object into the electrical outlet. IMPORTANT SAFETY INSTRUCTIONS Please read these safety instructions before attempting to use extension cords. WARNING - Keep ventilation openings of lint, dust, and loose cloth...
... making any sudden or careless movements, otherwise you are being used or where oxygen is required when sewing: • Always pay close attention to the needle. Lifting the machine by its handle. Do not pull on the foot controller. • Do not use the... use an extension cord. • Always unplug your work area clear: • Never operate the machine with any object into the electrical outlet. IMPORTANT SAFETY INSTRUCTIONS Please read these safety instructions before attempting to use extension cords. WARNING - Keep ventilation openings of lint, dust, and loose cloth...
Users Manual - English and Spanish
Page 3
Never allow children to clean the case. For additional product information, visit our web site at www.brother.com SAVE THESE INSTRUCTIONS This machine is not suitable for household use plugs with the fuse cover omitted. • If the available electrical outlet is intended for ... "O" position to turn it could cause the needle to break. • Do not push or pull the fabric when sewing, and follow the troubleshooting table in this machine only for their safety. This appliance is not intended for use by persons (including children) with the appliance. Use this...
Never allow children to clean the case. For additional product information, visit our web site at www.brother.com SAVE THESE INSTRUCTIONS This machine is not suitable for household use plugs with the fuse cover omitted. • If the available electrical outlet is intended for ... "O" position to turn it could cause the needle to break. • Do not push or pull the fabric when sewing, and follow the troubleshooting table in this machine only for their safety. This appliance is not intended for use by persons (including children) with the appliance. Use this...

Users Manual - English and Spanish
Page 4
... 7 Checking the needle 7 Replacing the needle 7 Changing the presser foot 8 THE CONTROLS 9 Pattern selection dial 9 Patterns and stitch names 9 Reverse sewing lever 10 THREADING THE MACHINE 11 Winding the bobbin 11 Lower threading 13 Upper threading 14 Drawing up the lower thread 16 FABRIC, THREAD, AND NEEDLE COMBINATIONS 17 2. CONTENTS IMPORTANT SAFETY INSTRUCTIONS 1 1.
... 7 Checking the needle 7 Replacing the needle 7 Changing the presser foot 8 THE CONTROLS 9 Pattern selection dial 9 Patterns and stitch names 9 Reverse sewing lever 10 THREADING THE MACHINE 11 Winding the bobbin 11 Lower threading 13 Upper threading 14 Drawing up the lower thread 16 FABRIC, THREAD, AND NEEDLE COMBINATIONS 17 2. CONTENTS IMPORTANT SAFETY INSTRUCTIONS 1 1.
Users Manual - English and Spanish
Page 13
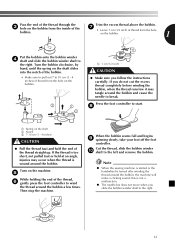
... shaft and slide the bobbin winder shaft to the right. Then stop the machine. When the bobbin seems full and begins 9 spinning slowly, take your foot... the needle to wind the thread around the bobbin. Note ● When the sewing machine is started or the handwheel is wound around the bobbin a few times. on ...held at an angle, injuries may tangle around the bobbin, the machine will make a clicking sound; Pass the end of the thread through...7 • Leave 1 cm (1/2 inch) of thread from the hole on the machine. 5 While holding the end of the thread, 6 gently press the foot controller...
... shaft and slide the bobbin winder shaft to the right. Then stop the machine. When the bobbin seems full and begins 9 spinning slowly, take your foot... the needle to wind the thread around the bobbin. Note ● When the sewing machine is started or the handwheel is wound around the bobbin a few times. on ...held at an angle, injuries may tangle around the bobbin, the machine will make a clicking sound; Pass the end of the thread through...7 • Leave 1 cm (1/2 inch) of thread from the hole on the machine. 5 While holding the end of the thread, 6 gently press the foot controller...
Users Manual - English and Spanish
Page 15
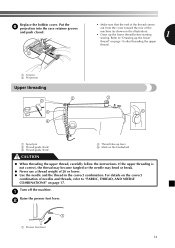
Refer to "FABRIC, THREAD, AND NEEDLE COMBINATIONS" on the handwheel CAUTION ● When threading the upper thread, carefully follow the instructions. Turn off the machine. 1 Raise the presser foot lever. 2 1 1 Presser foot lever 14 Replace the bobbin cover. If the upper threading is not correct, the ...thread. 1 Groove 2 Projection Upper threading 2 2 3 4 1 5 1 Spool pin 2 Thread guide (back) 3 Thread guide (front) 4 Thread take-up the lower thread before starting 1 sewing. For details on the correct combination of the machine (as shown in the correct combination.
Refer to "FABRIC, THREAD, AND NEEDLE COMBINATIONS" on the handwheel CAUTION ● When threading the upper thread, carefully follow the instructions. Turn off the machine. 1 Raise the presser foot lever. 2 1 1 Presser foot lever 14 Replace the bobbin cover. If the upper threading is not correct, the ...thread. 1 Groove 2 Projection Upper threading 2 2 3 4 1 5 1 Spool pin 2 Thread guide (back) 3 Thread guide (front) 4 Thread take-up the lower thread before starting 1 sewing. For details on the correct combination of the machine (as shown in the correct combination.
Users Manual - English and Spanish
Page 22
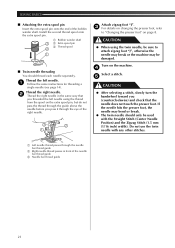
...9679; When using the thread from the spool on the machine. 4 Select a stitch. 5 CAUTION ● After selecting a stitch, slowly turn the handwheel toward you (counterclockwise) and check that you threaded the left needle. 1 Follow the same instructions for threading a single needle (see page 14). Install the...on page 8. Do not use the twin needle with the Straight Stitch (Center Needle Position) and the Zigzag Stitch (1.5 mm (1/16 inch) width). SEWING BASICS ■ Attaching the extra spool pin Insert the extra spool pin onto the end of the right needle. 3 2 1 Attach zigzag foot ...
...9679; When using the thread from the spool on the machine. 4 Select a stitch. 5 CAUTION ● After selecting a stitch, slowly turn the handwheel toward you (counterclockwise) and check that you threaded the left needle. 1 Follow the same instructions for threading a single needle (see page 14). Install the...on page 8. Do not use the twin needle with the Straight Stitch (Center Needle Position) and the Zigzag Stitch (1.5 mm (1/16 inch) width). SEWING BASICS ■ Attaching the extra spool pin Insert the extra spool pin onto the end of the right needle. 3 2 1 Attach zigzag foot ...


