
Users Manual - English and Spanish
Page 3
For additional product information, visit our web site at www.brother.com SAVE THESE INSTRUCTIONS This machine is not suitable for household use outdoors. 7 For a longer service life: ...use by authorized dealer. • In the event a malfunction occurs or adjustment is required, first follow careful instruction when freehand stitching so that this machine only for their safety. FOR USERS IN THE UK, EIRE, MALTA AND CYPRUS ONLY IMPORTANT • In.... Use accessories recommended by ASTA to change without notice. Children should contact your local authorized Brother dealer.
For additional product information, visit our web site at www.brother.com SAVE THESE INSTRUCTIONS This machine is not suitable for household use outdoors. 7 For a longer service life: ...use by authorized dealer. • In the event a malfunction occurs or adjustment is required, first follow careful instruction when freehand stitching so that this machine only for their safety. FOR USERS IN THE UK, EIRE, MALTA AND CYPRUS ONLY IMPORTANT • In.... Use accessories recommended by ASTA to change without notice. Children should contact your local authorized Brother dealer.

Users Manual - English and Spanish
Page 4
...Precautions on storing the machine 38 Cleaning 38 TROUBLESHOOTING 40 INDEX 43 Straight stitching 23 Zigzag stitching 23 Blind hem stitching 24 Shell tuck stitching 25 Elastic stitching 25 Double action stitching 26 Decorative stitching 26 3 KNOWING YOUR SEWING MACHINE 4 ACCESSORIES 4 Optional accessories 4 ...Checking the needle 7 Replacing the needle 7 Changing the presser foot 8 THE CONTROLS 9 Pattern selection dial 9 Patterns and stitch names 9 Reverse sewing lever 10 THREADING THE MACHINE 11 Winding the bobbin 11 Lower threading 13 Upper threading 14 Drawing ...
...Precautions on storing the machine 38 Cleaning 38 TROUBLESHOOTING 40 INDEX 43 Straight stitching 23 Zigzag stitching 23 Blind hem stitching 24 Shell tuck stitching 25 Elastic stitching 25 Double action stitching 26 Decorative stitching 26 3 KNOWING YOUR SEWING MACHINE 4 ACCESSORIES 4 Optional accessories 4 ...Checking the needle 7 Replacing the needle 7 Changing the presser foot 8 THE CONTROLS 9 Pattern selection dial 9 Patterns and stitch names 9 Reverse sewing lever 10 THREADING THE MACHINE 11 Winding the bobbin 11 Lower threading 13 Upper threading 14 Drawing ...
Users Manual - English and Spanish
Page 5
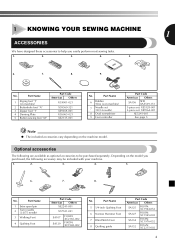
... "M" Part Code Americas Others XC4901-021 X59369-321 XE9369-001 XC6063-021 XE2137-001 No. No. Part Name 5 1/4-inch Quilting Foot 6 Narrow Hemmer Foot 7 Blind Stitch Foot 8 Quilting guide Part Code Americas Others SA125 F001N: XC1944-052 SA127 F003N: XC1945-002 SA134 F018N: XC1976-052 SA132 F016N: XC2215-002 4 Optional accessories...
... "M" Part Code Americas Others XC4901-021 X59369-321 XE9369-001 XC6063-021 XE2137-001 No. No. Part Name 5 1/4-inch Quilting Foot 6 Narrow Hemmer Foot 7 Blind Stitch Foot 8 Quilting guide Part Code Americas Others SA125 F001N: XC1944-052 SA127 F003N: XC1945-002 SA134 F018N: XC1976-052 SA132 F016N: XC2215-002 4 Optional accessories...

Users Manual - English and Spanish
Page 6
.... Foot Controller: Model KD-1902 for 110/120V area Model KD-2902 for use this lever to stitch in the reverse direction. 0 Pattern selection dial (Page 9) Rotate the dial in either direction to choose the stitch you want. E Presser foot lever (Page 14) Used to the power supply. D Foot controller jack / socket...
.... Foot Controller: Model KD-1902 for 110/120V area Model KD-2902 for use this lever to stitch in the reverse direction. 0 Pattern selection dial (Page 9) Rotate the dial in either direction to choose the stitch you want. E Presser foot lever (Page 14) Used to the power supply. D Foot controller jack / socket...

Users Manual - English and Spanish
Page 9
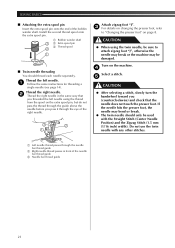
... presser foot. Press the black button at the back of the sewing machine may cause injury. ● Only use the correct presser foot for the stitch pattern you change the presser foot depending on the wheel points up. Next, tighten the needle clamp using an oval screwdriver. 2 3 You will start and...
... presser foot. Press the black button at the back of the sewing machine may cause injury. ● Only use the correct presser foot for the stitch pattern you change the presser foot depending on the wheel points up. Next, tighten the needle clamp using an oval screwdriver. 2 3 You will start and...
Users Manual - English and Spanish
Page 10
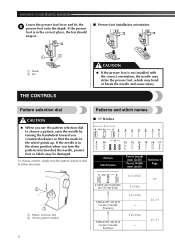
... the needle, presser foot or fabric may bend or break the needle and cause injury. Pattern selection dial Patterns and stitch names CAUTION ● When you use the pattern selection dial to choose a pattern, raise the needle by turning the... foot is in either direction. 2 1 1 Pattern selection dial 2 Chosen pattern number ■ 17 Stitches 1 2 3 4 5 6 78 9 10 11 12 13 14 15 16 17 Pattern Stitch Name 1 4-STEP AUTOMATIC BUTTONHOLE 2 STRAIGHT STITCH (Center Needle Position) 3 STRAIGHT STITCH (Center Needle Position) Preset Length (mm (inch)) Preset Width (mm (inch)) 0.5 (1/32) 5...
... the needle, presser foot or fabric may bend or break the needle and cause injury. Pattern selection dial Patterns and stitch names CAUTION ● When you use the pattern selection dial to choose a pattern, raise the needle by turning the... foot is in either direction. 2 1 1 Pattern selection dial 2 Chosen pattern number ■ 17 Stitches 1 2 3 4 5 6 78 9 10 11 12 13 14 15 16 17 Pattern Stitch Name 1 4-STEP AUTOMATIC BUTTONHOLE 2 STRAIGHT STITCH (Center Needle Position) 3 STRAIGHT STITCH (Center Needle Position) Preset Length (mm (inch)) Preset Width (mm (inch)) 0.5 (1/32) 5...
Users Manual - English and Spanish
Page 11
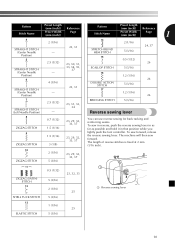
... Preset Length (mm (inch)) Preset Width (mm (inch)) Reference Page Pattern Preset Length (mm (inch)) Reference Stitch Name Preset Width (mm (inch)) Page 1 4 STRAIGHT STITCH (Center Needle Position) 5 STRAIGHT STITCH (Center Needle Position) 6 STRAIGHT STITCH (Center Needle Position) 2 (1/16) - 23, 31 2.5 (3/32) - 23, 30, 31, 33, 34, 35, 37 4 (3/16) - 23, 31 14 STRETCH...
... Preset Length (mm (inch)) Preset Width (mm (inch)) Reference Page Pattern Preset Length (mm (inch)) Reference Stitch Name Preset Width (mm (inch)) Page 1 4 STRAIGHT STITCH (Center Needle Position) 5 STRAIGHT STITCH (Center Needle Position) 6 STRAIGHT STITCH (Center Needle Position) 2 (1/16) - 23, 31 2.5 (3/32) - 23, 30, 31, 33, 34, 35, 37 4 (3/16) - 23, 31 14 STRETCH...
Users Manual - English and Spanish
Page 18
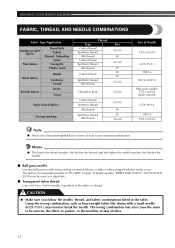
... the thicker the needle. ■ Ball point needle Use the ball point needle when sewing on stretch fabrics or fabrics where skipped stitches easily occur. The factory recommended needle is "HG-4BR" (Organ). The wrong combination may cause machine malfunction. KNOWING YOUR SEWING MACHINE... Flannel, Gabardine Lawn Georgette Challis, Satin Thick fabrics Stretch fabrics Denim Corduroy Tweed Jersey Tricot Easily frayed fabrics For top-stitching Thread Type Cotton thread Synthetic thread Silk thread Cotton thread Synthetic thread Silk thread Cotton thread Synthetic thread Silk thread Size ...
... the thicker the needle. ■ Ball point needle Use the ball point needle when sewing on stretch fabrics or fabrics where skipped stitches easily occur. The factory recommended needle is "HG-4BR" (Organ). The wrong combination may cause machine malfunction. KNOWING YOUR SEWING MACHINE... Flannel, Gabardine Lawn Georgette Challis, Satin Thick fabrics Stretch fabrics Denim Corduroy Tweed Jersey Tricot Easily frayed fabrics For top-stitching Thread Type Cotton thread Synthetic thread Silk thread Cotton thread Synthetic thread Silk thread Cotton thread Synthetic thread Silk thread Size ...
Users Manual - English and Spanish
Page 19
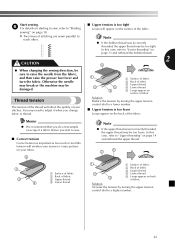
..., the needle may hit the presser foot and bend or break and you (counterclockwise). Turning it the other way may cause the thread to select a 3 stitch (see page 8). 4 1 Presser foot lever Place the fabric under the presser foot, 6 pass the thread under the presser foot, otherwise the presser foot may be...
..., the needle may hit the presser foot and bend or break and you (counterclockwise). Turning it the other way may cause the thread to select a 3 stitch (see page 8). 4 1 Presser foot lever Place the fabric under the presser foot, 6 pass the thread under the presser foot, otherwise the presser foot may be...
Users Manual - English and Spanish
Page 20
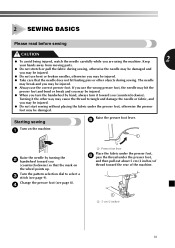
... needle in the fabric at the point where you (counterclockwise). Using the needle as those used for your project, and check the thread tension and stitch length and width. b Pull the fabric to the left hand, turn the fabric, lower the presser foot lever, and then continue sewing. 1... tacking and reinforcing seams by turning the a handwheel toward you (counterclockwise) with your right hand to lower the needle to the starting point of the stitching. Take your foot off the foot controller. 0 X The machine stops sewing. • You can use reverse sewing for the details. Use a...
... needle in the fabric at the point where you (counterclockwise). Using the needle as those used for your project, and check the thread tension and stitch length and width. b Pull the fabric to the left hand, turn the fabric, lower the presser foot lever, and then continue sewing. 1... tacking and reinforcing seams by turning the a handwheel toward you (counterclockwise) with your right hand to lower the needle to the starting point of the stitching. Take your foot off the foot controller. 0 X The machine stops sewing. • You can use reverse sewing for the details. Use a...
Users Manual - English and Spanish
Page 21
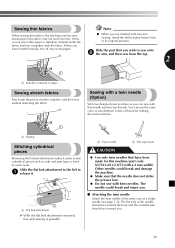
... is possible. 1 Twin needle 2 Extra spool pin CAUTION ● Use only twin needles that have been made for making decorative stitches. 1 1 Basting Stitching cylindrical pieces Removing the flat bed attachment makes it together with the fabric. Slide the part that the needle does not strike the ...toward you wish to sew cylindrical pieces such as a single needle (see page 7-8). Sewing thin fabrics Note When sewing thin fabrics, the stitching may become misaligned or the fabric may not feed correctly. When you . ■ Attaching the twin needle Attach the twin needle in ...
... is possible. 1 Twin needle 2 Extra spool pin CAUTION ● Use only twin needles that have been made for making decorative stitches. 1 1 Basting Stitching cylindrical pieces Removing the flat bed attachment makes it together with the fabric. Slide the part that the needle does not strike the ...toward you wish to sew cylindrical pieces such as a single needle (see page 7-8). Sewing thin fabrics Note When sewing thin fabrics, the stitching may become misaligned or the fabric may not feed correctly. When you . ■ Attaching the twin needle Attach the twin needle in ...
Users Manual - English and Spanish
Page 22
... the right needle in front of the needle bar thread guide 3 Needle bar thread guide 21 Turn on the machine. 4 Select a stitch. 5 CAUTION ● After selecting a stitch, slowly turn the handwheel toward you (counterclockwise) and check that you threaded the left needle. 1 Follow the same instructions for threading ...CAUTION ● When using the thread from the spool on page 8. Do not use the twin needle with the Straight Stitch (Center Needle Position) and the Zigzag Stitch (1.5 mm (1/16 inch) width). If the needle hits the presser foot, the needle may be used with any other...
... the right needle in front of the needle bar thread guide 3 Needle bar thread guide 21 Turn on the machine. 4 Select a stitch. 5 CAUTION ● After selecting a stitch, slowly turn the handwheel toward you (counterclockwise) and check that you threaded the left needle. 1 Follow the same instructions for threading ...CAUTION ● When using the thread from the spool on page 8. Do not use the twin needle with the Straight Stitch (Center Needle Position) and the Zigzag Stitch (1.5 mm (1/16 inch) width). If the needle hits the presser foot, the needle may be used with any other...
Users Manual - English and Spanish
Page 23
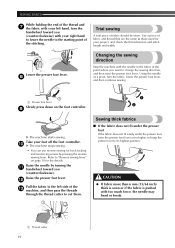
... thread may be sure to raise the needle from the fabric, and then raise the presser foot lever and turn the fabric. X Two lines of stitching are sewn parallel to each other. ■ Upper tension is too tight Loops will affect the quality of your fabric. 2 1 3 4 1 Surface of fabric 2 Back of... tension will weaken your seams or cause puckers on page 18. Start sewing. 6 For details on starting to sew, refer to "Starting sewing" on your stitches.
... thread may be sure to raise the needle from the fabric, and then raise the presser foot lever and turn the fabric. X Two lines of stitching are sewn parallel to each other. ■ Upper tension is too tight Loops will affect the quality of your fabric. 2 1 3 4 1 Surface of fabric 2 Back of... tension will weaken your seams or cause puckers on page 18. Start sewing. 6 For details on starting to sew, refer to "Starting sewing" on your stitches.
Users Manual - English and Spanish
Page 24
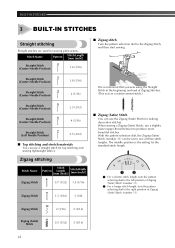
... sewing. When sewing a Zigzag (Satin) Stitch, use the Zigzag (Satin) Stitch for making decorative stitches. BUILT-IN STITCHES 3 BUILT-IN STITCHES Straight stitching Straight stitches are used for sewing plain seams. Stitch Name Pattern Stitch Length [mm (inch)] Straight Stitch 2 (Center Needle Position) 1.6 (1/16) Straight Stitch 3 (Center Needle Position) 1.8 (1/16) Straight Stitch 4 (Center Needle Position) 2 (1/16) Straight Stitch 5 (Center Needle Position) 2.5 (3/32) Straight...
... sewing. When sewing a Zigzag (Satin) Stitch, use the Zigzag (Satin) Stitch for making decorative stitches. BUILT-IN STITCHES 3 BUILT-IN STITCHES Straight stitching Straight stitches are used for sewing plain seams. Stitch Name Pattern Stitch Length [mm (inch)] Straight Stitch 2 (Center Needle Position) 1.6 (1/16) Straight Stitch 3 (Center Needle Position) 1.8 (1/16) Straight Stitch 4 (Center Needle Position) 2 (1/16) Straight Stitch 5 (Center Needle Position) 2.5 (3/32) Straight...
Users Manual - English and Spanish
Page 25
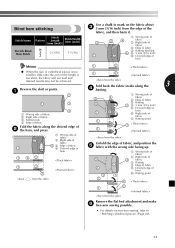
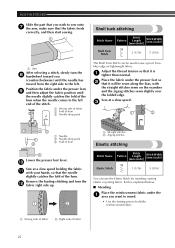
...is 1 2 too short, the fabric will not feed and desired results may not be achieved. Blind hem stitching Stitch Name Pattern Stitch Length [mm (inch)] Stitch Width [mm (inch)] Stretch Blind 14 Hem Stitch 2 (1/16) 5 (3/16) Use a chalk to mark on the fabric about 3 5 mm (3/16 inch...) from the edge of the fabric, and then baste it. 3 1 5 2 1 Wrong side of 4 fabric 2 Right side of fabric 3 Edge of fabric 4 Basting stitching 6 5 5 mm (3/16 inch) 6 Desired edge of hem Memo 1 2 ● When the size of hem 6 Basting point 6 1 2 Remove the flat bed attachment ...
...is 1 2 too short, the fabric will not feed and desired results may not be achieved. Blind hem stitching Stitch Name Pattern Stitch Length [mm (inch)] Stitch Width [mm (inch)] Stretch Blind 14 Hem Stitch 2 (1/16) 5 (3/16) Use a chalk to mark on the fabric about 3 5 mm (3/16 inch...) from the edge of the fabric, and then baste it. 3 1 5 2 1 Wrong side of 4 fabric 2 Right side of fabric 3 Edge of fabric 4 Basting stitching 6 5 5 mm (3/16 inch) 6 Desired edge of hem Memo 1 2 ● When the size of hem 6 Basting point 6 1 2 Remove the flat bed attachment ...
Users Manual - English and Spanish
Page 26
... want to mend. • Use the basting pins to sew a picot (lacelike) edge on the seamline and the zigzag stitches sewn slightly over the folded edge. Place the fabric under the presser foot so 2 that it is explained below. ■..., and then start sewing. 1 Shell tuck stitching Stitch Name Shell Tuck Stitch Pattern Stitch Length [mm (inch)] Stitch Width [mm (inch)] 12 2 (1/16) 5 (3/16) 1 Arm After selecting a stitch, slowly turn the b fabric right side up. 1 2 Stitch Name Elastic Stitch Pattern Stitch Length [mm (inch)] Stitch Width [mm (inch)] 13 1 (1/16)...
... want to mend. • Use the basting pins to sew a picot (lacelike) edge on the seamline and the zigzag stitches sewn slightly over the folded edge. Place the fabric under the presser foot so 2 that it is explained below. ■..., and then start sewing. 1 Shell tuck stitching Stitch Name Shell Tuck Stitch Pattern Stitch Length [mm (inch)] Stitch Width [mm (inch)] 12 2 (1/16) 5 (3/16) 1 Arm After selecting a stitch, slowly turn the b fabric right side up. 1 2 Stitch Name Elastic Stitch Pattern Stitch Length [mm (inch)] Stitch Width [mm (inch)] 13 1 (1/16)...
Users Manual - English and Spanish
Page 27
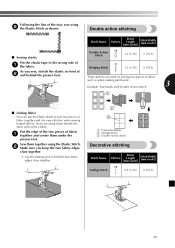
... pins to hold the two fabric edges close together. 2 3 1 Desired seamline 2 Straight Stitch 3 Double Action Stitch Decorative stitching Stitch Name Pattern Stitch Length [mm (inch)] Stitch Width [mm (inch)] 15 Scallop Stitch 0.5 (1/32) 5 (3/16) 26 Sew them under the presser foot. Double action stitching Stitch Name Pattern Stitch Length [mm (inch)] Stitch Width [mm (inch)] ■ Sewing elastic Double Action 16...
... pins to hold the two fabric edges close together. 2 3 1 Desired seamline 2 Straight Stitch 3 Double Action Stitch Decorative stitching Stitch Name Pattern Stitch Length [mm (inch)] Stitch Width [mm (inch)] 15 Scallop Stitch 0.5 (1/32) 5 (3/16) 26 Sew them under the presser foot. Double action stitching Stitch Name Pattern Stitch Length [mm (inch)] Stitch Width [mm (inch)] ■ Sewing elastic Double Action 16...
Users Manual - English and Spanish
Page 28
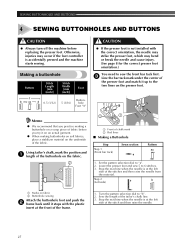
...presser foot, which may occur if the foot controller is not installed with the plastic insert at the front of the frame. 1. Making a buttonhole Pattern 1 Stitch Stitch Length [mm Width [mm Foot (inch)] (inch)] 0.5 (1/32) Button5 (3/16) hole Foot "A" CAUTION ● If the presser foot is accidentally pressed...the needle from the material. Stop the machine when the needle is at the left side of the presser foot and match it up to 6 stitches. 3. Memo ● We recommend that you practice making a buttonhole on the presser foot. Lower the presser foot and sew 5 to the ...
...presser foot, which may occur if the foot controller is not installed with the plastic insert at the front of the frame. 1. Making a buttonhole Pattern 1 Stitch Stitch Length [mm Width [mm Foot (inch)] (inch)] 0.5 (1/32) Button5 (3/16) hole Foot "A" CAUTION ● If the presser foot is accidentally pressed...the needle from the material. Stop the machine when the needle is at the left side of the presser foot and match it up to 6 stitches. 3. Memo ● We recommend that you practice making a buttonhole on the presser foot. Lower the presser foot and sew 5 to the ...
Users Manual - English and Spanish
Page 29
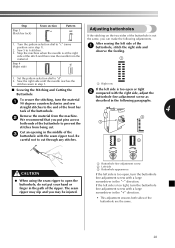
... material 1 90 degrees counterclockwise and sew described in step 1). 2. Sew the right side until the needle reaches the stitches sewn in step 1. 1 Right row ■ Securing the Stitching and Cutting the Buttonhole If the left side is too open or tight 2 compared with a large screwdriver in the ...seam ripper tool. The seam ripper may be injured. 1 Buttonhole fine-adjustment screw 2 Left side 3 Buttonhole appearance If the left side of the stitch and then raise the needle from the machine. 2 We recommend that you put your hand or finger in the "-" direction. Step 4 (Right ...
... material 1 90 degrees counterclockwise and sew described in step 1). 2. Sew the right side until the needle reaches the stitches sewn in step 1. 1 Right row ■ Securing the Stitching and Cutting the Buttonhole If the left side is too open or tight 2 compared with a large screwdriver in the ...seam ripper tool. The seam ripper may be injured. 1 Buttonhole fine-adjustment screw 2 Left side 3 Buttonhole appearance If the left side of the stitch and then raise the needle from the machine. 2 We recommend that you put your hand or finger in the "-" direction. Step 4 (Right ...

Users Manual - English and Spanish
Page 30
... may break and you may be injured. Turn on the needle 4 plate. SEWING BUTTONHOLES AND BUTTONS Sewing buttons Stitch Name Pattern Zigzag 8 Stitch Zigzag 9 Stitch Zigzag 10 Stitch Stitch Length [mm (inch)] 0.7 (1/32) 1.5 (1/16) 2 (1/16) Stitch Width [mm (inch)] 1.5 (1/16) 3 (1/8) 5 (3/16) Foot Other Button Sewing Darning Foot Plate "M"...the upper thread at the beginning of the fabric, and then tie it hits, see step 1. At a slow speed, sew about 10 stitches. 7 CAUTION ● Make sure the needle does not hit the button during sewing. Put a button between the 1 buttonholes and set...
... may break and you may be injured. Turn on the needle 4 plate. SEWING BUTTONHOLES AND BUTTONS Sewing buttons Stitch Name Pattern Zigzag 8 Stitch Zigzag 9 Stitch Zigzag 10 Stitch Stitch Length [mm (inch)] 0.7 (1/32) 1.5 (1/16) 2 (1/16) Stitch Width [mm (inch)] 1.5 (1/16) 3 (1/8) 5 (3/16) Foot Other Button Sewing Darning Foot Plate "M"...the upper thread at the beginning of the fabric, and then tie it hits, see step 1. At a slow speed, sew about 10 stitches. 7 CAUTION ● Make sure the needle does not hit the button during sewing. Put a button between the 1 buttonholes and set...


