
Brother International LX2500 Support Question
Brother International LX2500 Support Question
Find answers below for this question about Brother International LX2500.Need a Brother International LX2500 manual? We have 2 online manuals for this item!
Question posted by simplysophie2010 on March 22nd, 2014
Sewing And Stitches
my machine is doing loose sloppy stitches and the fabric won't go through when I sew...I have to pull it from behind...what can I do?
Current Answers
Related Brother International LX2500 Manual Pages
Users Manual - English and Spanish - Page 3
... to play with the bag due to break.
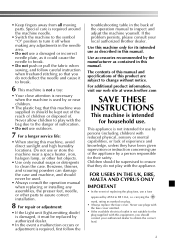
• Do not push or pull the fabric when sewing, and follow the
troubleshooting table in should contact your local authorized Brother dealer.
Never...follow careful instruction when freehand stitching so that this product are subject to BS 1362, i.e. The contents of this manual and specifications of this machine was supplied in the back...
Users Manual - English and Spanish - Page 4

... the needle 7 Changing the presser foot 8
THE CONTROLS 9 Pattern selection dial 9 Patterns and stitch names 9 Reverse sewing lever 10
THREADING THE MACHINE 11 Winding the bobbin 11 Lower threading 13 Upper threading 14 Drawing up the lower thread 16
FABRIC, THREAD, AND NEEDLE COMBINATIONS 17
2. APPENDIX 38
MAINTENANCE 38 Restrictions on oiling 38 Precautions...
Users Manual - English and Spanish - Page 5
1 KNOWING YOUR SEWING MACHINE
1
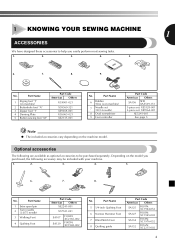
ACCESSORIES
We have designed these accessories to be included with your machine.
1.
2.
3.
4.
5.
6.
7.
8. Optional accessories
The following are available as optional accessories to help you purchased, the following accessory may be purchased separately. No. Part Name
5 1/4-inch Quilting Foot
6 Narrow Hemmer Foot
7 Blind Stitch Foot
8 Quilting ...
Users Manual - English and Spanish - Page 6

... and lower the presser foot.
Flat bed attachment
The accessories can be stored in the foot controller plug and connect the machine to start and stop sewing.
A Handwheel Used to choose the stitch you want. Contact your dealer or the nearest authorized service center.
D Foot controller jack / socket (Page 6) Plug in a compartment inside...
Users Manual - English and Spanish - Page 9

...controller, the machine will have been designed to be damaged. With the flat side of the sewing machine may cause injury.
● Only use the correct presser foot for the stitch pattern you have... button at the back of the machine, insert the needle
until it touches the needle stopper. CAUTION
CAUTION
● Before replacing the needle, place fabric
● Make sure you insert the...
Users Manual - English and Spanish - Page 10
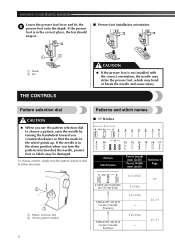
... Position) 3
STRAIGHT STITCH (Center Needle Position)
Preset Length (mm (inch)) Preset Width (mm (inch))
0.5 (1/32)
5 (3/16) 1.6 (1/16)
-
1.8 (1/16)
- Reference Page 27
23, 31
23, 31
9 If the presser
foot is in the down position when you (counterclockwise) so that the mark on the wheel points up.
KNOWING YOUR SEWING MACHINE
Lower the presser...
Users Manual - English and Spanish - Page 11
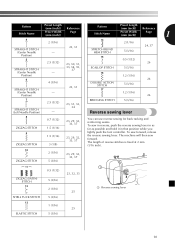
... sew forward, release the reverse sewing lever. The length of reverse stitches is fixed at 2 mm (1/16 inch).
10 ZIGZAG STITCH
2 (1/16) 5 (3/16)
23, 29, 32, 33, 37
11
ZIGZAG (SATIN) STITCH 12
0.5 (1/32) 5 (3/16) 2 (1/16)
23, 32, 33 25
1
1 Reverse sewing lever
SHELL TUCK STITCH
5 (3/16)
13 1 (1/16) 25
ELASTIC STITCH
5 (3/16)
10 The machine will then sew forward...
Users Manual - English and Spanish - Page 18
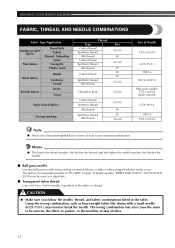
...). The wrong combination may cause machine malfunction. KNOWING YOUR SEWING MACHINE
FABRIC, THREAD, AND NEEDLE COMBINATIONS
Fabric Type/Application
Medium weight fabrics
Thin fabrics
Broadcloth Taffeta
Flannel, Gabardine Lawn
Georgette Challis, Satin
Thick fabrics Stretch fabrics
Denim
Corduroy Tweed Jersey
Tricot
Easily frayed fabrics
For top-stitching
Thread Type Cotton thread...
Users Manual - English and Spanish - Page 19
...
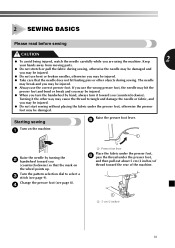
presser foot and bend or break and you may be injured.
● Do not start sewing without placing the fabric under the presser foot,
and then pull out about 5 cm (2 inches) of thread toward the rear of the machine.
1
1 5 cm (2 inches)
18
Turn the pattern selection dial to tangle and damage the needle or...
Users Manual - English and Spanish - Page 20
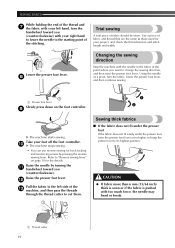
... those used for your project, and check the thread tension and stitch length and width. Trial sewing
A trial piece of the stitching. Take your right hand to lower the needle to "Reverse sewing lever" on the foot controller.
9
1 2
X The machine starts sewing. CAUTION
● If fabric more than 6 mm (15/64 inch) thick is sewn or if...
Users Manual - English and Spanish - Page 21
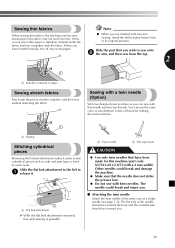
... twin needle Attach the twin needle in its original position. Sewing thin fabrics
Note
When sewing thin fabrics, the stitching may become misaligned or the fabric may not feed correctly.
You can sew with this machine (part code: X57521-021:2.0/75 with a twin needle (Option)
We have finished sewing, tear off any excess paper.
Other needles could break and...
Users Manual - English and Spanish - Page 22
...CAUTION
● When using the thread from the spool on the machine.
4
Select a stitch.
5
CAUTION
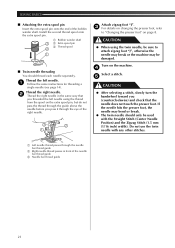
● After selecting a stitch, slowly turn the handwheel toward you (counterclockwise) and check that
...the left needle. 1 Follow the same instructions for threading a
single needle (see page 14). SEWING BASICS
■ Attaching the extra spool pin Insert the extra spool pin onto the end of ...
Users Manual - English and Spanish - Page 23
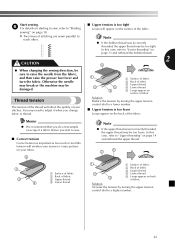
... much or too little tension will affect the quality of your fabric.
2
1 3 4
1 Surface of fabric 2 Back of stitching are sewn parallel to
each other.
■ Upper tension is too loose Loops appear on page 13 and rethread the bobbin thread.
2
CAUTION
2
● When changing the sewing direction, be sure to raise the needle from the...
Users Manual - English and Spanish - Page 28
... 1
Stitch
Stitch
Length [mm
Width [mm
Foot
(inch)]
(inch)]
0.5 (1/32)
Button5 (3/16) hole
Foot "A"
CAUTION
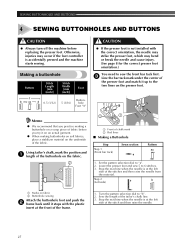
● If the presser foot is accidentally pressed and the machine starts sewing.
SEWING BUTTONHOLES AND BUTTONS
4 SEWING BUTTONHOLES AND BUTTONS
CAUTION
● Always turn off the machine before you practice making a buttonhole on a scrap piece of fabric...
Users Manual - English and Spanish - Page 29
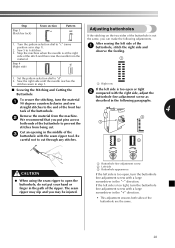
... of the buttonhole to prevent the
1
2
stitches from the material. straight stitches to "c" (same position as
To secure the stitching, turn the buttonhole fine-adjustment screw with the seam ripper tool. Stop the machine when the needle is too tight, turn the material 1 90 degrees counterclockwise and sew
described in the following adjustments.
Cut an...
Users Manual - English and Spanish - Page 30

... injured. Turn off the machine.
2
Change the foot to the Zigzag Stitch with the bobbin thread. Place the darning plate on the machine.
5
29
Pull the upper thread at the beginning of the fabric, and then tie it hits, see step 1. Turn on the needle 4 plate.
At a slow speed, sew about 10 stitches.
7
CAUTION
● Make sure...
Users Manual - English and Spanish - Page 31
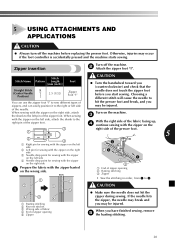
... hit the zipper during sewing.
With the right side of the fabric facing up, 4 continue sewing with the zipper on the
3
right side of the presser foot.
1
5
2
I "
needle does not touch the zipper foot before replacing the presser foot. Zipper insertion
Turn off the machine before you may be injured. Stitch
Stitch Name Pattern Length
Foot...
Users Manual - English and Spanish - Page 32
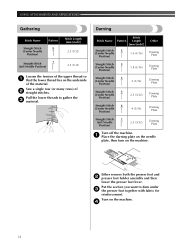
Sew a single row (or many rows) of 2 straight stitches. Put the section you want to gather the 3 material.
Either remove both the presser foot and 2 presser foot holder assembly and then
lower the presser foot lever.
Pull the lower threads to darn under 3 the presser foot together with fabric for
reinforcement. Stitch Name
Stitch Pattern Length
[mm...
Users Manual - English and Spanish - Page 34
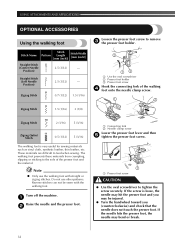
...
● Use the oval screwdriver to the sole of the walking 4 foot onto the needle clamp screw.
1
2
10 Zigzag Stitch
2 (1/16)
5 (3/16)
Zigzag (Satin) Stitch
11
0.5 (1/32)
5 (3/16)
The walking foot is loose, the needle may hit the presser foot and you (counterclockwise) and check that the needle does not touch the presser...
Users Manual - English and Spanish - Page 37
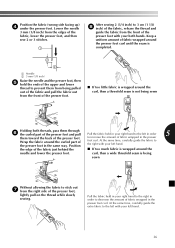
...pulled out of the fabric and pull the fabric out from the right side of the presser foot and pull
Pull the fabric held in your left in the same way.
At the same time, carefully guide the extra fabric to the left hand.
the edge of fabric wrapped in the presser foot curl. Pull the fabric... of the fabric, lower the presser foot, and then sew 2 or 3 stitches.
1
After sewing 2 (3/4 ...
Similar Questions

Switching Sewing Stitches
how do we switch the stitches on the pace setter?
how do we switch the stitches on the pace setter?
(Posted by rkkeranen 9 years ago)

Brother Lx2500 Sewing Machine Skips Zig Zag Stitches. Skips Stitches In Any Zig
(Posted by jadeokoye 9 years ago)

Why Is My Machine Sewing Stitches On The Underside?
(Posted by rfinley81749 9 years ago)
How To Tighten A Zig Zag Stitch On A Brother Lx2500 Sewing Machine
(Posted by Royxaaleckk 10 years ago)

What Stitch To Use On A Brothers Lx2500 Sewing Machine For Stretchy Fabrics
(Posted by linlul 10 years ago)