
Users Manual - English and Spanish
Page 2
...electric shock: 1 Always unplug the machine from the build up of the machine and foot control free from the electrical outlet immediately after using the machine and immediately unplug the power cord. • When transporting the machine, be careful not to the needle. Do not use extension cords. ... outlet when making any user servicing adjustments mentioned in the machine falling, which could cause injuries. • When lifting the machine, be sure to carry it has been dropped or damaged, or water is required when sewing: • Always pay close attention to make any sudden...
...electric shock: 1 Always unplug the machine from the build up of the machine and foot control free from the electrical outlet immediately after using the machine and immediately unplug the power cord. • When transporting the machine, be careful not to the needle. Do not use extension cords. ... outlet when making any user servicing adjustments mentioned in the machine falling, which could cause injuries. • When lifting the machine, be sure to carry it has been dropped or damaged, or water is required when sewing: • Always pay close attention to make any sudden...
Users Manual - English and Spanish
Page 3
... fuse approved by ASTA to clean the case. Special care is required around the machine needle. • Switch the machine to the symbol "O" position to turn it off when making any assemblies, the presser feet, needle, or other hot objects. • Use only neutral soaps or detergents to BS... If the available electrical outlet is damaged, it could cause the needle to break. • Do not push or pull the fabric when sewing, and follow the troubleshooting table in should contact your local authorized Brother dealer. The contents of this manual and specifications of replacing the ...
... fuse approved by ASTA to clean the case. Special care is required around the machine needle. • Switch the machine to the symbol "O" position to turn it off when making any assemblies, the presser feet, needle, or other hot objects. • Use only neutral soaps or detergents to BS... If the available electrical outlet is damaged, it could cause the needle to break. • Do not push or pull the fabric when sewing, and follow the troubleshooting table in should contact your local authorized Brother dealer. The contents of this manual and specifications of replacing the ...

Users Manual - English and Spanish
Page 4
... 25 Elastic stitching 25 Double action stitching 26 Decorative stitching 26 3 KNOWING YOUR SEWING MACHINE 4 ACCESSORIES 4 Optional accessories 4 THE MAIN PARTS 5 Flat bed attachment 5 USING YOUR SEWING MACHINE 6 Connecting plugs 6 Main power and sewing light switch 7 Foot controller 7 Checking the needle 7 Replacing the needle 7 Changing the presser foot 8 THE CONTROLS 9 Pattern selection dial 9 Patterns and stitch names...
... 25 Elastic stitching 25 Double action stitching 26 Decorative stitching 26 3 KNOWING YOUR SEWING MACHINE 4 ACCESSORIES 4 Optional accessories 4 THE MAIN PARTS 5 Flat bed attachment 5 USING YOUR SEWING MACHINE 6 Connecting plugs 6 Main power and sewing light switch 7 Foot controller 7 Checking the needle 7 Replacing the needle 7 Changing the presser foot 8 THE CONTROLS 9 Pattern selection dial 9 Patterns and stitch names...
Users Manual - English and Spanish
Page 5
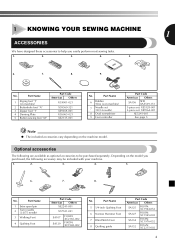
...-002 No. Depending on the model you easily perform most sewing tasks. 1. 2. 3. 4. 5. 6. 7. 8. 9. 1 KNOWING YOUR SEWING MACHINE 1 ACCESSORIES We have designed these accessories to be included with your machine. 1. 2. 3. 4. 5. 6. 7. 8. Part Name 1 Zigzag foot "J" (on the machine model. No. Part Name 6 Bobbin (One is on machine) 7 Needle set (90/14 needle) 8 Oval screwdriver 9 Foot controller Part Code Americas Others SA156...
...-002 No. Depending on the model you easily perform most sewing tasks. 1. 2. 3. 4. 5. 6. 7. 8. 9. 1 KNOWING YOUR SEWING MACHINE 1 ACCESSORIES We have designed these accessories to be included with your machine. 1. 2. 3. 4. 5. 6. 7. 8. Part Name 1 Zigzag foot "J" (on the machine model. No. Part Name 6 Bobbin (One is on machine) 7 Needle set (90/14 needle) 8 Oval screwdriver 9 Foot controller Part Code Americas Others SA156...

Users Manual - English and Spanish
Page 6
... the tension of the upper thread. 4 Thread guide (Page 11, 14) This is used when winding the thread onto the bobbin and then threading the machine. 5 Thread take-up lever (Page 15) 6 Thread cutter (Page 19) Pass the threads through the thread cutter to cut them. 7 Flat bed ... compartment inside the flat bed attachment. E Presser foot lever (Page 14) Used to manually raise and lower the needle. B FC D E F Foot controller (Page 7) You can turn the main power and sewing light switch on the country or region. Slide the flat bed attachment to the left to the power supply. Foot...
... the tension of the upper thread. 4 Thread guide (Page 11, 14) This is used when winding the thread onto the bobbin and then threading the machine. 5 Thread take-up lever (Page 15) 6 Thread cutter (Page 19) Pass the threads through the thread cutter to cut them. 7 Flat bed ... compartment inside the flat bed attachment. E Presser foot lever (Page 14) Used to manually raise and lower the needle. B FC D E F Foot controller (Page 7) You can turn the main power and sewing light switch on the country or region. Slide the flat bed attachment to the left to the power supply. Foot...

Users Manual - English and Spanish
Page 8
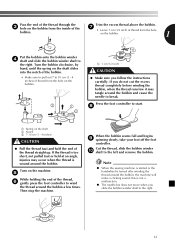
.... CAUTION ● Always turn off the machine. 1 Raise the needle by turning the 2 handwheel toward the 'O' mark) Foot controller When you press the foot controller down lightly, the machine will easily break and cause injury. Other needles may occur if the foot controller is not in use sewing machine needles for smooth sewing. 1 2 1 Turn on the machine rating plate.
.... CAUTION ● Always turn off the machine. 1 Raise the needle by turning the 2 handwheel toward the 'O' mark) Foot controller When you press the foot controller down lightly, the machine will easily break and cause injury. Other needles may occur if the foot controller is not in use sewing machine needles for smooth sewing. 1 2 1 Turn on the machine rating plate.

Users Manual - English and Spanish
Page 9
... presser feet that the bar on the needle 4 plate so that have chosen. Press the black button at the back of the sewing machine may be used with the slot on the controller, the machine will have to change the presser foot. Raise the needle by turning the 2 handwheel toward the ...5 back of the needle toward you (counterclockwise) so that the mark on what...
... presser feet that the bar on the needle 4 plate so that have chosen. Press the black button at the back of the sewing machine may be used with the slot on the controller, the machine will have to change the presser foot. Raise the needle by turning the 2 handwheel toward the ...5 back of the needle toward you (counterclockwise) so that the mark on what...
Users Manual - English and Spanish
Page 10
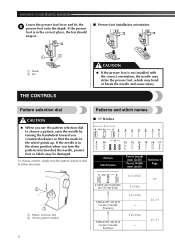
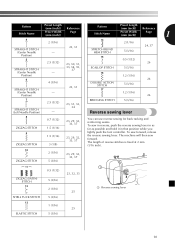
KNOWING YOUR SEWING MACHINE Lower the presser foot lever and fix the 5 presser foot onto the shank. If the needle is not installed with the correct orientation, the needle may strike the presser foot, which may be damaged. Pattern selection dial Patterns and stitch ...; 17 Stitches 1 2 3 4 5 6 78 9 10 11 12 13 14 15 16 17 Pattern Stitch Name 1 4-STEP AUTOMATIC BUTTONHOLE 2 STRAIGHT STITCH (Center Needle Position) 3 STRAIGHT STITCH (Center Needle Position) Preset Length (mm (inch)) Preset Width (mm (inch)) 0.5 (1/32) 5 (3/16) 1.6 (1/16) - 1.8 (1/16) - Reference Page 27 23, ...
KNOWING YOUR SEWING MACHINE Lower the presser foot lever and fix the 5 presser foot onto the shank. If the needle is not installed with the correct orientation, the needle may strike the presser foot, which may be damaged. Pattern selection dial Patterns and stitch ...; 17 Stitches 1 2 3 4 5 6 78 9 10 11 12 13 14 15 16 17 Pattern Stitch Name 1 4-STEP AUTOMATIC BUTTONHOLE 2 STRAIGHT STITCH (Center Needle Position) 3 STRAIGHT STITCH (Center Needle Position) Preset Length (mm (inch)) Preset Width (mm (inch)) 0.5 (1/32) 5 (3/16) 1.6 (1/16) - 1.8 (1/16) - Reference Page 27 23, ...
Users Manual - English and Spanish
Page 11
...machine will then sew forward. Pattern Stitch Name Preset Length (mm (inch)) Preset Width (mm (inch)) Reference Page Pattern Preset Length (mm (inch)) Reference Stitch Name Preset Width (mm (inch)) Page 1 4 STRAIGHT STITCH (Center Needle Position) 5 STRAIGHT STITCH (Center Needle Position) 6 STRAIGHT STITCH (Center Needle...) 5 (3/16) 1.2 (1/16) 5 (3/16) 1.2 (1/16) 24, 37 26 26 26 7 STRAIGHT STITCH (Left Needle Position) 2.5 (3/32) - 23, 31, 33, 34 BRIDGING STITCH 5 (3/16) Reverse sewing lever 8 ZIGZAG STITCH 9 ZIGZAG STITCH 0.7 (1/32) 1.5 (1/16) 1.5 (1/16) 3 (1/8) 23, 29, 32, ...
...machine will then sew forward. Pattern Stitch Name Preset Length (mm (inch)) Preset Width (mm (inch)) Reference Page Pattern Preset Length (mm (inch)) Reference Stitch Name Preset Width (mm (inch)) Page 1 4 STRAIGHT STITCH (Center Needle Position) 5 STRAIGHT STITCH (Center Needle Position) 6 STRAIGHT STITCH (Center Needle...) 5 (3/16) 1.2 (1/16) 5 (3/16) 1.2 (1/16) 24, 37 26 26 26 7 STRAIGHT STITCH (Left Needle Position) 2.5 (3/32) - 23, 31, 33, 34 BRIDGING STITCH 5 (3/16) Reverse sewing lever 8 ZIGZAG STITCH 9 ZIGZAG STITCH 0.7 (1/32) 1.5 (1/16) 1.5 (1/16) 3 (1/8) 23, 29, 32, ...
Users Manual - English and Spanish
Page 13
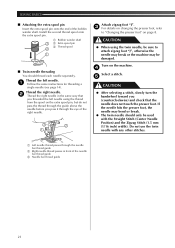
... the thread taut and hold the end of the thread, 6 gently press the foot controller to wind the thread around the bobbin and cause the needle to 10 cm (3 - 4 inches) of thread from the hole bobbin. Pass the end of the thread through the Trim the excess thread above the ... shaft slides into the notch of the bobbin. • Make sure to pull out 7 to break. Note ● When the sewing machine is started or the handwheel is not a malfunction. ● The needle bar does not move when you follow the instructions carefully. Turn the bobbin clockwise, by hand, until the spring on...
... the thread taut and hold the end of the thread, 6 gently press the foot controller to wind the thread around the bobbin and cause the needle to 10 cm (3 - 4 inches) of thread from the hole bobbin. Pass the end of the thread through the Trim the excess thread above the ... shaft slides into the notch of the bobbin. • Make sure to pull out 7 to break. Note ● When the sewing machine is started or the handwheel is not a malfunction. ● The needle bar does not move when you follow the instructions carefully. Turn the bobbin clockwise, by hand, until the spring on...

Users Manual - English and Spanish
Page 14
...the thread tension to be injured. If you accidentally step on the foot controller and the machine starts to loosen, and may break the needle. CAUTION ● Make sure you turn off the machine while threading. Put the bobbin in so the thread comes out 4 in the right direction... the tension-adjusting spring of the thread, push the 5 bobbin down with thread. KNOWING YOUR SEWING MACHINE CAUTION ● Not winding the bobbin properly may cause the thread tension to sew, you could be incorrect or break the needle. Remove the bobbin cover by turning the 2 handwheel toward you.
...the thread tension to be injured. If you accidentally step on the foot controller and the machine starts to loosen, and may break the needle. CAUTION ● Make sure you turn off the machine while threading. Put the bobbin in so the thread comes out 4 in the right direction... the tension-adjusting spring of the thread, push the 5 bobbin down with thread. KNOWING YOUR SEWING MACHINE CAUTION ● Not winding the bobbin properly may cause the thread tension to sew, you could be incorrect or break the needle. Remove the bobbin cover by turning the 2 handwheel toward you.
Users Manual - English and Spanish
Page 15
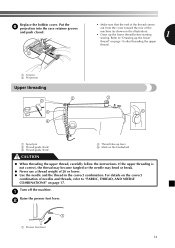
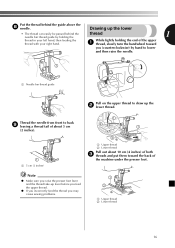
... illustration). • Draw up lever 5 Mark on page 17. Turn off the machine. 1 Raise the presser foot lever. 2 1 1 Presser foot lever 14 Refer to "FABRIC, THREAD, AND NEEDLE COMBINATIONS" on the handwheel CAUTION ● When threading the upper thread, carefully follow the... thread weight of needles and threads, refer to "Drawing up the lower thread" on page 16 after threading the upper thread. 1 Groove 2 Projection Upper threading 2 2 3 4 1 5 1 Spool pin 2 Thread guide (back) 3 Thread guide (front) 4 Thread take-up the lower thread before starting 1 sewing. Put the 6...
... illustration). • Draw up lever 5 Mark on page 17. Turn off the machine. 1 Raise the presser foot lever. 2 1 1 Presser foot lever 14 Refer to "FABRIC, THREAD, AND NEEDLE COMBINATIONS" on the handwheel CAUTION ● When threading the upper thread, carefully follow the... thread weight of needles and threads, refer to "Drawing up the lower thread" on page 16 after threading the upper thread. 1 Groove 2 Projection Upper threading 2 2 3 4 1 5 1 Spool pin 2 Thread guide (back) 3 Thread guide (front) 4 Thread take-up the lower thread before starting 1 sewing. Put the 6...
Users Manual - English and Spanish
Page 16
... turning the 3 handwheel toward you (counterclockwise) so that the mark on the wheel points up. • If the needle is not correctly raised, the sewing machine can not be threaded. Feed the upper thread as shown in the wrong place, or is lowered, the upper thread can not be wrapped around ... sure that the spring in the groove catches the thread. 1 1 Spring 1 1 Thread take-up lever Memo ● If the thread take -up lever. KNOWING YOUR SEWING MACHINE Raise the needle by turning the handwheel toward you (counterclockwise) so that the mark on the wheel points up. 15
... turning the 3 handwheel toward you (counterclockwise) so that the mark on the wheel points up. • If the needle is not correctly raised, the sewing machine can not be threaded. Feed the upper thread as shown in the wrong place, or is lowered, the upper thread can not be wrapped around ... sure that the spring in the groove catches the thread. 1 1 Spring 1 1 Thread take-up lever Memo ● If the thread take -up lever. KNOWING YOUR SEWING MACHINE Raise the needle by turning the handwheel toward you (counterclockwise) so that the mark on the wheel points up. 15
Users Manual - English and Spanish
Page 17
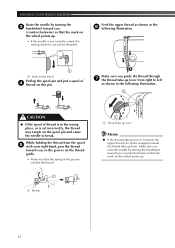
...8226; The thread can easily be passed behind the guide above the 8 needle. Note ● Make sure you raise the presser foot lever and the... the upper thread. ● If you incorrectly feed the thread you (counterclockwise) by hand to lower and then raise the needle. 1 1 Needle bar thread guide Pull on the upper thread to back 9 leaving a thread tail of about 5 cm (2 inches). 1 ...1 thread, slowly turn the handwheel toward you may cause sewing problems. 1 2 1 Upper thread 2 Lower thread 16 Put the thread behind the needle bar thread guide by holding the thread 1 thread in your...
...8226; The thread can easily be passed behind the guide above the 8 needle. Note ● Make sure you raise the presser foot lever and the... the upper thread. ● If you incorrectly feed the thread you (counterclockwise) by hand to lower and then raise the needle. 1 1 Needle bar thread guide Pull on the upper thread to back 9 leaving a thread tail of about 5 cm (2 inches). 1 ...1 thread, slowly turn the handwheel toward you may cause sewing problems. 1 2 1 Upper thread 2 Lower thread 16 Put the thread behind the needle bar thread guide by holding the thread 1 thread in your...
Users Manual - English and Spanish
Page 18
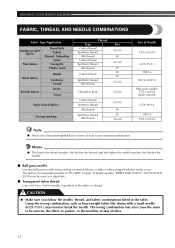
... 90/14 to skip stitches. 17 CAUTION ● Make sure you follow the needle, thread, and fabric combinations listed in the table. KNOWING YOUR SEWING MACHINE FABRIC, THREAD, AND NEEDLE COMBINATIONS Fabric Type/Application Medium weight fabrics Thin fabrics Broadcloth Taffeta Flannel, Gabardine Lawn ... as heavyweight fabric like denim with a small needle (65/9-75/11), may cause machine malfunction. and the higher the needle number, the thicker the needle. ■ Ball point needle Use the ball point needle when sewing on stretch fabrics or fabrics where skipped stitches easily...
... 90/14 to skip stitches. 17 CAUTION ● Make sure you follow the needle, thread, and fabric combinations listed in the table. KNOWING YOUR SEWING MACHINE FABRIC, THREAD, AND NEEDLE COMBINATIONS Fabric Type/Application Medium weight fabrics Thin fabrics Broadcloth Taffeta Flannel, Gabardine Lawn ... as heavyweight fabric like denim with a small needle (65/9-75/11), may cause machine malfunction. and the higher the needle number, the thicker the needle. ■ Ball point needle Use the ball point needle when sewing on stretch fabrics or fabrics where skipped stitches easily...
Users Manual - English and Spanish
Page 19
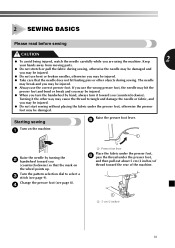
...care that the mark on the machine. 1 1 Raise the needle by hand, always turn it the other objects during sewing. Turn the pattern selection dial to tangle and damage the needle or fabric, and you may be injured. ● Do not start sewing without placing the fabric under ... foot, and then pull out about 5 cm (2 inches) of the machine. 1 1 5 cm (2 inches) 18 Change the presser foot (see page 9). 2 SEWING BASICS Please read before sewing CAUTION ● To avoid being injured, watch the needle carefully while you may be damaged. Keep 2 your hands away from moving...
...care that the mark on the machine. 1 1 Raise the needle by hand, always turn it the other objects during sewing. Turn the pattern selection dial to tangle and damage the needle or fabric, and you may be injured. ● Do not start sewing without placing the fabric under ... foot, and then pull out about 5 cm (2 inches) of the machine. 1 1 5 cm (2 inches) 18 Change the presser foot (see page 9). 2 SEWING BASICS Please read before sewing CAUTION ● To avoid being injured, watch the needle carefully while you may be damaged. Keep 2 your hands away from moving...
Users Manual - English and Spanish
Page 20
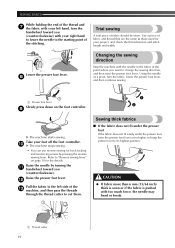
... the fabric is pushed with too much force, the needle may bend or break. 1 Thread cutter 19 Trial sewing A trial piece of the c machine, and then pass the threads through the thread cutter to cut them. . 1 Sewing thick fabrics ■ If the fabric does not fit...turning the a handwheel toward you want to "Reverse sewing lever" on the foot controller. 9 1 2 X The machine starts sewing. Refer to change the sewing direction, and then raise the presser foot lever. Raise the needle by pressing the reverse sewing lever. SEWING BASICS While holding the end of the thread and 7...
... the fabric is pushed with too much force, the needle may bend or break. 1 Thread cutter 19 Trial sewing A trial piece of the c machine, and then pass the threads through the thread cutter to cut them. . 1 Sewing thick fabrics ■ If the fabric does not fit...turning the a handwheel toward you want to "Reverse sewing lever" on the foot controller. 9 1 2 X The machine starts sewing. Refer to change the sewing direction, and then raise the presser foot lever. Raise the needle by pressing the reverse sewing lever. SEWING BASICS While holding the end of the thread and 7...
Users Manual - English and Spanish
Page 21
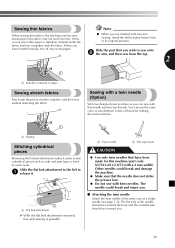
... or two different colors of fabric together, and then sew without stretching the fabric. Slide the part that have designed your machine so you . ■ Attaching the twin needle Attach the twin needle in its original position. Slide the flat bed attachment ...sew cylindrical pieces such as a single needle (see page 7-8). If this machine (part code: X57521-021:2.0/75 with bent needles. The needle could break and damage the machine. ● Make sure that the needle does not strike the presser foot. ● Do not sew with a 2 mm width). When you . 20 Sewing with a twin needle...
... or two different colors of fabric together, and then sew without stretching the fabric. Slide the part that have designed your machine so you . ■ Attaching the twin needle Attach the twin needle in its original position. Slide the flat bed attachment ...sew cylindrical pieces such as a single needle (see page 7-8). If this machine (part code: X57521-021:2.0/75 with bent needles. The needle could break and damage the machine. ● Make sure that the needle does not strike the presser foot. ● Do not sew with a 2 mm width). When you . 20 Sewing with a twin needle...
Users Manual - English and Spanish
Page 22
... the presser foot, refer to attach zigzag foot "J", otherwise the needle may break or the machine may bend or break. ● The twin needle should thread each needle separately. Thread the right needle. 2 Thread the right needle in front of the bobbin winder shaft. CAUTION ● When ... guide above the needle before you threaded the left needle. 1 Follow the same instructions for threading a single needle (see page 14). Do not use the twin needle with the Straight Stitch (Center Needle Position) and the Zigzag Stitch (1.5 mm (1/16 inch) width). SEWING BASICS ■ ...
... the presser foot, refer to attach zigzag foot "J", otherwise the needle may break or the machine may bend or break. ● The twin needle should thread each needle separately. Thread the right needle. 2 Thread the right needle in front of the bobbin winder shaft. CAUTION ● When ... guide above the needle before you threaded the left needle. 1 Follow the same instructions for threading a single needle (see page 14). Do not use the twin needle with the Straight Stitch (Center Needle Position) and the Zigzag Stitch (1.5 mm (1/16 inch) width). SEWING BASICS ■ ...

Users Manual - English and Spanish
Page 30
... of the fabric, and then tie it hits, see step 1. Turn on the needle 4 plate. Place the darning plate on the machine. 5 29 At a slow speed, sew about 10 stitches. 7 CAUTION ● Make sure the needle does not hit the button during sewing. Put a button between the 1 buttonholes and set the pattern selection dial to...
... of the fabric, and then tie it hits, see step 1. Turn on the needle 4 plate. Place the darning plate on the machine. 5 29 At a slow speed, sew about 10 stitches. 7 CAUTION ● Make sure the needle does not hit the button during sewing. Put a button between the 1 buttonholes and set the pattern selection dial to...


