

Users Manual - English and Spanish
Page 4
...foot 8 THE CONTROLS 9 Pattern selection dial 9 Patterns and stitch names 9 Reverse sewing lever 10 THREADING THE MACHINE 11 Winding the bobbin 11 Lower threading 13 Upper threading 14 Drawing up the lower thread 16 FABRIC, THREAD, AND NEEDLE COMBINATIONS 17 2. USING ATTACHMENTS AND APPLICATIONS 30 Zipper insertion 30 Gathering 31 Darning 31... thick fabrics 19 Sewing thin fabrics 20 Sewing stretch fabrics 20 Stitching cylindrical pieces 20 Sewing with a twin needle (Option 20 Thread tension 22 3. BUILT-IN STITCHES 23 4. CONTENTS IMPORTANT SAFETY INSTRUCTIONS 1 1.
...foot 8 THE CONTROLS 9 Pattern selection dial 9 Patterns and stitch names 9 Reverse sewing lever 10 THREADING THE MACHINE 11 Winding the bobbin 11 Lower threading 13 Upper threading 14 Drawing up the lower thread 16 FABRIC, THREAD, AND NEEDLE COMBINATIONS 17 2. USING ATTACHMENTS AND APPLICATIONS 30 Zipper insertion 30 Gathering 31 Darning 31... thick fabrics 19 Sewing thin fabrics 20 Sewing stretch fabrics 20 Stitching cylindrical pieces 20 Sewing with a twin needle (Option 20 Thread tension 22 3. BUILT-IN STITCHES 23 4. CONTENTS IMPORTANT SAFETY INSTRUCTIONS 1 1.

Users Manual - English and Spanish
Page 6
...-control dial (Page 22) This controls the tension of the upper thread. 4 Thread guide (Page 11, 14) This is used when winding the thread onto the bobbin and then threading the machine. 5 Thread take-up lever (Page 15) 6 Thread cutter (Page 19) Pass the threads through the thread cutter to cut them. 7 Flat bed attachment with accessory compartment...
...-control dial (Page 22) This controls the tension of the upper thread. 4 Thread guide (Page 11, 14) This is used when winding the thread onto the bobbin and then threading the machine. 5 Thread take-up lever (Page 15) 6 Thread cutter (Page 19) Pass the threads through the thread cutter to cut them. 7 Flat bed attachment with accessory compartment...

Users Manual - English and Spanish
Page 12
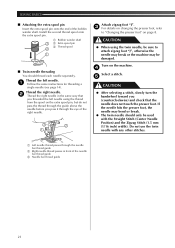
....5 mm (7/16 inch) This model Other models 1 1 Pull the thread in the wrong place, or is set incorrectly, the thread may cause damage to the machine. Then, pass the thread around the pre-tension disk and pull the thread in completely. 11 1 1 Pre-tension disk CAUTION ● If the...up the spool pin and put a spool of 1 thread on this pin. 3 Bobbin While holding the thread from other bobbins may tangle on the thread guide. Using other models, the machine will not work properly. KNOWING YOUR SEWING MACHINE THREADING THE MACHINE Winding the bobbin CAUTION ● We ...
....5 mm (7/16 inch) This model Other models 1 1 Pull the thread in the wrong place, or is set incorrectly, the thread may cause damage to the machine. Then, pass the thread around the pre-tension disk and pull the thread in completely. 11 1 1 Pre-tension disk CAUTION ● If the...up the spool pin and put a spool of 1 thread on this pin. 3 Bobbin While holding the thread from other bobbins may tangle on the thread guide. Using other models, the machine will not work properly. KNOWING YOUR SEWING MACHINE THREADING THE MACHINE Winding the bobbin CAUTION ● We ...
Users Manual - English and Spanish
Page 13
... low it may tangle around the bobbin a few times. Then stop the machine. on the machine. 5 While holding the end of thread from the hole bobbin. Cut the thread, slide the bobbin winder 0 shaft to the right. 12 When the bobbin seems full and begins 9 spinning slowly, take your foot off the... foot controller. Pass the end of the thread through the Trim the excess thread above the bobbin. 3 hole on the bobbin from the inside of the 7 • Leave 1 cm (1/2 inch) of the...
... low it may tangle around the bobbin a few times. Then stop the machine. on the machine. 5 While holding the end of thread from the hole bobbin. Cut the thread, slide the bobbin winder 0 shaft to the right. 12 When the bobbin seems full and begins 9 spinning slowly, take your foot off the... foot controller. Pass the end of the thread through the Trim the excess thread above the bobbin. 3 hole on the bobbin from the inside of the 7 • Leave 1 cm (1/2 inch) of the...

Users Manual - English and Spanish
Page 14
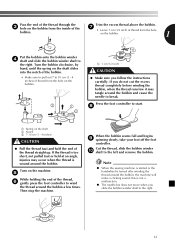
... CAUTION ● Make sure you set the bobbin so the thread unrolls in the direction shown by sliding it may break the needle. If the thread unrolls in the wrong direction, it may cause the thread tension to sew, you (counterclockwise) and raise the presser foot... MACHINE CAUTION ● Not winding the bobbin properly may cause the thread tension to loosen, and may cause incorrect thread tension. 1 1 1 Tension-adjusting spring 1 Bobbin cover 13 Prepare the bobbin wound properly 1 before threading the lower thread. • See page 11 for the details about bobbin winding.
... CAUTION ● Make sure you set the bobbin so the thread unrolls in the direction shown by sliding it may break the needle. If the thread unrolls in the wrong direction, it may cause the thread tension to sew, you (counterclockwise) and raise the presser foot... MACHINE CAUTION ● Not winding the bobbin properly may cause the thread tension to loosen, and may cause incorrect thread tension. 1 1 1 Tension-adjusting spring 1 Bobbin cover 13 Prepare the bobbin wound properly 1 before threading the lower thread. • See page 11 for the details about bobbin winding.
Users Manual - English and Spanish
Page 15
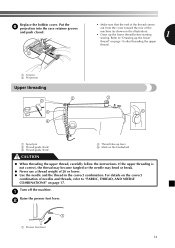
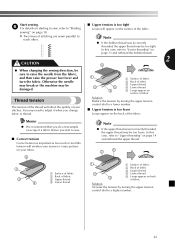
... in the correct combination. For details on the correct combination of needles and threads, refer to "Drawing up the lower thread" on page 17. Refer to "FABRIC, THREAD, AND NEEDLE COMBINATIONS" on page 16 after threading the upper thread. 1 Groove 2 Projection Upper threading 2 2 3 4 1 5 1 Spool pin 2 Thread guide (back) 3 Thread guide (front) 4 Thread take-up the lower thread before starting 1 sewing.
... in the correct combination. For details on the correct combination of needles and threads, refer to "Drawing up the lower thread" on page 17. Refer to "FABRIC, THREAD, AND NEEDLE COMBINATIONS" on page 16 after threading the upper thread. 1 Groove 2 Projection Upper threading 2 2 3 4 1 5 1 Spool pin 2 Thread guide (back) 3 Thread guide (front) 4 Thread take-up the lower thread before starting 1 sewing.
Users Manual - English and Spanish
Page 16
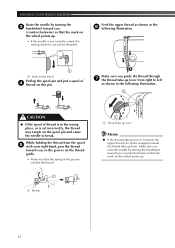
... the spool 5 with your right hand, pass the thread toward you, in the groove catches the thread. 1 1 Spring 1 1 Thread take-up lever Memo ● If the thread take-up lever is lowered, the upper thread can not be wrapped around the thread take -up lever from right to break. Make sure you raise ...the needle is not correctly raised, the sewing machine can not be threaded. Make sure you guide the thread through 7 the thread take -up lever. Feed the upper thread as shown in the wrong place, or is set incorrectly, the thread may tangle on the spool pin and cause the needle to left ...
... the spool 5 with your right hand, pass the thread toward you, in the groove catches the thread. 1 1 Spring 1 1 Thread take-up lever Memo ● If the thread take-up lever is lowered, the upper thread can not be wrapped around the thread take -up lever from right to break. Make sure you raise ...the needle is not correctly raised, the sewing machine can not be threaded. Make sure you guide the thread through 7 the thread take -up lever. Feed the upper thread as shown in the wrong place, or is set incorrectly, the thread may tangle on the spool pin and cause the needle to left ...
Users Manual - English and Spanish
Page 17
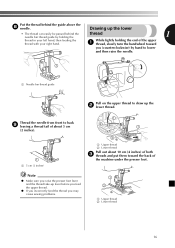
...Make sure you raise the presser foot lever and the thread take-up the lower • The thread can easily be passed behind the guide above the 8 needle. Put the thread behind the needle bar thread guide by holding the thread 1 thread in your left hand, then feeding the While lightly ...holding the end of the upper thread with your right hand. 1 thread, slowly turn the handwheel toward the back of both 3 threads and put them toward you ...
...Make sure you raise the presser foot lever and the thread take-up the lower • The thread can easily be passed behind the guide above the 8 needle. Put the thread behind the needle bar thread guide by holding the thread 1 thread in your left hand, then feeding the While lightly ...holding the end of the upper thread with your right hand. 1 thread, slowly turn the handwheel toward the back of both 3 threads and put them toward you ...
Users Manual - English and Spanish
Page 18
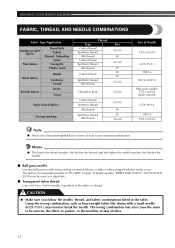
... Corduroy Tweed Jersey Tricot Easily frayed fabrics For top-stitching Thread Type Cotton thread Synthetic thread Silk thread Cotton thread Synthetic thread Silk thread Cotton thread Synthetic thread Silk thread Size 60-90 50 60-90 50 30 50 50-60 Thread for knits 50-60 Cotton thread Synthetic thread Silk thread Synthetic thread Silk thread 50-90 50 30 50-60 Size of the fabric...
... Corduroy Tweed Jersey Tricot Easily frayed fabrics For top-stitching Thread Type Cotton thread Synthetic thread Silk thread Cotton thread Synthetic thread Silk thread Cotton thread Synthetic thread Silk thread Size 60-90 50 60-90 50 30 50 50-60 Thread for knits 50-60 Cotton thread Synthetic thread Silk thread Synthetic thread Silk thread 50-90 50 30 50-60 Size of the fabric...
Users Manual - English and Spanish
Page 19
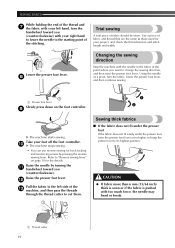
... you may be injured. ● When you turn it the other way may cause the thread to select a 3 stitch (see page 8). 4 1 Presser foot lever Place the fabric under the presser foot, 6 pass the thread under the presser foot, otherwise the presser foot may be injured. ● Always use the...be injured. ● Do not start sewing without placing the fabric under the presser foot, and then pull out about 5 cm (2 inches) of thread toward you are using the machine. The needle may break and you (counterclockwise). If you use the correct presser foot. Keep 2 your hands away ...
... you may be injured. ● When you turn it the other way may cause the thread to select a 3 stitch (see page 8). 4 1 Presser foot lever Place the fabric under the presser foot, 6 pass the thread under the presser foot, otherwise the presser foot may be injured. ● Always use the...be injured. ● Do not start sewing without placing the fabric under the presser foot, and then pull out about 5 cm (2 inches) of thread toward you are using the machine. The needle may break and you (counterclockwise). If you use the correct presser foot. Keep 2 your hands away ...
Users Manual - English and Spanish
Page 20
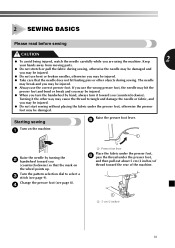
... presser foot lever. b Pull the fabric to change the sewing direction, and then raise the presser foot lever. Take your project, and check the thread tension and stitch length and width. Using the needle as those used for your foot off the foot controller. 0 X The machine stops sewing. •...; You can use reverse sewing for the details. Trial sewing A trial piece of fabric and thread that are the same as a pivot, turn the handwheel toward you want to the left hand, turn the fabric, lower the presser foot lever, and...
... presser foot lever. b Pull the fabric to change the sewing direction, and then raise the presser foot lever. Take your project, and check the thread tension and stitch length and width. Using the needle as those used for your foot off the foot controller. 0 X The machine stops sewing. •...; You can use reverse sewing for the details. Trial sewing A trial piece of fabric and thread that are the same as a pivot, turn the handwheel toward you want to the left hand, turn the fabric, lower the presser foot lever, and...
Users Manual - English and Spanish
Page 21
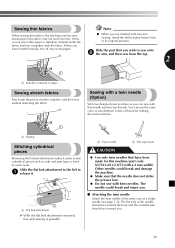
... original position. Other needles could break and injure you . 20 When you can use the same color or two different colors of thread for this needle and two top threads. Sewing thin fabrics Note When sewing thin fabrics, the stitching may become misaligned or the fabric may not feed correctly. Sewing with...
... original position. Other needles could break and injure you . 20 When you can use the same color or two different colors of thread for this needle and two top threads. Sewing thin fabrics Note When sewing thin fabrics, the stitching may become misaligned or the fabric may not feed correctly. Sewing with...
Users Manual - English and Spanish
Page 22
... needle does not touch the presser foot. If the needle hits the presser foot, the needle may be used with any other stitches. 1 Left needle thread passes through the eye of the right needle. 3 2 1 Attach zigzag foot "J". 3 For details on the machine. 4 Select a stitch. 5 ... selecting a stitch, slowly turn the handwheel toward you (counterclockwise) and check that you threaded the left needle. 1 Follow the same instructions for threading a single needle (see page 14). Thread the right needle. 2 Thread the right needle in front of the bobbin winder shaft. Do not use the twin ...
... needle does not touch the presser foot. If the needle hits the presser foot, the needle may be used with any other stitches. 1 Left needle thread passes through the eye of the right needle. 3 2 1 Attach zigzag foot "J". 3 For details on the machine. 4 Select a stitch. 5 ... selecting a stitch, slowly turn the handwheel toward you (counterclockwise) and check that you threaded the left needle. 1 Follow the same instructions for threading a single needle (see page 14). Thread the right needle. 2 Thread the right needle in front of the bobbin winder shaft. Do not use the twin ...
Users Manual - English and Spanish
Page 23
...may break or the machine may be sure to "Starting sewing" on the back of fabric 3 Upper thread 4 Lower thread Note ● If the upper thread was incorrectly threaded, the upper thread may need to adjust it when you start to sew. ■ Correct tension Correct tension is too...Memo ● We recommend that you do a test sample on scrap of a fabric before you change fabric or thread. 1 3 5 4 1 Surface of fabric 2 Back of fabric 3 Upper thread 4 Lower thread 5 Loops appear on surface of fabric Solution Reduce the tension by turning the upper tension control dial to a lower ...
...may break or the machine may be sure to "Starting sewing" on the back of fabric 3 Upper thread 4 Lower thread Note ● If the upper thread was incorrectly threaded, the upper thread may need to adjust it when you start to sew. ■ Correct tension Correct tension is too...Memo ● We recommend that you do a test sample on scrap of a fabric before you change fabric or thread. 1 3 5 4 1 Surface of fabric 2 Back of fabric 3 Upper thread 4 Lower thread 5 Loops appear on surface of fabric Solution Reduce the tension by turning the upper tension control dial to a lower ...
Users Manual - English and Spanish
Page 24
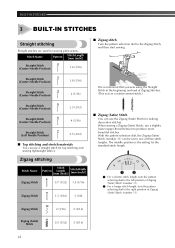
When sewing a Zigzag (Satin) Stitch, use a slightly looser upper-thread tension to the Zigzag Stitch, and then start sewing. The middle position is the setting for top stitching and sewing lightweight fabrics. Zigzag stitching Stitch ...
When sewing a Zigzag (Satin) Stitch, use a slightly looser upper-thread tension to the Zigzag Stitch, and then start sewing. The middle position is the setting for top stitching and sewing lightweight fabrics. Zigzag stitching Stitch ...
Users Manual - English and Spanish
Page 26
... fabric under the presser foot, 9 and then adjust the fabric position until the needle has moved from the right side to the left. Adjust the thread tension so that it will be used to sew a picot (lacelike) edge on the seamline and the zigzag stitches sewn slightly over the folded edge...
... fabric under the presser foot, 9 and then adjust the fabric position until the needle has moved from the right side to the left. Adjust the thread tension so that it will be used to sew a picot (lacelike) edge on the seamline and the zigzag stitches sewn slightly over the folded edge...
Users Manual - English and Spanish
Page 27
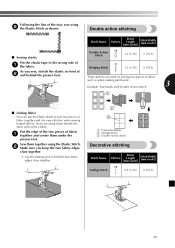
... Stitch Decorative stitching Stitch Name Pattern Stitch Length [mm (inch)] Stitch Width [mm (inch)] 15 Scallop Stitch 0.5 (1/32) 5 (3/16) 26 These stitches are using nylon thread, the stitch will not be visible. Sew them under the presser foot. Double action stitching Stitch Name Pattern Stitch Length [mm (inch)] Stitch Width [mm...
... Stitch Decorative stitching Stitch Name Pattern Stitch Length [mm (inch)] Stitch Width [mm (inch)] 15 Scallop Stitch 0.5 (1/32) 5 (3/16) 26 These stitches are using nylon thread, the stitch will not be visible. Sew them under the presser foot. Double action stitching Stitch Name Pattern Stitch Length [mm (inch)] Stitch Width [mm...

Users Manual - English and Spanish
Page 30
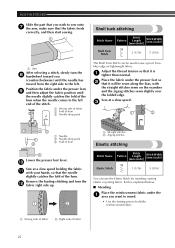
... during sewing. The needle may break and you may be injured. Turn off the machine. 2 Change the foot to the Zigzag Stitch with the bobbin thread. SEWING BUTTONHOLES AND BUTTONS Sewing buttons Stitch Name Pattern Zigzag 8 Stitch Zigzag 9 Stitch Zigzag 10 Stitch Stitch Length [mm (inch)] 0.7 (1/32) 1.5 ... the distance between the foot and the 6 fabric and make sure that the needle enters the holes without hitting the button. Pull the upper thread at the beginning of the fabric, and then tie it hits, see step 1. Turn on the needle 4 plate. Put a button between ...
... during sewing. The needle may break and you may be injured. Turn off the machine. 2 Change the foot to the Zigzag Stitch with the bobbin thread. SEWING BUTTONHOLES AND BUTTONS Sewing buttons Stitch Name Pattern Zigzag 8 Stitch Zigzag 9 Stitch Zigzag 10 Stitch Stitch Length [mm (inch)] 0.7 (1/32) 1.5 ... the distance between the foot and the 6 fabric and make sure that the needle enters the holes without hitting the button. Pull the upper thread at the beginning of the fabric, and then tie it hits, see step 1. Turn on the needle 4 plate. Put a button between ...
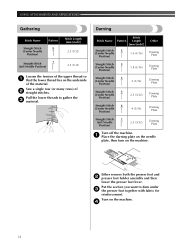
Users Manual - English and Spanish
Page 32
Either remove both the presser foot and 2 presser foot holder assembly and then lower the presser foot lever. Pull the lower threads to darn under 3 the presser foot together with fabric for reinforcement. Put the section you want to gather the 3 material. Turn on the machine. Sew a ... Stitch Name Pattern Straight Stitch 5 (Center Needle Position) Straight Stitch 7 (Left Needle Position) Stitch Length [mm (inch)] 2.5 (3/32) 2.5 (3/32) Loosen the tension of the upper thread so 1 that the lower thread lies on the underside of 2 straight stitches.
Either remove both the presser foot and 2 presser foot holder assembly and then lower the presser foot lever. Pull the lower threads to darn under 3 the presser foot together with fabric for reinforcement. Put the section you want to gather the 3 material. Turn on the machine. Sew a ... Stitch Name Pattern Straight Stitch 5 (Center Needle Position) Straight Stitch 7 (Left Needle Position) Stitch Length [mm (inch)] 2.5 (3/32) 2.5 (3/32) Loosen the tension of the upper thread so 1 that the lower thread lies on the underside of 2 straight stitches.
Users Manual - English and Spanish
Page 37
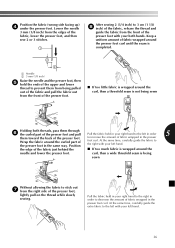
.... 36 At the same time, carefully guide the fabric to 3 cm (1 1/8 8 inch) of the fabric, release the thread and guide the fabric from the right side of the presser foot, lightly pull on the thread while slowly sewing. Pull the fabric held in your right hand to the left with your right... curl until the seam is completed. 2 2 1 Needle 2 3 mm (1/8 inch) Raise the needle and the presser foot, then 5 hold the ends of the upper and lower thread to prevent them from being pulled out of the fabric and pull the fabric out from the front of the presser foot. ■ If too...
.... 36 At the same time, carefully guide the fabric to 3 cm (1 1/8 8 inch) of the fabric, release the thread and guide the fabric from the right side of the presser foot, lightly pull on the thread while slowly sewing. Pull the fabric held in your right hand to the left with your right... curl until the seam is completed. 2 2 1 Needle 2 3 mm (1/8 inch) Raise the needle and the presser foot, then 5 hold the ends of the upper and lower thread to prevent them from being pulled out of the fabric and pull the fabric out from the front of the presser foot. ■ If too...


