

Users Manual - English and Spanish
Page 4
... quilting foot 34 Using the 1/4-inch quilting foot 35 Using the narrow hemmer foot 35 Using the blind stitch foot 37 6. SEWING BUTTONHOLES AND BUTTONS 27 Making a buttonhole 27 Adjusting buttonholes 28 Sewing buttons 29 5. SEWING BASICS 18 Please read before sewing 18 Starting sewing 18 Trial sewing 19 Changing the sewing direction...
... quilting foot 34 Using the 1/4-inch quilting foot 35 Using the narrow hemmer foot 35 Using the blind stitch foot 37 6. SEWING BUTTONHOLES AND BUTTONS 27 Making a buttonhole 27 Adjusting buttonholes 28 Sewing buttons 29 5. SEWING BASICS 18 Please read before sewing 18 Starting sewing 18 Trial sewing 19 Changing the sewing direction...
Users Manual - English and Spanish
Page 5
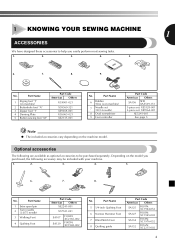
... SA156 SFB: XA5539-151 3-piece set: XE5328-001 2-piece set: XE7064-001 XE5241-001 See page 5 Note ● The included accessories vary depending on machine) 2 Buttonhole foot "A" 3 Zipper foot "I" 4 Darning Plate 5 Button sewing foot "M" Part Code Americas Others XC4901-021 X59369-321 XE9369-001 XC6063-021 XE2137-001 No. Part Name...
... SA156 SFB: XA5539-151 3-piece set: XE5328-001 2-piece set: XE7064-001 XE5241-001 See page 5 Note ● The included accessories vary depending on machine) 2 Buttonhole foot "A" 3 Zipper foot "I" 4 Darning Plate 5 Button sewing foot "M" Part Code Americas Others XC4901-021 X59369-321 XE9369-001 XC6063-021 XE2137-001 No. Part Name...

Users Manual - English and Spanish
Page 6
... manually raise and lower the needle. Flat bed attachment The accessories can turn the main power and sewing light switch on the country or region. B Buttonhole fine-adjustment screw (Page 28) C Main power and sewing light switch (Page 7) You can be stored in the foot controller plug and connect the machine...
... manually raise and lower the needle. Flat bed attachment The accessories can turn the main power and sewing light switch on the country or region. B Buttonhole fine-adjustment screw (Page 28) C Main power and sewing light switch (Page 7) You can be stored in the foot controller plug and connect the machine...
Users Manual - English and Spanish
Page 10
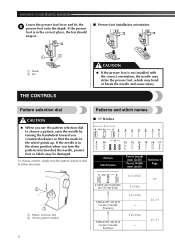
... either direction. 2 1 1 Pattern selection dial 2 Chosen pattern number ■ 17 Stitches 1 2 3 4 5 6 78 9 10 11 12 13 14 15 16 17 Pattern Stitch Name 1 4-STEP AUTOMATIC BUTTONHOLE 2 STRAIGHT STITCH (Center Needle Position) 3 STRAIGHT STITCH (Center Needle Position) Preset Length (mm (inch)) Preset Width (mm (inch)) 0.5 (1/32) 5 (3/16) 1.6 (1/16) - 1.8 (1/16) - To choose a stitch...
... either direction. 2 1 1 Pattern selection dial 2 Chosen pattern number ■ 17 Stitches 1 2 3 4 5 6 78 9 10 11 12 13 14 15 16 17 Pattern Stitch Name 1 4-STEP AUTOMATIC BUTTONHOLE 2 STRAIGHT STITCH (Center Needle Position) 3 STRAIGHT STITCH (Center Needle Position) Preset Length (mm (inch)) Preset Width (mm (inch)) 0.5 (1/32) 5 (3/16) 1.6 (1/16) - 1.8 (1/16) - To choose a stitch...
Users Manual - English and Spanish
Page 28
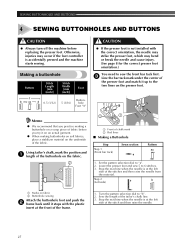
...We recommend that you try it up to 6 stitches. 3. Using tailor's chalk, mark the position and 1 length of the buttonhole on fabric 2 Buttonhole sewing Attach the buttonhole foot and push the 2 frame back until it stops with the correct orientation, the needle may strike the presser foot, which ... the machine when the needle is accidentally pressed and the machine starts sewing. Sew the length of chalk mark 2 Red lines ■ Making a Buttonhole Step Step 1 (Front bar tack) Sewn section Pattern 1. Otherwise, injuries may bend or break the needle and cause injury. (See page 8 ...
...We recommend that you try it up to 6 stitches. 3. Using tailor's chalk, mark the position and 1 length of the buttonhole on fabric 2 Buttonhole sewing Attach the buttonhole foot and push the 2 frame back until it stops with the correct orientation, the needle may strike the presser foot, which ... the machine when the needle is accidentally pressed and the machine starts sewing. Sew the length of chalk mark 2 Red lines ■ Making a Buttonhole Step Step 1 (Front bar tack) Sewn section Pattern 1. Otherwise, injuries may bend or break the needle and cause injury. (See page 8 ...
Users Manual - English and Spanish
Page 29
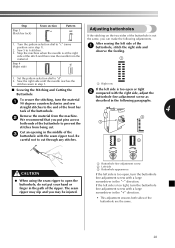
... the pattern selection dial to prevent the 1 2 stitches from the material. The seam ripper may be injured. 1 Buttonhole fine-adjustment screw 2 Left side 3 Buttonhole appearance If the left side is not the same, you may slip and you can make the following paragraphs. straight stitches... to open , turn the material 1 90 degrees counterclockwise and sew described in the path of the buttonhole. 4 Remove the material from the machine. 2 We recommend that you put your hand or finger in the following adjustments. Step Step...
... the pattern selection dial to prevent the 1 2 stitches from the material. The seam ripper may be injured. 1 Buttonhole fine-adjustment screw 2 Left side 3 Buttonhole appearance If the left side is not the same, you may slip and you can make the following paragraphs. straight stitches... to open , turn the material 1 90 degrees counterclockwise and sew described in the path of the buttonhole. 4 Remove the material from the machine. 2 We recommend that you put your hand or finger in the following adjustments. Step Step...

Users Manual - English and Spanish
Page 30
...side of the 8 stitching to the button sewing foot 3 "M". Place the darning plate on the machine. 5 29 Put a button between the 1 buttonholes and set the pattern selection dial to the Zigzag Stitch with the bobbin thread. The needle may break and you may be injured. At a slow.... X Use scissors to cut the upper thread and the bobbin thread at the end of the fabric, and then tie it hits, see step 1. SEWING BUTTONHOLES AND BUTTONS Sewing buttons Stitch Name Pattern Zigzag 8 Stitch Zigzag 9 Stitch Zigzag 10 Stitch Stitch Length [mm (inch)] 0.7 (1/32) 1.5 (1/16) 2 (1/16) ...
...side of the 8 stitching to the button sewing foot 3 "M". Place the darning plate on the machine. 5 29 Put a button between the 1 buttonholes and set the pattern selection dial to the Zigzag Stitch with the bobbin thread. The needle may break and you may be injured. At a slow.... X Use scissors to cut the upper thread and the bobbin thread at the end of the fabric, and then tie it hits, see step 1. SEWING BUTTONHOLES AND BUTTONS Sewing buttons Stitch Name Pattern Zigzag 8 Stitch Zigzag 9 Stitch Zigzag 10 Stitch Stitch Length [mm (inch)] 0.7 (1/32) 1.5 (1/16) 2 (1/16) ...
Users Manual - English and Spanish
Page 44
... A , Accessories 4 optional 4 33 Appliqués 32 B Blind hem stitching 24 Blind stitch foot 37 Bobbin winding 11 Button sewing 29 Buttonhole adjusting 28 making 27 Buttonhole fine-adjustment screw 28 C Cleaning 38 Connecting plugs 6 D , , Darning 31 Darning plate 29 31 34 Decorative stitching 26 Double action stitching 26 Drawing up the ...
... A , Accessories 4 optional 4 33 Appliqués 32 B Blind hem stitching 24 Blind stitch foot 37 Bobbin winding 11 Button sewing 29 Buttonhole adjusting 28 making 27 Buttonhole fine-adjustment screw 28 C Cleaning 38 Connecting plugs 6 D , , Darning 31 Darning plate 29 31 34 Decorative stitching 26 Double action stitching 26 Drawing up the ...


