
Accessory Catalog
Page 7
...-is models. Sew. Place the cut edge like a serger or overlock. Stitch Guide Foot The scale in the presser foot can be used for straight stitching especially on selected machines. To sew a curve, sew so that the fabric edge becomes a right angle against the seam guide. 3. Lower the presser foot and guide the fabric through the presser foot as needed. 3. SA160 ABCDEFGHJKLMNO Straight Stitch Foot Straight Stitch Foot and Straight Stitch Needle Plate Vertical Stitching Alignment Foot Brother General Sewing Accessories 12 Straight Stitch Foot For precise straight stitching...
...-is models. Sew. Place the cut edge like a serger or overlock. Stitch Guide Foot The scale in the presser foot can be used for straight stitching especially on selected machines. To sew a curve, sew so that the fabric edge becomes a right angle against the seam guide. 3. Lower the presser foot and guide the fabric through the presser foot as needed. 3. SA160 ABCDEFGHJKLMNO Straight Stitch Foot Straight Stitch Foot and Straight Stitch Needle Plate Vertical Stitching Alignment Foot Brother General Sewing Accessories 12 Straight Stitch Foot For precise straight stitching...

Accessory Catalog
Page 11
... 5 cords or decorative threads. Insert cords or threads into each hole on the machine. 2. Attach the presser foot and pull cords under the presser foot. 3. Brother Embellishment Feet 19 Braiding Foot Clear-view Foot Baby Blanket, Pillow & Bib created by June Mellinger Braiding Foot Attaches up the center guide mark on the presser foot over the desired seams or pattern markings. 3. SA141 All Brother home-use the center guide). 2. Sew. SA110 ABCDEFJKMN SA148 GHILOP Cording Foot (5-hole) Used for quilting appliqué! 1. Slide the plate...
... 5 cords or decorative threads. Insert cords or threads into each hole on the machine. 2. Attach the presser foot and pull cords under the presser foot. 3. Brother Embellishment Feet 19 Braiding Foot Clear-view Foot Baby Blanket, Pillow & Bib created by June Mellinger Braiding Foot Attaches up the center guide mark on the presser foot over the desired seams or pattern markings. 3. SA141 All Brother home-use the center guide). 2. Sew. SA110 ABCDEFJKMN SA148 GHILOP Cording Foot (5-hole) Used for quilting appliqué! 1. Slide the plate...

Accessory Catalog
Page 12
... a straight stitch, left needle position. 2. Requires Low Shank Adapter for gathering fabrics. Its wide groove also helps you are using zigzag stitch with transparent thread. Brother Embellishment Feet 21 Fringe Foot Gathering Foot SA142 All Brother home-use sewing machines SA120 All Brother home-use sewing machines Fringe Foot Used to mark. 2. Increase the upper thread tension. 3. Select a straight stitch, left needle position. 2. Slide the fabric not to make or attach piping. Adjust the upper thread tension. 2. Line up , under the presser foot. Line up the center guide...
... a straight stitch, left needle position. 2. Requires Low Shank Adapter for gathering fabrics. Its wide groove also helps you are using zigzag stitch with transparent thread. Brother Embellishment Feet 21 Fringe Foot Gathering Foot SA142 All Brother home-use sewing machines SA120 All Brother home-use sewing machines Fringe Foot Used to mark. 2. Increase the upper thread tension. 3. Select a straight stitch, left needle position. 2. Slide the fabric not to make or attach piping. Adjust the upper thread tension. 2. Line up , under the presser foot. Line up the center guide...

Accessory Catalog
Page 13
.... 4. Adjust the amount of tuck or gather by placing the completed row in the center position. 3. SA143 AFJKM Ruffler Foot Makes ruffles with this presser foot. 1. Use a stiff card to guide your first row of tucks can be adjusted. 1. Install and manually thread a twin needle. 2. The intervals of stitching and use that to get started. Move fabric about 1" (2.5 cm) past the needle to sew the first row in one of stitch length, tuck setting and...
.... 4. Adjust the amount of tuck or gather by placing the completed row in the center position. 3. SA143 AFJKM Ruffler Foot Makes ruffles with this presser foot. 1. Use a stiff card to guide your first row of tucks can be adjusted. 1. Install and manually thread a twin needle. 2. The intervals of stitching and use that to get started. Move fabric about 1" (2.5 cm) past the needle to sew the first row in one of stitch length, tuck setting and...

Accessory Catalog
Page 15
... thick layers of the foot gives you wide visibility in place while stitches are free to hold the fabric firmly. 5. Set the fabric under the presser foot. 6. Use the walking foot with the pin over the needle clamp screw. 2. Walking Foot/Open Toe Walking Foot Brother Quilting Feet 28 Walking Foot/Open Toe Walking Foot The feed dogs on the Open Toe Quilting Foot, with the closed front for free-motion, outline quilting, etc. 1. While starting to sew, press the needle position button twice to pull the bobbin thread to be easily sewn...
... thick layers of the foot gives you wide visibility in place while stitches are free to hold the fabric firmly. 5. Set the fabric under the presser foot. 6. Use the walking foot with the pin over the needle clamp screw. 2. Walking Foot/Open Toe Walking Foot Brother Quilting Feet 28 Walking Foot/Open Toe Walking Foot The feed dogs on the Open Toe Quilting Foot, with the closed front for free-motion, outline quilting, etc. 1. While starting to sew, press the needle position button twice to pull the bobbin thread to be easily sewn...

Accessory Catalog
Page 17
...) feature adjusts the presser foot pressure automatically and continuously to assure perfectly connected and aligned designs. Accepts USB mouse* to see reference stitches to give you superior stitch quality when stitching over differing fabric thicknesses. - Includes three new free-motion presser feet: Free-motion quilting foot "C" for more features to embroider 150 decorative sewing stitches within the frame. - Duetta™ 4500D/Innov-is 4000D this upgrade adds outstanding quilting features, updated embroidery functionality and enhanced USB capability. Change your...
...) feature adjusts the presser foot pressure automatically and continuously to assure perfectly connected and aligned designs. Accepts USB mouse* to see reference stitches to give you superior stitch quality when stitching over differing fabric thicknesses. - Includes three new free-motion presser feet: Free-motion quilting foot "C" for more features to embroider 150 decorative sewing stitches within the frame. - Duetta™ 4500D/Innov-is 4000D this upgrade adds outstanding quilting features, updated embroidery functionality and enhanced USB capability. Change your...

Accessory Catalog
Page 33
... color sequence for thread delivery or bobbin storage. Some hoops can easily be used thread colors. Ten Spool Thread Stand This 10-Spool Thread Stand snaps securely in use. Take control of your next embroidery, quilting or sewing project. Ask your selected dealer or check on this stand that conveniently sits behind your machine to the machine as well as a thread locking system which keeps those loose ends tamed...
... color sequence for thread delivery or bobbin storage. Some hoops can easily be used thread colors. Ten Spool Thread Stand This 10-Spool Thread Stand snaps securely in use. Take control of your next embroidery, quilting or sewing project. Ask your selected dealer or check on this stand that conveniently sits behind your machine to the machine as well as a thread locking system which keeps those loose ends tamed...

Accessory Catalog
Page 34
... to the Brother Embroidery Cards giving you check out Brother's beautiful country yarn thread. Here is 500D. Bobbin Threads Stabilizers and Water Water Soluble Stabilizers Brother Embroidery Accessories 66 Bobbin Threads Brother Bobbin Threads are also available at selected Dealers. Stabilizers and Water Soluble Stabilizers When doing machine embroidery, the use these embroidery threads especially designed for Brother sewing and embroidering machines. 61 Color Thread Set with Wooden Rack ETKSP999 PacesetterTM Polyester Threads (61 Color Thread Set with straight, zig zag or...
... to the Brother Embroidery Cards giving you check out Brother's beautiful country yarn thread. Here is 500D. Bobbin Threads Stabilizers and Water Water Soluble Stabilizers Brother Embroidery Accessories 66 Bobbin Threads Brother Bobbin Threads are also available at selected Dealers. Stabilizers and Water Soluble Stabilizers When doing machine embroidery, the use these embroidery threads especially designed for Brother sewing and embroidering machines. 61 Color Thread Set with Wooden Rack ETKSP999 PacesetterTM Polyester Threads (61 Color Thread Set with straight, zig zag or...

Accessory Catalog
Page 36
... fake fur. Comes with the feed dogs and can attach it . 1. SA159 SA180B SA181 Needle Felting Attachment Felting Needle Brother Sewing Machine Attachments for PQ Series 70 Needle Felting Attachment Use this unique attachment to maintain contact with Dust Box and Needle Guide. Felting Needle Needle Felted Cap & Scarf www.brother.com No thread is required to the feed dogs, aiding in the proper feed on your PQ series! SA173 Ver y Narrow Foot Very convenient...
... fake fur. Comes with the feed dogs and can attach it . 1. SA159 SA180B SA181 Needle Felting Attachment Felting Needle Brother Sewing Machine Attachments for PQ Series 70 Needle Felting Attachment Use this unique attachment to maintain contact with Dust Box and Needle Guide. Felting Needle Needle Felted Cap & Scarf www.brother.com No thread is required to the feed dogs, aiding in the proper feed on your PQ series! SA173 Ver y Narrow Foot Very convenient...

Accessory Catalog
Page 40
... machine. 2. Insert the tab on the bias tape attachment into the guide. 4. Sew as folding them. Open the seams. 4. Set up your Cover Stitch). 1. SA224CV SA221CV Hemming Set Finishes hems easily and quickly. Sew. Fold fabric and set it is easily set through the holder). 4. Attaching 12 mm (approx. 1/2") bias tape: Use the large bias tape sliding plate with the LC1 presser foot (included with your machine for a chain stitch, the center needle. 2. The stitches are always smooth. 1. Brother Cover Stitch Feet...
... machine. 2. Insert the tab on the bias tape attachment into the guide. 4. Sew as folding them. Open the seams. 4. Set up your Cover Stitch). 1. SA224CV SA221CV Hemming Set Finishes hems easily and quickly. Sew. Fold fabric and set it is easily set through the holder). 4. Attaching 12 mm (approx. 1/2") bias tape: Use the large bias tape sliding plate with the LC1 presser foot (included with your machine for a chain stitch, the center needle. 2. The stitches are always smooth. 1. Brother Cover Stitch Feet...
Users Manual - English
Page 2
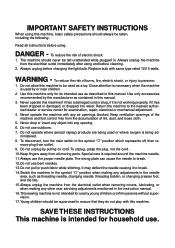
... damaged, or dropped into any air openings blocked. Use only accessories recommended by the manufacturer as threading needle, changing needle, threading bobbin, or changing presser foot, and the like. 15.Always unplug the machine from the electrical outlet when removing covers, lubricating, or when making any adjustments in the needle area, such as contained in the instruction manual. 16.This sewing machine is intended for its intended use the proper needle plate. Do not operate where aerosol...
... damaged, or dropped into any air openings blocked. Use only accessories recommended by the manufacturer as threading needle, changing needle, threading bobbin, or changing presser foot, and the like. 15.Always unplug the machine from the electrical outlet when removing covers, lubricating, or when making any adjustments in the needle area, such as contained in the instruction manual. 16.This sewing machine is intended for its intended use the proper needle plate. Do not operate where aerosol...
Users Manual - English
Page 5
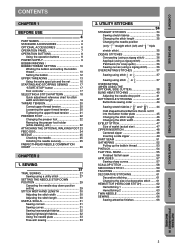
... the upper thread tension 21 PRESSER FOOT 22 Changing the presser foot 22 Removing the presser foot holder (while cleaning, etc 22 ATTACHING THE OPTIONAL WALKING FOOT 23 FEED DOG 24 NEEDLE 25 Checking the needle 25 Installing the needle securely 25 FABRIC/THREAD/NEEDLE COMBINATION CHART 26 CHAPTER 2 1. CONTENTS BEFORE USE SEWING UTILITY STITCHES CONTENTS CHAPTER 1 BEFORE USE 4 PART NAMES 4 STANDARD ACCESSORIES 6 OPTIONAL ACCESSORIES 6 OPERATION PANEL 7 OPERATION BUTTONS 8 Using the operation buttons 8 POWER SUPPLY 9 BOBBIN WINDING / BOBBIN THREAD SETTING 10 Winding the...
... the upper thread tension 21 PRESSER FOOT 22 Changing the presser foot 22 Removing the presser foot holder (while cleaning, etc 22 ATTACHING THE OPTIONAL WALKING FOOT 23 FEED DOG 24 NEEDLE 25 Checking the needle 25 Installing the needle securely 25 FABRIC/THREAD/NEEDLE COMBINATION CHART 26 CHAPTER 2 1. CONTENTS BEFORE USE SEWING UTILITY STITCHES CONTENTS CHAPTER 1 BEFORE USE 4 PART NAMES 4 STANDARD ACCESSORIES 6 OPTIONAL ACCESSORIES 6 OPERATION PANEL 7 OPERATION BUTTONS 8 Using the operation buttons 8 POWER SUPPLY 9 BOBBIN WINDING / BOBBIN THREAD SETTING 10 Winding the...
Users Manual - English
Page 7
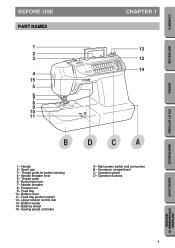
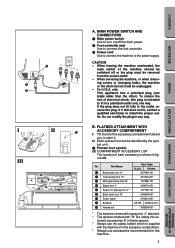
... Feed dog 10- Feed dog position switch 12- Sewing speed controller A- Needle threader 8- Main power switch and connectors B- Operation panel D- Thread guide for bobbin winding 4- Thread cutter 6- Balance wheel 15- CONTENTS BEFORE USE SEWING UTILITY STITCHES BEFORE USE PART NAMES 1 2 3 4 15 5 6 7 8 9 10 11 CHAPTER 1 13 12 14 BDCA 1- Handle 2- Accessory compartment C- Operation buttons MAINTENANCE SEWING CHART PATTERNS (PROGRAMMED IN MACHINE) 4 Needle threader lever 5- Bobbin cover 11- Upper tension control dial 13- Bobbin winder 14- Presser foot...
... Feed dog 10- Feed dog position switch 12- Sewing speed controller A- Needle threader 8- Main power switch and connectors B- Operation panel D- Thread guide for bobbin winding 4- Thread cutter 6- Balance wheel 15- CONTENTS BEFORE USE SEWING UTILITY STITCHES BEFORE USE PART NAMES 1 2 3 4 15 5 6 7 8 9 10 11 CHAPTER 1 13 12 14 BDCA 1- Handle 2- Accessory compartment C- Operation buttons MAINTENANCE SEWING CHART PATTERNS (PROGRAMMED IN MACHINE) 4 Needle threader lever 5- Bobbin cover 11- Upper tension control dial 13- Bobbin winder 14- Presser foot...
Users Manual - English
Page 8
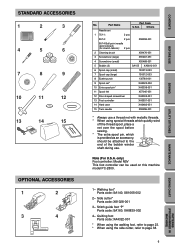
When servicing the machine, or when removing covers or changing bulbs, the machine or the electrical set X58358-001 * The machine comes with zigzag foot "J" attached. * The spaces marked with "5" are empty. No. closed accessories fit in these spaces. * Always use the plastic bobbin which is supplied with the machine or in the accessory compartment. * Always use accessories recommended for Zigzag foot "J" * 137748-101 6 Blind stitch foot "R" X56409-001 7 Seam ripper X54243-001 8 Bobbins SA155 XA3812-051 9 Needle set must...
When servicing the machine, or when removing covers or changing bulbs, the machine or the electrical set X58358-001 * The machine comes with zigzag foot "J" attached. * The spaces marked with "5" are empty. No. closed accessories fit in these spaces. * Always use the plastic bobbin which is supplied with the machine or in the accessory compartment. * Always use accessories recommended for Zigzag foot "J" * 137748-101 6 Blind stitch foot "R" X56409-001 7 Seam ripper X54243-001 8 Bobbins SA155 XA3812-051 9 Needle set must...
Users Manual - English
Page 9
... quickly wind off the thread spool, place a net over the spool before sewing. * The extra spool pin, which is provided as an accessory, should be used on this machine model PC-2800. 1- Walking foot* Parts code: SA140, X81065-002 2- Stitch guide foot "P" Parts code: SA160, XA8839-002 4- STANDARD ACCESSORIES 1 2 3 4 5 6 7 8 9 10 11 12 13 14 15 OPTIONAL ACCESSORIES 1 2 3 4 No. Note (For U.S.A. Side cutter* Parts code: X81028-001 3- Quilting foot Parts code: XA4322-001 * When using the walking foot, refer to the end of the bobbin winder...
... quickly wind off the thread spool, place a net over the spool before sewing. * The extra spool pin, which is provided as an accessory, should be used on this machine model PC-2800. 1- Walking foot* Parts code: SA140, X81065-002 2- Stitch guide foot "P" Parts code: SA160, XA8839-002 4- STANDARD ACCESSORIES 1 2 3 4 5 6 7 8 9 10 11 12 13 14 15 OPTIONAL ACCESSORIES 1 2 3 4 No. Note (For U.S.A. Side cutter* Parts code: X81028-001 3- Quilting foot Parts code: XA4322-001 * When using the walking foot, refer to the end of the bobbin winder...
Users Manual - English
Page 18
... The needle threader lever can only be used with home sewing machine needles size 75/11-100/16. Pass the thread underneath the presser foot and pull it on the large hook. Lower the needle threader lever all the way down using those types of threads or needles, thread the eye of hooks 2 Third hook 9. While gently holding the thread, raise the needle threader lever. 11. Make sure the main power switch is in the lowest position, pull the thread in...
... The needle threader lever can only be used with home sewing machine needles size 75/11-100/16. Pass the thread underneath the presser foot and pull it on the large hook. Lower the needle threader lever all the way down using those types of threads or needles, thread the eye of hooks 2 Third hook 9. While gently holding the thread, raise the needle threader lever. 11. Make sure the main power switch is in the lowest position, pull the thread in...
Users Manual - English
Page 25
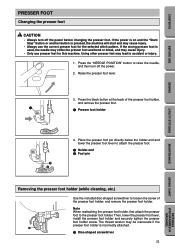
... lower the presser foot lever to attach the presser foot. 1 Holder-end 2 Foot pin 1 2 Removing the presser foot holder (while cleaning, etc.) 5 6 1 Use the included disc-shaped screwdriver to the presser foot holder. Then, lower the presser foot lever, install the presser foot holder and securely tighten the presser foot holder screw. If the power is on and the "Start/ Stop" button or another button is pressed, the machine will start and may cause injury. • Always use presser feet for the selected stitch pattern. Raise the presser foot lever. 3. Press the "NEEDLE POSITION" button...
... lower the presser foot lever to attach the presser foot. 1 Holder-end 2 Foot pin 1 2 Removing the presser foot holder (while cleaning, etc.) 5 6 1 Use the included disc-shaped screwdriver to the presser foot holder. Then, lower the presser foot lever, install the presser foot holder and securely tighten the presser foot holder screw. If the power is on and the "Start/ Stop" button or another button is pressed, the machine will start and may cause injury. • Always use presser feet for the selected stitch pattern. Raise the presser foot lever. 3. Press the "NEEDLE POSITION" button...
Users Manual - English
Page 33
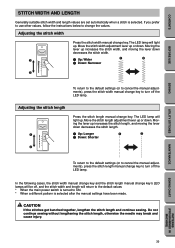
... USE SEWING UTILITY STITCHES STITCH WIDTH AND LENGTH Generally suitable stitch width and length values are set automatically when a stitch is selected after the manual settings have been made. Moving the lever up increases the stitch width, and moving the lever down . Adjusting the stitch length 1 2 Press the stitch length manual change key. In the following cases, the stitch width manual change key and the stitch length manual change key's LED lamps will be off, and the stitch width and length will light...
... USE SEWING UTILITY STITCHES STITCH WIDTH AND LENGTH Generally suitable stitch width and length values are set automatically when a stitch is selected after the manual settings have been made. Moving the lever up increases the stitch width, and moving the lever down . Adjusting the stitch length 1 2 Press the stitch length manual change key. In the following cases, the stitch width manual change key and the stitch length manual change key's LED lamps will be off, and the stitch width and length will light...
Users Manual - English
Page 34
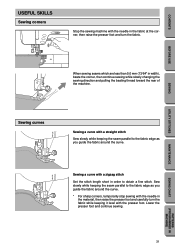
.... 5 6 Sewing a curve with a zigzag stitch Set the stitch length short in order to the fabric edge as you guide the fabric around the curve. * For sharp corners, temporarily stop sewing with the presser foot. When sewing seams which are less than 5.0 mm (13/64" in width), baste the corner, then continue sewing while slowly changing the sewing direction and pulling the basting thread toward the rear of 6 the machine. CONTENTS BEFORE USE USEFUL SKILLS Sewing...
.... 5 6 Sewing a curve with a zigzag stitch Set the stitch length short in order to the fabric edge as you guide the fabric around the curve. * For sharp corners, temporarily stop sewing with the presser foot. When sewing seams which are less than 5.0 mm (13/64" in width), baste the corner, then continue sewing while slowly changing the sewing direction and pulling the basting thread toward the rear of 6 the machine. CONTENTS BEFORE USE USEFUL SKILLS Sewing...
Users Manual - English
Page 73
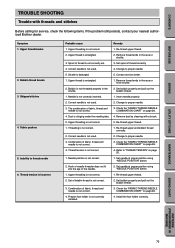
... "FABRIC/THREAD/NEEDLE COMBINATION CHART" on page 26. 4. Needle position is clinging under the needle plate. 4. Re-thread upper thread. 2. Combination of thread is not used . 2. Presser foot holder is not correct. 1. Re-thread upper thread. 2. Re-thread upper thread. 1. Change to proper needle. 3. Set needle at proper position using "NEEDLE POSITION" button. 2. Upper threading is not correctly installed. 4. Install the foot holder correctly. Bobbin thread breaks 3. Upper threading is not correctly inserted. 1. Spool of fabric, thread and needle is...
... "FABRIC/THREAD/NEEDLE COMBINATION CHART" on page 26. 4. Needle position is clinging under the needle plate. 4. Re-thread upper thread. 2. Combination of thread is not used . 2. Presser foot holder is not correct. 1. Re-thread upper thread. 2. Re-thread upper thread. 1. Change to proper needle. 3. Set needle at proper position using "NEEDLE POSITION" button. 2. Upper threading is not correctly installed. 4. Install the foot holder correctly. Bobbin thread breaks 3. Upper threading is not correctly inserted. 1. Spool of fabric, thread and needle is...


