Users Manual - English
Page 5
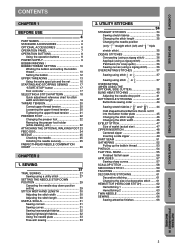
...10 Winding the bobbin and setting the bobbin thread 10 Setting the bobbin 12 UPPER THREADING 13 Using the extra spool pin and the net .......... 16 STARTING AND STOPPING SEWING 17 "START/STOP" button 17 Foot controller 17 SELECTING A STITCH PATTERN 18 Quick adjustment reference chart for ...Sewing using a zigzag stitch 36 Patchwork (for stitch width and stitch length 19 THREAD TENSION 20 Correct upper thread tension 20 Loosening the upper thread tension 20 Tightening the upper thread tension 21 PRESSER FOOT 22 Changing the presser foot 22 Removing the presser foot holder (while...
...10 Winding the bobbin and setting the bobbin thread 10 Setting the bobbin 12 UPPER THREADING 13 Using the extra spool pin and the net .......... 16 STARTING AND STOPPING SEWING 17 "START/STOP" button 17 Foot controller 17 SELECTING A STITCH PATTERN 18 Quick adjustment reference chart for ...Sewing using a zigzag stitch 36 Patchwork (for stitch width and stitch length 19 THREAD TENSION 20 Correct upper thread tension 20 Loosening the upper thread tension 20 Tightening the upper thread tension 21 PRESSER FOOT 22 Changing the presser foot 22 Removing the presser foot holder (while...
Users Manual - English
Page 23
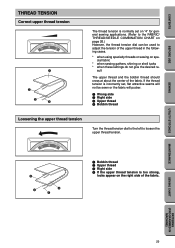
... , flat attractive seams will not be sewn or the fabric will pucker. 1 Wrong side 2 Right side 3 Upper thread 4 Bobbin thread Loosening the upper thread tension Turn the thread tension dial to the left to adjust the tension of the upper thread in the following cases. * when using specialty threads or sewing on the right side...
... , flat attractive seams will not be sewn or the fabric will pucker. 1 Wrong side 2 Right side 3 Upper thread 4 Bobbin thread Loosening the upper thread tension Turn the thread tension dial to the left to adjust the tension of the upper thread in the following cases. * when using specialty threads or sewing on the right side...
Users Manual - English
Page 55
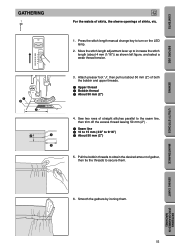
...Smooth the gathers by ironing them . 6. UTILITY STITCHES MAINTENANCE SEWING CHART PATTERNS (PROGRAMMED IN MACHINE) 52 Move the stitch length adjustment lever up to secure them . Pull the bobbin threads to obtain the desired amount of straight stitches parallel to the seam line, then trim off the excess thread leaving 50...to turn on the LED lamp. 2. Attach presser foot "J", then pull out about 4 mm (1/16")) as shown left figure, and select a weak thread tension. 3. CONTENTS BEFORE USE SEWING GATHERING 1 1 2 3 J For the waists of skirts, the sleeve openings of both the...
...Smooth the gathers by ironing them . 6. UTILITY STITCHES MAINTENANCE SEWING CHART PATTERNS (PROGRAMMED IN MACHINE) 52 Move the stitch length adjustment lever up to secure them . Pull the bobbin threads to obtain the desired amount of straight stitches parallel to the seam line, then trim off the excess thread leaving 50...to turn on the LED lamp. 2. Attach presser foot "J", then pull out about 4 mm (1/16")) as shown left figure, and select a weak thread tension. 3. CONTENTS BEFORE USE SEWING GATHERING 1 1 2 3 J For the waists of skirts, the sleeve openings of both the...
Users Manual - English
Page 62
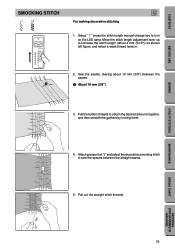
... IN MACHINE) 59 Move the stitch length adjustment lever up to sew the spaces between the seams. 1 About 10 mm (3/8'') 3. Pull the bobbin threads to turn on the LED lamp. Sew the seams, leaving about 4 mm (3/16")) as shown left figure, and select a weak thread tension. 2. Select " " press the stitch length manual change...
... IN MACHINE) 59 Move the stitch length adjustment lever up to sew the spaces between the seams. 1 About 10 mm (3/8'') 3. Pull the bobbin threads to turn on the LED lamp. Sew the seams, leaving about 4 mm (3/16")) as shown left figure, and select a weak thread tension. 2. Select " " press the stitch length manual change...


