
Accessory Catalog
Page 7
... adjust settings as it stitches. SA160 ABCDEFGHJKLMNO Straight Stitch Foot Straight Stitch Foot and Straight Stitch Needle Plate Vertical Stitching Alignment Foot Brother General Sewing Accessories 12 Straight Stitch Foot For precise straight stitching on thin fabrics or on thin... Available in Fall 2008. Sew. SA189 ABCDEFGHJKLMNO www.brother.com Each divisional mark equals 2 mm. 1. Installing the Straight Stitch Needle Plate automatically sets the needle position to accomplish perfect straight stitching. Brother General Sewing Accessories 11 Seam Guide Side Cutter Stitch ...
... adjust settings as it stitches. SA160 ABCDEFGHJKLMNO Straight Stitch Foot Straight Stitch Foot and Straight Stitch Needle Plate Vertical Stitching Alignment Foot Brother General Sewing Accessories 12 Straight Stitch Foot For precise straight stitching on thin fabrics or on thin... Available in Fall 2008. Sew. SA189 ABCDEFGHJKLMNO www.brother.com Each divisional mark equals 2 mm. 1. Installing the Straight Stitch Needle Plate automatically sets the needle position to accomplish perfect straight stitching. Brother General Sewing Accessories 11 Seam Guide Side Cutter Stitch ...

Accessory Catalog
Page 40
...joint and the groove of fabric pointed so that it into the front cover slot. 3. Set up your machine for a chain stitch, the center needle. 2. Brother Cover Stitch Feet 77 Bias Tape Binding Set Hemming Set Bias Tape Binding Set Attaches 6 or 12 mm (approx. 1/4 to your Cover Stitch). ...1. Set T1/T2 presser foot. 2. Attach the hem positioning plate A/B to the hemming attachment, and attach it to 1/2 inch) bias tapes as holding the fabric lightly with 3 or 6 mm (approx. 1/8 or 1/4 inch)...
...joint and the groove of fabric pointed so that it into the front cover slot. 3. Set up your machine for a chain stitch, the center needle. 2. Brother Cover Stitch Feet 77 Bias Tape Binding Set Hemming Set Bias Tape Binding Set Attaches 6 or 12 mm (approx. 1/4 to your Cover Stitch). ...1. Set T1/T2 presser foot. 2. Attach the hem positioning plate A/B to the hemming attachment, and attach it to 1/2 inch) bias tapes as holding the fabric lightly with 3 or 6 mm (approx. 1/8 or 1/4 inch)...
Users Manual - English
Page 2
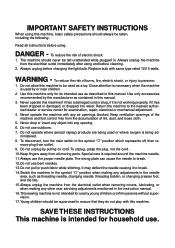
WARNING - Keep ventilation openings of lint, dust, and loose cloth. 5. The wrong plate can cause the needle to break. 12.Do not use outdoors. 7. SAVE THESE INSTRUCTIONS This machine is intended for examination, repair, electrical or mechanical adjustment. 4. Always unplug .... Always unplug before using. To reduce the risk of electric shock: 1. DANGER - Use this machine only for its intended use the proper needle plate. Do not use bent needles. 13.Do not pull or push fabric while stitching. To disconnect, turn the main switch to persons: 1. To unplug, grasp the plug,...
WARNING - Keep ventilation openings of lint, dust, and loose cloth. 5. The wrong plate can cause the needle to break. 12.Do not use outdoors. 7. SAVE THESE INSTRUCTIONS This machine is intended for examination, repair, electrical or mechanical adjustment. 4. Always unplug .... Always unplug before using. To reduce the risk of electric shock: 1. DANGER - Use this machine only for its intended use the proper needle plate. Do not use bent needles. 13.Do not pull or push fabric while stitching. To disconnect, turn the main switch to persons: 1. To unplug, grasp the plug,...
Users Manual - English
Page 5
... 22 Removing the presser foot holder (while cleaning, etc 22 ATTACHING THE OPTIONAL WALKING FOOT 23 FEED DOG 24 NEEDLE 25 Checking the needle 25 Installing the needle securely 25 FABRIC/THREAD/NEEDLE COMBINATION CHART 26 CHAPTER 2 1. CONTENTS BEFORE USE SEWING UTILITY STITCHES CONTENTS CHAPTER 1 BEFORE USE 4 PART NAMES ...order 44 13 14 Sewing stretch fabrics (" " and 44 Odd shaped buttons/Buttons that do not fit into the button holder plate 45 Changing the stitch length 46 Changing the stitch width 46 EYELET STITCH 47 Size of eyelet (actual size 47 ZIPPER INSERTION 48...
... 22 Removing the presser foot holder (while cleaning, etc 22 ATTACHING THE OPTIONAL WALKING FOOT 23 FEED DOG 24 NEEDLE 25 Checking the needle 25 Installing the needle securely 25 FABRIC/THREAD/NEEDLE COMBINATION CHART 26 CHAPTER 2 1. CONTENTS BEFORE USE SEWING UTILITY STITCHES CONTENTS CHAPTER 1 BEFORE USE 4 PART NAMES ...order 44 13 14 Sewing stretch fabrics (" " and 44 Odd shaped buttons/Buttons that do not fit into the button holder plate 45 Changing the stitch length 46 Changing the stitch width 46 EYELET STITCH 47 Size of eyelet (actual size 47 ZIPPER INSERTION 48...
Users Manual - English
Page 36
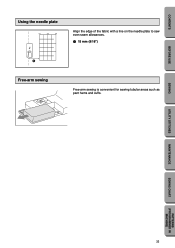
SEWING UTILITY STITCHES MAINTENANCE SEWING CHART PATTERNS (PROGRAMMED IN MACHINE) 33 CONTENTS BEFORE USE Using the needle plate 15 25 35 Align the edge of the fabric with a line on the needle plate to sew even seam allowances. 1 15 mm (9/16") 1 Free-arm sewing Free-arm sewing is convenient for sewing tubular areas such as pant hems and cuffs.
SEWING UTILITY STITCHES MAINTENANCE SEWING CHART PATTERNS (PROGRAMMED IN MACHINE) 33 CONTENTS BEFORE USE Using the needle plate 15 25 35 Align the edge of the fabric with a line on the needle plate to sew even seam allowances. 1 15 mm (9/16") 1 Free-arm sewing Free-arm sewing is convenient for sewing tubular areas such as pant hems and cuffs.
Users Manual - English
Page 42
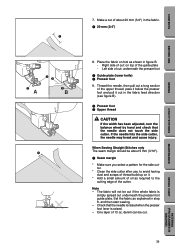
... CAUTION If the width has been adjusted, turn the balance wheel by hand and check that the needle is raised when the presser foot lever is simply spread out underneath the presser foot guide plate. Right side of cut of about 5 mm (3/16''). 1 Seam margin * Make sure you select... in step 8, and then start sewing. - MAINTENANCE SEWING CHART PATTERNS (PROGRAMMED IN MACHINE) 39 One layer of the guide plate - CONTENTS BEFORE USE SEWING UTILITY STITCHES 7. Thread the needle, then pull out a long section of cut if the whole fabric is raised. - The fabric will not be cut :...
... CAUTION If the width has been adjusted, turn the balance wheel by hand and check that the needle is raised when the presser foot lever is simply spread out underneath the presser foot guide plate. Right side of cut of about 5 mm (3/16''). 1 Seam margin * Make sure you select... in step 8, and then start sewing. - MAINTENANCE SEWING CHART PATTERNS (PROGRAMMED IN MACHINE) 39 One layer of the guide plate - CONTENTS BEFORE USE SEWING UTILITY STITCHES 7. Thread the needle, then pull out a long section of cut if the whole fabric is raised. - The fabric will not be cut :...

Users Manual - English
Page 68
... not set the thread in damage to the machine. Thread the twin needle by hand, from front to check the needle does not touch the needle plate. Types of the machine. MAINTENANCE SEWING CHART PATTERNS (PROGRAMMED IN MACHINE) 65 Thread the needle on the 5 needle bar. CAUTION Stitch width Adjust the stitch width. Set the extra...
... not set the thread in damage to the machine. Thread the twin needle by hand, from front to check the needle does not touch the needle plate. Types of the machine. MAINTENANCE SEWING CHART PATTERNS (PROGRAMMED IN MACHINE) 65 Thread the needle on the 5 needle bar. CAUTION Stitch width Adjust the stitch width. Set the extra...
Users Manual - English
Page 70
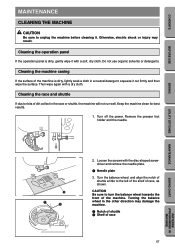
...injury may damage the machine. 1 Notch of shuttle 2 Shelf of the machine. Then wipe again with the disc-shaped screwdriver and remove the needle plate. 1 Needle plate 3. Turning the balance wheel in a neutral detergent, squeeze it out firmly and then wipe the surface. Cleaning the machine casing If the ... lightly soak a cloth in the other direction may result. Do not use organic solvents or detergents. Remove the presser foot holder and the needle. Cleaning the race and shuttle If dust or bits of race, as shown. Loosen the screws with a dry cloth. CAUTION Be sure ...
...injury may damage the machine. 1 Notch of shuttle 2 Shelf of the machine. Then wipe again with the disc-shaped screwdriver and remove the needle plate. 1 Needle plate 3. Turning the balance wheel in a neutral detergent, squeeze it out firmly and then wipe the surface. Cleaning the machine casing If the ... lightly soak a cloth in the other direction may result. Do not use organic solvents or detergents. Remove the presser foot holder and the needle. Cleaning the race and shuttle If dust or bits of race, as shown. Loosen the screws with a dry cloth. CAUTION Be sure ...
Users Manual - English
Page 71
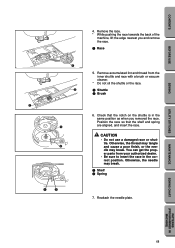
...shuttle and race with a brush or vacuum cleaner. * Do not oil the shuttle or the race. 1 Shuttle 2 Brush 6. Otherwise, the needle may break. MAINTENANCE SEWING CHART PATTERNS (PROGRAMMED IN MACHINE) 68 Remove the race. * While pushing the race towards the back of the machine... notch on the shuttle is in the correct position. CAUTION • Do not use a damaged race or shuttle. Reattach the needle plate. Otherwise, the thread may tangle and cause a poor finish, or the needle may break. 1 Shelf 2 Spring 7. CONTENTS BEFORE USE SEWING UTILITY STITCHES 5 6 5 6 1 1 2 1 2 12 4....
...shuttle and race with a brush or vacuum cleaner. * Do not oil the shuttle or the race. 1 Shuttle 2 Brush 6. Otherwise, the needle may break. MAINTENANCE SEWING CHART PATTERNS (PROGRAMMED IN MACHINE) 68 Remove the race. * While pushing the race towards the back of the machine... notch on the shuttle is in the correct position. CAUTION • Do not use a damaged race or shuttle. Reattach the needle plate. Otherwise, the thread may tangle and cause a poor finish, or the needle may break. 1 Shelf 2 Spring 7. CONTENTS BEFORE USE SEWING UTILITY STITCHES 5 6 5 6 1 1 2 1 2 12 4....
Users Manual - English
Page 73
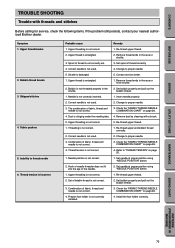
... still persists, contact your nearest authorized Brother dealer. Upper threading is not correct. 1. Correct needle is not used . 2. Combination of thread is not correct. 3. Needle position is not correct. 5. Set needle at proper position using "NEEDLE POSITION" button. 1. Set bobbin properly...not correct. 3. Upper threading is clinging under the needle plate. 4. Re-thread upper thread. 2. Set of the needle. 2. Combination of fabric, thread and needle is not correctly installed. 4. Check the "FABRIC/THREAD/NEEDLE COMBINATION CHART" on page 20. 1. Presser foot holder...
... still persists, contact your nearest authorized Brother dealer. Upper threading is not correct. 1. Correct needle is not used . 2. Combination of thread is not correct. 3. Needle position is not correct. 5. Set needle at proper position using "NEEDLE POSITION" button. 1. Set bobbin properly...not correct. 3. Upper threading is clinging under the needle plate. 4. Re-thread upper thread. 2. Set of the needle. 2. Combination of fabric, thread and needle is not correctly installed. 4. Check the "FABRIC/THREAD/NEEDLE COMBINATION CHART" on page 20. 1. Presser foot holder...

