Brother International CS-100T/4000 Support and Manuals
Get Help and Manuals for this Brother International item
View All Support Options Below
Free Brother International CS-100T/4000 manuals!
Problems with Brother International CS-100T/4000?
Ask a Question
Free Brother International CS-100T/4000 manuals!
Problems with Brother International CS-100T/4000?
Ask a Question
Popular Brother International CS-100T/4000 Manual Pages
Operation Manual - Page 2
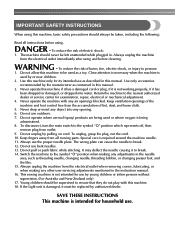
... this manual. Do not use the proper needle plate. It may deflect the needle causing it must be replaced by or near children.
2. Always unplug the machine from all instructions before ...unattended while plugged in the instruction manual. 16. SAVE THESE INSTRUCTIONS This machine is damaged, it to ensure that they do not play with any other user servicing adjustments mentioned in . Close...
Operation Manual - Page 4
....
For a longer service life 1. For repair or adjustment In the event a malfunction occurs or adjustment is completed • Replacing or removing the needle or any assemblies, the presser feet, needle, or other moving parts. 2. For additional product information and updates, visit our web site at www.brother.com The contents of this manual and specifications of this machine...
Operation Manual - Page 7
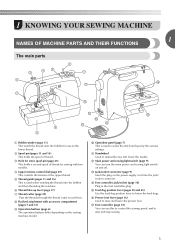
...settings. 1 KNOWING YOUR SEWING MACHINE
1
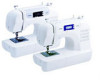
NAMES OF MACHINE PARTS AND THEIR FUNCTIONS
The main parts
a Bobbin winder (page 11) This winds the thread onto the bobbin for sewing with accessory compartment (pages 7 and 31)
i Operation buttons (page 6) The operation buttons differ depending on the sewing machine model...the threads through the thread cutter to manually raise and lower the needle.
o ...
Operation Manual - Page 8
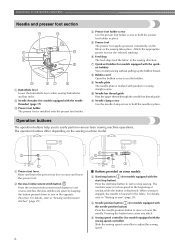
e Presser foot The presser foot applies pressure consistently on the sewing machine model. g Quick-set the bobbin.
When sewing is stopped, the needle is depressed. e Sewing speed controller (for models equipped with guides for models equipped with the needle threader) (page 17)
c Presser foot holder The presser foot is marked with the sewing speed controller) Slide...
Operation Manual - Page 10
...
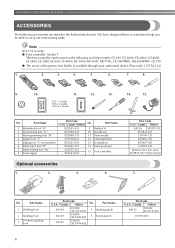
Part Code U.S.A. / Canada Others
No. Part Name
XC2691-031
9 Bobbin (4)
XC3098-031
10 Needle set
X53840-331
11 Twin needle
X59370-021
12 Cleaning brush
XC3021-031
13 Screwdriver
XC4051-031
14 Extra spool pin
X59375-121 X54243-001
15 Foot controller
Optional accessories
1.
2.
3.
4.
KNOWING YOUR SEWING MACHINE
ACCESSORIES
The following machine models: CS-100, CS-6000, CS...
Operation Manual - Page 17
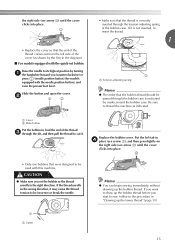
...passed through the bobbin case is indicated by the line in the diagram).
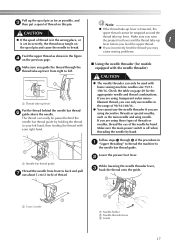
■ For models equipped with the quick-set the bobbin so the thread unrolls in the right direction. the right side (see arrow... b) until the cover clicks into place.
• Replace the cover so that the end of the ...
Operation Manual - Page 18
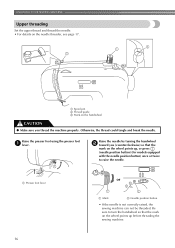
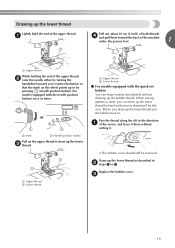
... Spool pin b Thread guide c Mark on the handwheel
CAUTION
● Make sure you (counterclockwise) so that the mark on the wheel points up , or press (needle position button) (for models equipped with the needle ...thread could tangle and break the needle. KNOWING YOUR SEWING MACHINE
Upper threading
Set the upper thread and thread the needle. • For details on the wheel points up before...
Operation Manual - Page 19
... in the wrong place, or is set incorrectly, the thread may
cause sewing problems.
■ Using the needle threader ...(for the appropriate needle and thread combinations. CAUTION
● If the spool of thread on page 20 for models equipped with the needle threader)
CAUTION
a Thread take-up lever
Put the thread behind the needle bar thread guide...
Operation Manual - Page 21
or
a Mark
b Needle position button
Pull on the wheel points up or by pressing (needle position button) (for models equipped with the quick-set bobbin You can draw up the bobbin thread. Pass the thread along the slit in the direction a of the arrow, and ... up the lower thread as described in b steps 1 to draw up the lower thread, put the bobbin back in. Replace the bobbin cover.
Operation Manual - Page 25
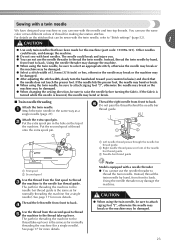
...be sure to back. b Put the extra spool pin in front of the needle bar thread guide. a First spool b Second spool
Use the thread from front to attach zigzag foot "J", ...thread from front to "Stitch settings" (page 52).
1
CAUTION
● Use only twin needles that can be damaged.
23 c Needle bar thread guide
Note
Models equipped with this machine (part code: 131096-121). Using the ...
Operation Manual - Page 32
...the needle is selected. After you (counterclockwise) or by pressing (needle position button) once (for models equipped with your project.
CAUTION
● When using the twin needle, be achieved.
Turn the ...the needle either by turning the handwheel toward you select a stitch, the machine automatically sets the stitch width and length for the stitch that is lowered, the needle may not...
Operation Manual - Page 35
... key b Left needle position c Right needle position
33 Application
Stitch Width [mm (inch.)]
Stitch Length [mm (inch.)]
Auto Manual Auto Manual
Straight Pattern
Presser Foot 70 stitches
model 60 stitches
model 50 stitches
model 40 stitches
model Twin Needle Walking Foot
Reverse/ Reinforcement
Stitching
Left
J
00
00
00
00
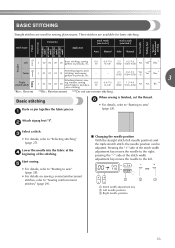
Basic stitching, sewing gathers or pintucks, etc...
Operation Manual - Page 48
... be sewn.
a Set the button guide plate on the presser...model 50 stitches model 40 stitches model Twin Needle Walking Foot
Reverse/ Reinforcement
Stitching
Stitch Name
Pattern No. c
• For details, refer to "Starting to sew" (page 28).
b
46 a
Select stitch .
Attach buttonhole foot "A". Application
Stitch Width [mm (inch.)]
Stitch Length [mm (inch.)]
Auto Manual Auto Manual...
Operation Manual - Page 54
... Auto Manual
Left
Center
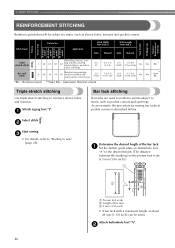
Triple stretch stitch
Stretch stitch
Zigzag stitch
3-point zigzag stitch
J
00
00
00
00
Basic stitching, sewing gathers or pintucks, etc.
0.0 (0)
0.0-7.0 (0-1/4)
2.5 (3/32)
0.2-5.0 (1/64-3/16)
No
Ye*s** Rev. *
Attaching zippers, basic
J 01 01 01 01 stitching, and sewing
-
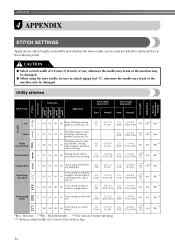
APPENDIX
4 APPENDIX
STITCH SETTINGS
Applications, stitch lengths and widths...
Operation Manual - Page 64
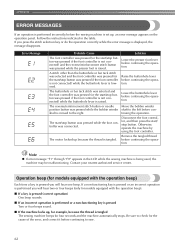
...the machine by using the foot controller. Contact your nearest authorized service center. Be sure to check for four seconds and the ...up , an error message appears on the operation panel.
Remove the tangled thread before continuing the operation. Follow the instructions indicated in the ...stop button. Operation beep (for models equipped with the operation beep)
Each time a key is pressed ...
Brother International CS-100T/4000 Reviews
We have not received any reviews for Brother International yet.