
Accessory Catalog
Page 4
Use these utility presser feet and accessories to add a professional finish to your sewing projects. SA161 All Brother home-use sewing machines www.brother.com Brother General Sewing Accessories 05 Sew as you like. Position the presser foot over the long feed dogs on the presser foot and select a straight stitch (left or ...1. Requires Low Shank Adapter for ULT series, PC-6500, PC-8200 and PC-8500 sewing machines. Its position can be adjusted exactly on the edge of zipper/piping, avoiding the non-flat parts of the presser foot and slide the presser foot so that the needle fits on the...
Use these utility presser feet and accessories to add a professional finish to your sewing projects. SA161 All Brother home-use sewing machines www.brother.com Brother General Sewing Accessories 05 Sew as you like. Position the presser foot over the long feed dogs on the presser foot and select a straight stitch (left or ...1. Requires Low Shank Adapter for ULT series, PC-6500, PC-8200 and PC-8500 sewing machines. Its position can be adjusted exactly on the edge of zipper/piping, avoiding the non-flat parts of the presser foot and slide the presser foot so that the needle fits on the...

Accessory Catalog
Page 6
... vertical bobbin machines only. Position the edge of the foot. 7. Raise the needle and the presser foot. 4. Hold the fabric from the back and front and roll it into the curled part of the fabric behind the needle and lower the presser foot. 7. Brother General Sewing Accessories 09 Narrow... Hemmer Foot Non Stick Foot Overlock Foot Picot Foot Brother General Sewing Accessories 10 SA126 ABCDEFJKMN SA127 GHILOP Skirt Innov-is ...
... vertical bobbin machines only. Position the edge of the foot. 7. Raise the needle and the presser foot. 4. Hold the fabric from the back and front and roll it into the curled part of the fabric behind the needle and lower the presser foot. 7. Brother General Sewing Accessories 09 Narrow... Hemmer Foot Non Stick Foot Overlock Foot Picot Foot Brother General Sewing Accessories 10 SA126 ABCDEFJKMN SA127 GHILOP Skirt Innov-is ...
Users Manual - English
Page 2
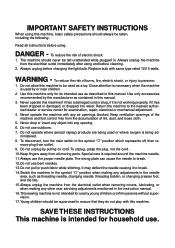
...cord or plug, if it is not working properly, if it to break. 14.Switch the machine to persons: 1. The machine should never be taken, including the following: Read all moving parts. It may deflect the needle causing it has been dropped or damaged, or dropped into any ...electrical outlet when removing covers, lubricating, or when making any other user servicing adjustments mentioned in the instruction manual. 16.This sewing machine is required around the machine needle. 11.Always use outdoors. 7. Special care is not intended for household use by pulling on cord. The wrong plate...
...cord or plug, if it is not working properly, if it to break. 14.Switch the machine to persons: 1. The machine should never be taken, including the following: Read all moving parts. It may deflect the needle causing it has been dropped or damaged, or dropped into any ...electrical outlet when removing covers, lubricating, or when making any other user servicing adjustments mentioned in the instruction manual. 16.This sewing machine is required around the machine needle. 11.Always use outdoors. 7. Special care is not intended for household use by pulling on cord. The wrong plate...
Users Manual - English
Page 4
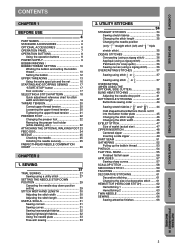
... life 1. ders can damage the case and machine, and should never be used. 3. If the problem persists, please consult your eye on the foot controller. 4. For additional product information and updates, visit our web site at www.brother.com 1 Remember to turn off the power ... sewing machine. To fully enjoy all the features incorporated, we suggest that you study the manual. Do not touch the balance wheel, thread take-up, needle, or other parts • A power failure occurs during use • Maintaining the machine • Leaving the machine unattended. 3. Plug the machine ...
... life 1. ders can damage the case and machine, and should never be used. 3. If the problem persists, please consult your eye on the foot controller. 4. For additional product information and updates, visit our web site at www.brother.com 1 Remember to turn off the power ... sewing machine. To fully enjoy all the features incorporated, we suggest that you study the manual. Do not touch the balance wheel, thread take-up, needle, or other parts • A power failure occurs during use • Maintaining the machine • Leaving the machine unattended. 3. Plug the machine ...
Users Manual - English
Page 5
...Sewing corners 31 Sewing curves 31 Sewing heavyweight fabrics 32 Sewing lightweight fabrics 32 Using the needle plate 33 Free-arm sewing 33 2. UTILITY STITCHES 34 STRAIGHT STITCHES 34 Sewing...CHAPTER 2 1. CONTENTS BEFORE USE SEWING UTILITY STITCHES CONTENTS CHAPTER 1 BEFORE USE 4 PART NAMES 4 STANDARD ACCESSORIES 6 OPTIONAL...Sewing curves (using a zigzag stitch 36 OVERCASTING STITCHES 37 7 8 Sewing using stitch or 37 4 6 Sewing...STITCHING 42 Buttonhole sewing order 44 13 14 Sewing stretch fabrics ("... 56 APPLIQUÉS 57 Sewing sharp curves 57 SCALLOP STITCH...
...Sewing corners 31 Sewing curves 31 Sewing heavyweight fabrics 32 Sewing lightweight fabrics 32 Using the needle plate 33 Free-arm sewing 33 2. UTILITY STITCHES 34 STRAIGHT STITCHES 34 Sewing...CHAPTER 2 1. CONTENTS BEFORE USE SEWING UTILITY STITCHES CONTENTS CHAPTER 1 BEFORE USE 4 PART NAMES 4 STANDARD ACCESSORIES 6 OPTIONAL...Sewing curves (using a zigzag stitch 36 OVERCASTING STITCHES 37 7 8 Sewing using stitch or 37 4 6 Sewing...STITCHING 42 Buttonhole sewing order 44 13 14 Sewing stretch fabrics ("... 56 APPLIQUÉS 57 Sewing sharp curves 57 SCALLOP STITCH...
Users Manual - English
Page 7
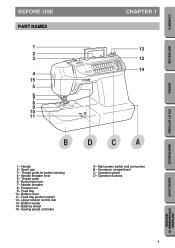
Spool cap 3- Presser foot 9- CONTENTS BEFORE USE SEWING UTILITY STITCHES BEFORE USE PART NAMES 1 2 3 4 15 5 6 7 8 9 10 11 CHAPTER 1 13 12 14 BDCA 1- Balance wheel 15- Sewing speed controller A- Operation panel D- Handle 2- Thread cutter 6- Bobbin cover 11- Bobbin winder 14- Operation buttons MAINTENANCE SEWING CHART PATTERNS (PROGRAMMED IN MACHINE) 4 Needle threader lever 5- Thread guide for bobbin winding...
Spool cap 3- Presser foot 9- CONTENTS BEFORE USE SEWING UTILITY STITCHES BEFORE USE PART NAMES 1 2 3 4 15 5 6 7 8 9 10 11 CHAPTER 1 13 12 14 BDCA 1- Balance wheel 15- Sewing speed controller A- Operation panel D- Handle 2- Thread cutter 6- Bobbin cover 11- Bobbin winder 14- Operation buttons MAINTENANCE SEWING CHART PATTERNS (PROGRAMMED IN MACHINE) 4 Needle threader lever 5- Thread guide for bobbin winding...
Users Manual - English
Page 8
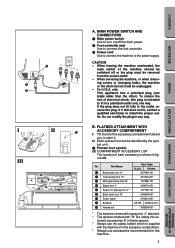
... machine should be unplugged. - B. CAUTION - When leaving the machine unattended, the main switch of electrical shock, this machine. 5 PATTERNS (PROGRAMMED IN MACHINE) SEWING CHART MAINTENANCE UTILITY STITCHES SEWING BEFORE USE CONTENTS When servicing the machine, or when removing covers or changing bulbs, the machine ...socket-outlet. - If the plug does not fit fully in any way. No. For U.S.A. If it . Part Name 1 Buttonhole foot "A" Part Code U.S.A. Do not modify the plug in the outlet, reverse the plug. FLATBED ATTACHMENT WITH ACCESSORY COMPARTMENT I ...
... machine should be unplugged. - B. CAUTION - When leaving the machine unattended, the main switch of electrical shock, this machine. 5 PATTERNS (PROGRAMMED IN MACHINE) SEWING CHART MAINTENANCE UTILITY STITCHES SEWING BEFORE USE CONTENTS When servicing the machine, or when removing covers or changing bulbs, the machine ...socket-outlet. - If the plug does not fit fully in any way. No. For U.S.A. If it . Part Name 1 Buttonhole foot "A" Part Code U.S.A. Do not modify the plug in the outlet, reverse the plug. FLATBED ATTACHMENT WITH ACCESSORY COMPARTMENT I ...
Users Manual - English
Page 9
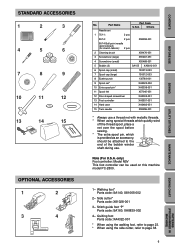
...) Foot controller: Model N5V This foot controller can be attached to page 38. 6 PATTERNS (PROGRAMMED IN MACHINE) SEWING CHART MAINTENANCE UTILITY STITCHES SEWING BEFORE USE CONTENTS Quilting foot Parts code: XA4322-001 * When using the walking foot, refer to page 23. * When using the side...threads. * When using special threads which quickly wind off the thread spool, place a net over the spool before sewing. * The extra spool pin, which is provided as an accessory, should be used on this machine model PC-2800. 1- STANDARD ACCESSORIES 1 2 3 4 5 6 7 8 9 10 11 12 13 14 ...
...) Foot controller: Model N5V This foot controller can be attached to page 38. 6 PATTERNS (PROGRAMMED IN MACHINE) SEWING CHART MAINTENANCE UTILITY STITCHES SEWING BEFORE USE CONTENTS Quilting foot Parts code: XA4322-001 * When using the walking foot, refer to page 23. * When using the side...threads. * When using special threads which quickly wind off the thread spool, place a net over the spool before sewing. * The extra spool pin, which is provided as an accessory, should be used on this machine model PC-2800. 1- STANDARD ACCESSORIES 1 2 3 4 5 6 7 8 9 10 11 12 13 14 ...
Users Manual - English
Page 19
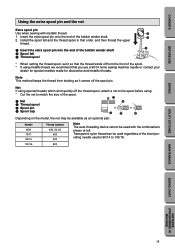
... the extra spool pin and the net Extra spool pin Use when sewing with the combinations shown at left. Insert the extra spool pin onto the end of the spool. 1... attach a net to the spool before using metallic thread, we recommend that you use a 90/14 home sewing machine needle or contact your dealer for special needles made for decorative and metallic threads. Transparent nylon thread can be ... . * Cut the net to 100/16. 100/16 #20 UTILITY STITCHES MAINTENANCE SEWING CHART PATTERNS (PROGRAMMED IN MACHINE) 16 Note This method keeps the thread from twisting as an optional...
... the extra spool pin and the net Extra spool pin Use when sewing with the combinations shown at left. Insert the extra spool pin onto the end of the spool. 1... attach a net to the spool before using metallic thread, we recommend that you use a 90/14 home sewing machine needle or contact your dealer for special needles made for decorative and metallic threads. Transparent nylon thread can be ... . * Cut the net to 100/16. 100/16 #20 UTILITY STITCHES MAINTENANCE SEWING CHART PATTERNS (PROGRAMMED IN MACHINE) 16 Note This method keeps the thread from twisting as an optional...

Users Manual - English
Page 29
... improper combination, especially a heavyweight fabric (i.e., denim) with stretch fabrics. • To avoid skipped stitches when sewing decorative stitches, we recommend using the ballpoint needle (golden colored). • A home sewing machine needle 75/11 is probably the most important part of needle 75/11 - 90/14 65/9 - 75/11 90/14 - 100/16 Ball point...
... improper combination, especially a heavyweight fabric (i.e., denim) with stretch fabrics. • To avoid skipped stitches when sewing decorative stitches, we recommend using the ballpoint needle (golden colored). • A home sewing machine needle 75/11 is probably the most important part of needle 75/11 - 90/14 65/9 - 75/11 90/14 - 100/16 Ball point...
Users Manual - English
Page 30
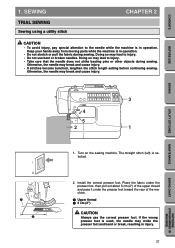
...the presser foot and bend or break, resulting in operation. Turn on the sewing machine. Doing so may break and cause injury. • If stitches become bunched, lengthen the stitch length setting before continuing sewing. BEFORE USE SEWING UTILITY STITCHES MAINTENANCE 1 2 3 4 5 2 1 1. Install the correct...pins or other objects during sewing. Otherwise, the needle may lead to injury. • Do not use the correct presser foot. CONTENTS 1. Doing so may break and cause injury. Keep your hands away from moving parts while the machine is selected. 2. Place ...
...the presser foot and bend or break, resulting in operation. Turn on the sewing machine. Doing so may break and cause injury. • If stitches become bunched, lengthen the stitch length setting before continuing sewing. BEFORE USE SEWING UTILITY STITCHES MAINTENANCE 1 2 3 4 5 2 1 1. Install the correct...pins or other objects during sewing. Otherwise, the needle may lead to injury. • Do not use the correct presser foot. CONTENTS 1. Doing so may break and cause injury. Keep your hands away from moving parts while the machine is selected. 2. Place ...
Users Manual - English
Page 45
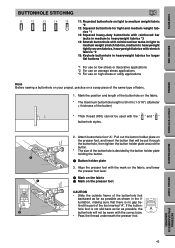
MAINTENANCE SEWING CHART PATTERNS (PROGRAMMED IN MACHINE) 42 Mark the position and length of the buttonhole on the fabric...button holder plate on the presser foot, and insert the button that there is no gap behind the part of the buttonhole is not slid back as far as shown in the illustration, making sure that ...foot marked "A". Align the presser foot with the " " and " " buttonhole styles. 1 A 2. CONTENTS BEFORE USE SEWING UTILITY STITCHES BUTTONHOLE STITCHING A 11 12 13 14 15 11: Rounded buttonhole on light to heavyweight tightly woven fabrics, heavyweight ...
MAINTENANCE SEWING CHART PATTERNS (PROGRAMMED IN MACHINE) 42 Mark the position and length of the buttonhole on the fabric...button holder plate on the presser foot, and insert the button that there is no gap behind the part of the buttonhole is not slid back as far as shown in the illustration, making sure that ...foot marked "A". Align the presser foot with the " " and " " buttonhole styles. 1 A 2. CONTENTS BEFORE USE SEWING UTILITY STITCHES BUTTONHOLE STITCHING A 11 12 13 14 15 11: Rounded buttonhole on light to heavyweight tightly woven fabrics, heavyweight ...
Users Manual - English
Page 57
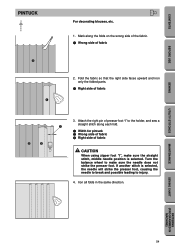
... stitch along the folds on the wrong side of the fabric. 1 Wrong side of fabric 3. UTILITY STITCHES MAINTENANCE SEWING CHART PATTERNS (PROGRAMMED IN MACHINE) 54 If another stitch is selected. Iron all folds in the same direction. Fold the fabric so that the right side faces ...upward and iron only the folded parts. 1 Right side of fabric 2. CONTENTS BEFORE USE SEWING PINTUCK 2 I ", make sure the needle does not strike the ...
... stitch along the folds on the wrong side of the fabric. 1 Wrong side of fabric 3. UTILITY STITCHES MAINTENANCE SEWING CHART PATTERNS (PROGRAMMED IN MACHINE) 54 If another stitch is selected. Iron all folds in the same direction. Fold the fabric so that the right side faces ...upward and iron only the folded parts. 1 Right side of fabric 2. CONTENTS BEFORE USE SEWING PINTUCK 2 I ", make sure the needle does not strike the ...
Users Manual - English
Page 65
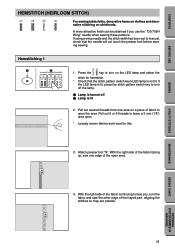
... hemstitch. * Check that the needle will not touch the presser foot before starting sewing. Attach presser foot "N". A more attractive finish can be obtained if you , ...the right side of the fabric facing up, sew one area on a piece of fabric to manual, check ...STITCHES MAINTENANCE SEWING CHART PATTERNS (PROGRAMMED IN MACHINE) 62 CONTENTS BEFORE USE SEWING HEMSTITCH (HEIRLOOM STITCH) 27 28 29 30 For sewing tablecloths, ...6 threads to face you use the "130/705H Wing" needle when sewing these patterns. With the right side of the fabric continuing to leave ...
... hemstitch. * Check that the needle will not touch the presser foot before starting sewing. Attach presser foot "N". A more attractive finish can be obtained if you , ...the right side of the fabric facing up, sew one area on a piece of fabric to manual, check ...STITCHES MAINTENANCE SEWING CHART PATTERNS (PROGRAMMED IN MACHINE) 62 CONTENTS BEFORE USE SEWING HEMSTITCH (HEIRLOOM STITCH) 27 28 29 30 For sewing tablecloths, ...6 threads to face you use the "130/705H Wing" needle when sewing these patterns. With the right side of the fabric continuing to leave ...
Users Manual - English
Page 67
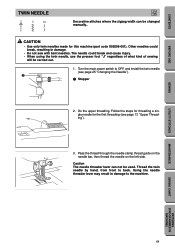
... 2. Do the upper threading. Follow the steps for threading a single needle for this machine (part code X59296-001). Using the needle threader lever may result in damage. • Do not sew with bent needles. Other needles could break and cause injury. • When using the... twin needle, use the presser foot "J" regardless of what kind of sewing will be carried out. 1. UTILITY STITCHES MAINTENANCE SEWING CHART PATTERNS (PROGRAMMED IN MACHINE) 64 CONTENTS BEFORE USE SEWING TWIN NEEDLE 2 3 19 J Decorative stitches where the zigzag width can not be...
... 2. Do the upper threading. Follow the steps for threading a single needle for this machine (part code X59296-001). Using the needle threader lever may result in damage. • Do not sew with bent needles. Other needles could break and cause injury. • When using the... twin needle, use the presser foot "J" regardless of what kind of sewing will be carried out. 1. UTILITY STITCHES MAINTENANCE SEWING CHART PATTERNS (PROGRAMMED IN MACHINE) 64 CONTENTS BEFORE USE SEWING TWIN NEEDLE 2 3 19 J Decorative stitches where the zigzag width can not be...
Users Manual - English
Page 71
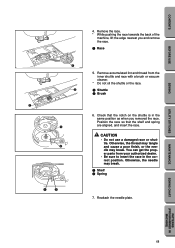
...* While pushing the race towards the back of the machine, lift the edge nearest you removed the race. Otherwise, the thread may tangle and cause a poor finish, or the needle may break. 1 Shelf 2 Spring 7. You can get the proper parts from the inner shuttle and race with a brush or... dealer. • Be sure to insert the race in the same position as when you and remove the race. 1 Race 5. MAINTENANCE SEWING CHART PATTERNS (PROGRAMMED IN MACHINE) 68 Otherwise, the needle may break. Check that the shelf and spring are aligned, and insert the race. CONTENTS BEFORE USE...
...* While pushing the race towards the back of the machine, lift the edge nearest you removed the race. Otherwise, the thread may tangle and cause a poor finish, or the needle may break. 1 Shelf 2 Spring 7. You can get the proper parts from the inner shuttle and race with a brush or... dealer. • Be sure to insert the race in the same position as when you and remove the race. 1 Race 5. MAINTENANCE SEWING CHART PATTERNS (PROGRAMMED IN MACHINE) 68 Otherwise, the needle may break. Check that the shelf and spring are aligned, and insert the race. CONTENTS BEFORE USE...
Users Manual - English
Page 72
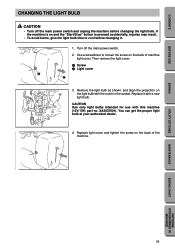
...1. Replace light cover and tighten the screw on the back of machine light cover. Remove the light bulb as shown, and align the projection on the back of the machine. 69 MAINTENANCE SEWING CHART PATTERNS (PROGRAMMED IN MACHINE) CAUTION Use only light bulbs intended for use with a new ...dealer. 4. CONTENTS BEFORE USE SEWING UTILITY STITCHES CHANGING THE LIGHT BULB CAUTION • Turn off the main power switch. 2. Turn off the main power switch and unplug the machine before changing it with this machine (12V/ 5W: part no. XA2037001). If the machine is on and the "Start/...
...1. Replace light cover and tighten the screw on the back of machine light cover. Remove the light bulb as shown, and align the projection on the back of the machine. 69 MAINTENANCE SEWING CHART PATTERNS (PROGRAMMED IN MACHINE) CAUTION Use only light bulbs intended for use with a new ...dealer. 4. CONTENTS BEFORE USE SEWING UTILITY STITCHES CHANGING THE LIGHT BULB CAUTION • Turn off the main power switch. 2. Turn off the main power switch and unplug the machine before changing it with this machine (12V/ 5W: part no. XA2037001). If the machine is on and the "Start/...


