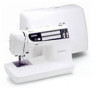

Accessory Catalog
Page 6
...and sew 2-3 stitches. 4. Lower the needle into the curled part of the fabric. Attach the presser foot. 3. Sew along the guide. Increase upper thread tension. 2. Hold the fabric from the edge and sew 2-3 stitches. 3. Raise the needle and the presser foot. 4. Non Stick Foot Designed for details.) www....brother.com Select a desired stitch and sew. Continue to sew to the end of the foot. 6. Slowly sew 2-3 stitches, making sure the fabric is ...
...and sew 2-3 stitches. 4. Lower the needle into the curled part of the fabric. Attach the presser foot. 3. Sew along the guide. Increase upper thread tension. 2. Hold the fabric from the edge and sew 2-3 stitches. 3. Raise the needle and the presser foot. 4. Non Stick Foot Designed for details.) www....brother.com Select a desired stitch and sew. Continue to sew to the end of the foot. 6. Slowly sew 2-3 stitches, making sure the fabric is ...

Accessory Catalog
Page 12
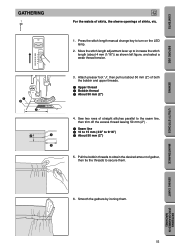
...for gathering fabrics. Adjust the upper thread tension. 2. Create 3-D loops and fringe with dense stitches. Increase the upper thread tension. 3. Adding decorative stitches over seams or patterns: Line up to 4 mm in size. SA150 ABCDEFJKMN www.brother.com Gathering Foot Used for edge-stitching ... on your fabric. 3. Line up , under the presser foot. For appliqué: 1. Requires Low Shank Adapter for details.) Brother Embellishment Feet Open Toe Foot 22 Pearls and Sequins Foot Metal type SA146 IP Open Toe Foot Provides better visibility in groove of appliqu...
...for gathering fabrics. Adjust the upper thread tension. 2. Create 3-D loops and fringe with dense stitches. Increase the upper thread tension. 3. Adding decorative stitches over seams or patterns: Line up to 4 mm in size. SA150 ABCDEFJKMN www.brother.com Gathering Foot Used for edge-stitching ... on your fabric. 3. Line up , under the presser foot. For appliqué: 1. Requires Low Shank Adapter for details.) Brother Embellishment Feet Open Toe Foot 22 Pearls and Sequins Foot Metal type SA146 IP Open Toe Foot Provides better visibility in groove of appliqu...

Accessory Catalog
Page 34
..., made in a fun assortment of fabrics. This metallic thread can be used on a wide range of colors specifically designed for Brother Embroidery machines, but compatible with other sewing and embroidery machine brands. Available in a 14-Pack and individual colors (sold in ... and made for brightness and durability to the needle thread. Dependable thread delivery through machine tensions. Brother Embroidery Accessories PacesetterTM Polyester Threads 65 Brother Country Yarn Embroidery Threads Metallic Threads For the best embroidery results, use these embroidery threads especially designed...
..., made in a fun assortment of fabrics. This metallic thread can be used on a wide range of colors specifically designed for Brother Embroidery machines, but compatible with other sewing and embroidery machine brands. Available in a 14-Pack and individual colors (sold in ... and made for brightness and durability to the needle thread. Dependable thread delivery through machine tensions. Brother Embroidery Accessories PacesetterTM Polyester Threads 65 Brother Country Yarn Embroidery Threads Metallic Threads For the best embroidery results, use these embroidery threads especially designed...

Accessory Catalog
Page 38
...3 thread overlock, stitch length to pearl size, stitch width to the guide on your machine. 2. SA210 Party Bag SA212 Piping Foot Taping Foot Brother Serger/ Overlock Feet 74 Piping Foot Sews piping tapes with two pieces of pearls/beads onto the tunnel and then sew. Note: When the fabrics... gather, tighten the thread tension. Set the machine setting: 3/4 thread overlock, stitch length to 3 - 4mm for tape attaching, 4 - 5mm for string of 3 to 1.5 mm from 5 mm,...
...3 thread overlock, stitch length to pearl size, stitch width to the guide on your machine. 2. SA210 Party Bag SA212 Piping Foot Taping Foot Brother Serger/ Overlock Feet 74 Piping Foot Sews piping tapes with two pieces of pearls/beads onto the tunnel and then sew. Note: When the fabrics... gather, tighten the thread tension. Set the machine setting: 3/4 thread overlock, stitch length to 3 - 4mm for tape attaching, 4 - 5mm for string of 3 to 1.5 mm from 5 mm,...
Users Manual - English
Page 5
... a zigzag stitch 36 Appliqué (using a zigzag stitch 36 Patchwork (for stitch width and stitch length 19 THREAD TENSION 20 Correct upper thread tension 20 Loosening the upper thread tension 20 Tightening the upper thread tension 21 PRESSER FOOT 22 Changing the presser foot 22 Removing the presser foot holder (while cleaning, etc 22...
... a zigzag stitch 36 Appliqué (using a zigzag stitch 36 Patchwork (for stitch width and stitch length 19 THREAD TENSION 20 Correct upper thread tension 20 Loosening the upper thread tension 20 Tightening the upper thread tension 21 PRESSER FOOT 22 Changing the presser foot 22 Removing the presser foot holder (while cleaning, etc 22...
Users Manual - English
Page 7
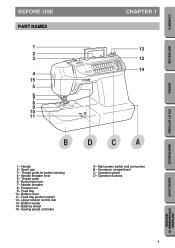
Thread guide for bobbin winding 4- Thread cutter 6- Sewing speed controller A- Upper tension control dial 13- Needle threader 8- Feed dog position switch 12- Accessory compartment C- Needle threader lever 5- Buttonhole lever 7- Operation panel D- Feed dog 10- Operation buttons MAINTENANCE ...
Thread guide for bobbin winding 4- Thread cutter 6- Sewing speed controller A- Upper tension control dial 13- Needle threader 8- Feed dog position switch 12- Accessory compartment C- Needle threader lever 5- Buttonhole lever 7- Operation panel D- Feed dog 10- Operation buttons MAINTENANCE ...
Users Manual - English
Page 15
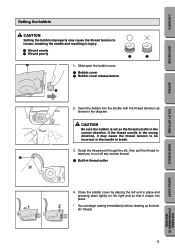
... the bobbin cover by placing the left end in place and pressing down lightly on the right end so that it may cause the thread tension to loosen, breaking the needle and resulting in the diagram. Guide the thread end through the slit, then pull the thread toward you to ... in injury. 1 Wound evenly 2 Wound poorly 1 2 1 1. CONTENTS BEFORE USE SEWING UTILITY STITCHES Setting the bobbin CAUTION Setting the bobbin improperly may cause the thread tension to be incorrect or the needle to break. 3. Slide open the bobbin cover. 1 Bobbin cover 2 Bobbin cover release button 2 2.
... the bobbin cover by placing the left end in place and pressing down lightly on the right end so that it may cause the thread tension to loosen, breaking the needle and resulting in the diagram. Guide the thread end through the slit, then pull the thread toward you to ... in injury. 1 Wound evenly 2 Wound poorly 1 2 1 1. CONTENTS BEFORE USE SEWING UTILITY STITCHES Setting the bobbin CAUTION Setting the bobbin improperly may cause the thread tension to be incorrect or the needle to break. 3. Slide open the bobbin cover. 1 Bobbin cover 2 Bobbin cover release button 2 2.
Users Manual - English
Page 17
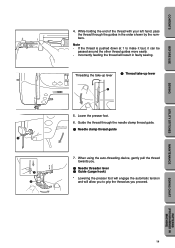
... thread is pushed down at 1 to grip the thread as you . 1 Needle threader lever 2 Guide (Large hook) * Lowering the presser foot will engage the automatic tension and will result in the order shown by the numbers. Guide the thread through the guides in faulty sewing. While holding the end of the...
... thread is pushed down at 1 to grip the thread as you . 1 Needle threader lever 2 Guide (Large hook) * Lowering the presser foot will engage the automatic tension and will result in the order shown by the numbers. Guide the thread through the guides in faulty sewing. While holding the end of the...
Users Manual - English
Page 18
... lowest position, pull the thread in the range of the needle's eye and catch it out from the machine or damage may occur to the tension unit. When using your right hand slightly to thread the needle when you are using transparent nylon mono-filament thread, only needles in front of...
... lowest position, pull the thread in the range of the needle's eye and catch it out from the machine or damage may occur to the tension unit. When using your right hand slightly to thread the needle when you are using transparent nylon mono-filament thread, only needles in front of...
Users Manual - English
Page 23
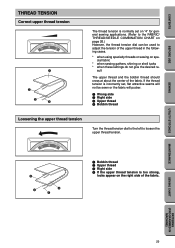
...appear on the right side of the upper thread in the following cases. * when using specialty threads or sewing on page 26.) However, the thread tension dial can be sewn or the fabric will not be used to the FABRIC/ THREAD/NEEDLE COMBINATION CHART on special fabric * when sewing gathers, shirring... or shell tucks * when these settings do not give the desired re- If the thread tension is incorrectly set, flat attractive seams will pucker. 1 Wrong side 2 Right side 3 Upper thread 4 Bobbin thread Loosening the upper thread...
...appear on the right side of the upper thread in the following cases. * when using specialty threads or sewing on page 26.) However, the thread tension dial can be sewn or the fabric will not be used to the FABRIC/ THREAD/NEEDLE COMBINATION CHART on special fabric * when sewing gathers, shirring... or shell tucks * when these settings do not give the desired re- If the thread tension is incorrectly set, flat attractive seams will pucker. 1 Wrong side 2 Right side 3 Upper thread 4 Bobbin thread Loosening the upper thread...

Users Manual - English
Page 24
CONTENTS BEFORE USE Tightening the upper thread tension Turn the thread tension dial to the right to tighten the upper thread tension. 543 6 2 4 3 1 Upper thread 2 Bobbin thread 3 Wrong side 4 If the upper thread tension is too weak, locks appear on the wrong side of the fabric. 1 2 SEWING UTILITY STITCHES MAINTENANCE SEWING CHART PATTERNS (PROGRAMMED IN MACHINE) 21
CONTENTS BEFORE USE Tightening the upper thread tension Turn the thread tension dial to the right to tighten the upper thread tension. 543 6 2 4 3 1 Upper thread 2 Bobbin thread 3 Wrong side 4 If the upper thread tension is too weak, locks appear on the wrong side of the fabric. 1 2 SEWING UTILITY STITCHES MAINTENANCE SEWING CHART PATTERNS (PROGRAMMED IN MACHINE) 21
Users Manual - English
Page 25
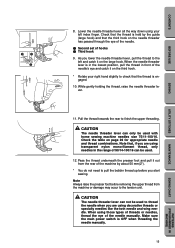
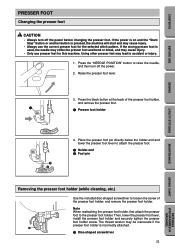
... turn off the power. 2. Then, lower the presser foot lever, install the presser foot holder and securely tighten the presser foot holder screw. The thread tension may lead to the presser foot holder. If the power is on and the "Start/ Stop" button or another button is incorrectly attached. 1 Disc-shaped...
... turn off the power. 2. Then, lower the presser foot lever, install the presser foot holder and securely tighten the presser foot holder screw. The thread tension may lead to the presser foot holder. If the power is on and the "Start/ Stop" button or another button is incorrectly attached. 1 Disc-shaped...
Users Manual - English
Page 35
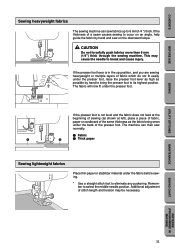
... or stabilizer material under the fabric before sewing. * Use a straight stitch foot to select the middle needle position. If the thickness of stitch length and tension may cause the needle to 6 mm(1/4 '') thick. CAUTION Do not forcefully push fabrics more than 6 mm (1/4'') thick through the sewing machine. UTILITY STITCHES MAINTENANCE SEWING...
... or stabilizer material under the fabric before sewing. * Use a straight stitch foot to select the middle needle position. If the thickness of stitch length and tension may cause the needle to 6 mm(1/4 '') thick. CAUTION Do not forcefully push fabrics more than 6 mm (1/4'') thick through the sewing machine. UTILITY STITCHES MAINTENANCE SEWING...
Users Manual - English
Page 55
... MAINTENANCE SEWING CHART PATTERNS (PROGRAMMED IN MACHINE) 52 Attach presser foot "J", then pull out about 4 mm (1/16")) as shown left figure, and select a weak thread tension. 3. Press the stitch length manual change key to obtain the desired amount of both the bobbin and upper threads. 1 Upper thread 2 Bobbin thread 3 About 50...
... MAINTENANCE SEWING CHART PATTERNS (PROGRAMMED IN MACHINE) 52 Attach presser foot "J", then pull out about 4 mm (1/16")) as shown left figure, and select a weak thread tension. 3. Press the stitch length manual change key to obtain the desired amount of both the bobbin and upper threads. 1 Upper thread 2 Bobbin thread 3 About 50...
Users Manual - English
Page 62
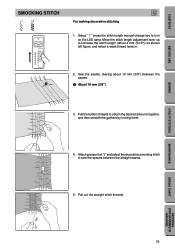
.... UTILITY STITCHES MAINTENANCE SEWING CHART PATTERNS (PROGRAMMED IN MACHINE) 59 Sew the seams, leaving about 4 mm (3/16")) as shown left figure, and select a weak thread tension. 2. Attach presser foot "J" and select the decorative smocking stitch to increase the stitch length (about 10 mm (3/8'') between the straight seams. J 5. Pull the bobbin threads...
.... UTILITY STITCHES MAINTENANCE SEWING CHART PATTERNS (PROGRAMMED IN MACHINE) 59 Sew the seams, leaving about 4 mm (3/16")) as shown left figure, and select a weak thread tension. 2. Attach presser foot "J" and select the decorative smocking stitch to increase the stitch length (about 10 mm (3/8'') between the straight seams. J 5. Pull the bobbin threads...
Users Manual - English
Page 73
... cleaning with threads and stitches Before calling for service, check the following items. If the problem still persists, contact your nearest authorized Brother dealer. Upper threading is not correct. 4. Thread tension is not correct. 5. Check the "FABRIC/THREAD/NEEDLE COMBINATION CHART" on page 26. 4. Bobbin thread breaks 3. Contact service center. 1. Set bobbin...
... cleaning with threads and stitches Before calling for service, check the following items. If the problem still persists, contact your nearest authorized Brother dealer. Upper threading is not correct. 4. Thread tension is not correct. 5. Check the "FABRIC/THREAD/NEEDLE COMBINATION CHART" on page 26. 4. Bobbin thread breaks 3. Contact service center. 1. Set bobbin...


