
Accessory Catalog
Page 13
... ruffling blade on lightweight fabric. Use a stiff card to guide your first row of tucks can be adjusted. 1. Install and manually thread a twin needle. 2. www.brother.com Draw a reference line to slide the fabric from left into gathers or tucks. The intervals of stitching and use that to... get started. Sew slowly for details.) Brother Embellishment Feet Pin Tuck Foot 24 Ruffler Foot Pin Tuck Foot This presser foot has 7 grooves and produces perfect pin tucks and corded...
... ruffling blade on lightweight fabric. Use a stiff card to guide your first row of tucks can be adjusted. 1. Install and manually thread a twin needle. 2. www.brother.com Draw a reference line to slide the fabric from left into gathers or tucks. The intervals of stitching and use that to... get started. Sew slowly for details.) Brother Embellishment Feet Pin Tuck Foot 24 Ruffler Foot Pin Tuck Foot This presser foot has 7 grooves and produces perfect pin tucks and corded...

Accessory Catalog
Page 34
...individual colors (sold in the most intricate designs. C (White only): The 1,000-meter (approx. 1,100-yds) spun thread is ideal for Brother sewing and embroidering machines. 61 Color Thread Set with Wooden Rack ETKSP999 PacesetterTM Polyester Threads (61 Color Thread Set with straight, zig zag or ....1,200-yds) filament thread is best suited for fabrics and applications when it is important that can stand on your instruction manual for each design. SA519 Iron-on the wall for Brother® Embroidery Machines, but compatible with other sewing and embroidery machine brands.
...individual colors (sold in the most intricate designs. C (White only): The 1,000-meter (approx. 1,100-yds) spun thread is ideal for Brother sewing and embroidering machines. 61 Color Thread Set with Wooden Rack ETKSP999 PacesetterTM Polyester Threads (61 Color Thread Set with straight, zig zag or ....1,200-yds) filament thread is best suited for fabrics and applications when it is important that can stand on your instruction manual for each design. SA519 Iron-on the wall for Brother® Embroidery Machines, but compatible with other sewing and embroidery machine brands.
Users Manual - English
Page 2
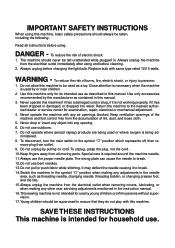
... using . It may deflect the needle causing it has been dropped or damaged, or dropped into any other user servicing adjustments mentioned in the instruction manual. 16.This sewing machine is not working properly, if it to break. 14.Switch the machine to be left unattended while plugged in the needle... area, such as contained in this manual. 3. Use this machine to the symbol " " position when making any opening. 6. Special care is being used as described in this...
... using . It may deflect the needle causing it has been dropped or damaged, or dropped into any other user servicing adjustments mentioned in the instruction manual. 16.This sewing machine is not working properly, if it to break. 14.Switch the machine to be left unattended while plugged in the needle... area, such as contained in this manual. 3. Use this machine to the symbol " " position when making any opening. 6. Special care is being used as described in this...
Users Manual - English
Page 4
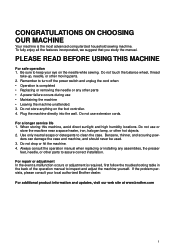
... If the problem persists, please consult your eye on the foot controller. 4. For additional product information and updates, visit our web site at www.brother.com 1 Do not touch the balance wheel, thread take-up, needle, or other parts • A power failure occurs during use •... computerized household sewing machine. Plug the machine directly into the wall. Do not drop or hit the machine. 4. Always consult the operation manual when replacing or installing any other moving parts. 2. Do not use extension cords. Benzene, thinner, and scouring pow- When storing this machine...
... If the problem persists, please consult your eye on the foot controller. 4. For additional product information and updates, visit our web site at www.brother.com 1 Do not touch the balance wheel, thread take-up, needle, or other parts • A power failure occurs during use •... computerized household sewing machine. Plug the machine directly into the wall. Do not drop or hit the machine. 4. Always consult the operation manual when replacing or installing any other moving parts. 2. Do not use extension cords. Benzene, thinner, and scouring pow- When storing this machine...
Users Manual - English
Page 10
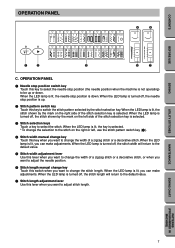
... the stitch on the right or left side of a zigzag stitch or a decorative stitch, or when you want to adjust the needle position. 6 Stitch length manual change key Touch this switch when you want to change the width of the stitch selection key is selected. When the LED lamp is not... stitch. When the LED lamp is turned off , the stitch shown by the mark on the left , use the stitch pattern switch key (2). 4 Stitch width manual change key Touch this key to select the needle stop position switch key Touch this key when you can make adjustments. When the LED lamp...
... the stitch on the right or left side of a zigzag stitch or a decorative stitch, or when you want to adjust the needle position. 6 Stitch length manual change key Touch this switch when you want to change the width of the stitch selection key is selected. When the LED lamp is not... stitch. When the LED lamp is turned off , the stitch shown by the mark on the left , use the stitch pattern switch key (2). 4 Stitch width manual change key Touch this key to select the needle stop position switch key Touch this key when you can make adjustments. When the LED lamp...
Users Manual - English
Page 14
... when it is normal to the left and remove the bobbin. After the bobbin has stopped moving, press the "START/STOP" button to sew or manually turning the balance wheel. 11 SEWING CHART PATTERNS (PROGRAMMED IN MACHINE) Wind the thread clockwise around the bobbin and cause the needle to the right...
... when it is normal to the left and remove the bobbin. After the bobbin has stopped moving, press the "START/STOP" button to sew or manually turning the balance wheel. 11 SEWING CHART PATTERNS (PROGRAMMED IN MACHINE) Wind the thread clockwise around the bobbin and cause the needle to the right...
Users Manual - English
Page 16
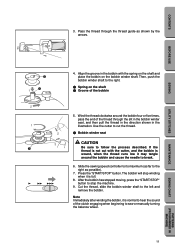
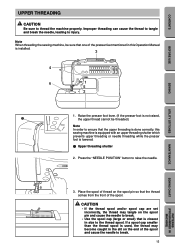
... tangle on the spool pin so that is not raised, 1 the upper thread cannot be sure that the upper threading is done correctly, this Operation Manual is lowered. 1 Upper threading shutter 2. Improper threading can cause the thread to tangle and break the needle, leading to raise the needle. UTILITY STITCHES MAINTENANCE...
... tangle on the spool pin so that is not raised, 1 the upper thread cannot be sure that the upper threading is done correctly, this Operation Manual is lowered. 1 Upper threading shutter 2. Improper threading can cause the thread to tangle and break the needle, leading to raise the needle. UTILITY STITCHES MAINTENANCE...
Users Manual - English
Page 18
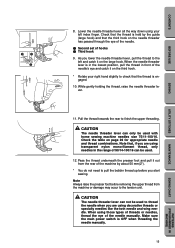
... need to thread the needle when you start sewing. As you are using transparent nylon mono-filament thread, only needles in front of the needle manually. 5 11 2 5 5 8. Note that, if you lower the needle threader lever, pull the thread to finish the upper threading. When... the needle threader lever is OFF when threading the needle manually. 15 PATTERNS (PROGRAMMED IN MACHINE) SEWING CHART MAINTENANCE UTILITY STITCHES SEWING BEFORE USE CONTENTS Lower the needle threader lever all the way...
... need to thread the needle when you start sewing. As you are using transparent nylon mono-filament thread, only needles in front of the needle manually. 5 11 2 5 5 8. Note that, if you lower the needle threader lever, pull the thread to finish the upper threading. When... the needle threader lever is OFF when threading the needle manually. 15 PATTERNS (PROGRAMMED IN MACHINE) SEWING CHART MAINTENANCE UTILITY STITCHES SEWING BEFORE USE CONTENTS Lower the needle threader lever all the way...
Users Manual - English
Page 22
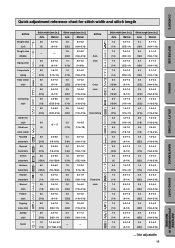
...26 27 28 Hemstitching 29 30 31 32 33 34 35 Decorative stitch 36 37 38 39 40 Stitch width [mm (in.)] Auto Manual 7.0 2.5-7.0 (1/4) (3/32-1/4) 7.0 2.5-7.0 (1/4) (3/32-1/4) 7.0 2.5-7.0 (1/4) (3/32-1/4) 7.0 2.5-7.0 (1/4) (3/32-1/4) 6.0 0.0-7.0 (15/64) (0-1/4) ... width [mm (in.)] Auto Manual 0.0 0.0-7.0 (0) (0-1/4) - - 3.5 (1/8) 5.0 (3/16) 0.0 (0) 5.0 (3/16) 3.5 (1/8) 5.0 (3/16) 0.0-7.0 (0-1/4) 1.5-7.0 (1/16-1/4) 0.0-7.0 (0-1/4) 0.0-7.0 (0-1/4) 2.5-5.0 (3/32-3/16) 2.5-5.0 (3/32-3/16) Stitch length [mm (in .)] Auto Manual 0.4 0.1-1.0 (1/64) (1/64-1/...
...26 27 28 Hemstitching 29 30 31 32 33 34 35 Decorative stitch 36 37 38 39 40 Stitch width [mm (in.)] Auto Manual 7.0 2.5-7.0 (1/4) (3/32-1/4) 7.0 2.5-7.0 (1/4) (3/32-1/4) 7.0 2.5-7.0 (1/4) (3/32-1/4) 7.0 2.5-7.0 (1/4) (3/32-1/4) 6.0 0.0-7.0 (15/64) (0-1/4) ... width [mm (in.)] Auto Manual 0.0 0.0-7.0 (0) (0-1/4) - - 3.5 (1/8) 5.0 (3/16) 0.0 (0) 5.0 (3/16) 3.5 (1/8) 5.0 (3/16) 0.0-7.0 (0-1/4) 1.5-7.0 (1/16-1/4) 0.0-7.0 (0-1/4) 0.0-7.0 (0-1/4) 2.5-5.0 (3/32-3/16) 2.5-5.0 (3/32-3/16) Stitch length [mm (in .)] Auto Manual 0.4 0.1-1.0 (1/64) (1/64-1/...
Users Manual - English
Page 33
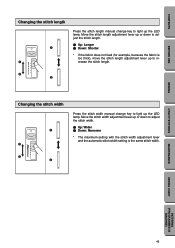
...the stitch length and continue sewing. MAINTENANCE SEWING CHART PATTERNS (PROGRAMMED IN MACHINE) 30 Adjusting the stitch width Press the stitch width manual change key. Move the stitch width adjustment lever up increases the stitch length, and moving the lever down . Moving the lever up... without lengthening the stitch length, otherwise the needle may break and cause injury. Adjusting the stitch length 1 2 Press the stitch length manual change key. Move the stitch length adjustment lever up increases the stitch width, and moving the lever down . CONTENTS BEFORE USE SEWING ...
...the stitch length and continue sewing. MAINTENANCE SEWING CHART PATTERNS (PROGRAMMED IN MACHINE) 30 Adjusting the stitch width Press the stitch width manual change key. Move the stitch width adjustment lever up increases the stitch length, and moving the lever down . Moving the lever up... without lengthening the stitch length, otherwise the needle may break and cause injury. Adjusting the stitch length 1 2 Press the stitch length manual change key. Move the stitch length adjustment lever up increases the stitch width, and moving the lever down . CONTENTS BEFORE USE SEWING ...
Users Manual - English
Page 38
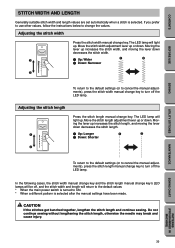
... without pulling the fabric. * Do not pull the fabric while sewing. 1 Basting Changing the stitch length 1 1 2 2 Press the stitch length manual change key to light up the LED lamp. Move the stitch length adjustment lever up or down to adjust the needle position. 1 Up: 7.0 mm... (1/4") [right needle position] 1 2 Down: 0 mm (0") [left ) and " 5 " triple stretch stitch) Press the stitch width manual change key to 4.0 mm (3/ 16") while sewing, even if the length setting is longer than 1.0 mm (1/16") thick, the maximum stitch length will automatically be...
... without pulling the fabric. * Do not pull the fabric while sewing. 1 Basting Changing the stitch length 1 1 2 2 Press the stitch length manual change key to light up the LED lamp. Move the stitch length adjustment lever up or down to adjust the needle position. 1 Up: 7.0 mm... (1/4") [right needle position] 1 2 Down: 0 mm (0") [left ) and " 5 " triple stretch stitch) Press the stitch width manual change key to 4.0 mm (3/ 16") while sewing, even if the length setting is longer than 1.0 mm (1/16") thick, the maximum stitch length will automatically be...
Users Manual - English
Page 44
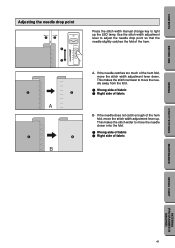
CONTENTS BEFORE USE SEWING Adjusting the needle drop point 12 1 2 A B Press the stitch width manual change key to light up . A- If the needle catches too much of the hem fold, move the stitch width adjustment lever down. If the needle ...
CONTENTS BEFORE USE SEWING Adjusting the needle drop point 12 1 2 A B Press the stitch width manual change key to light up . A- If the needle catches too much of the hem fold, move the stitch width adjustment lever down. If the needle ...
Users Manual - English
Page 49
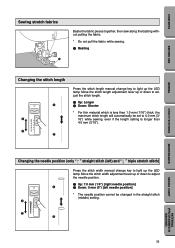
CONTENTS BEFORE USE SEWING Changing the stitch length 1 1 Press the stitch length manual change key to adjust the stitch length. 1 Up: Longer 2 Down: Shorter * If the fabric does not feed (for example, because the fabric is the same ... width setting is too thick), move the stitch length adjustment lever up to increase the stitch length. 2 2 Changing the stitch width 1 1 Press the stitch width manual change key to light up or down to light up the LED lamp.
CONTENTS BEFORE USE SEWING Changing the stitch length 1 1 Press the stitch length manual change key to adjust the stitch length. 1 Up: Longer 2 Down: Shorter * If the fabric does not feed (for example, because the fabric is the same ... width setting is too thick), move the stitch length adjustment lever up to increase the stitch length. 2 2 Changing the stitch width 1 1 Press the stitch width manual change key to light up or down to light up the LED lamp.
Users Manual - English
Page 50
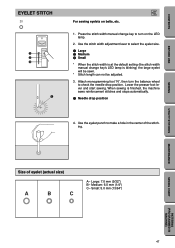
... lever to select the eyelet size. 1 Large 2 Medium 3 Small * When the stitch width is at the default setting (the stitch width manual change key to turn the balance wheel to make a hole in the center of eyelet (actual size) A B C A- When sewing is blinking...B- Size of the stitching. Small: 5.0 mm (13/64") UTILITY STITCHES MAINTENANCE SEWING CHART PATTERNS (PROGRAMMED IN MACHINE) 47 Press the stitch width manual change key's LED lamp is finished, the machine sews reinforcement stitches and stops automatically. 1 Needle drop position 4. Use the eyelet punch to check ...
... lever to select the eyelet size. 1 Large 2 Medium 3 Small * When the stitch width is at the default setting (the stitch width manual change key to turn the balance wheel to make a hole in the center of eyelet (actual size) A B C A- When sewing is blinking...B- Size of the stitching. Small: 5.0 mm (13/64") UTILITY STITCHES MAINTENANCE SEWING CHART PATTERNS (PROGRAMMED IN MACHINE) 47 Press the stitch width manual change key's LED lamp is finished, the machine sews reinforcement stitches and stops automatically. 1 Needle drop position 4. Use the eyelet punch to check ...
Users Manual - English
Page 55
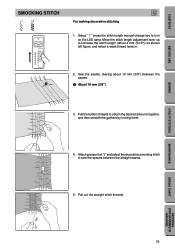
Press the stitch length manual change key to increase the stitch length (about 50 mm (2") of straight stitches parallel to the seam line, then trim off the excess thread leaving ...
Press the stitch length manual change key to increase the stitch length (about 50 mm (2") of straight stitches parallel to the seam line, then trim off the excess thread leaving ...
Users Manual - English
Page 62
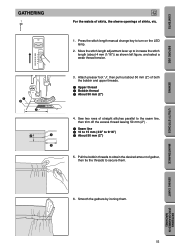
... length adjustment lever up to sew the spaces between the seams. 1 About 10 mm (3/8'') 3. Pull out the straight stitch threads. Select " " press the stitch length manual change key to obtain the desired amount of gather, and then smooth the gathers by ironing them. 4. Attach presser foot "J" and select the decorative smocking...
... length adjustment lever up to sew the spaces between the seams. 1 About 10 mm (3/8'') 3. Pull out the straight stitch threads. Select " " press the stitch length manual change key to obtain the desired amount of gather, and then smooth the gathers by ironing them. 4. Attach presser foot "J" and select the decorative smocking...
Users Manual - English
Page 65
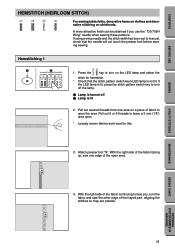
.... 4. A more attractive finish can be obtained if you , turn off the lamp. 1 Lamp is turned off 2 Lamp is not lit. Pull out 5 or 6 threads to manual, check that the stitch pattern switch key's LED lamp is lit 2. Attach presser foot "N".
.... 4. A more attractive finish can be obtained if you , turn off the lamp. 1 Lamp is turned off 2 Lamp is not lit. Pull out 5 or 6 threads to manual, check that the stitch pattern switch key's LED lamp is lit 2. Attach presser foot "N".
Users Manual - English
Page 67
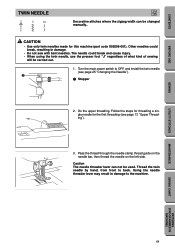
... needles could break and cause injury. • When using the twin needle, use the presser foot "J" regardless of what kind of sewing will be changed manually.. Do the upper threading. UTILITY STITCHES MAINTENANCE SEWING CHART PATTERNS (PROGRAMMED IN MACHINE) 64 The needle could break, resulting in damage to the machine. Follow...
... needles could break and cause injury. • When using the twin needle, use the presser foot "J" regardless of what kind of sewing will be changed manually.. Do the upper threading. UTILITY STITCHES MAINTENANCE SEWING CHART PATTERNS (PROGRAMMED IN MACHINE) 64 The needle could break, resulting in damage to the machine. Follow...


