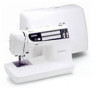

Accessory Catalog
Page 3
...a lightweight and affordable sewing machine for garment construction, heirloom sewing or home decoration can then be easily created with leading-edge technology Brother's new and exciting high-end sewing and embroidery machine Quattro™ 6000D is 500D, SE270D, HE120/PKG, CS80, CS8060, CS8150...and even crafting capability! Some models feature automatic machine embroidery as well. Innov-is not only incredibly sophisticated and innovative but powerful sewing and quilting machines. Perfect for which the shown accessory is ready to use, unique cassette based threading system, these ...
...a lightweight and affordable sewing machine for garment construction, heirloom sewing or home decoration can then be easily created with leading-edge technology Brother's new and exciting high-end sewing and embroidery machine Quattro™ 6000D is 500D, SE270D, HE120/PKG, CS80, CS8060, CS8150...and even crafting capability! Some models feature automatic machine embroidery as well. Innov-is not only incredibly sophisticated and innovative but powerful sewing and quilting machines. Perfect for which the shown accessory is ready to use, unique cassette based threading system, these ...
Users Manual - English
Page 4
... In the event a malfunction occurs or adjustment is the most advanced computerized household sewing machine. Be sure to keep your local authorized Brother dealer. Plug the machine directly into the wall. Always consult the operation manual when replacing or installing any other hot objects. 2. ... you study the manual. Do not use or store the machine near a space heater, iron, halogen lamp, or other parts • A power failure occurs during use • Maintaining the machine • Leaving the machine unattended. 3. ders can damage the case and machine, and should never...
... In the event a malfunction occurs or adjustment is the most advanced computerized household sewing machine. Be sure to keep your local authorized Brother dealer. Plug the machine directly into the wall. Always consult the operation manual when replacing or installing any other hot objects. 2. ... you study the manual. Do not use or store the machine near a space heater, iron, halogen lamp, or other parts • A power failure occurs during use • Maintaining the machine • Leaving the machine unattended. 3. ders can damage the case and machine, and should never...
Users Manual - English
Page 5
CONTENTS BEFORE USE SEWING UTILITY STITCHES CONTENTS CHAPTER 1 BEFORE USE 4 PART NAMES 4 STANDARD ACCESSORIES 6 OPTIONAL ACCESSORIES 6 OPERATION PANEL 7 OPERATION BUTTONS 8 Using the operation buttons 8 POWER SUPPLY 9 BOBBIN WINDING / BOBBIN THREAD SETTING 10 Winding the bobbin and setting the bobbin thread 10 Setting the bobbin 12 UPPER THREADING 13 Using the ...
CONTENTS BEFORE USE SEWING UTILITY STITCHES CONTENTS CHAPTER 1 BEFORE USE 4 PART NAMES 4 STANDARD ACCESSORIES 6 OPTIONAL ACCESSORIES 6 OPERATION PANEL 7 OPERATION BUTTONS 8 Using the operation buttons 8 POWER SUPPLY 9 BOBBIN WINDING / BOBBIN THREAD SETTING 10 Winding the bobbin and setting the bobbin thread 10 Setting the bobbin 12 UPPER THREADING 13 Using the ...
Users Manual - English
Page 7
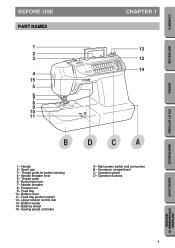
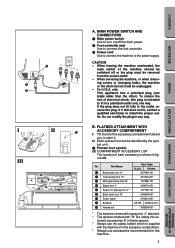
Buttonhole lever 7- Bobbin winder 14- Main power switch and connectors B- CONTENTS BEFORE USE SEWING UTILITY STITCHES BEFORE USE PART NAMES 1 2 3 4 15 5 6 7 8 9 10 11 CHAPTER 1 13 12 14 BDCA 1- Needle threader lever 5- Sewing ...
Buttonhole lever 7- Bobbin winder 14- Main power switch and connectors B- CONTENTS BEFORE USE SEWING UTILITY STITCHES BEFORE USE PART NAMES 1 2 3 4 15 5 6 7 8 9 10 11 CHAPTER 1 13 12 14 BDCA 1- Needle threader lever 5- Sewing ...
Users Manual - English
Page 8
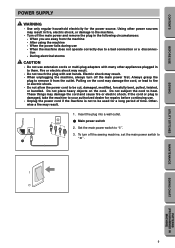
...X56409-001 7 Seam ripper X54243-001 8 Bobbins SA155 XA3812-051 9 Needle set must be switched off the main power. 2 Foot controller jack Use to connect the foot controller. 3 Power cord Use to connect the machine to fit in figure III. B. Part Name 1 Buttonhole foot "A" Part Code U.S.A.... SEWING BEFORE USE CONTENTS CAUTION - For U.S.A. To reduce the risk of each accessory is intended to the power supply. MAIN POWER SWITCH AND CONNECTORS 1 Main power switch Use to install the proper outlet. No en- 2 1 3 I II 1 J III 1 9 5 2 3 6 5 7 5 45...
...X56409-001 7 Seam ripper X54243-001 8 Bobbins SA155 XA3812-051 9 Needle set must be switched off the main power. 2 Foot controller jack Use to connect the foot controller. 3 Power cord Use to connect the machine to fit in figure III. B. Part Name 1 Buttonhole foot "A" Part Code U.S.A.... SEWING BEFORE USE CONTENTS CAUTION - For U.S.A. To reduce the risk of each accessory is intended to the power supply. MAIN POWER SWITCH AND CONNECTORS 1 Main power switch Use to install the proper outlet. No en- 2 1 3 I II 1 J III 1 9 5 2 3 6 5 7 5 45...
Users Manual - English
Page 12
... with wet hands. Pulling on the cord. Otherwise a fire may damage the cord and cause fire or electric shock. To turn off the main power first. When you are away from the outlet. If the cord or plug is damaged, take the machine to the machine. • Turn off...only regular household electricity for repairs before continuing use - Using other appliances plugged in fire, electric shock, or damage to your authorized dealer for the power source. When the machine does not operate correctly due to heat. Fire or electric shock may result. • Do not touch the plug with...
... with wet hands. Pulling on the cord. Otherwise a fire may damage the cord and cause fire or electric shock. To turn off the main power first. When you are away from the outlet. If the cord or plug is damaged, take the machine to the machine. • Turn off...only regular household electricity for repairs before continuing use - Using other appliances plugged in fire, electric shock, or damage to your authorized dealer for the power source. When the machine does not operate correctly due to heat. Fire or electric shock may result. • Do not touch the plug with...
Users Manual - English
Page 13
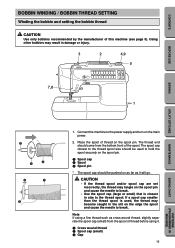
...spool. The spool cap closest to the thread spool size should be pushed on the edge the spool and cause the needle to the power supply and turn on the spool pin. Connect the machine to break. If a spool cap smaller than the thread spool is closest in... in the slit on as far as cross wound thread, slightly separate the spool cap (small) from the bottom front of thread on the main power. 2. Note If using it will go. Using other bobbins may become caught in damage or injury. 3 2 4,9 5 6 7,8 1 SEWING UTILITY STITCHES MAINTENANCE SEWING CHART 3 1 2 3 1 2 1. ...
...spool. The spool cap closest to the thread spool size should be pushed on the edge the spool and cause the needle to the power supply and turn on the spool pin. Connect the machine to break. If a spool cap smaller than the thread spool is closest in... in the slit on as far as cross wound thread, slightly separate the spool cap (small) from the bottom front of thread on the main power. 2. Note If using it will go. Using other bobbins may become caught in damage or injury. 3 2 4,9 5 6 7,8 1 SEWING UTILITY STITCHES MAINTENANCE SEWING CHART 3 1 2 3 1 2 1. ...
Users Manual - English
Page 18
... is OFF when threading the needle manually. 15 PATTERNS (PROGRAMMED IN MACHINE) SEWING CHART MAINTENANCE UTILITY STITCHES SEWING BEFORE USE CONTENTS Make sure the main power switch is engaged. 10. Pass the thread underneath the presser foot and pull it on page 26 for appropriate needle and thread combinations. As you...
... is OFF when threading the needle manually. 15 PATTERNS (PROGRAMMED IN MACHINE) SEWING CHART MAINTENANCE UTILITY STITCHES SEWING BEFORE USE CONTENTS Make sure the main power switch is engaged. 10. Pass the thread underneath the presser foot and pull it on page 26 for appropriate needle and thread combinations. As you...
Users Manual - English
Page 21
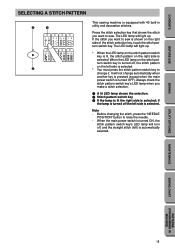
Note - Press the stitch selection key that shows the stitch you want to change automatically when another key is pressed (except when the main power switch is selected. When the LED lamp on the stitch pattern switch key is turned off the left side is selected. It will light up . * ... sew. The LED lamp will not change it. if the lamp is turned off , the stitch pattern on the left ) is selected; When the main power switch is turned ON, the stitch pattern switch key's LED lamp will light up . Always check the stitch pattern switch key's LED lamp when you...
Note - Press the stitch selection key that shows the stitch you want to change automatically when another key is pressed (except when the main power switch is selected. When the LED lamp on the stitch pattern switch key is turned off the left side is selected. It will light up . * ... sew. The LED lamp will not change it. if the lamp is turned off , the stitch pattern on the left ) is selected; When the main power switch is turned ON, the stitch pattern switch key's LED lamp will light up . Always check the stitch pattern switch key's LED lamp when you...
Users Manual - English
Page 25
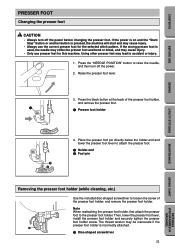
Press the "NEEDLE POSITION" button to the presser foot holder. If the power is on and the "Start/ Stop" button or another button is incorrectly attached. 1 Disc-shaped screwdriver 22 PATTERNS (... feet for the selected stitch pattern. CONTENTS BEFORE USE PRESSER FOOT Changing the presser foot CAUTION • Always turn off the power before changing the presser foot. Place the presser foot pin directly below the holder-end and lower the presser foot lever to attach... the presser foot holder, first attach the presser foot to raise the needle, and then turn off the power. 2.
Press the "NEEDLE POSITION" button to the presser foot holder. If the power is on and the "Start/ Stop" button or another button is incorrectly attached. 1 Disc-shaped screwdriver 22 PATTERNS (... feet for the selected stitch pattern. CONTENTS BEFORE USE PRESSER FOOT Changing the presser foot CAUTION • Always turn off the power before changing the presser foot. Place the presser foot pin directly below the holder-end and lower the presser foot lever to attach... the presser foot holder, first attach the presser foot to raise the needle, and then turn off the power. 2.
Users Manual - English
Page 26
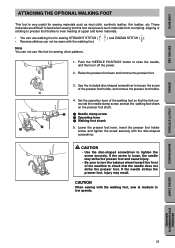
... this foot can prevent such materials from crumpling, slipping or sticking to presser foot thanks to even feeding of the machine to turn off the power. 2. rounds the needle clamp screw, and set the walking foot shank 5 on the presser foot shaft. 6 1 1 Needle clamp screw 2 Operating lever 3 Walking foot shank 2 3 5. CAUTION...
... this foot can prevent such materials from crumpling, slipping or sticking to presser foot thanks to even feeding of the machine to turn off the power. 2. rounds the needle clamp screw, and set the walking foot shank 5 on the presser foot shaft. 6 1 1 Needle clamp screw 2 Operating lever 3 Walking foot shank 2 3 5. CAUTION...
Users Manual - English
Page 28
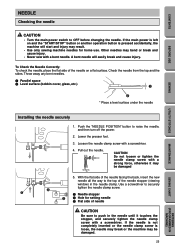
If the main power is left on a flat surface. To Check the Needle Correctly: To check the needle, place the flat side of the needle on and the "START/... tighten the needle clamp screw with a bent needle. CONTENTS BEFORE USE NEEDLE Checking the needle CAUTION • Turn the main power switch to raise the needle, and then turn off the power. 2. With the flat side of the needle facing the back, insert the new needle all the way to the top...
If the main power is left on a flat surface. To Check the Needle Correctly: To check the needle, place the flat side of the needle on and the "START/... tighten the needle clamp screw with a bent needle. CONTENTS BEFORE USE NEEDLE Checking the needle CAUTION • Turn the main power switch to raise the needle, and then turn off the power. 2. With the flat side of the needle facing the back, insert the new needle all the way to the top...

Users Manual - English
Page 32
...needle stops in the down position. Touch the needle stop position switch key to change automatically when another key is pressed (except when the main power switch is not necessary to press the "NEEDLE POSITION" button to lower the needle before rotating the fabric when continuously starting and stopping sewing....Press the needle stop position switch key to turn off , the needle stop position will be set in the up position. * When the main power switch is set to ON, the needle stop position switch key's LED lamp will be set in the up position. It will light up position...
...needle stops in the down position. Touch the needle stop position switch key to change automatically when another key is pressed (except when the main power switch is not necessary to press the "NEEDLE POSITION" button to lower the needle before rotating the fabric when continuously starting and stopping sewing....Press the needle stop position switch key to turn off , the needle stop position will be set in the up position. * When the main power switch is set to ON, the needle stop position switch key's LED lamp will be set in the up position. It will light up position...
Users Manual - English
Page 33
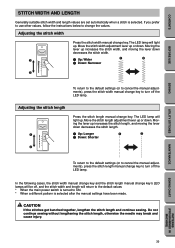
... stitch width manual change key's LED lamps will be off, and the stitch width and length will return to the default values * When the main power switch is selected. In the following cases, the stitch width manual change key and the stitch length manual change key to ON. * When a different pattern...
... stitch width manual change key's LED lamps will be off, and the stitch width and length will return to the default values * When the main power switch is selected. In the following cases, the stitch width manual change key and the stitch length manual change key to ON. * When a different pattern...
Users Manual - English
Page 41
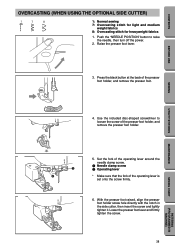
... for light and medium weight fabrics 8: Overcasting stitch for heavyweight fabrics 1. Use the included disc-shaped screwdriver to raise the needle, then turn off the power. 2.
... for light and medium weight fabrics 8: Overcasting stitch for heavyweight fabrics 1. Use the included disc-shaped screwdriver to raise the needle, then turn off the power. 2.
Users Manual - English
Page 67
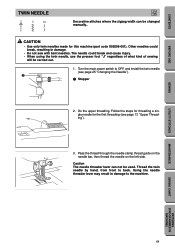
Turn the main power switch to back. Thread the twin needle by hand, from front to OFF, and install the twin needle (see page 13 "Upper Threading"). 3. The needle ...
Turn the main power switch to back. Thread the twin needle by hand, from front to OFF, and install the twin needle (see page 13 "Upper Threading"). 3. The needle ...
Users Manual - English
Page 70
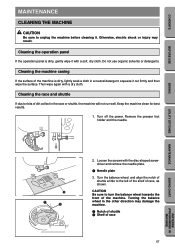
... MACHINE) 67 Cleaning the race and shuttle If dust or bits of race, as shown. Keep the machine clean for best results. 5 6 1. Turn off the power. Turn the balance wheel, and align the notch of shuttle a little to turn the balance wheel towards the front of the machine. Cleaning the operation...
... MACHINE) 67 Cleaning the race and shuttle If dust or bits of race, as shown. Keep the machine clean for best results. 5 6 1. Turn off the power. Turn the balance wheel, and align the notch of shuttle a little to turn the balance wheel towards the front of the machine. Cleaning the operation...
Users Manual - English
Page 72
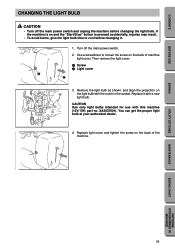
... back of the machine. 69 MAINTENANCE SEWING CHART PATTERNS (PROGRAMMED IN MACHINE) Use a screwdriver to cool before changing the light bulb. Turn off the main power switch and unplug the machine before changing it with a new light bulb. Replace it . 1. You can get the proper light bulb at your authorized dealer... the screw on the back of machine light cover. CONTENTS BEFORE USE SEWING UTILITY STITCHES CHANGING THE LIGHT BULB CAUTION • Turn off the main power switch. 2.
... back of the machine. 69 MAINTENANCE SEWING CHART PATTERNS (PROGRAMMED IN MACHINE) Use a screwdriver to cool before changing the light bulb. Turn off the main power switch and unplug the machine before changing it with a new light bulb. Replace it . 1. You can get the proper light bulb at your authorized dealer... the screw on the back of machine light cover. CONTENTS BEFORE USE SEWING UTILITY STITCHES CHANGING THE LIGHT BULB CAUTION • Turn off the main power switch. 2.
Users Manual - English
Page 74
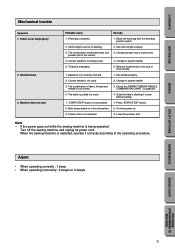
...correctly inserted. 1. Needle is not correct. 4. Correct needle is not lowered. 3. Check the "FABRIC/THREAD/NEEDLE COMBINATION CHART" on . 3. Turn the power on page 26. 4. Presser foot is not used . 4. Correct needle is entangled. 5. Thread is not being operated: Turn off position. 2. Main... power switch is pulled too much. 4. Raise the feed dog with the feed dog position switch. 2. The fabric is in the race or inner...
...correctly inserted. 1. Needle is not correct. 4. Correct needle is not lowered. 3. Check the "FABRIC/THREAD/NEEDLE COMBINATION CHART" on . 3. Turn the power on page 26. 4. Presser foot is not used . 4. Correct needle is entangled. 5. Thread is not being operated: Turn off position. 2. Main... power switch is pulled too much. 4. Raise the feed dog with the feed dog position switch. 2. The fabric is in the race or inner...


