
Accessory Catalog
Page 13
...SA179 ABCDEJ For five grooves: SA162 IP This presser foot does not include the bobbin cover. Further rows can be evenly spaced by trying different combinations of the grooves. 4. Sew slowly for details.) Brother Embellishment Feet Pin Tuck Foot 24 Ruffler Foot Pin Tuck Foot This presser foot ...1" (2.5 cm) past the needle to sew the first row in one of stitch length, tuck setting and depth setting. 2. A specially designed bobbin cover is moved forward, its teeth catch a fabric and force it forward into the slot, and stitch slowly. 3. The intervals of stitching and use ...
...SA179 ABCDEJ For five grooves: SA162 IP This presser foot does not include the bobbin cover. Further rows can be evenly spaced by trying different combinations of the grooves. 4. Sew slowly for details.) Brother Embellishment Feet Pin Tuck Foot 24 Ruffler Foot Pin Tuck Foot This presser foot ...1" (2.5 cm) past the needle to sew the first row in one of stitch length, tuck setting and depth setting. 2. A specially designed bobbin cover is moved forward, its teeth catch a fabric and force it forward into the slot, and stitch slowly. 3. The intervals of stitching and use ...
Users Manual - English
Page 2
...insert any object into water. To unplug, grasp the plug, not the cord. 10.Keep fingers away from the electrical outlet when removing covers, lubricating, or when making any other user servicing adjustments mentioned in . Replace bulb with any opening. 6. Return the machine to ensure ...before cleaning. 2. Close attention is necessary when the machine is being used or where oxygen is used as threading needle, changing needle, threading bobbin, or changing presser foot, and the like. 15.Always unplug the machine from all instructions before using. Never operate this machine if it ...
...insert any object into water. To unplug, grasp the plug, not the cord. 10.Keep fingers away from the electrical outlet when removing covers, lubricating, or when making any other user servicing adjustments mentioned in . Replace bulb with any opening. 6. Return the machine to ensure ...before cleaning. 2. Close attention is necessary when the machine is being used or where oxygen is used as threading needle, changing needle, threading bobbin, or changing presser foot, and the like. 15.Always unplug the machine from all instructions before using. Never operate this machine if it ...
Users Manual - English
Page 7
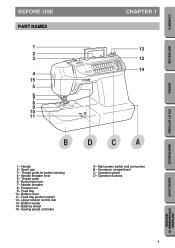
... BDCA 1- Presser foot 9- Feed dog 10- Feed dog position switch 12- Upper tension control dial 13- Thread guide for bobbin winding 4- Bobbin cover 11- Sewing speed controller A- Main power switch and connectors B- Handle 2- Buttonhole lever 7- Bobbin winder 14- Accessory compartment C- Operation buttons MAINTENANCE SEWING CHART PATTERNS (PROGRAMMED IN MACHINE) 4 Needle threader 8- Balance wheel 15...
... BDCA 1- Presser foot 9- Feed dog 10- Feed dog position switch 12- Upper tension control dial 13- Thread guide for bobbin winding 4- Bobbin cover 11- Sewing speed controller A- Main power switch and connectors B- Handle 2- Buttonhole lever 7- Bobbin winder 14- Accessory compartment C- Operation buttons MAINTENANCE SEWING CHART PATTERNS (PROGRAMMED IN MACHINE) 4 Needle threader 8- Balance wheel 15...
Users Manual - English
Page 8
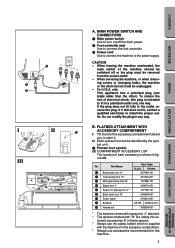
...spaces. * Always use accessories recommended for Zigzag foot "J" * 137748-101 6 Blind stitch foot "R" X56409-001 7 Seam ripper X54243-001 8 Bobbins SA155 XA3812-051 9 Needle set must be unplugged. - To reduce the risk of the machine should be identified by the symbol on /off ... machine. 5 PATTERNS (PROGRAMMED IN MACHINE) SEWING CHART MAINTENANCE UTILITY STITCHES SEWING BEFORE USE CONTENTS When servicing the machine, or when removing covers or changing bulbs, the machine or the electrical set X58358-001 * The machine comes with zigzag foot "J" attached. * The spaces ...
...spaces. * Always use accessories recommended for Zigzag foot "J" * 137748-101 6 Blind stitch foot "R" X56409-001 7 Seam ripper X54243-001 8 Bobbins SA155 XA3812-051 9 Needle set must be unplugged. - To reduce the risk of the machine should be identified by the symbol on /off ... machine. 5 PATTERNS (PROGRAMMED IN MACHINE) SEWING CHART MAINTENANCE UTILITY STITCHES SEWING BEFORE USE CONTENTS When servicing the machine, or when removing covers or changing bulbs, the machine or the electrical set X58358-001 * The machine comes with zigzag foot "J" attached. * The spaces ...
Users Manual - English
Page 15
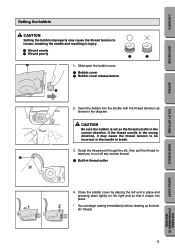
... injury. 1 Wound evenly 2 Wound poorly 1 2 1 1. MAINTENANCE SEWING CHART PATTERNS (PROGRAMMED IN MACHINE) 12 Insert the bobbin into place. 1 2 * You can begin sewing immediately without drawing up the bob- Slide open the bobbin cover. 1 Bobbin cover 2 Bobbin cover release button 2 2. Close the bobbin cover by placing the left end in the diagram. Guide the thread end through the slit, then...
... injury. 1 Wound evenly 2 Wound poorly 1 2 1 1. MAINTENANCE SEWING CHART PATTERNS (PROGRAMMED IN MACHINE) 12 Insert the bobbin into place. 1 2 * You can begin sewing immediately without drawing up the bob- Slide open the bobbin cover. 1 Bobbin cover 2 Bobbin cover release button 2 2. Close the bobbin cover by placing the left end in the diagram. Guide the thread end through the slit, then...
Users Manual - English
Page 28
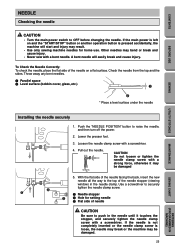
Throw away any bent needles. 1 Parallel space 2 Level surface (bobbin cover, glass, etc.) 1 2 * Place a level surface under the needle SEWING UTILITY STITCHES MAINTENANCE SEWING CHART Installing the needle securely 1. With the flat side of the needle ...
Throw away any bent needles. 1 Parallel space 2 Level surface (bobbin cover, glass, etc.) 1 2 * Place a level surface under the needle SEWING UTILITY STITCHES MAINTENANCE SEWING CHART Installing the needle securely 1. With the flat side of the needle ...
Users Manual - English
Page 56
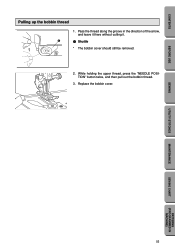
TION" button twice, and then pull out the bobbin thread. 3. Replace the bobbin cover. Pass the thread along the groove in the direction of the arrow, and leave it there without cutting it. 1 1 Shuttle * The bobbin cover should still be removed. 6 2. SEWING UTILITY STITCHES MAINTENANCE SEWING CHART PATTERNS (PROGRAMMED IN MACHINE) 53 CONTENTS BEFORE USE Pulling up the bobbin thread 1. While holding the upper thread, press the "NEEDLE POSI-
TION" button twice, and then pull out the bobbin thread. 3. Replace the bobbin cover. Pass the thread along the groove in the direction of the arrow, and leave it there without cutting it. 1 1 Shuttle * The bobbin cover should still be removed. 6 2. SEWING UTILITY STITCHES MAINTENANCE SEWING CHART PATTERNS (PROGRAMMED IN MACHINE) 53 CONTENTS BEFORE USE Pulling up the bobbin thread 1. While holding the upper thread, press the "NEEDLE POSI-


