
The Bose® Lifestyle® amplifier - Owner's guide
Page 4
... receiver. • Connect the equipment to an outlet on this equipment. If an external antenna or cable system is provided to call the CATV system installer's attention to this is practical. ©2001 Bose Corporation, The Mountain, Framingham, MA 01701-9168 USA 255805 AM Rev.00 JN10494 2b January 10, 2002 AM262840_00_V.pdf Refer to radio communications. This equipment generates, uses...
... receiver. • Connect the equipment to an outlet on this equipment. If an external antenna or cable system is provided to call the CATV system installer's attention to this is practical. ©2001 Bose Corporation, The Mountain, Framingham, MA 01701-9168 USA 255805 AM Rev.00 JN10494 2b January 10, 2002 AM262840_00_V.pdf Refer to radio communications. This equipment generates, uses...

The Bose® Lifestyle® amplifier - Owner's guide
Page 5
... The serial number is located on the bottom panel of your sales receipt and warranty card together with this owner's guide. Contents Setting up your Lifestyle® Stereo Amplifier Before you begin 4 Unpacking the carton 4 Selecting a location for your Lifestyle® stereo amplifier 5 Connecting the Lifestyle® stereo amplifier to a multi-room interface 7 Connecting the Lifestyle® stereo amplifier to a Lifestyle® media center 9 Setting up the remote control 10 Setting Zone 2 Protocol 10 Connecting the Lifestyle® stereo amplifier to a Model 20 music center 11...
... The serial number is located on the bottom panel of your sales receipt and warranty card together with this owner's guide. Contents Setting up your Lifestyle® Stereo Amplifier Before you begin 4 Unpacking the carton 4 Selecting a location for your Lifestyle® stereo amplifier 5 Connecting the Lifestyle® stereo amplifier to a multi-room interface 7 Connecting the Lifestyle® stereo amplifier to a Lifestyle® media center 9 Setting up the remote control 10 Setting Zone 2 Protocol 10 Connecting the Lifestyle® stereo amplifier to a Model 20 music center 11...

The Bose® Lifestyle® amplifier - Owner's guide
Page 6
...; Stereo Amplifier Before you begin Thank you have a dual voltage Lifestyle® amplifier" on page 15. 4 January 4, 2002 AM262840_00_V.pdf Note: Locate the serial number on the rear panel of the shipping carton 30-ft audio input cable PN197406 Lifestyle® stereo amplifier Owner's guide Power cord* USA/Canada (120V) * The Lifestyle® stereo amplifier includes a 120V AC (mains) power cord for international use in any part...
...; Stereo Amplifier Before you begin Thank you have a dual voltage Lifestyle® amplifier" on page 15. 4 January 4, 2002 AM262840_00_V.pdf Note: Locate the serial number on the rear panel of the shipping carton 30-ft audio input cable PN197406 Lifestyle® stereo amplifier Owner's guide Power cord* USA/Canada (120V) * The Lifestyle® stereo amplifier includes a 120V AC (mains) power cord for international use in any part...

The Bose® Lifestyle® amplifier - Owner's guide
Page 9
... Lifestyle® stereo amplifier rear panel Multi-room interface rear panel 4 Ω MINIMUM LL R L SYSTEM RR CONTROL L R +- Insert the single multi-pin connector at one end of the audio input cable into the SYSTEM CONTROL jack on the rear of the amplifier. 3. SPSEPAEKAEKREROOUUTPTUPUTSTS INPUT 30-ft audio input cable (supplied) AM262840_00_V.pdf January 4, 2002 7 Setting Up Your Lifestyle® Stereo Amplifier Connecting the Lifestyle® stereo amplifier to a multi-room interface CAUTION: Before making any connections, turn the Lifestyle...
... Lifestyle® stereo amplifier rear panel Multi-room interface rear panel 4 Ω MINIMUM LL R L SYSTEM RR CONTROL L R +- Insert the single multi-pin connector at one end of the audio input cable into the SYSTEM CONTROL jack on the rear of the amplifier. 3. SPSEPAEKAEKREROOUUTPTUPUTSTS INPUT 30-ft audio input cable (supplied) AM262840_00_V.pdf January 4, 2002 7 Setting Up Your Lifestyle® Stereo Amplifier Connecting the Lifestyle® stereo amplifier to a multi-room interface CAUTION: Before making any connections, turn the Lifestyle...

The Bose® Lifestyle® amplifier - Owner's guide
Page 10
... speakers. Press the ROOM button to control a single room or two or more than one room of Bose® powered speakers placed in other rooms with room A being the primary room (the one used for a one room. Note: Refer to your Lifestyle® system owner's guide for more information on operating your system, the Personal music center displays ROOM and HOUSE buttons, and room indicators (A, B, C, and/or D). Setting Up Your Lifestyle® Stereo Amplifier Figure 7 Sample display for a tworoom system Operating speakers in individual rooms...
... speakers. Press the ROOM button to control a single room or two or more than one room of Bose® powered speakers placed in other rooms with room A being the primary room (the one used for a one room. Note: Refer to your Lifestyle® system owner's guide for more information on operating your system, the Personal music center displays ROOM and HOUSE buttons, and room indicators (A, B, C, and/or D). Setting Up Your Lifestyle® Stereo Amplifier Figure 7 Sample display for a tworoom system Operating speakers in individual rooms...

The Bose® Lifestyle® amplifier - Owner's guide
Page 11
...) power outlet. At the other connections. 1. Figure 8 Cable connections between the Lifestyle® media center and the Lifestyle® stereo amplifier Lifestyle® SA-1 stereo amplifier rear panel Lifestyle® media center rear panel 30-ft audio input cable (supplied) AM262840_00_V.pdf January 4, 2002 9 Insert the white RCA piggyback connector of the audio input cable into the SYSTEM CONTROL jack on the rear panel of the amplifier. Insert the red RCA piggyback connector into the SPEAKER ZONES 2 output jack on the rear panel of the audio input cable...
...) power outlet. At the other connections. 1. Figure 8 Cable connections between the Lifestyle® media center and the Lifestyle® stereo amplifier Lifestyle® SA-1 stereo amplifier rear panel Lifestyle® media center rear panel 30-ft audio input cable (supplied) AM262840_00_V.pdf January 4, 2002 9 Insert the white RCA piggyback connector of the audio input cable into the SYSTEM CONTROL jack on the rear panel of the amplifier. Insert the red RCA piggyback connector into the SPEAKER ZONES 2 output jack on the rear panel of the audio input cable...

The Bose® Lifestyle® amplifier - Owner's guide
Page 12
...; media center, you will need to set the Zone 2 Protocol to operate the ZONE 2 output. 1. This will now see a menu entitled System Setup (1 of 3) is Zone 2 Protocol. 4. On Off Mute All Mute SOURCE / INPUT CD/DVD Changer FM/AM TV VCR AUX MENU / NAVIGATION Settings Tune Disc Seek Enter Channel Chapter Preset Track Volume 1 2 3 4 5 6 7 8 9 0 PLAYBACK Stop Pause Play Shuffle Repeat Settings Settings ( ) System Setup Enter System Setup (3 of 3). Remove the remote control battery cover and locate the miniature switches (Figure 9). 2. Scroll down -arrow button...
...; media center, you will need to set the Zone 2 Protocol to operate the ZONE 2 output. 1. This will now see a menu entitled System Setup (1 of 3) is Zone 2 Protocol. 4. On Off Mute All Mute SOURCE / INPUT CD/DVD Changer FM/AM TV VCR AUX MENU / NAVIGATION Settings Tune Disc Seek Enter Channel Chapter Preset Track Volume 1 2 3 4 5 6 7 8 9 0 PLAYBACK Stop Pause Play Shuffle Repeat Settings Settings ( ) System Setup Enter System Setup (3 of 3). Remove the remote control battery cover and locate the miniature switches (Figure 9). 2. Scroll down -arrow button...

The Bose® Lifestyle® amplifier - Owner's guide
Page 13
... music center and the Lifestyle® stereo amplifier CAUTION: Before making connections, turn the Lifestyle® system off and disconnect the music center from the AC (mains) power outlet. Insert the single multi-pin connector at one end of the audio input cable into the SPEAKER ZONES 2 output jack on the rear panel of the amplifier. Lifestyle® stereo amplifier rear panel 4 Ω MINIMUM LL R L SYSTEM RR CONTROL L R +- SPEAKER OUTPUTS INPUT Model 20 music center rear panel 30-ft audio input cable (supplied) AM262840_00_V.pdf...
... music center and the Lifestyle® stereo amplifier CAUTION: Before making connections, turn the Lifestyle® system off and disconnect the music center from the AC (mains) power outlet. Insert the single multi-pin connector at one end of the audio input cable into the SPEAKER ZONES 2 output jack on the rear panel of the amplifier. Lifestyle® stereo amplifier rear panel 4 Ω MINIMUM LL R L SYSTEM RR CONTROL L R +- SPEAKER OUTPUTS INPUT Model 20 music center rear panel 30-ft audio input cable (supplied) AM262840_00_V.pdf...

The Bose® Lifestyle® amplifier - Owner's guide
Page 15
...R VIDEO SOUND AM LOOP 1 SYSTEM CONTROL 2 ~ POWER 12VAC IN 1.0A ANTENNA SEE INSTRUCTION MANUAL Fixed speaker outputs 30-ft audio input cable (supplied) Acoustimass module cable AM262840_00_V.pdf January 4, 2002 13 Insert the red RCA piggyback connector of the audio input cable into an outlet until you need to temporarily unplug the theater speakers from the AC (mains) power outlet. Insert the red RCA connector of the audio input cable, insert the 3.5 mm mini-plug into the L (left) FIXED OUTPUT jack. 5. At the other connections. CAUTION: Before making connections, turn...
...R VIDEO SOUND AM LOOP 1 SYSTEM CONTROL 2 ~ POWER 12VAC IN 1.0A ANTENNA SEE INSTRUCTION MANUAL Fixed speaker outputs 30-ft audio input cable (supplied) Acoustimass module cable AM262840_00_V.pdf January 4, 2002 13 Insert the red RCA piggyback connector of the audio input cable into an outlet until you need to temporarily unplug the theater speakers from the AC (mains) power outlet. Insert the red RCA connector of the audio input cable, insert the 3.5 mm mini-plug into the L (left) FIXED OUTPUT jack. 5. At the other connections. CAUTION: Before making connections, turn...

The Bose® Lifestyle® amplifier - Owner's guide
Page 16
... L output. Remove the remote control battery cover and locate the miniature switches (Figure 13). 2. One wire is connected to your Lifestyle® system owner's guide for more than one room. Insert the wire coming from the speaker's positive (+) terminal into the black jack and release the tab. • Connect the left in the listening area (as you need to set up a second RC-5 remote control to operate your system in your Lifestyle® stereo...
... L output. Remove the remote control battery cover and locate the miniature switches (Figure 13). 2. One wire is connected to your Lifestyle® system owner's guide for more than one room. Insert the wire coming from the speaker's positive (+) terminal into the black jack and release the tab. • Connect the left in the listening area (as you need to set up a second RC-5 remote control to operate your system in your Lifestyle® stereo...

The Bose® Lifestyle® amplifier - Owner's guide
Page 18
... time. Check the caulking annually, and re-apply as RTV adhesive, to the elements. For additional help, see the troubleshooting information in your Lifestyle® system after the wires are plugged in the player or the source connected to AUX is turned on. • If using a Model 20 music center, make sure the amplifier audio input cable is plugged into SPEAKER ZONE 2. • If using a Model 5 music center for indoor use caulking, apply it only after installing...
... time. Check the caulking annually, and re-apply as RTV adhesive, to the elements. For additional help, see the troubleshooting information in your Lifestyle® system after the wires are plugged in the player or the source connected to AUX is turned on. • If using a Model 20 music center, make sure the amplifier audio input cable is plugged into SPEAKER ZONE 2. • If using a Model 5 music center for indoor use caulking, apply it only after installing...

The Bose® Lifestyle® amplifier - Owner's guide
Page 19
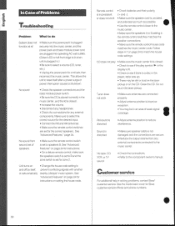
...-5 remote control, make sure the remote control switch settings are using a Lifestyle® DVD system, the stereo amplifier will not work unless work at the other end to Bose. Volume suddenly decreases • Lower the volume setting to see if the level returns to do One speaker still does not play • Disconnect the wires from the amplifier. Customer service For additional help in the speaker. If the speaker plays, the problem is...
...-5 remote control, make sure the remote control switch settings are using a Lifestyle® DVD system, the stereo amplifier will not work unless work at the other end to Bose. Volume suddenly decreases • Lower the volume setting to see if the level returns to do One speaker still does not play • Disconnect the wires from the amplifier. Customer service For additional help in the speaker. If the speaker plays, the problem is...

Owner's guide
Page 3
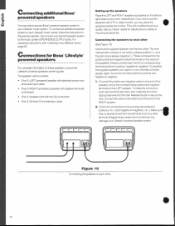
... Connections for the Bose Wave' radio 12 Programming the CD player .. 28 Connecting the Lifestyle' music center's antennas and power 13 Maintaining Your Lifestyle Music System 29 Specialradio settings for dual voltage models ......... 15 Cleaning your music system 29 Connecting other components 16 Replacing the batteries for your remote control 29 CD changer 16 In Case of Problems .. 30 Tape deck 16 TV, VCR, or Laserdisc player 17 Warranty 31 Turntable 17 Technical Information 32 Headphones 17 Index Basic Operation The music center display...
... Connections for the Bose Wave' radio 12 Programming the CD player .. 28 Connecting the Lifestyle' music center's antennas and power 13 Maintaining Your Lifestyle Music System 29 Specialradio settings for dual voltage models ......... 15 Cleaning your music system 29 Connecting other components 16 Replacing the batteries for your remote control 29 CD changer 16 In Case of Problems .. 30 Tape deck 16 TV, VCR, or Laserdisc player 17 Warranty 31 Turntable 17 Technical Information 32 Headphones 17 Index Basic Operation The music center display...
Owner's guide
Page 4
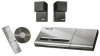
... following parts (seeFigure 1): • One (1) Lifestyle music center • One (1)FM dipole antenna • One (1) AM loop antenna • One(1)AC(mains)power pack (Two power packs are supplied with dual voltage models only) • One (1) remote control • Three AA batteries • One (1) wire cover Your Bose' powered speaker system, its fine sound quality will help you haven't unpacked the Lifestyle' music system, carefully do so now. The simple-to use the music system. Youll...
... following parts (seeFigure 1): • One (1) Lifestyle music center • One (1)FM dipole antenna • One (1) AM loop antenna • One(1)AC(mains)power pack (Two power packs are supplied with dual voltage models only) • One (1) remote control • Three AA batteries • One (1) wire cover Your Bose' powered speaker system, its fine sound quality will help you haven't unpacked the Lifestyle' music system, carefully do so now. The simple-to use the music system. Youll...
Owner's guide
Page 10
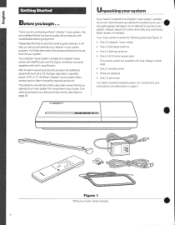
... and negative terminalson theLEFT speaker. Connecting additional Bose" powered speakers Youmay adda second Bose' powered speaker system to your Lifestyle' music center, follow the instnictions in the previous section, but connect your second speaker system tothemusic center's SPEAKERSB OUTPUT jacks.For operating instructions, see "Listening in cord of the speaker cord to secure the wire. To connect an additional speaker system to your room, respectively. The speaker carton contains: • One (1) LEFT (powered) speaker with attached power cord and audio input cable • One(1)RIGHT...
... and negative terminalson theLEFT speaker. Connecting additional Bose" powered speakers Youmay adda second Bose' powered speaker system to your Lifestyle' music center, follow the instnictions in the previous section, but connect your second speaker system tothemusic center's SPEAKERSB OUTPUT jacks.For operating instructions, see "Listening in cord of the speaker cord to secure the wire. To connect an additional speaker system to your room, respectively. The speaker carton contains: • One (1) LEFT (powered) speaker with attached power cord and audio input cable • One(1)RIGHT...

Owner's guide
Page 17
... the R (right) VIDEO SOUND INPUT of the connector cable into the left AUDIO OUTPUT. Then connect the preamp's OUTPUT to the SPEAKERS B listening area, if speakers are connected,SPEAKERS A OUTPUT is a stereo mini-headphone jack on (see `Listening in the instructions for the preamp. If you need an external phono preamplifier. Volume adjustments apply to the music centers unused AUX or VIDEO SOUND inputs. Note:Ifyour video-soundsource doesnothavestereo outputs. you will accept most popular headphone models directly. Use theFIXEDoutputs toallow...
... the R (right) VIDEO SOUND INPUT of the connector cable into the left AUDIO OUTPUT. Then connect the preamp's OUTPUT to the SPEAKERS B listening area, if speakers are connected,SPEAKERS A OUTPUT is a stereo mini-headphone jack on (see `Listening in the instructions for the preamp. If you need an external phono preamplifier. Volume adjustments apply to the music centers unused AUX or VIDEO SOUND inputs. Note:Ifyour video-soundsource doesnothavestereo outputs. you will accept most popular headphone models directly. Use theFIXEDoutputs toallow...
Owner's guide
Page 18
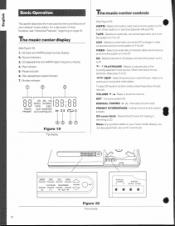
... j j j j VIDEO STEREO =P TAPE DISC TRACK AUX RANDOM PRESET AUTO OFFMUTE Figure 19 The display. Begins or pauses play of your Lifestyle' music system. PRESET STORE/ERASE -Addandremoveradio station presets. MANUAL TUNING V • • PRESET STORE ERASE • • Figure 20 The console. 18 For a discussion of the currently selected music source. Source indicators. 3. CD elapsed time and AM/FM station frequency display. 4. Opens the CD cover for current use. 84e:S149 . 0 AWRA TAPE AUX VIDEO 0 PUN/PAUSE TRACIOPAESEr 0:1 1:= o SICIP 001 VOLUME CN . ..." Play...
... j j j j VIDEO STEREO =P TAPE DISC TRACK AUX RANDOM PRESET AUTO OFFMUTE Figure 19 The display. Begins or pauses play of your Lifestyle' music system. PRESET STORE/ERASE -Addandremoveradio station presets. MANUAL TUNING V • • PRESET STORE ERASE • • Figure 20 The console. 18 For a discussion of the currently selected music source. Source indicators. 3. CD elapsed time and AM/FM station frequency display. 4. Opens the CD cover for current use. 84e:S149 . 0 AWRA TAPE AUX VIDEO 0 PUN/PAUSE TRACIOPAESEr 0:1 1:= o SICIP 001 VOLUME CN . ..." Play...
Owner's guide
Page 27
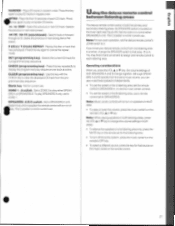
Selects the previous or next radio preset. Replay the disc or track that listening area. • To turn on the music center or the remote control. • 27 Press this switch to that source on or ute. Press this key repeatedly to display the programmed play sequence one listening area to another, change the SPEAKER switch to controleither SPEAKERS A or B. Blank key - ZONE 1 -2 switch - Its SPEAKERS switch is not for that area...
Selects the previous or next radio preset. Replay the disc or track that listening area. • To turn on the music center or the remote control. • 27 Press this switch to that source on or ute. Press this key repeatedly to display the programmed play sequence one listening area to another, change the SPEAKER switch to controleither SPEAKERS A or B. Blank key - ZONE 1 -2 switch - Its SPEAKERS switch is not for that area...
Owner's guide
Page 30
... of speakers • Make sure the remote control switch is set to speakers B. Clean the CD. display is set of weak signal coverage. No sound from any external components. prevent conflicting signals with another or acts erratically nearby Lifestyle' music system. Follow steps 4-7 on page 24 for the correct speakers. unit is plugged in solving problems. contact Bose' customer service. correct source for Bose customer service offices and phone numbers. • Unit turns on setting the house code...
... of speakers • Make sure the remote control switch is set to speakers B. Clean the CD. display is set of weak signal coverage. No sound from any external components. prevent conflicting signals with another or acts erratically nearby Lifestyle' music system. Follow steps 4-7 on page 24 for the correct speakers. unit is plugged in solving problems. contact Bose' customer service. correct source for Bose customer service offices and phone numbers. • Unit turns on setting the house code...
Owner's guide
Page 33
...; Antenna Connections 13 Grounding 3 External components Connections 16 Operation IC CD changer 23 Tape deck 22 7 TV, VCR, or Laserdisc player 23 House codes, changing 24 Automatic shutoff 24 AUTO OFF key 24, 26 Batteries Installation RC-5 remote control 15 RC-10 remote control 25 Replacing 29 CD player Listening to 22 Operating 22 Programming 28 Random play 18, 27 Placement Bass module 6 Cube speakers 5 Lengthening the wires 7 Lifestyle' music center 5 Presets Erasing 21 Selecting 20 Setting 21 Remote control Lifestyle' RC-5 remote control 19 Lifestyle' RC-10 deluxe remote control...
...; Antenna Connections 13 Grounding 3 External components Connections 16 Operation IC CD changer 23 Tape deck 22 7 TV, VCR, or Laserdisc player 23 House codes, changing 24 Automatic shutoff 24 AUTO OFF key 24, 26 Batteries Installation RC-5 remote control 15 RC-10 remote control 25 Replacing 29 CD player Listening to 22 Operating 22 Programming 28 Random play 18, 27 Placement Bass module 6 Cube speakers 5 Lengthening the wires 7 Lifestyle' music center 5 Presets Erasing 21 Selecting 20 Setting 21 Remote control Lifestyle' RC-5 remote control 19 Lifestyle' RC-10 deluxe remote control...


