
The Bose® Lifestyle® amplifier - Owner's guide
Page 10
... individual rooms. These rooms are referred to as one room of Bose® powered speakers placed in more than one The room indicators tell you must follow the procedure for setting up to your Lifestyle® system owner's guide for more than one -room system)....allows you to control more information on operating your system, the Personal music center displays ROOM and HOUSE buttons, and room indicators (A, B, C, and/or D). Setting Up Your Lifestyle® Stereo Amplifier Figure 7 Sample display for a tworoom system Operating speakers in other rooms with the Personal® ...
... individual rooms. These rooms are referred to as one room of Bose® powered speakers placed in more than one The room indicators tell you must follow the procedure for setting up to your Lifestyle® system owner's guide for more than one -room system)....allows you to control more information on operating your system, the Personal music center displays ROOM and HOUSE buttons, and room indicators (A, B, C, and/or D). Setting Up Your Lifestyle® Stereo Amplifier Figure 7 Sample display for a tworoom system Operating speakers in other rooms with the Personal® ...

The Bose® Lifestyle® amplifier - Owner's guide
Page 12
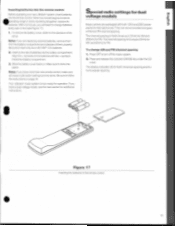
... ensures that the house code settings (switches 1, 2, 3, and 4) match those in your system in more ...". Setting Up Your Lifestyle® Stereo Amplifier Figure 9 Setting up a Zone 2 remote control Setting up the remote control You need to set up , ...January 4, 2002 AM262840_00_V.pdf Remove the remote control battery cover and locate the miniature switches (Figure 9). 2. Scroll down with a Lifestyle® media center, you will now see a menu entitled System Setup (1 of 3) is on, press the Settings button ... to "more than one room. The last item on -screen display. 2.
... ensures that the house code settings (switches 1, 2, 3, and 4) match those in your system in more ...". Setting Up Your Lifestyle® Stereo Amplifier Figure 9 Setting up a Zone 2 remote control Setting up the remote control You need to set up , ...January 4, 2002 AM262840_00_V.pdf Remove the remote control battery cover and locate the miniature switches (Figure 9). 2. Scroll down with a Lifestyle® media center, you will now see a menu entitled System Setup (1 of 3) is on, press the Settings button ... to "more than one room. The last item on -screen display. 2.

Owner's guide
Page 3
...deluxe remote control between Connections for Lifestyle' powered speakers 10 listening areas 27 Connections for the Bose Wave' radio 12 Programming the CD player .. 28 Connecting the Lifestyle' music center's antennas and power 13 Maintaining Your Lifestyle Music System 29 Specialradio settings for ...31 Turntable 17 Technical Information 32 Headphones 17 Index Basic Operation The music center display 18 Bose Corporation 18 inside back cover The music center controls 18 • The Lifestyle' remote control Listening to the radio 19 20 Tuning 20 Listening to a ...
...deluxe remote control between Connections for Lifestyle' powered speakers 10 listening areas 27 Connections for the Bose Wave' radio 12 Programming the CD player .. 28 Connecting the Lifestyle' music center's antennas and power 13 Maintaining Your Lifestyle Music System 29 Specialradio settings for ...31 Turntable 17 Technical Information 32 Headphones 17 Index Basic Operation The music center display 18 Bose Corporation 18 inside back cover The music center controls 18 • The Lifestyle' remote control Listening to the radio 19 20 Tuning 20 Listening to a ...
Owner's guide
Page 15
... sure allhouse code switchsettings are packaged with the + symbols inside the battery compartment. 3. InsertingbatteriesInto theremote control Before operating your new Lifestyle system, insert batteries into the battery compartment. The channel spacing in the remote control. 15 When the remote begins to follow theinstructions..., slide it clicks into place. Be sure to lose its perating range or stops operating altogether, replace its batteries. Your Lifestyles music system is 9 kHz for AM and 50 kHz for European spacing. If you will need to turn off the music...
... sure allhouse code switchsettings are packaged with the + symbols inside the battery compartment. 3. InsertingbatteriesInto theremote control Before operating your new Lifestyle system, insert batteries into the battery compartment. The channel spacing in the remote control. 15 When the remote begins to follow theinstructions..., slide it clicks into place. Be sure to lose its perating range or stops operating altogether, replace its batteries. Your Lifestyles music system is 9 kHz for AM and 50 kHz for European spacing. If you will need to turn off the music...
Owner's guide
Page 18
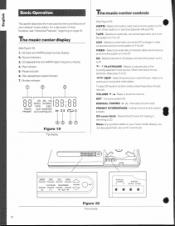
... Play indicator. 5. TAPE - PRESET STORE/ERASE -Addandremoveradio station presets. CD track and AIVVFM preset number display. 2. CD elapsed time and AM/FM station frequency display. 4. Themusic centercontrols (SeeFigure 20) AM/FM -Selects thebuilt-inradio and turns the systemonifit is off. ...the system on page 24. Note:Mysymbols visibleonyourmusic centerdisplay, but not discussedhere, arenot for two seconds, stops play of your Lifestyle' music system. Source indicators. 3. AUX -Selects an externally connected CD changer or other functions, see "Advanced Features: beginning...
... Play indicator. 5. TAPE - PRESET STORE/ERASE -Addandremoveradio station presets. CD track and AIVVFM preset number display. 2. CD elapsed time and AM/FM station frequency display. 4. Themusic centercontrols (SeeFigure 20) AM/FM -Selects thebuilt-inradio and turns the systemonifit is off. ...the system on page 24. Note:Mysymbols visibleonyourmusic centerdisplay, but not discussedhere, arenot for two seconds, stops play of your Lifestyle' music system. Source indicators. 3. AUX -Selects an externally connected CD changer or other functions, see "Advanced Features: beginning...

Owner's guide
Page 21
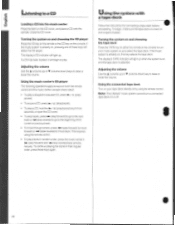
... location. Press the ERASE key again to store the displayed stationin the displayed preset location. Press the STORE key. Close theCDcover. Setting a station preset Your Lifestyle' music center can store up to erase that preset station. 4. The display will stop flashing and will be displayed. The display will stop flashing, and the new preset number will...
... location. Press the ERASE key again to store the displayed stationin the displayed preset location. Press the STORE key. Close theCDcover. Setting a station preset Your Lifestyle' music center can store up to erase that preset station. 4. The display will stop flashing and will be displayed. The display will stop flashing, and the new preset number will...
Owner's guide
Page 22
...volume Use the • (volume up ) or ♦ (volume down ) keys to move back. Note: The Lifestyle' music system cannot turn your tape deck directly or by using the remote control. • To play . The display's TAPE indicator will begin , make sure the tape deck is turned on and a tape is already... track. • To move through a track, press lolo (seek forward) to move forward or 414 (seek reverse) to raise or lower the volume. The displays CD indicator will select the CD player. Tuning the system on and choosing the tape deck Press the TAPE key on and select the tape...
...volume Use the • (volume up ) or ♦ (volume down ) keys to move back. Note: The Lifestyle' music system cannot turn your tape deck directly or by using the remote control. • To play . The display's TAPE indicator will begin , make sure the tape deck is turned on and a tape is already... track. • To move through a track, press lolo (seek forward) to move forward or 414 (seek reverse) to raise or lower the volume. The displays CD indicator will select the CD player. Tuning the system on and choosing the tape deck Press the TAPE key on and select the tape...
Owner's guide
Page 23
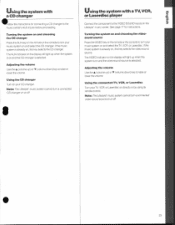
... center. or Laserdisc on , thiskey selects the CD changer. Note: The Lifestyle' music system cannot turn a connected vide-osoundsource onoroft 23 If the music system is selected. The VIDEO indicator on the display will light up when the system is on and the video-sound source is ... for connecting a CD changer to raise or lower the volume. Note: TheLifestyle musicsystemcannot turn a connected CD changeronoroff. The AUX indicator on the display will light up when the system is on , this key selects the video-sound source. Using the connected TV, VCR, or Laserdisc Turn your...
... center. or Laserdisc on , thiskey selects the CD changer. Note: The Lifestyle' music system cannot turn a connected vide-osoundsource onoroft 23 If the music system is selected. The VIDEO indicator on the display will light up when the system is on and the video-sound source is ... for connecting a CD changer to raise or lower the volume. Note: TheLifestyle musicsystemcannot turn a connected CD changeronoroff. The AUX indicator on the display will light up when the system is on , this key selects the video-sound source. Using the connected TV, VCR, or Laserdisc Turn your...

Owner's guide
Page 24
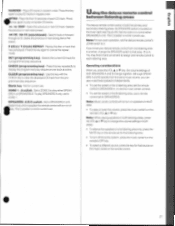
...of each one and change the house code switches to confirm recognition of another nearby Lifestyle music system. Changing house codes to prevent interferencewithother Lifestyle' music systems • Your Lifestyle remote control's commands will probably not conflict with the "Basic Operation" section before...do, set your system and its remote control(s) by moving them in 15 minutes, press theAUTOOFFkey while yourmusic system isplaying.The display'sAUTOOFF indicator willlightup. • To increase the time until shutoff. Note: Besurethemusic centerisfumedoft 1. Press any key on the ...
...of each one and change the house code switches to confirm recognition of another nearby Lifestyle music system. Changing house codes to prevent interferencewithother Lifestyle' music systems • Your Lifestyle remote control's commands will probably not conflict with the "Basic Operation" section before...do, set your system and its remote control(s) by moving them in 15 minutes, press theAUTOOFFkey while yourmusic system isplaying.The display'sAUTOOFF indicator willlightup. • To increase the time until shutoff. Note: Besurethemusic centerisfumedoft 1. Press any key on the ...
Owner's guide
Page 27
Selects the previous or next radio preset. Press this key again to clear the displayed CD track from the programmed play sequence. SET (programming key) - CLEAR (programming key) - Use this switch to SPEAKERS A or B. Set to controleither SPEAKERS..., the volume settings of eachCD track.Press is not for SPEAKERS B. ZONE 1 -2 switch - Youmay find it more convenient toassign one remote control to display the programmed play either SPEAKERS A or SPEAKERS B. Note:Music center controls willnot turnonspeakersintheEt area. • To raise or lower the volume, press the music...
Selects the previous or next radio preset. Press this key again to clear the displayed CD track from the programmed play sequence. SET (programming key) - CLEAR (programming key) - Use this switch to SPEAKERS A or B. Set to controleither SPEAKERS..., the volume settings of eachCD track.Press is not for SPEAKERS B. ZONE 1 -2 switch - Youmay find it more convenient toassign one remote control to display the programmed play either SPEAKERS A or SPEAKERS B. Note:Music center controls willnot turnonspeakersintheEt area. • To raise or lower the volume, press the music...

Owner's guide
Page 28
...:Ifyouselectanonexistent track (forexample: track 11 ona disc withonly 10tracks), the trackregisters on the display. Turn the music system on with the first track in a sequence. Note: Ifyouchangeyourmindatanypoint during the programmingsequence,press OFF andbeginagain. 3. ... will begin programming. To cancel programmed play a programmed sequence 2. Repeat Steps 3-4 to program up the unwanted track on the display butitisnotprogrammedinto the sequence. Example: Toprograma sequenceoftracks3, 1, 7, and 10. SET. Note: Youmayprogram thesame track intoa sequencemore than one or...
...:Ifyouselectanonexistent track (forexample: track 11 ona disc withonly 10tracks), the trackregisters on the display. Turn the music system on with the first track in a sequence. Note: Ifyouchangeyourmindatanypoint during the programmingsequence,press OFF andbeginagain. 3. ... will begin programming. To cancel programmed play a programmed sequence 2. Repeat Steps 3-4 to program up the unwanted track on the display butitisnotprogrammedinto the sequence. Example: Toprograma sequenceoftracks3, 1, 7, and 10. SET. Note: Youmayprogram thesame track intoa sequencemore than one or...
Owner's guide
Page 30
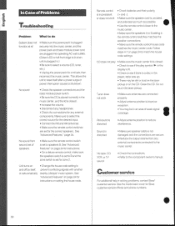
... for zone 2. Make sure to reduce • Connect the FM and AM antennas. correct source for Bose customer service offices and phone numbers. • FM sound is • Adjust antenna position to select the... • Check the speaker connections and the touch the laser pickup. No sound from any external components. display is • Check to see if the play symbol ► in the etc.). • Unplug the... manual. prevent conflicting signals with another or acts erratically nearby Lifestyle' music system. Customer service For additional help in solving problems. contact...
... for zone 2. Make sure to reduce • Connect the FM and AM antennas. correct source for Bose customer service offices and phone numbers. • FM sound is • Adjust antenna position to select the... • Check the speaker connections and the touch the laser pickup. No sound from any external components. display is • Check to see if the play symbol ► in the etc.). • Unplug the... manual. prevent conflicting signals with another or acts erratically nearby Lifestyle' music system. Customer service For additional help in solving problems. contact...
Owner's guide
Page 33
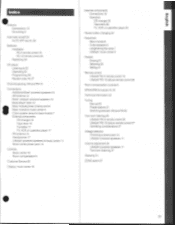
...-10 deluxe remote control 26 Channel spacing, AM and FM 15 Room compensation controls 9 Connections Additional Bose' powered speakers 10 AM antenna 14 Bose' Lifestyle' powered speakers 10 •BoseWave' radio 12 Bass module power (mains) cord 8 Bass module to music center 8... 25 Lifestyle' RC-5 remote control 25 Lifestyle' RC-10 deluxe remote control 27 Operating considerations 27 Voltage selection Choosing a power pack 14 Lifestyle' powered speakers 11 Volume adjustment 20 Lifestyle' powered speakers 11 Two-room listening 27 Warranty 31 Customer Service 30 ZONE switch 27 Display, music...
...-10 deluxe remote control 26 Channel spacing, AM and FM 15 Room compensation controls 9 Connections Additional Bose' powered speakers 10 AM antenna 14 Bose' Lifestyle' powered speakers 10 •BoseWave' radio 12 Bass module power (mains) cord 8 Bass module to music center 8... 25 Lifestyle' RC-5 remote control 25 Lifestyle' RC-10 deluxe remote control 27 Operating considerations 27 Voltage selection Choosing a power pack 14 Lifestyle' powered speakers 11 Volume adjustment 20 Lifestyle' powered speakers 11 Two-room listening 27 Warranty 31 Customer Service 30 ZONE switch 27 Display, music...


