
The Bose® Lifestyle® amplifier - Owner's guide
Page 9
... audio input cable, insert the 3.5 mm mini-plug into one of the unused ROOM output jacks (B, C, or D) on the rear panel of the multi-room interface (Figure 6). 2. Setting Up Your Lifestyle® Stereo Amplifier Connecting the Lifestyle® stereo amplifier to a multi...-room interface CAUTION: Before making any connections, turn the Lifestyle® system off and disconnect the music center from the AC (mains) ...
... audio input cable, insert the 3.5 mm mini-plug into one of the unused ROOM output jacks (B, C, or D) on the rear panel of the multi-room interface (Figure 6). 2. Setting Up Your Lifestyle® Stereo Amplifier Connecting the Lifestyle® stereo amplifier to a multi...-room interface CAUTION: Before making any connections, turn the Lifestyle® system off and disconnect the music center from the AC (mains) ...

The Bose® Lifestyle® amplifier - Owner's guide
Page 11
...right) INPUT jack of the amplifier. 3. Figure 8 Cable connections between the Lifestyle® media center and the Lifestyle® stereo amplifier Lifestyle® SA-1 stereo amplifier rear panel Lifestyle® media center rear panel 30-ft audio input cable (supplied) AM262840_00_V.pdf January ...4, 2002 9 Insert the red RCA piggyback connector into an outlet until you have completed all other end of the audio input cable, insert the 3.5 mm mini-plug ...
...right) INPUT jack of the amplifier. 3. Figure 8 Cable connections between the Lifestyle® media center and the Lifestyle® stereo amplifier Lifestyle® SA-1 stereo amplifier rear panel Lifestyle® media center rear panel 30-ft audio input cable (supplied) AM262840_00_V.pdf January ...4, 2002 9 Insert the red RCA piggyback connector into an outlet until you have completed all other end of the audio input cable, insert the 3.5 mm mini-plug ...

The Bose® Lifestyle® amplifier - Owner's guide
Page 13
SPEAKER OUTPUTS INPUT Model 20 music center rear panel 30-ft audio input cable (supplied) AM262840_00_V.pdf January 4, 2002 11 Lifestyle® stereo amplifier rear panel 4 Ω MINIMUM LL R L SYSTEM RR CONTROL L R +- Insert the single multi-pin connector at one end...other end of the audio input cable, insert the 3.5 mm mini-plug into the SYSTEM CONTROL jack on the rear panel of the amplifier. 3. At the other connections. 1. Setting Up Your Lifestyle® Stereo Amplifier Connecting the Lifestyle® stereo amplifier to a Model 20 music center ...
SPEAKER OUTPUTS INPUT Model 20 music center rear panel 30-ft audio input cable (supplied) AM262840_00_V.pdf January 4, 2002 11 Lifestyle® stereo amplifier rear panel 4 Ω MINIMUM LL R L SYSTEM RR CONTROL L R +- Insert the single multi-pin connector at one end...other end of the audio input cable, insert the 3.5 mm mini-plug into the SYSTEM CONTROL jack on the rear panel of the amplifier. 3. At the other connections. 1. Setting Up Your Lifestyle® Stereo Amplifier Connecting the Lifestyle® stereo amplifier to a Model 20 music center ...

The Bose® Lifestyle® amplifier - Owner's guide
Page 15
... input cables from the FIXED R and FIXED L OUTPUT jacks. When adding the Lifestyle® amplifier, you have completed all other end of the audio input cable, insert the 3.5 mm mini-plug into the R (right) FIXED OUTPUT jack. The amplifier is ...; stereo amplifier Model 5 music center rear panel Lifestyle® stereo amplifier rear panel 4 Ω MINIMUM LL LL SYSTEM RR CONTROL R +- SPSEPAEKAEKREROOUUTPTUPUTSTS INPUT 3.5 mm mini-plug L R A B SPEAKERS OUTPUT FIXED REC PLAY AUX TAPE INPUT L R VIDEO SOUND AM LOOP 1 SYSTEM CONTROL 2 ~ POWER...
... input cables from the FIXED R and FIXED L OUTPUT jacks. When adding the Lifestyle® amplifier, you have completed all other end of the audio input cable, insert the 3.5 mm mini-plug into the R (right) FIXED OUTPUT jack. The amplifier is ...; stereo amplifier Model 5 music center rear panel Lifestyle® stereo amplifier rear panel 4 Ω MINIMUM LL LL SYSTEM RR CONTROL R +- SPSEPAEKAEKREROOUUTPTUPUTSTS INPUT 3.5 mm mini-plug L R A B SPEAKERS OUTPUT FIXED REC PLAY AUX TAPE INPUT L R VIDEO SOUND AM LOOP 1 SYSTEM CONTROL 2 ~ POWER...

The Bose® Lifestyle® amplifier - Owner's guide
Page 19
... checking for correct phone numbers. Bass or treble is covered by the Bose limited one-year transferable warranty. Choosing a lower setting should ensure continuous, even volume. AM262840_00_V.pdf January 4, 2002 17 Maintaining Your Lifestyle® Stereo Amplifier Problem What to do One speaker still does not ... are touching across terminals. • See "Connecting speakers to "Legacy". Remote does not adjust the volume • Be sure the 1/8" mini-plug is set too high and is in the terminals on the right in the SYSTEM CONTROL 2 jack. • If you are using...
... checking for correct phone numbers. Bass or treble is covered by the Bose limited one-year transferable warranty. Choosing a lower setting should ensure continuous, even volume. AM262840_00_V.pdf January 4, 2002 17 Maintaining Your Lifestyle® Stereo Amplifier Problem What to do One speaker still does not ... are touching across terminals. • See "Connecting speakers to "Legacy". Remote does not adjust the volume • Be sure the 1/8" mini-plug is set too high and is in the terminals on the right in the SYSTEM CONTROL 2 jack. • If you are using...
The Bose® Lifestyle® amplifier - Owner's guide
Page 20
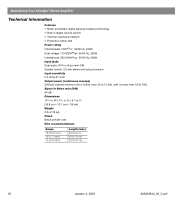
...max.) 30 ft (9 m) 45 ft (14 m) 70 ft (21 m) 18 January 4, 2002 AM262840_00_V.pdf Maintaining Your Lifestyle® Stereo Amplifier Technical information Features • Bose® proprietary digital signal processing technology • Built-in digital volume control • Thermal overload protection • Protective ... 50/60 Hz, 220W International: 220-240V 50/60 Hz, 220W Input jacks Dual audio: RCA or 8-pin mini-DIN System control: 3.5 mm stereo mini-plug connector Input sensitivity 0.5 Vrms @ 1 kHz Output power (continuous average) 35W per channel minimum into 4 Ohms...
...max.) 30 ft (9 m) 45 ft (14 m) 70 ft (21 m) 18 January 4, 2002 AM262840_00_V.pdf Maintaining Your Lifestyle® Stereo Amplifier Technical information Features • Bose® proprietary digital signal processing technology • Built-in digital volume control • Thermal overload protection • Protective ... 50/60 Hz, 220W International: 220-240V 50/60 Hz, 220W Input jacks Dual audio: RCA or 8-pin mini-DIN System control: 3.5 mm stereo mini-plug connector Input sensitivity 0.5 Vrms @ 1 kHz Output power (continuous average) 35W per channel minimum into 4 Ohms...

Owner's guide
Page 17
... to convertits singleaudiooutputjack totwojacks that came with your dealer. Insert the black or white plug into the right AUDIO OUTPUT of your Lifestyle' music center. If you need an external phono preamplifier. Whenheadphones are turned on the left AUDIO OUTPUT. Connecting a TV, ...outputs. Then connect the preamp's OUTPUT to the SPEAKERS B listening area, if speakers are connected,SPEAKERS A OUTPUT is a stereo mini-headphone jack on (see `Listening in the instructions for the preamp. Connect the turntable to determine the appropriate preamplifier model. page 25...
... to convertits singleaudiooutputjack totwojacks that came with your dealer. Insert the black or white plug into the right AUDIO OUTPUT of your Lifestyle' music center. If you need an external phono preamplifier. Whenheadphones are turned on the left AUDIO OUTPUT. Connecting a TV, ...outputs. Then connect the preamp's OUTPUT to the SPEAKERS B listening area, if speakers are connected,SPEAKERS A OUTPUT is a stereo mini-headphone jack on (see `Listening in the instructions for the preamp. Connect the turntable to determine the appropriate preamplifier model. page 25...
