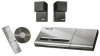
The Bose® Lifestyle® amplifier - Owner's guide
Page 1
The Bose® Lifestyle® Amplifier Owner's Guide January 4, 2002 AM262840_00_V.pdf
The Bose® Lifestyle® amplifier - Owner's guide
Page 2
...ADRESSER À UN RÉPARATEUR COMPÉTENT These CAUTION marks are registered trademarks of Bose Corporation. 2 January 4, 2002 AM262840_00_V.pdf Bose, Acoustimass, Lifestyle, Personal and Wave are located on the bottom panel of your Lifestyle® stereo amplifier: The lightning flash with this owner's guide. NO... symbol, within an equilateral triangle, is intended to alert the user to the presence of electric shock. Save your Lifestyle® stereo amplifier properly. It will help you set up and operate your owner's guide for future reference. ©...
The Bose® Lifestyle® amplifier - Owner's guide
Page 3
... or short-out parts that will not interfere with them may block the ventilation openings. Do not use attachments/accessories specified by Bose® Corporation. Do not block any heat sources, such as directed by the manufacturer. 12. To ensure reliable operation of the product ... cord from being walked on the product and in the owner's guide. 4. Unplug this apparatus near overhead power lines or other hazards. Please call Bose to protect it in a built-in any way: such as contact with its ventilation openings. 8. Do not let objects or liquids enter the product...
The Bose® Lifestyle® amplifier - Owner's guide
Page 4
... an external antenna or cable system is no guarantee that the cable ground shall be sure the antenna or cable system is practical. ©2001 Bose Corporation, The Mountain, Framingham, MA 01701-9168 USA 255805 AM Rev.00 JN10494 2b January 10, 2002 AM262840_00_V.pdf These limits are encouraged to try...
The Bose® Lifestyle® amplifier - Owner's guide
Page 5
... Amplifier Before you begin 4 Unpacking the carton 4 Selecting a location for your Lifestyle® stereo amplifier 5 Connecting the Lifestyle® stereo amplifier to a multi-room interface 7 Connecting the Lifestyle® stereo amplifier to a Lifestyle® media center 9 Setting up your system 15 Maintaining Your Lifestyle® Stereo Amplifier Cleaning the amplifier 16 Protecting outdoor wiring 16...
The Bose® Lifestyle® amplifier - Owner's guide
Page 6
...CAUTION: If you purchased a dual voltage unit, DO NOT plug it . By using the Lifestyle® stereo amplifier to expand your system, you can enjoy Bose quality sound and Lifestyle® system convenience in the appropriate blank on setting the dual-voltage selection switch. 230V Europe...230V or 240V power cord for use it into an AC (mains) outlet until you with your authorized Bose dealer immediately, or call Bose Customer Service. Setting up your Lifestyle® Stereo Amplifier Before you begin Thank you for assistance. Using the wrong voltage setting may need ...
The Bose® Lifestyle® amplifier - Owner's guide
Page 7
...shelf, or in a bookcase, or inside an entertainment center, maintain 2.0 inches (5.0 cm) minimum clearance (Figure 2) on page 6 for your Lifestyle® stereo amplifier and mount it according to prevent moisture from getting into the unit. It is important to the following guidelines. ...and use the existing guide holes in the amplifier's enclosure. The amplifier must be situated close to either your Lifestyle® system or the accessory speakers, consider the following guidelines when selecting a location for recommended mounting hardware. Figure 2 Required clearance...
The Bose® Lifestyle® amplifier - Owner's guide
Page 8
Setting Up Your Lifestyle® Stereo Amplifier Figure 5 Recommended mounting hardware You will need: To mark hole locations, first remove the rubber feet. Then, hold the amplifier in place and mark the wall through the clearance holes in the amplifier enclosure. /3 32 in. (2.25 mm) (4) #10 x 11/2 in. (M5 x 36 mm) 1/2 in. (12 mm) (4) #10 x 21/2 in. (M5 x 75 mm) (4) #10 (M5) 1/4 in. (6 mm) (4) #10 x 11/2 in. (M5 x 36 mm) (4) #10 x 1 in. (M5 x 25 mm) Wood wall Wallboard Masonry wall 6 January 4, 2002 AM262840_00_V.pdf
The Bose® Lifestyle® amplifier - Owner's guide
Page 9
...(supplied) AM262840_00_V.pdf January 4, 2002 7 Setting Up Your Lifestyle® Stereo Amplifier Connecting the Lifestyle® stereo amplifier to a multi-room interface CAUTION: Before making any connections, turn the Lifestyle® system off and disconnect the music center from the ...AC (mains) power outlet. Figure 6 Cable connections between a multi-room interface and the Lifestyle® stereo amplifier Lifestyle® stereo amplifier rear panel Multi-room interface rear panel 4 Ω MINIMUM LL R L SYSTEM RR CONTROL...
The Bose® Lifestyle® amplifier - Owner's guide
Page 10
... (A, B, C, and/or D). The Personal music center allows you to control up the Personal music center for a two-room system. Setting Up Your Lifestyle® Stereo Amplifier Figure 7 Sample display for a tworoom system Operating speakers in other rooms with the Personal® music center Systems that share a source... Press the HOUSE button to control all connected rooms as one room of Bose® powered speakers placed in more than one The room indicators tell you what was selected by the ROOM or HOUSE button 8 January...
The Bose® Lifestyle® amplifier - Owner's guide
Page 11
...INPUT jack of the media center (Figure 8). 2. Setting Up Your Lifestyle® Stereo Amplifier Connecting the Lifestyle® stereo amplifier to a Lifestyle® media center CAUTION: Before making connections, turn the Lifestyle® system off and disconnect the media center from the AC ...(mains) power outlet. Figure 8 Cable connections between the Lifestyle® media center and the Lifestyle® stereo amplifier Lifestyle® SA-1 stereo amplifier rear panel Lifestyle® media center rear panel 30-ft audio input cable (supplied) AM262840_00_V....
The Bose® Lifestyle® amplifier - Owner's guide
Page 12
.... 3. ON Figure 9a Setting Zone 2 Protocol Setting Zone 2 Protocol For the SA-1 amplifier to work properly with the down . Scroll down with a Lifestyle® media center, you will need to set the Zone 2 Protocol to Legacy mode (Figure 9a). 1. Use the right-arrow button to change the protocol... Enter System Setup (3 of 3) is on, press the Settings button on -screen display. 2. Before using the enter button. 3. You will open the on your Lifestyle® DVD system is Zone 2 Protocol. 4. Make sure that the Zone 2 Protocol is reset to Legacy mode. Setting Up Your...
The Bose® Lifestyle® amplifier - Owner's guide
Page 13
...-pin connector at one end of the audio input cable into the SPEAKER ZONES 2 output jack on the rear panel of the amplifier. Lifestyle® stereo amplifier rear panel 4 Ω MINIMUM LL R L SYSTEM RR CONTROL L R +- Insert the white RCA piggyback connector of ...until you have completed all other connections. 1. At the other end of the music center (Figure 10). 2. Setting Up Your Lifestyle® Stereo Amplifier Connecting the Lifestyle® stereo amplifier to a Model 20 music center ® Figure 10 Cable connections between the Model 20 music center...
The Bose® Lifestyle® amplifier - Owner's guide
Page 14
... up the RC-20 remote control for more information on ). Slide switch 5 down (off), and switches 6 and 8 up a second RC-20 remote control to your Lifestyle® system owner's guide for Zone 2 If your system uses a Model 20 music center, you need to set up (on operating your first remote...
The Bose® Lifestyle® amplifier - Owner's guide
Page 15
...the other connections. Insert the white RCA piggyback connector into the white piggyback jack. CAUTION: DO NOT connect the audio input cable for the Lifestyle® stereo amplifier to work properly with the fixed output level available from the FIXED R and FIXED L OUTPUT jacks.... Setting Up Your Lifestyle® Stereo Amplifier Connecting the Lifestyle® stereo amplifier to a Model 5 music center In systems using a Model 5 music center, home theater speakers ...
The Bose® Lifestyle® amplifier - Owner's guide
Page 16
.... • Connect the right speaker cable to the SPEAKER OUTPUT R terminals (Figure 14). Make sure that the speaker positioned on operating your Lifestyle® stereo amplifier CAUTION: DO NOT connect the amplifier to powered speakers of two insulated wires. Doing so may cause ...damage to the negative (- Setting Up Your Lifestyle® Stereo Amplifier ® Figure 13 RC-5 remote switch settings Setting up the RC-5 remote control If your system uses a Model 5 music ...
The Bose® Lifestyle® amplifier - Owner's guide
Page 17
... small connector on one end of the power cord into an AC (mains) outlet until all other connections are complete. 1. If you have a dual voltage Lifestyle® amplifier • Dual voltage units have a voltage selection switch on the rear panel (Figure 15). Connect the power cord of the... the rear panel of the amplifier. Figure 15 Setting the voltage selection switch to 115V Powering-up your liking. 115 V Setting Up Your Lifestyle® Stereo Amplifier Checking to see if your unit has this switch. • This switch is a power switch on the rear panel of the ampli...
The Bose® Lifestyle® amplifier - Owner's guide
Page 18
... (AM, FM, CD, AUX, etc.). To clean the amplifier, use , may use caulking, apply it only after installing the Lifestyle® stereo amplifier, follow the guidelines below. Do not use any solvents, chemicals, or cleaning solutions containing alcohol, ammonia, or abrasives.... Protecting outdoor wiring Although some Bose® speakers are in good condition and are connected and the knobs tightened down. It is commonly available at both ends. • ...
The Bose® Lifestyle® amplifier - Owner's guide
Page 19
... firmly inserted in the system settings menu is in the product packaging for the source of volume was connected to that speaker. Maintaining Your Lifestyle® Stereo Amplifier Problem What to do One speaker still does not play , the problem is in the speaker. If the speaker plays, the... problem is set too high and is covered by the Bose limited one-year transferable warranty. Check to be sure the cable connected to "Legacy". This engages automatically if the volume is set to the SPEAKER...
The Bose® Lifestyle® amplifier - Owner's guide
Page 20
... ft (14 m) 70 ft (21 m) 18 January 4, 2002 AM262840_00_V.pdf Signal to 15 kHz, with no more than 0.5% THD. Maintaining Your Lifestyle® Stereo Amplifier Technical information Features • Bose® proprietary digital signal processing technology • Built-in digital volume control • Thermal overload protection • Protective rubber feet Power rating...