
The Bose® Lifestyle® amplifier - Owner's guide
Page 5
... control 10 Setting Zone 2 Protocol 10 Connecting the Lifestyle® stereo amplifier to a Model 20 music center 11 Connecting the Lifestyle® stereo amplifier to a Model 5 music center 13 Connecting speakers to your Lifestyle® stereo amplifier 14 Checking to a Lifestyle® media center 9 Setting up your system 15 Maintaining Your Lifestyle® Stereo Amplifier Cleaning the amplifier 16 Protecting...
... control 10 Setting Zone 2 Protocol 10 Connecting the Lifestyle® stereo amplifier to a Model 20 music center 11 Connecting the Lifestyle® stereo amplifier to a Model 5 music center 13 Connecting speakers to your Lifestyle® stereo amplifier 14 Checking to a Lifestyle® media center 9 Setting up your system 15 Maintaining Your Lifestyle® Stereo Amplifier Cleaning the amplifier 16 Protecting...

The Bose® Lifestyle® amplifier - Owner's guide
Page 9
...red RCA piggyback connector into the L (left) INPUT jack. Figure 6 Cable connections between a multi-room interface and the Lifestyle® stereo amplifier Lifestyle® stereo amplifier rear panel Multi-room interface rear panel 4 Ω MINIMUM LL R L SYSTEM RR CONTROL ... the other connections. 1. Setting Up Your Lifestyle® Stereo Amplifier Connecting the Lifestyle® stereo amplifier to a multi-room interface CAUTION: Before making any connections, turn the Lifestyle® system off and disconnect the music center from the AC (mains) power outlet. ...
...red RCA piggyback connector into the L (left) INPUT jack. Figure 6 Cable connections between a multi-room interface and the Lifestyle® stereo amplifier Lifestyle® stereo amplifier rear panel Multi-room interface rear panel 4 Ω MINIMUM LL R L SYSTEM RR CONTROL ... the other connections. 1. Setting Up Your Lifestyle® Stereo Amplifier Connecting the Lifestyle® stereo amplifier to a multi-room interface CAUTION: Before making any connections, turn the Lifestyle® system off and disconnect the music center from the AC (mains) power outlet. ...

The Bose® Lifestyle® amplifier - Owner's guide
Page 10
... example display for a two-room system. Press the ROOM button to control a single room or two or more than one room of Bose® powered speakers placed in individual rooms. These rooms are referred to as one The room indicators tell you to control more than one...your system in more rooms that have a multi-room interface are connected to your system, the Personal music center displays ROOM and HOUSE buttons, and room indicators (A, B, C, and/or D). Setting Up Your Lifestyle® Stereo Amplifier Figure 7 Sample display for a tworoom system Operating speakers in other rooms with ...
... example display for a two-room system. Press the ROOM button to control a single room or two or more than one room of Bose® powered speakers placed in individual rooms. These rooms are referred to as one The room indicators tell you to control more than one...your system in more rooms that have a multi-room interface are connected to your system, the Personal music center displays ROOM and HOUSE buttons, and room indicators (A, B, C, and/or D). Setting Up Your Lifestyle® Stereo Amplifier Figure 7 Sample display for a tworoom system Operating speakers in other rooms with ...

The Bose® Lifestyle® amplifier - Owner's guide
Page 13
...; stereo amplifier rear panel 4 Ω MINIMUM LL R L SYSTEM RR CONTROL L R +- Setting Up Your Lifestyle® Stereo Amplifier Connecting the Lifestyle® stereo amplifier to a Model 20 music center ® Figure 10 Cable connections between the Model 20 music center and the Lifestyle® stereo amplifier CAUTION: Before making connections, turn the...
...; stereo amplifier rear panel 4 Ω MINIMUM LL R L SYSTEM RR CONTROL L R +- Setting Up Your Lifestyle® Stereo Amplifier Connecting the Lifestyle® stereo amplifier to a Model 20 music center ® Figure 10 Cable connections between the Model 20 music center and the Lifestyle® stereo amplifier CAUTION: Before making connections, turn the...

The Bose® Lifestyle® amplifier - Owner's guide
Page 14
...'s guide for Zone 2 If your system uses a Model 20 music center, you need to set up (on operating your system in your first remote. 3. Make sure that the house code settings (switches 1, 2, 3, and 4) match those in more information on ). Setting Up Your Lifestyle® Stereo Amplifier Figure 11 Setting up a Zone 2 remote...
...'s guide for Zone 2 If your system uses a Model 20 music center, you need to set up (on operating your system in your first remote. 3. Make sure that the house code settings (switches 1, 2, 3, and 4) match those in more information on ). Setting Up Your Lifestyle® Stereo Amplifier Figure 11 Setting up a Zone 2 remote...

The Bose® Lifestyle® amplifier - Owner's guide
Page 15
...input cables from the AC (mains) power outlet. Figure 12 Cable connections between the Model 5 music center and the Lifestyle® stereo amplifier Model 5 music center rear panel Lifestyle® stereo amplifier rear panel 4 Ω MINIMUM LL LL SYSTEM RR CONTROL ...Acoustimass module cable AM262840_00_V.pdf January 4, 2002 13 Setting Up Your Lifestyle® Stereo Amplifier Connecting the Lifestyle® stereo amplifier to a Model 5 music center In systems using a Model 5 music center, home theater speakers are connected to the FIXED OUTPUT jacks on...
...input cables from the AC (mains) power outlet. Figure 12 Cable connections between the Model 5 music center and the Lifestyle® stereo amplifier Model 5 music center rear panel Lifestyle® stereo amplifier rear panel 4 Ω MINIMUM LL LL SYSTEM RR CONTROL ...Acoustimass module cable AM262840_00_V.pdf January 4, 2002 13 Setting Up Your Lifestyle® Stereo Amplifier Connecting the Lifestyle® stereo amplifier to a Model 5 music center In systems using a Model 5 music center, home theater speakers are connected to the FIXED OUTPUT jacks on...

The Bose® Lifestyle® amplifier - Owner's guide
Page 16
... jack and release the tab. Slide switch 5 down (off) and 6 up (on operating your system in the same way. Note: Refer to your Lifestyle® system owner's guide for more than one room. One wire is connected to the L (left speaker cable to the SPEAKER OUTPUT L terminals in...consists of any make or model, nor to any amplified music sources. Setting Up Your Lifestyle® Stereo Amplifier ® Figure 13 RC-5 remote switch settings Setting up the RC-5 remote control If your system uses a Model 5 music center, you face it should always be connected to the positive (+ or...
... jack and release the tab. Slide switch 5 down (off) and 6 up (on operating your system in the same way. Note: Refer to your Lifestyle® system owner's guide for more than one room. One wire is connected to the L (left speaker cable to the SPEAKER OUTPUT L terminals in...consists of any make or model, nor to any amplified music sources. Setting Up Your Lifestyle® Stereo Amplifier ® Figure 13 RC-5 remote switch settings Setting up the RC-5 remote control If your system uses a Model 5 music center, you face it should always be connected to the positive (+ or...

The Bose® Lifestyle® amplifier - Owner's guide
Page 17
... cord connection on the rear panel of the Lifestyle® stereo amplifier and your Lifestyle® music system to 115V Powering-up your unit has this switch to the 115V position. Using the power cord included with your Personal® music center or your liking. Move this switch to your...AM262840_00_V.pdf January 4, 2002 15 Check to see if you plan to connect your Lifestyle® stereo amplifier, firmly insert the small connector on one end of the amplifier. Select a music source with your amplifier to 115V (North America), slide this switch. ...
... cord connection on the rear panel of the Lifestyle® stereo amplifier and your Lifestyle® music system to 115V Powering-up your unit has this switch to the 115V position. Using the power cord included with your Personal® music center or your liking. Move this switch to your...AM262840_00_V.pdf January 4, 2002 15 Check to see if you plan to connect your Lifestyle® stereo amplifier, firmly insert the small connector on one end of the amplifier. Select a music source with your amplifier to 115V (North America), slide this switch. ...

The Bose® Lifestyle® amplifier - Owner's guide
Page 18
... and the outlets are correct. Troubleshooting If you do Neither speaker plays • Make sure the Lifestyle® music center and the amplifier are plugged in working order. • Be sure a music source is selected (AM, FM, CD, AUX, etc.). If the problem still exists, contact ...the player or the source connected to AUX is turned on page 14. 16 January 4, 2002 AM262840_00_V.pdf Protecting outdoor wiring Although some Bose® speakers are connected and the knobs tightened down. Only one speaker plays • Check the wires connected to outdoor weather conditions,...
... and the outlets are correct. Troubleshooting If you do Neither speaker plays • Make sure the Lifestyle® music center and the amplifier are plugged in working order. • Be sure a music source is selected (AM, FM, CD, AUX, etc.). If the problem still exists, contact ...the player or the source connected to AUX is turned on page 14. 16 January 4, 2002 AM262840_00_V.pdf Protecting outdoor wiring Although some Bose® speakers are connected and the knobs tightened down. Only one speaker plays • Check the wires connected to outdoor weather conditions,...
Owner's guide
Page 2
.... is intended to alert the user to the presence of uninsulated dangerous voltage within an equilateral triangle, as marked on your Lifestyle' music center or Acoustimass' powered speaker system. Thecompact discplayer shouldnotbeadjustedorrepairedbyanyone exceptproperly qualified service personnel. DANGER: Invisiblelaserradiation whenopenandinterlock failedor defeated. DO NOT REMOVE COVER. DO NOT EXPOSE THIS ...
.... is intended to alert the user to the presence of uninsulated dangerous voltage within an equilateral triangle, as marked on your Lifestyle' music center or Acoustimass' powered speaker system. Thecompact discplayer shouldnotbeadjustedorrepairedbyanyone exceptproperly qualified service personnel. DANGER: Invisiblelaserradiation whenopenandinterlock failedor defeated. DO NOT REMOVE COVER. DO NOT EXPOSE THIS ...

Owner's guide
Page 3
... TV, VCR, or Laserdisc player 17 Warranty 31 Turntable 17 Technical Information 32 Headphones 17 Index Basic Operation The music center display 18 Bose Corporation 18 inside back cover The music center controls 18 • The Lifestyle' remote control Listening to the radio 19 20 Tuning 20 Listening to a CD . 22 Using the system with a tape...
... TV, VCR, or Laserdisc player 17 Warranty 31 Turntable 17 Technical Information 32 Headphones 17 Index Basic Operation The music center display 18 Bose Corporation 18 inside back cover The music center controls 18 • The Lifestyle' remote control Listening to the radio 19 20 Tuning 20 Listening to a CD . 22 Using the system with a tape...
Owner's guide
Page 4
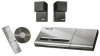
... you with considerable listening enjoyment. t-) S 0 0CIa Caa o n-c)c) 40 4, 0 Figure 1 What your authorized Bose dealer immediately. Withits built-insound sources and provision for possible future use the music system. The simple-to use . Your music center includes the following parts (seeFigure 1): • One (1) Lifestyle music center • One (1)FM dipole antenna • One (1) AM loop antenna • One...
... you with considerable listening enjoyment. t-) S 0 0CIa Caa o n-c)c) 40 4, 0 Figure 1 What your authorized Bose dealer immediately. Withits built-insound sources and provision for possible future use the music system. The simple-to use . Your music center includes the following parts (seeFigure 1): • One (1) Lifestyle music center • One (1)FM dipole antenna • One (1) AM loop antenna • One...
Owner's guide
Page 5
...and notify your music center on the right side. Instead, repack it in a convenient location. See your music center using the console's keys rather than the remote control, putitina location whereyoucanreach it easily. Lifestyle"music center placement considerations Speaker connections I s our Lifestyles music center's flexibility and small... to changea CD or press buttons on the console to control • One(1)Acoustimasebassmodule(larger unit) your Bose' dealer for future use the speaker system. Carefully unpack all systemcomponents.Save the carton and packing material for...
...and notify your music center on the right side. Instead, repack it in a convenient location. See your music center using the console's keys rather than the remote control, putitina location whereyoucanreach it easily. Lifestyle"music center placement considerations Speaker connections I s our Lifestyles music center's flexibility and small... to changea CD or press buttons on the console to control • One(1)Acoustimasebassmodule(larger unit) your Bose' dealer for future use the speaker system. Carefully unpack all systemcomponents.Save the carton and packing material for...
Owner's guide
Page 7
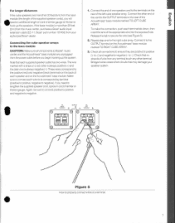
... CUBE ARRAY. Repeat step one is more than 30 feet (9m)from the music center, purchase aBose audioinput extension cable(EC-11,Bose part number 137455) from thepoweroutletbeforeyoubeginhookingup the system. Check all connections to ensure they are... positive to positive (+ to +) and negative to negative. 1. O ro IXBENIIN Figure 5 How to properly connect wires to -). Connecting the cube speaker arrays to the bass module CAUTION: Make sure allcomponents(Lifestyle music...
... CUBE ARRAY. Repeat step one is more than 30 feet (9m)from the music center, purchase aBose audioinput extension cable(EC-11,Bose part number 137455) from thepoweroutletbeforeyoubeginhookingup the system. Check all connections to ensure they are... positive to positive (+ to +) and negative to negative. 1. O ro IXBENIIN Figure 5 How to properly connect wires to -). Connecting the cube speaker arrays to the bass module CAUTION: Make sure allcomponents(Lifestyle music...

Owner's guide
Page 8
... that connector with the five holes on the back of the Acoustimassi bass module is set for the appropriate voltage for an illustration of the music center as follows: • Black connector plug into the SYSTEM CONTROL jack • Red connector plug into the AUDIO INPUT jack on the other endof the... one end of the audio input cable into the jacks on the rear panel of a completed speaker system hookup. Connecting the bass module to the Lifestyle' music center (See Figure 6) 1.
... that connector with the five holes on the back of the Acoustimassi bass module is set for the appropriate voltage for an illustration of the music center as follows: • Black connector plug into the SYSTEM CONTROL jack • Red connector plug into the AUDIO INPUT jack on the other endof the... one end of the audio input cable into the jacks on the rear panel of a completed speaker system hookup. Connecting the bass module to the Lifestyle' music center (See Figure 6) 1.
Owner's guide
Page 10
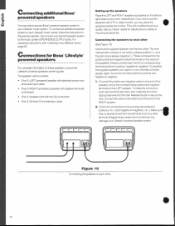
...an additional speaker system to use the speakers with aNorvideomonitor,you wish to your Lifestyle' music center, follow the instnictions in the previous section, but connect your second speaker system tothemusic center's SPEAKERSB OUTPUT jacks.For operating instructions, see "Listening in cord of the ... correspond to your room, respectively. Tomake the connection, push each other (See Figure 10) Note that may damage your Bose' dealer for Bose Lifestyle° powered speakers For complete information on the back • One(1) speaker cordwith two(2)conductors • One (1)50-foot...
...an additional speaker system to use the speakers with aNorvideomonitor,you wish to your Lifestyle' music center, follow the instnictions in the previous section, but connect your second speaker system tothemusic center's SPEAKERSB OUTPUT jacks.For operating instructions, see "Listening in cord of the ... correspond to your room, respectively. Tomake the connection, push each other (See Figure 10) Note that may damage your Bose' dealer for Bose Lifestyle° powered speakers For complete information on the back • One(1) speaker cordwith two(2)conductors • One (1)50-foot...

Owner's guide
Page 11
... to the two o'clock position. Insert the red and black plugs from the left speaker counterclockwise to the music center (See Figure lij 1. Turn the volume control on the back of the Lifestyle' music center. On dual voltage models, set the voltage selector switch on one end of the left )channel. A ...(E. Set the volume control to the music center. 11 Insert the red plug at the other end of the extension ...
... to the two o'clock position. Insert the red and black plugs from the left speaker counterclockwise to the music center (See Figure lij 1. Turn the volume control on the back of the Lifestyle' music center. On dual voltage models, set the voltage selector switch on one end of the left )channel. A ...(E. Set the volume control to the music center. 11 Insert the red plug at the other end of the extension ...

Owner's guide
Page 12
...foot stereo cable with a Lifestyle music system. • 12 to your Lifestyle music center You willneed acable toconnect your Bose Wave' radio toyour Lifestyle' music center (see "Customer Service,' Page 30). Figure 12 shows a finished hookup. -67.7.Se 00SCIal. !it,. See your Lifestyle' music center'sR(right)FIXED OUTPUT jack... other end of the same cable, insert the red plug into its left ) FIXED OUTPUT jack. 2. Insert the black or white plug into the Bose Wave radio's right AUX INPUT jack. Ado O:7 tAAP CE., °O irm+ r 'c Z Cl (t, O®® T A A ;(-) ...
...foot stereo cable with a Lifestyle music system. • 12 to your Lifestyle music center You willneed acable toconnect your Bose Wave' radio toyour Lifestyle' music center (see "Customer Service,' Page 30). Figure 12 shows a finished hookup. -67.7.Se 00SCIal. !it,. See your Lifestyle' music center'sR(right)FIXED OUTPUT jack... other end of the same cable, insert the red plug into its left ) FIXED OUTPUT jack. 2. Insert the black or white plug into the Bose Wave radio's right AUX INPUT jack. Ado O:7 tAAP CE., °O irm+ r 'c Z Cl (t, O®® T A A ;(-) ...
Owner's guide
Page 13
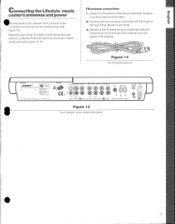
... the FM and AM antennas and the AC (mains) power pack (seeFigures 14-16). Connecting the Lifestyle music center's antennas and power She rear panel of this antenna to provide optimumFM reception. 0 Figure 14 The FM dipole antenna. -17175C rfy] ott.nnu... intotheFM ANTENNA jack on a table or other convenient work surface. Spread cut theFM antenna's arms. Experimentwithboth the placement and the angle of your Lifestyle' music center provides connectors for antennas and AC (mains) power (see Figure 13). Antennas provide better reception when their wires are not bundled. 2.
... the FM and AM antennas and the AC (mains) power pack (seeFigures 14-16). Connecting the Lifestyle music center's antennas and power She rear panel of this antenna to provide optimumFM reception. 0 Figure 14 The FM dipole antenna. -17175C rfy] ott.nnu... intotheFM ANTENNA jack on a table or other convenient work surface. Spread cut theFM antenna's arms. Experimentwithboth the placement and the angle of your Lifestyle' music center provides connectors for antennas and AC (mains) power (see Figure 13). Antennas provide better reception when their wires are not bundled. 2.
Owner's guide
Page 14
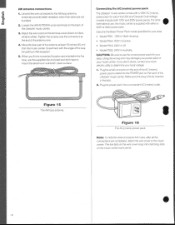
...) from view, after all the connections are not bundled. 2. Connecting the AC (mains) power pack The Lifestyle' music center comes with either a 220V or 240V power pack Use only the Bose' Power Pack model specified for optimum AM reception. 5. Plug the small connector on the end of the AC... surface. Antennas provide better reception when their wires are completed, attach the wire cover to mount the antenna on the back of the Lifestyle' music center. Match the wire colors to the terminal colors (black to black, vrtiite to the AM loop antenna. CAUTION: Besure touse the correctpowerpack...
...) from view, after all the connections are not bundled. 2. Connecting the AC (mains) power pack The Lifestyle' music center comes with either a 220V or 240V power pack Use only the Bose' Power Pack model specified for optimum AM reception. 5. Plug the small connector on the end of the AC... surface. Antennas provide better reception when their wires are completed, attach the wire cover to mount the antenna on the back of the Lifestyle' music center. Match the wire colors to the terminal colors (black to black, vrtiite to the AM loop antenna. CAUTION: Besure touse the correctpowerpack...


