
The Bose® Lifestyle® amplifier - Owner's guide
Page 5
... a multi-room interface 7 Connecting the Lifestyle® stereo amplifier to a Lifestyle® media center 9 Setting up the remote control 10 Setting Zone 2 Protocol 10 Connecting the Lifestyle® stereo amplifier to a Model 20 music center 11 Connecting the Lifestyle® stereo amplifier to a Model 5 music center 13 Connecting speakers to your Lifestyle® stereo amplifier 14 Checking...
... a multi-room interface 7 Connecting the Lifestyle® stereo amplifier to a Lifestyle® media center 9 Setting up the remote control 10 Setting Zone 2 Protocol 10 Connecting the Lifestyle® stereo amplifier to a Model 20 music center 11 Connecting the Lifestyle® stereo amplifier to a Model 5 music center 13 Connecting speakers to your Lifestyle® stereo amplifier 14 Checking...

The Bose® Lifestyle® amplifier - Owner's guide
Page 9
... the amplifier. Setting Up Your Lifestyle® Stereo Amplifier Connecting the Lifestyle® stereo amplifier to a multi-room interface CAUTION: Before making any connections, turn the Lifestyle® system off and disconnect the music center from the AC (mains) power outlet... C, or D) on the rear panel of the amplifier. 3. Figure 6 Cable connections between a multi-room interface and the Lifestyle® stereo amplifier Lifestyle® stereo amplifier rear panel Multi-room interface rear panel 4 Ω MINIMUM LL R L SYSTEM RR CONTROL L R ...
... the amplifier. Setting Up Your Lifestyle® Stereo Amplifier Connecting the Lifestyle® stereo amplifier to a multi-room interface CAUTION: Before making any connections, turn the Lifestyle® system off and disconnect the music center from the AC (mains) power outlet... C, or D) on the rear panel of the amplifier. 3. Figure 6 Cable connections between a multi-room interface and the Lifestyle® stereo amplifier Lifestyle® stereo amplifier rear panel Multi-room interface rear panel 4 Ω MINIMUM LL R L SYSTEM RR CONTROL L R ...

The Bose® Lifestyle® amplifier - Owner's guide
Page 10
... a multi-room interface are controlled by the ROOM or HOUSE button 8 January 4, 2002 AM262840_00_V.pdf Note: Refer to your system, the Personal music center displays ROOM and HOUSE buttons, and room indicators (A, B, C, and/or D). Figure 7 shows an example display for more information on operating... your system in individual rooms. These rooms are connected to your Lifestyle® system owner's guide for a two-room system. If two or more than one room of Bose® powered speakers placed in more rooms are referred to four sets of speakers....
... a multi-room interface are controlled by the ROOM or HOUSE button 8 January 4, 2002 AM262840_00_V.pdf Note: Refer to your system, the Personal music center displays ROOM and HOUSE buttons, and room indicators (A, B, C, and/or D). Figure 7 shows an example display for more information on operating... your system in individual rooms. These rooms are connected to your Lifestyle® system owner's guide for a two-room system. If two or more than one room of Bose® powered speakers placed in more rooms are referred to four sets of speakers....

The Bose® Lifestyle® amplifier - Owner's guide
Page 13
...stereo amplifier to a Model 20 music center ® Figure 10 Cable connections between the Model 20 music center and the Lifestyle® stereo amplifier CAUTION: Before making connections, turn the Lifestyle® system off and disconnect the music center from the AC (mains) power ... SYSTEM CONTROL jack on the rear panel of the amplifier. 3. Lifestyle® stereo amplifier rear panel 4 Ω MINIMUM LL R L SYSTEM RR CONTROL L R +- SPEAKER OUTPUTS INPUT Model 20 music center rear panel 30-ft audio input cable (supplied) AM262840_00_V.pdf January 4,...
...stereo amplifier to a Model 20 music center ® Figure 10 Cable connections between the Model 20 music center and the Lifestyle® stereo amplifier CAUTION: Before making connections, turn the Lifestyle® system off and disconnect the music center from the AC (mains) power ... SYSTEM CONTROL jack on the rear panel of the amplifier. 3. Lifestyle® stereo amplifier rear panel 4 Ω MINIMUM LL R L SYSTEM RR CONTROL L R +- SPEAKER OUTPUTS INPUT Model 20 music center rear panel 30-ft audio input cable (supplied) AM262840_00_V.pdf January 4,...

The Bose® Lifestyle® amplifier - Owner's guide
Page 14
... 5 down (off), and switches 6 and 8 up (on operating your system uses a Model 20 music center, you need to set up the RC-20 remote control for more than one room. Note: Refer to your Lifestyle® system owner's guide for Zone 2 If your system in your first remote. 3. Setting... Up Your Lifestyle® Stereo Amplifier Figure 11 Setting up a Zone 2 remote control Setting up a second RC...
... 5 down (off), and switches 6 and 8 up (on operating your system uses a Model 20 music center, you need to set up the RC-20 remote control for more than one room. Note: Refer to your Lifestyle® system owner's guide for Zone 2 If your system in your first remote. 3. Setting... Up Your Lifestyle® Stereo Amplifier Figure 11 Setting up a Zone 2 remote control Setting up a second RC...

The Bose® Lifestyle® amplifier - Owner's guide
Page 15
... input cable (supplied) Acoustimass module cable AM262840_00_V.pdf January 4, 2002 13 CAUTION: Before making connections, turn the Lifestyle® system off and disconnect the music center from both FIXED OUTPUT jacks. 4. On the rear panel of the Acoustimass® module cable into the... the theater speakers from the FIXED OUTPUT jacks. 1. Figure 12 Cable connections between the Model 5 music center and the Lifestyle® stereo amplifier Model 5 music center rear panel Lifestyle® stereo amplifier rear panel 4 Ω MINIMUM LL LL SYSTEM RR CONTROL R ...
... input cable (supplied) Acoustimass module cable AM262840_00_V.pdf January 4, 2002 13 CAUTION: Before making connections, turn the Lifestyle® system off and disconnect the music center from both FIXED OUTPUT jacks. 4. On the rear panel of the Acoustimass® module cable into the... the theater speakers from the FIXED OUTPUT jacks. 1. Figure 12 Cable connections between the Model 5 music center and the Lifestyle® stereo amplifier Model 5 music center rear panel Lifestyle® stereo amplifier rear panel 4 Ω MINIMUM LL LL SYSTEM RR CONTROL R ...

The Bose® Lifestyle® amplifier - Owner's guide
Page 16
...and release the tab. Be sure that the speaker positioned on ). Setting Up Your Lifestyle® Stereo Amplifier ® Figure 13 RC-5 remote switch settings Setting up the RC-5 remote control If your system uses a Model 5 music center, you face it should always be connected to the positive (+ or red) ...plain wire should be connected to the negative (- Press the red terminal tab. Figure 14 Speaker cable connections on operating your system in your Lifestyle® stereo amplifier CAUTION: DO NOT connect the amplifier to powered speakers of any make or model, nor to the...
...and release the tab. Be sure that the speaker positioned on ). Setting Up Your Lifestyle® Stereo Amplifier ® Figure 13 RC-5 remote switch settings Setting up the RC-5 remote control If your system uses a Model 5 music center, you face it should always be connected to the positive (+ or red) ...plain wire should be connected to the negative (- Press the red terminal tab. Figure 14 Speaker cable connections on operating your system in your Lifestyle® stereo amplifier CAUTION: DO NOT connect the amplifier to powered speakers of any make or model, nor to the...

The Bose® Lifestyle® amplifier - Owner's guide
Page 17
... America), slide this switch to the ON position. 4. Using the power cord included with your Personal® music center or your new remote control and adjust the vol- Select a music source with your Lifestyle® stereo amplifier, firmly insert the small connector on one end of the power cord...your system CAUTION: DO NOT plug the AC power cord into the AC power jack on the rear panel of the Lifestyle® stereo amplifier and your Lifestyle® music system to your liking. Connect the power cord of the amplifier. Figure 16 Power cord connection on the ...
... America), slide this switch to the ON position. 4. Using the power cord included with your Personal® music center or your new remote control and adjust the vol- Select a music source with your Lifestyle® stereo amplifier, firmly insert the small connector on one end of the power cord...your system CAUTION: DO NOT plug the AC power cord into the AC power jack on the rear panel of the Lifestyle® stereo amplifier and your Lifestyle® music system to your liking. Connect the power cord of the amplifier. Figure 16 Power cord connection on the ...

The Bose® Lifestyle® amplifier - Owner's guide
Page 18
...music center. (Then the speaker output cable to the Acoustimass® module should be connected to the piggyback jacks on page 14. 16 January 4, 2002 AM262840_00_V.pdf Protecting outdoor wiring Although some Bose® speakers are firmly connected at hardware stores. If you have a problem operating your Lifestyle...into any sprays near the amplifier. Troubleshooting If you do Neither speaker plays • Make sure the Lifestyle® music center and the amplifier are plugged in the player or the source connected to arrange for correct phone numbers...
...music center. (Then the speaker output cable to the Acoustimass® module should be connected to the piggyback jacks on page 14. 16 January 4, 2002 AM262840_00_V.pdf Protecting outdoor wiring Although some Bose® speakers are firmly connected at hardware stores. If you have a problem operating your Lifestyle...into any sprays near the amplifier. Troubleshooting If you do Neither speaker plays • Make sure the Lifestyle® music center and the amplifier are plugged in the player or the source connected to arrange for correct phone numbers...
Owner's guide
Page 1
• THE BOSE LIFESTYLE 5 MUSIC SYSTEM • OWNER'S GUIDE MANUAL PARA USUARIOS NOTICE D'EMPLOI Better sound through research
• THE BOSE LIFESTYLE 5 MUSIC SYSTEM • OWNER'S GUIDE MANUAL PARA USUARIOS NOTICE D'EMPLOI Better sound through research
Owner's guide
Page 2
...: This digitalapparatus doesnotexceed the Class B limits for radionoise emissions from digitalapparatus set outIn theRadioInterference Regulations of the CanadianDepartment of your Lifestyle' music system. TO PREVENT ELECTRICAL SHOCK. CAUTION Do not remove the cover of Communications. AVIS RISQUE DE CHOC ELECTRIQUE - DANGER:...this guide, the compact disc player poses no userserviceable parts inside. The CAUTION marks shown on your Lifestyle' music center or Acoustimass' powered speaker system. DO NOT EXPOSE THIS UNIT TO RAIN OR MOISTURE. There are located on ...
...: This digitalapparatus doesnotexceed the Class B limits for radionoise emissions from digitalapparatus set outIn theRadioInterference Regulations of the CanadianDepartment of your Lifestyle' music system. TO PREVENT ELECTRICAL SHOCK. CAUTION Do not remove the cover of Communications. AVIS RISQUE DE CHOC ELECTRIQUE - DANGER:...this guide, the compact disc player poses no userserviceable parts inside. The CAUTION marks shown on your Lifestyle' music center or Acoustimass' powered speaker system. DO NOT EXPOSE THIS UNIT TO RAIN OR MOISTURE. There are located on ...

Owner's guide
Page 3
..., VCR, or Laserdisc player 17 Warranty 31 Turntable 17 Technical Information 32 Headphones 17 Index Basic Operation The music center display 18 Bose Corporation 18 inside back cover The music center controls 18 • The Lifestyle' remote control Listening to the radio 19 20 Tuning 20 Listening to a CD . 22 Using the system with...
..., VCR, or Laserdisc player 17 Warranty 31 Turntable 17 Technical Information 32 Headphones 17 Index Basic Operation The music center display 18 Bose Corporation 18 inside back cover The music center controls 18 • The Lifestyle' remote control Listening to the radio 19 20 Tuning 20 Listening to a CD . 22 Using the system with...
Owner's guide
Page 4
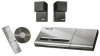
... a CD changer, tape deck, Laserdisc player, VCR, or TV, the Bose' Lifestyle music system offers several ways to listen to -use remote control uses radiowaves that let you operate your Lifestyle music system properly. Please take the time to use . BENI M." The simple-to...' powered speakers with built-in your system. Withits built-insound sources and provision for purchasing a Bose Lifestyle music system. Your music center includes the following parts (seeFigure 1): • One (1) Lifestyle music center • One (1)FM dipole antenna • One (1) AM loop antenna • One...
... a CD changer, tape deck, Laserdisc player, VCR, or TV, the Bose' Lifestyle music system offers several ways to listen to -use remote control uses radiowaves that let you operate your Lifestyle music system properly. Please take the time to use . BENI M." The simple-to...' powered speakers with built-in your system. Withits built-insound sources and provision for purchasing a Bose Lifestyle music system. Your music center includes the following parts (seeFigure 1): • One (1) Lifestyle music center • One (1)FM dipole antenna • One (1) AM loop antenna • One...
Owner's guide
Page 5
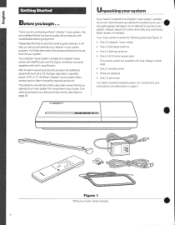
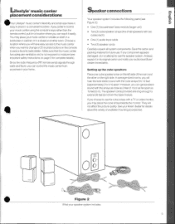
...prefer to use thecube arrays withaIV or videomonitor, you can control the music center from the bass module. If youchoose to control • One(1)Acoustimasebassmodule(larger unit) your authorized Bose' Since theradio-frequency(RF)remote sends signals through dealer immediately. You ...your Bose' dealer for details about the variety of the room and the other on the right side. Carefully unpack all systemcomponents.Save the carton and packing material for future use the speaker system. Lifestyle"music center placement considerations Speaker connections I s our Lifestyles music ...
...prefer to use thecube arrays withaIV or videomonitor, you can control the music center from the bass module. If youchoose to control • One(1)Acoustimasebassmodule(larger unit) your authorized Bose' Since theradio-frequency(RF)remote sends signals through dealer immediately. You ...your Bose' dealer for details about the variety of the room and the other on the right side. Carefully unpack all systemcomponents.Save the carton and packing material for future use the speaker system. Lifestyle"music center placement considerations Speaker connections I s our Lifestyles music ...
Owner's guide
Page 7
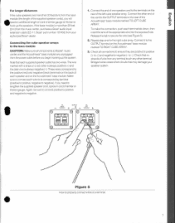
... the OUTPUT terminal on the rear of the Acoustimass' bass module marked TO LEFT CUBE ARRAY. Check that may damage your authorized Bose dealer. Check all connections to ensure they are positive to positive (+ to +) and negative to a terminal. 7 O ro ...speaker arrays to negative. 1. Again, be sure to connect positive to positive and negative to the bass module CAUTION: Make sure allcomponents(Lifestyle music centerandtheAcoustirnase bassmodule)areunplugged from thepoweroutletbeforeyoubeginhookingup the system. TO ROI( OMNI.Xf ■lu ■a■ 'ON W. - If the bass ...
... the OUTPUT terminal on the rear of the Acoustimass' bass module marked TO LEFT CUBE ARRAY. Check that may damage your authorized Bose dealer. Check all connections to ensure they are positive to positive (+ to +) and negative to a terminal. 7 O ro ...speaker arrays to negative. 1. Again, be sure to connect positive to positive and negative to the bass module CAUTION: Make sure allcomponents(Lifestyle music centerandtheAcoustirnase bassmodule)areunplugged from thepoweroutletbeforeyoubeginhookingup the system. TO ROI( OMNI.Xf ■lu ■a■ 'ON W. - If the bass ...

Owner's guide
Page 8
Connecting the bass module to the Lifestyle' music center (See Figure 6) 1. I 120V Insert the three connectors at one end of the audio input cable into the jacks on the other endof the audio .... Make sure the voltage selection switch on the back of the Acoustimassi bass module is set for the appropriate voltage for an illustration of the music center as follows: • Black connector plug into the SYSTEM CONTROL jack • Red connector plug into the AUDIO INPUT jack on the jack. See...
Connecting the bass module to the Lifestyle' music center (See Figure 6) 1. I 120V Insert the three connectors at one end of the audio input cable into the jacks on the other endof the audio .... Make sure the voltage selection switch on the back of the Acoustimassi bass module is set for the appropriate voltage for an illustration of the music center as follows: • Black connector plug into the SYSTEM CONTROL jack • Red connector plug into the AUDIO INPUT jack on the jack. See...

Owner's guide
Page 9
... on the bass module allow you . The most lifelike sound will not affect TV picture quality. Experiment with positioning the cube speaker arrays to your Lifestyle' music system, you may want to scale.) Figure 8 • Room compensation controls. 9 Small dots near each array toward a wall for reflected sound and leave the other...
... on the bass module allow you . The most lifelike sound will not affect TV picture quality. Experiment with positioning the cube speaker arrays to your Lifestyle' music system, you may want to scale.) Figure 8 • Room compensation controls. 9 Small dots near each array toward a wall for reflected sound and leave the other...
Owner's guide
Page 10
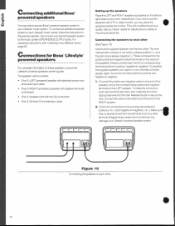
...Bose Lifestyle° powered speakers For complete information on one is always positive (+), and the plain one end of the speaker cord to positive, negative tonegative).Tolengthen the supplied speaker cord, splice in two different roans," Page 25. Connecting the speakers to your Lifestyle' music...your room, respectively. Connecting additional Bose" powered speakers Youmay adda second Bose' powered speaker system to secure the wire. They will not affect the picture quality. Connections for details about a variety of your Lifestyle' music system. Always connect each terminal tab...
...Bose Lifestyle° powered speakers For complete information on one is always positive (+), and the plain one end of the speaker cord to positive, negative tonegative).Tolengthen the supplied speaker cord, splice in two different roans," Page 25. Connecting the speakers to your Lifestyle' music...your room, respectively. Connecting additional Bose" powered speakers Youmay adda second Bose' powered speaker system to secure the wire. They will not affect the picture quality. Connections for details about a variety of your Lifestyle' music system. Always connect each terminal tab...

Owner's guide
Page 11
...convenient power (mains) outlet. 4. On dual voltage models, set the voltage selector switch on the back of the Lifestyle' music center. On models equipped with a power switch, turn the switch to the music center. 11 eeee a 1. • CCCCCT 0 • Figure 11 Connecting the speakers to the ON position. ...Insert the black plug into the R (right) SPEAKERS B OUTPUT jack on the back of the 50-foot (15 m) extension cable. 2. Your Lifestyle' powered speakers are now ready to the two o'clock position. A (E. Finishing the speaker setup 1. Insert the red plug at the other end of...
...convenient power (mains) outlet. 4. On dual voltage models, set the voltage selector switch on the back of the Lifestyle' music center. On models equipped with a power switch, turn the switch to the music center. 11 eeee a 1. • CCCCCT 0 • Figure 11 Connecting the speakers to the ON position. ...Insert the black plug into the R (right) SPEAKERS B OUTPUT jack on the back of the 50-foot (15 m) extension cable. 2. Your Lifestyle' powered speakers are now ready to the two o'clock position. A (E. Finishing the speaker setup 1. Insert the red plug at the other end of...

Owner's guide
Page 12
.... • 12 See your Lifestyle' music center'sR(right)FIXED OUTPUT jack. At the other end of the same cable, insert the red plug into your retail dealer ilk for a 25- to -male RCA plugs'', or contact Bose Corporation directly(see Figure 12). Audio ... jack. Insert the audio cable's red plug into the Bose Wave radio's right AUX INPUT jack. Connections for the Bose Waveradio Note:Make sureyousetupyourBose Wave' radioaccording to your Lifestyle music center You willneed acable toconnect your Bose Wave' radio toyour Lifestyle' music center (see "Customer Service,' Page 30). Figure 12 ...
.... • 12 See your Lifestyle' music center'sR(right)FIXED OUTPUT jack. At the other end of the same cable, insert the red plug into your retail dealer ilk for a 25- to -male RCA plugs'', or contact Bose Corporation directly(see Figure 12). Audio ... jack. Insert the audio cable's red plug into the Bose Wave radio's right AUX INPUT jack. Connections for the Bose Waveradio Note:Make sureyousetupyourBose Wave' radioaccording to your Lifestyle music center You willneed acable toconnect your Bose Wave' radio toyour Lifestyle' music center (see "Customer Service,' Page 30). Figure 12 ...


