The Bose® Lifestyle® amplifier - Owner's guide
Page 20
...January 4, 2002 AM262840_00_V.pdf Signal to 15 kHz, with no more than 0.5% THD. Maintaining Your Lifestyle® Stereo Amplifier Technical information Features • Bose® proprietary digital signal processing technology • Built-in digital volume control • Thermal overload ...protection • Protective rubber feet Power rating USA/Canada: 120V 50/60 Hz, 220W Dual voltage: 115/230V 50/60 Hz, 220W International: 220-240V 50...
...January 4, 2002 AM262840_00_V.pdf Signal to 15 kHz, with no more than 0.5% THD. Maintaining Your Lifestyle® Stereo Amplifier Technical information Features • Bose® proprietary digital signal processing technology • Built-in digital volume control • Thermal overload ...protection • Protective rubber feet Power rating USA/Canada: 120V 50/60 Hz, 220W Dual voltage: 115/230V 50/60 Hz, 220W International: 220-240V 50...
Owner's guide
Page 10
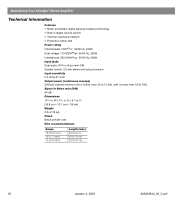
... negative terminalson theLEFT speaker. Connect the positive and negative wires on the back • One(1) speaker cordwith two(2)conductors • One (1)50-foot (15 m) extension cable. To connect an additional speaker system to the RIGHT speaker. 2. Release the tab to use the speakers ...with aNorvideomonitor,you wish to secure the wire. Bridged wires create short circuits that may damage your Bose' dealer for Bose Lifestyle° powered speakers For complete information on the other (See Figure 10) Note that no strands of your room, respectively. ...
... negative terminalson theLEFT speaker. Connect the positive and negative wires on the back • One(1) speaker cordwith two(2)conductors • One (1)50-foot (15 m) extension cable. To connect an additional speaker system to the RIGHT speaker. 2. Release the tab to use the speakers ...with aNorvideomonitor,you wish to secure the wire. Bridged wires create short circuits that may damage your Bose' dealer for Bose Lifestyle° powered speakers For complete information on the other (See Figure 10) Note that no strands of your room, respectively. ...

Owner's guide
Page 11
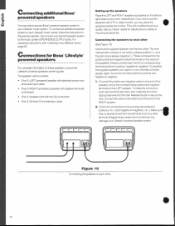
... the speaker setup 1. A (E. Insert the red and black plugs from the left speaker into the corresponding red and black jacks on the back of the 50-foot (15 m) extension cable. 2. On dual voltage models, set the voltage selector switch on one end of the left speaker counterclockwise to the music center.... 11 eeee a 1. • CCCCCT 0 • Figure 11 Connecting the speakers to the two o'clock position. Plug the power (mains) cord from the L (left )channel. Your Lifestyle' powered speakers are now ready to the ON position. Insert the red plug at the other end of the...
... the speaker setup 1. A (E. Insert the red and black plugs from the left speaker into the corresponding red and black jacks on the back of the 50-foot (15 m) extension cable. 2. On dual voltage models, set the voltage selector switch on one end of the left speaker counterclockwise to the music center.... 11 eeee a 1. • CCCCCT 0 • Figure 11 Connecting the speakers to the two o'clock position. Plug the power (mains) cord from the L (left )channel. Your Lifestyle' powered speakers are now ready to the ON position. Insert the red plug at the other end of the...
Owner's guide
Page 15
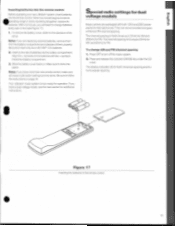
...1.5Vbattenes. 2. Make sure it in the remote control. 15 The channel spacing in North America is 9 kHz for AM and 50 kHz for FM. Press OFF to follow theinstructions onpage24. The display indicates US for North American spacing and EU for additional instructions. ... need to lose its perating range or stops operating altogether, replace its batteries. InsertingbatteriesInto theremote control Before operating your new Lifestyle system, insert batteries into place. Note: Ifyouhavemore thanoneremotecontrol, make sure allhouse code switchsettings are packaged with the + symbols inside the ...
...1.5Vbattenes. 2. Make sure it in the remote control. 15 The channel spacing in North America is 9 kHz for AM and 50 kHz for FM. Press OFF to follow theinstructions onpage24. The display indicates US for North American spacing and EU for additional instructions. ... need to lose its perating range or stops operating altogether, replace its batteries. InsertingbatteriesInto theremote control Before operating your new Lifestyle system, insert batteries into place. Note: Ifyouhavemore thanoneremotecontrol, make sure allhouse code switchsettings are packaged with the + symbols inside the ...


