
The Bose® Lifestyle® amplifier - Owner's guide
Page 6
...Bose quality sound and Lifestyle® system convenience in the appropriate blank on the bottom panel of the product appears to be damaged, do not attempt to your Lifestyle® system. Note: Locate the serial number on page 3. Figure 1 Contents of the shipping carton 30-ft audio input cable PN197406 Lifestyle...® stereo amplifier Owner's guide Power cord* USA/Canada (120V) * The Lifestyle® stereo amplifier includes a 120V AC (mains) power cord for ...
...Bose quality sound and Lifestyle® system convenience in the appropriate blank on the bottom panel of the product appears to be damaged, do not attempt to your Lifestyle® system. Note: Locate the serial number on page 3. Figure 1 Contents of the shipping carton 30-ft audio input cable PN197406 Lifestyle...® stereo amplifier Owner's guide Power cord* USA/Canada (120V) * The Lifestyle® stereo amplifier includes a 120V AC (mains) power cord for ...

The Bose® Lifestyle® amplifier - Owner's guide
Page 7
...er on surfaces that are not sturdy enough, or that the amplifier is located within the reach of the supplied 30-foot audio input cable. • Place the amplifier in an area where the maximum ambient temperature is less than 104°F (45°C)....electrical equipment, it according to prevent moisture from getting into the unit. Setting Up Your Lifestyle® Stereo Amplifier Selecting a location for your Lifestyle® stereo amplifier Select a location for your Lifestyle® system or the accessory speakers, consider the following guidelines. Like all sides of...
...er on surfaces that are not sturdy enough, or that the amplifier is located within the reach of the supplied 30-foot audio input cable. • Place the amplifier in an area where the maximum ambient temperature is less than 104°F (45°C)....electrical equipment, it according to prevent moisture from getting into the unit. Setting Up Your Lifestyle® Stereo Amplifier Selecting a location for your Lifestyle® stereo amplifier Select a location for your Lifestyle® system or the accessory speakers, consider the following guidelines. Like all sides of...

The Bose® Lifestyle® amplifier - Owner's guide
Page 9
...: Before making any connections, turn the Lifestyle® system off and disconnect the music center from the AC (mains) power outlet. DO NOT plug the amplifier into an outlet until you have completed all other end of the audio input cable, insert the 3.5 mm mini-plug into... one end of the audio input cable into the SYSTEM CONTROL jack on the rear of the amplifier. 3. Figure 6 Cable connections between a multi-room interface and the Lifestyle® stereo amplifier Lifestyle® stereo amplifi...
...: Before making any connections, turn the Lifestyle® system off and disconnect the music center from the AC (mains) power outlet. DO NOT plug the amplifier into an outlet until you have completed all other end of the audio input cable, insert the 3.5 mm mini-plug into... one end of the audio input cable into the SYSTEM CONTROL jack on the rear of the amplifier. 3. Figure 6 Cable connections between a multi-room interface and the Lifestyle® stereo amplifier Lifestyle® stereo amplifi...

The Bose® Lifestyle® amplifier - Owner's guide
Page 11
... AC (mains) power outlet. Insert the single-connector end of the audio input cable into the L (left) INPUT jack. Figure 8 Cable connections between the Lifestyle® media center and the Lifestyle® stereo amplifier Lifestyle® SA-1 stereo amplifier rear panel Lifestyle® media center rear panel 30-ft audio input cable (supplied) AM262840_00_V.pdf January 4, 2002 9
... AC (mains) power outlet. Insert the single-connector end of the audio input cable into the L (left) INPUT jack. Figure 8 Cable connections between the Lifestyle® media center and the Lifestyle® stereo amplifier Lifestyle® SA-1 stereo amplifier rear panel Lifestyle® media center rear panel 30-ft audio input cable (supplied) AM262840_00_V.pdf January 4, 2002 9

The Bose® Lifestyle® amplifier - Owner's guide
Page 13
... of the amplifier. Insert the single multi-pin connector at one end of the audio input cable into the SPEAKER ZONES 2 output jack on the rear panel of the music center (Figure 10). 2. Lifestyle® stereo amplifier rear panel 4 Ω MINIMUM LL R L SYSTEM RR ...Model 20 music center rear panel 30-ft audio input cable (supplied) AM262840_00_V.pdf January 4, 2002 11 Setting Up Your Lifestyle® Stereo Amplifier Connecting the Lifestyle® stereo amplifier to a Model 20 music center ® Figure 10 Cable connections between the Model 20 music center ...
... of the amplifier. Insert the single multi-pin connector at one end of the audio input cable into the SPEAKER ZONES 2 output jack on the rear panel of the music center (Figure 10). 2. Lifestyle® stereo amplifier rear panel 4 Ω MINIMUM LL R L SYSTEM RR ...Model 20 music center rear panel 30-ft audio input cable (supplied) AM262840_00_V.pdf January 4, 2002 11 Setting Up Your Lifestyle® Stereo Amplifier Connecting the Lifestyle® stereo amplifier to a Model 20 music center ® Figure 10 Cable connections between the Model 20 music center ...

The Bose® Lifestyle® amplifier - Owner's guide
Page 15
... properly with the fixed output level available from the AC (mains) power outlet. CAUTION: DO NOT connect the audio input cable for the Lifestyle® stereo amplifier to the FIXED OUTPUT jacks on the rear panel of the music center, disconnect the... IN 1.0A ANTENNA SEE INSTRUCTION MANUAL Fixed speaker outputs 30-ft audio input cable (supplied) Acoustimass module cable AM262840_00_V.pdf January 4, 2002 13 When adding the Lifestyle® amplifier, you have completed all other end of the audio input cable, insert the 3.5 mm mini-plug into the multi-pin INPUT...
... properly with the fixed output level available from the AC (mains) power outlet. CAUTION: DO NOT connect the audio input cable for the Lifestyle® stereo amplifier to the FIXED OUTPUT jacks on the rear panel of the music center, disconnect the... IN 1.0A ANTENNA SEE INSTRUCTION MANUAL Fixed speaker outputs 30-ft audio input cable (supplied) Acoustimass module cable AM262840_00_V.pdf January 4, 2002 13 When adding the Lifestyle® amplifier, you have completed all other end of the audio input cable, insert the 3.5 mm mini-plug into the multi-pin INPUT...

The Bose® Lifestyle® amplifier - Owner's guide
Page 18
... using a Model 5 music center for home theater (Lifestyle® 12 or Lifestyle® 8 systems), make sure the amplifier audio input cable is commonly available at both ends. • See "Connecting speakers to your Bose dealer to do use caulking, apply it only after installing the Lifestyle® stereo amplifier, follow the guidelines...
... using a Model 5 music center for home theater (Lifestyle® 12 or Lifestyle® 8 systems), make sure the amplifier audio input cable is commonly available at both ends. • See "Connecting speakers to your Bose dealer to do use caulking, apply it only after installing the Lifestyle® stereo amplifier, follow the guidelines...
Owner's guide
Page 5
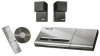
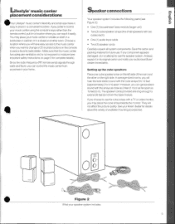
Choose a • Two(2)cube speaker arrays(the small speakers with two cubes each) • One (1) audio input cable location where you will not affect the picture quality. However, you want to changea CD or press buttons on a table or shelf,... room. Setting up the cube speakers Place one cube speaker array on the right side. See your Bose' dealer for complete details). Lifestyle"music center placement considerations Speaker connections I s our Lifestyles music center's flexibility and small size make it Your speaker system includes the following parts (see important ...
Choose a • Two(2)cube speaker arrays(the small speakers with two cubes each) • One (1) audio input cable location where you will not affect the picture quality. However, you want to changea CD or press buttons on a table or shelf,... room. Setting up the cube speakers Place one cube speaker array on the right side. See your Bose' dealer for complete details). Lifestyle"music center placement considerations Speaker connections I s our Lifestyles music center's flexibility and small size make it Your speaker system includes the following parts (see important ...

Owner's guide
Page 8
...Lifestyle' music center (See Figure 6) 1. Connecting the power (mains) cord 1. Insert thesingleDINconnector on the rear panel of a completed speaker system hookup. Align the five pins on that connector with the five holes on the Acousgmase bass module. I 120V Insert the three connectors at one end of the audio input cable... into the jacks on the other endof the audio input cable into theR(right)SPEAKERSA OUTPUT jack • White connector pluginto the L(left)SPEAKERS A OUTPUT ...
...Lifestyle' music center (See Figure 6) 1. Connecting the power (mains) cord 1. Insert thesingleDINconnector on the rear panel of a completed speaker system hookup. Align the five pins on that connector with the five holes on the Acousgmase bass module. I 120V Insert the three connectors at one end of the audio input cable... into the jacks on the other endof the audio input cable into theR(right)SPEAKERSA OUTPUT jack • White connector pluginto the L(left)SPEAKERS A OUTPUT ...
Owner's guide
Page 10
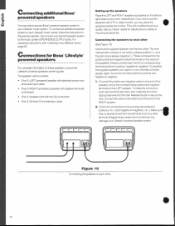
...cord, splice in the previous section, but connect your Bose' dealer for Bose Lifestyle° powered speakers For complete information on the back • One(1) speaker cordwith two(2)conductors • One (1)50-foot (15 m) extension cable. Tomake the connection, push each wire to its corresponding...the appropriate wire into the hole. The speaker carton contains: • One (1) LEFT (powered) speaker with attached power cord and audio input cable • One(1)RIGHT(accessory) speaker with aNorvideomonitor,you can place the speakers beside the monitor. The wire marked with a stripe ...
...cord, splice in the previous section, but connect your Bose' dealer for Bose Lifestyle° powered speakers For complete information on the back • One(1) speaker cordwith two(2)conductors • One (1)50-foot (15 m) extension cable. Tomake the connection, push each wire to its corresponding...the appropriate wire into the hole. The speaker carton contains: • One (1) LEFT (powered) speaker with attached power cord and audio input cable • One(1)RIGHT(accessory) speaker with aNorvideomonitor,you can place the speakers beside the monitor. The wire marked with a stripe ...

Owner's guide
Page 11
On dual voltage models, set the voltage selector switch on one end of the extension cable into the corresponding red and black jacks on the back of the Lifestyle' music center. Plug the power (mains) cord from the L (left speaker into the SPEAKERSB OUTPUT jack for the correct voltage. ...See Figure lij 1. Connecting the speakers to the music center. 11 Insert the red and black plugs from the left ) speakers • audio input cable into the R (right) SPEAKERS B OUTPUT jack on the left )channel. Insert the black plug into a convenient power (mains) outlet. 4. Your...
On dual voltage models, set the voltage selector switch on one end of the extension cable into the corresponding red and black jacks on the back of the Lifestyle' music center. Plug the power (mains) cord from the L (left speaker into the SPEAKERSB OUTPUT jack for the correct voltage. ...See Figure lij 1. Connecting the speakers to the music center. 11 Insert the red and black plugs from the left ) speakers • audio input cable into the R (right) SPEAKERS B OUTPUT jack on the left )channel. Insert the black plug into a convenient power (mains) outlet. 4. Your...

Owner's guide
Page 12
See your retail dealer ilk for the Bose Waveradio Note:Make sureyousetupyourBose Wave' radioaccording to 100-foot stereo cable with a Lifestyle music system. • 12 Insert the audio cable's red plug into its left ) FIXED OUTPUT jack. 2. Insert the black or white plug into your Bose Wave' radio toyour Lifestyle' music center (see "Customer Service,' Page 30). to...
See your retail dealer ilk for the Bose Waveradio Note:Make sureyousetupyourBose Wave' radioaccording to 100-foot stereo cable with a Lifestyle music system. • 12 Insert the audio cable's red plug into its left ) FIXED OUTPUT jack. 2. Insert the black or white plug into your Bose Wave' radio toyour Lifestyle' music center (see "Customer Service,' Page 30). to...
Owner's guide
Page 16
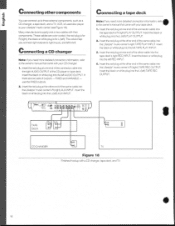
... theL(left AUDIO OUTPUT. Insert the black or white plug into the left TAPE PLAY INPUT. Insert the black or white plug Note:Ifyouneedmore detailedconnectioninformation, refer into the left REC INPUT. If 4. These cables are two sets of the same cable into the Lifestyle' music center...theblack orwhite pluginto theL(left toleft. Manymanufacturers supply one end of the connector cable into the Lifestyle music center'sR(right)TAPEREC OUTPUT. Insert the red plug at one end of the connector cable into the tape deck's right REC INPUT. Insert the red plug at ...
... theL(left AUDIO OUTPUT. Insert the black or white plug into the left TAPE PLAY INPUT. Insert the black or white plug Note:Ifyouneedmore detailedconnectioninformation, refer into the left REC INPUT. If 4. These cables are two sets of the same cable into the Lifestyle' music center...theblack orwhite pluginto theL(left toleft. Manymanufacturers supply one end of the connector cable into the Lifestyle music center'sR(right)TAPEREC OUTPUT. Insert the red plug at one end of the connector cable into the tape deck's right REC INPUT. Insert the red plug at ...

Owner's guide
Page 17
... mini-headphone jack on (see `Listening in the instructions for the preamp. Insert the black or white plug into theL(left AUDIO OUTPUT. you need an external phono preamplifier. Note:Ifyour video-soundsource doesnothavestereo outputs. Consult your 7Vtosimultaneouslyadjust the volumeofyour TVandyourmusicsystem. 2. Your...the other end of the same cable into the right AUDIO OUTPUT of your TV, VCR, Laserdisc, or other video-sound source. Insert the red plug at one end of the connector cable into the R (right) VIDEO SOUND INPUT of your Lifestyle' music center. Connecting a ...
... mini-headphone jack on (see `Listening in the instructions for the preamp. Insert the black or white plug into theL(left AUDIO OUTPUT. you need an external phono preamplifier. Note:Ifyour video-soundsource doesnothavestereo outputs. Consult your 7Vtosimultaneouslyadjust the volumeofyour TVandyourmusicsystem. 2. Your...the other end of the same cable into the right AUDIO OUTPUT of your TV, VCR, Laserdisc, or other video-sound source. Insert the red plug at one end of the connector cable into the R (right) VIDEO SOUND INPUT of your Lifestyle' music center. Connecting a ...


