
The Bose® Lifestyle® amplifier - Owner's guide
Page 5
... remote control 10 Setting Zone 2 Protocol 10 Connecting the Lifestyle® stereo amplifier to a Model 20 music center 11 Connecting the Lifestyle® stereo amplifier to a Model 5 music center 13 Connecting speakers to your Lifestyle® stereo amplifier 14 Checking to see if you keep your Lifestyle® stereo amplifier. Serial number Purchase...
... remote control 10 Setting Zone 2 Protocol 10 Connecting the Lifestyle® stereo amplifier to a Model 20 music center 11 Connecting the Lifestyle® stereo amplifier to a Model 5 music center 13 Connecting speakers to your Lifestyle® stereo amplifier 14 Checking to see if you keep your Lifestyle® stereo amplifier. Serial number Purchase...

The Bose® Lifestyle® amplifier - Owner's guide
Page 6
... enclosed in the amplifier, ensures full, rich stereo sound, even when the speakers are playing at low volumes. The Lifestyle® stereo amplifier provides you with your Lifestyle® system. Carefully unpack the shipping carton. Bose proprietary Integrated Signal Processing technology, featured in the product packaging for assistance. Refer to...
... enclosed in the amplifier, ensures full, rich stereo sound, even when the speakers are playing at low volumes. The Lifestyle® stereo amplifier provides you with your Lifestyle® system. Carefully unpack the shipping carton. Bose proprietary Integrated Signal Processing technology, featured in the product packaging for assistance. Refer to...

The Bose® Lifestyle® amplifier - Owner's guide
Page 7
...of the amplifier with an open area of 3.0 inches (7.5 cm) minimum immediately above it to either your Lifestyle® system or the accessory speakers, consider the following guidelines. The amplifier must be situated close to allow for air flow. If ... place the amplifier in the amplifier's enclosure. Setting Up Your Lifestyle® Stereo Amplifier Selecting a location for your Lifestyle® stereo amplifier Select a location for your Lifestyle® stereo amplifier and mount it according to the following guidelines when selecting...
...of the amplifier with an open area of 3.0 inches (7.5 cm) minimum immediately above it to either your Lifestyle® system or the accessory speakers, consider the following guidelines. The amplifier must be situated close to allow for air flow. If ... place the amplifier in the amplifier's enclosure. Setting Up Your Lifestyle® Stereo Amplifier Selecting a location for your Lifestyle® stereo amplifier Select a location for your Lifestyle® stereo amplifier and mount it according to the following guidelines when selecting...

The Bose® Lifestyle® amplifier - Owner's guide
Page 10
...However, if you purchase a second Personal music center, you must follow the procedure for setting up to four sets of speakers. Press the ROOM button to your Lifestyle® system owner's guide for more information on operating your system, the Personal music center displays ROOM and HOUSE buttons, ...a one-room system). Figure 7 shows an example display for the first time. If two or more than one room of Bose® powered speakers placed in individual rooms. These rooms are connected to your system in other rooms with the Personal® music center Systems that share a...
...However, if you purchase a second Personal music center, you must follow the procedure for setting up to four sets of speakers. Press the ROOM button to your Lifestyle® system owner's guide for more information on operating your system, the Personal music center displays ROOM and HOUSE buttons, ...a one-room system). Figure 7 shows an example display for the first time. If two or more than one room of Bose® powered speakers placed in individual rooms. These rooms are connected to your system in other rooms with the Personal® music center Systems that share a...

The Bose® Lifestyle® amplifier - Owner's guide
Page 11
Figure 8 Cable connections between the Lifestyle® media center and the Lifestyle® stereo amplifier Lifestyle® SA-1 stereo amplifier rear panel Lifestyle® media center rear panel 30-ft audio input cable (supplied) AM262840_00_V.pdf January 4, 2002 9 ...er into the SPEAKER ZONES 2 output jack on the rear panel of the media center (Figure 8). 2. Setting Up Your Lifestyle® Stereo Amplifier Connecting the Lifestyle® stereo amplifier to a Lifestyle® media center CAUTION: Before making connections, turn the Lifestyle® system off...
Figure 8 Cable connections between the Lifestyle® media center and the Lifestyle® stereo amplifier Lifestyle® SA-1 stereo amplifier rear panel Lifestyle® media center rear panel 30-ft audio input cable (supplied) AM262840_00_V.pdf January 4, 2002 9 ...er into the SPEAKER ZONES 2 output jack on the rear panel of the media center (Figure 8). 2. Setting Up Your Lifestyle® Stereo Amplifier Connecting the Lifestyle® stereo amplifier to a Lifestyle® media center CAUTION: Before making connections, turn the Lifestyle® system off...

The Bose® Lifestyle® amplifier - Owner's guide
Page 13
... the SYSTEM CONTROL jack on the rear panel of the amplifier. Lifestyle® stereo amplifier rear panel 4 Ω MINIMUM LL R L SYSTEM RR CONTROL L R +- At the other connections. 1. SPEAKER OUTPUTS INPUT Model 20 music center rear panel 30-ft audio input cable (supplied... music center (Figure 10). 2. Insert the red RCA piggyback connector into the L (left) INPUT jack. Setting Up Your Lifestyle® Stereo Amplifier Connecting the Lifestyle® stereo amplifier to a Model 20 music center ® Figure 10 Cable connections between the Model 20 music ...
... the SYSTEM CONTROL jack on the rear panel of the amplifier. Lifestyle® stereo amplifier rear panel 4 Ω MINIMUM LL R L SYSTEM RR CONTROL L R +- At the other connections. 1. SPEAKER OUTPUTS INPUT Model 20 music center rear panel 30-ft audio input cable (supplied... music center (Figure 10). 2. Insert the red RCA piggyback connector into the L (left) INPUT jack. Setting Up Your Lifestyle® Stereo Amplifier Connecting the Lifestyle® stereo amplifier to a Model 20 music center ® Figure 10 Cable connections between the Model 20 music ...

The Bose® Lifestyle® amplifier - Owner's guide
Page 15
...to a Model 5 music center In systems using a Model 5 music center, home theater speakers are connected to the SPEAKERS A or SPEAKERS B outputs. CAUTION: Before making connections, turn the Lifestyle® system off and disconnect the music center from both FIXED OUTPUT jacks. 4. Insert the...SYSTEM CONTROL 2 ~ POWER 12VAC IN 1.0A ANTENNA SEE INSTRUCTION MANUAL Fixed speaker outputs 30-ft audio input cable (supplied) Acoustimass module cable AM262840_00_V.pdf January 4, 2002 13 When adding the Lifestyle® amplifier, you have completed all other end of the ...
...to a Model 5 music center In systems using a Model 5 music center, home theater speakers are connected to the SPEAKERS A or SPEAKERS B outputs. CAUTION: Before making connections, turn the Lifestyle® system off and disconnect the music center from both FIXED OUTPUT jacks. 4. Insert the...SYSTEM CONTROL 2 ~ POWER 12VAC IN 1.0A ANTENNA SEE INSTRUCTION MANUAL Fixed speaker outputs 30-ft audio input cable (supplied) Acoustimass module cable AM262840_00_V.pdf January 4, 2002 13 When adding the Lifestyle® amplifier, you have completed all other end of the ...

The Bose® Lifestyle® amplifier - Owner's guide
Page 16
...see "Wire recommendations" on the amplifier 14 January 4, 2002 AM262840_00_V.pdf ON K40 l 2345678 Connecting speakers to your system in more information on the left in your Lifestyle® stereo amplifier. 1. Be sure that it ) attaches to the cable connected to the L...on ). The plain wire should be connected to the negative (- Insert the wire coming from the speaker's negative (-) terminal into the red jack and release the tab. Setting Up Your Lifestyle® Stereo Amplifier ® Figure 13 RC-5 remote switch settings Setting up the RC-5 remote ...
...see "Wire recommendations" on the amplifier 14 January 4, 2002 AM262840_00_V.pdf ON K40 l 2345678 Connecting speakers to your system in more information on the left in your Lifestyle® stereo amplifier. 1. Be sure that it ) attaches to the cable connected to the L...on ). The plain wire should be connected to the negative (- Insert the wire coming from the speaker's negative (-) terminal into the red jack and release the tab. Setting Up Your Lifestyle® Stereo Amplifier ® Figure 13 RC-5 remote switch settings Setting up the RC-5 remote ...

The Bose® Lifestyle® amplifier - Owner's guide
Page 18
...Bose dealer to the address list enclosed in the product packaging for correct phone numbers. Do not use any openings. If the problem still exists, contact your Lifestyle® system after the wires are correct. Troubleshooting If you do Neither speaker plays • Make sure the Lifestyle... piggyback jacks on page 14. 16 January 4, 2002 AM262840_00_V.pdf It is plugged into SPEAKER ZONE 2. • If using a Model 5 music center for home theater (Lifestyle® 12 or Lifestyle® 8 systems), make sure the amplifier audio input cable is commonly available...
...Bose dealer to the address list enclosed in the product packaging for correct phone numbers. Do not use any openings. If the problem still exists, contact your Lifestyle® system after the wires are correct. Troubleshooting If you do Neither speaker plays • Make sure the Lifestyle... piggyback jacks on page 14. 16 January 4, 2002 AM262840_00_V.pdf It is plugged into SPEAKER ZONE 2. • If using a Model 5 music center for home theater (Lifestyle® 12 or Lifestyle® 8 systems), make sure the amplifier audio input cable is commonly available...

The Bose® Lifestyle® amplifier - Owner's guide
Page 19
...;er. Bass or treble is covered by the Bose limited one-year transferable warranty. This engages automatically if the volume is firmly inserted in the speaker. Choosing a lower setting should ensure continuous, even volume. Warranty period The Lifestyle® stereo amplifier is •... enclosed in solving problems, contact Bose® Customer Service. Refer to the speaker on the amplifier rear panel. Connect it to + and weak - Zone 2 does not • If you are connected + to Bose. Make sure the wires are using a Lifestyle® DVD system, the stereo...
...;er. Bass or treble is covered by the Bose limited one-year transferable warranty. This engages automatically if the volume is firmly inserted in the speaker. Choosing a lower setting should ensure continuous, even volume. Warranty period The Lifestyle® stereo amplifier is •... enclosed in solving problems, contact Bose® Customer Service. Refer to the speaker on the amplifier rear panel. Connect it to + and weak - Zone 2 does not • If you are connected + to Bose. Make sure the wires are using a Lifestyle® DVD system, the stereo...
Owner's guide
Page 2
... servicing to the user. The exclamation point within an equilateral triangle, as marked on your Lifestyle' music center or Acoustimass' powered speaker system. Whenoperatedas describedin this owner's guide. CAUTION: Use ofcontrols foradjustmentsorperformanceof proceduresother than thosespecifiedhereinmayresult in ...doesnotexceed the Class B limits for radionoise emissions from digitalapparatus set outIn theRadioInterference Regulations of the CanadianDepartment of your Lifestyle' music system. NE PAS OUVRIR. DO NOT REMOVE COVER. NO USER-SERVICEABLE PARTS INSIDE. The lightning ...
... servicing to the user. The exclamation point within an equilateral triangle, as marked on your Lifestyle' music center or Acoustimass' powered speaker system. Whenoperatedas describedin this owner's guide. CAUTION: Use ofcontrols foradjustmentsorperformanceof proceduresother than thosespecifiedhereinmayresult in ...doesnotexceed the Class B limits for radionoise emissions from digitalapparatus set outIn theRadioInterference Regulations of the CanadianDepartment of your Lifestyle' music system. NE PAS OUVRIR. DO NOT REMOVE COVER. NO USER-SERVICEABLE PARTS INSIDE. The lightning ...

Owner's guide
Page 3
... 410Safely Information Getting Started 2 other Lifestyle' music systems 4 Listening in two different rooms 24 g 25 Speaker connections 5 Using the optional deluxe Lifestyle' RC•10 remote control 25 Connecting additional Bose' powered speakers ..........10 Using the deluxe remote control between Connections for Lifestyle' powered speakers 10 listening areas 27 Connections for the Bose Wave' radio 12 Programming the...
... 410Safely Information Getting Started 2 other Lifestyle' music systems 4 Listening in two different rooms 24 g 25 Speaker connections 5 Using the optional deluxe Lifestyle' RC•10 remote control 25 Connecting additional Bose' powered speakers ..........10 Using the deluxe remote control between Connections for Lifestyle' powered speakers 10 listening areas 27 Connections for the Bose Wave' radio 12 Programming the...
Owner's guide
Page 4
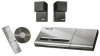
...with dual voltage models only) • One (1) remote control • Three AA batteries • One (1) wire cover Your Bose' powered speaker system, its components and connections, are supplied with considerable listening enjoyment. The simple-to use the music system. Unpackingyour system do ... repack the carton and notify your Lifestyle music system properly. Getting Started Before you for purchasing a Bose Lifestyle music system. Your Lifestyle music system consists of a Lifestyle music center with AM/FM tuner and CD player,andBose' powered speakers with built-in your house. Thank...
...with dual voltage models only) • One (1) remote control • Three AA batteries • One (1) wire cover Your Bose' powered speaker system, its components and connections, are supplied with considerable listening enjoyment. The simple-to use the music system. Unpackingyour system do ... repack the carton and notify your Lifestyle music system properly. Getting Started Before you for purchasing a Bose Lifestyle music system. Your Lifestyle music system consists of a Lifestyle music center with AM/FM tuner and CD player,andBose' powered speakers with built-in your house. Thank...
Owner's guide
Page 5
...'s keys rather than the remote control, putitina location whereyoucanreach it easily. Lifestyle"music center placement considerations Speaker connections I s our Lifestyles music center's flexibility and small size make it Your speaker system includes the following parts (see important safety instructions on page 2 ...Figure 2): g easy to extend 20 feet (6 m) from anywhere in a convenient location. See your Bose' dealer for complete details). Setting up the cube speakers Place one cube speaker array on a table or shelf, in a bookcase or cabinet, or in its original carton and ...
...'s keys rather than the remote control, putitina location whereyoucanreach it easily. Lifestyle"music center placement considerations Speaker connections I s our Lifestyles music center's flexibility and small size make it Your speaker system includes the following parts (see important safety instructions on page 2 ...Figure 2): g easy to extend 20 feet (6 m) from anywhere in a convenient location. See your Bose' dealer for complete details). Setting up the cube speakers Place one cube speaker array on a table or shelf, in a bookcase or cabinet, or in its original carton and ...

Owner's guide
Page 6
... produce themost bass whenit is most convenient - do not block the built-in front of the room from the cube arrays, try to 1.5 m) from your Lifestyle' 5 speaker system. The amplifier generates some heat (not dangerous to the touch) and needs open air to locate the bass module at least 2 inches (5 cm) of...
... produce themost bass whenit is most convenient - do not block the built-in front of the room from the cube arrays, try to 1.5 m) from your Lifestyle' 5 speaker system. The amplifier generates some heat (not dangerous to the touch) and needs open air to locate the bass module at least 2 inches (5 cm) of...
Owner's guide
Page 7
... the bass module CAUTION: Make sure allcomponents(Lifestyle music centerandtheAcoustirnase bassmodule)areunplugged from thepoweroutletbeforeyoubeginhookingup the system. If the bass module is always negative (-). Connect the end of one speaker cord to lengthen the supplied speaker cord, splice in cord of the appropriate wire...feet (9m)from the music center, purchase aBose audioinput extension cable(EC-11,Bose part number 137455) from your speaker system. Check that may damage your authorized Bose dealer. Connect it to the OUTPUT terminals on the rear of each terminal ...
... the bass module CAUTION: Make sure allcomponents(Lifestyle music centerandtheAcoustirnase bassmodule)areunplugged from thepoweroutletbeforeyoubeginhookingup the system. If the bass module is always negative (-). Connect the end of one speaker cord to lengthen the supplied speaker cord, splice in cord of the appropriate wire...feet (9m)from the music center, purchase aBose audioinput extension cable(EC-11,Bose part number 137455) from your speaker system. Check that may damage your authorized Bose dealer. Connect it to the OUTPUT terminals on the rear of each terminal ...

Owner's guide
Page 8
... plug into the SYSTEM CONTROL jack • Red connector plug into theR(right)SPEAKERSA OUTPUT jack • White connector pluginto the L(left)SPEAKERS A OUTPUT jack 2. Connecting the power (mains) cord 1. Align the five pins on that connector with the five holes on the rear panel... of a completed speaker system hookup. I 120V Make sure the voltage selection switch on the Acousgmase bass module. Connecting the bass module to the Lifestyle' music center (See Figure 6) 1. Insert thesingleDINconnector on the other endof ...
... plug into the SYSTEM CONTROL jack • Red connector plug into theR(right)SPEAKERSA OUTPUT jack • White connector pluginto the L(left)SPEAKERS A OUTPUT jack 2. Connecting the power (mains) cord 1. Align the five pins on that connector with the five holes on the rear panel... of a completed speaker system hookup. I 120V Make sure the voltage selection switch on the Acousgmase bass module. Connecting the bass module to the Lifestyle' music center (See Figure 6) 1. Insert thesingleDINconnector on the other endof ...

Owner's guide
Page 9
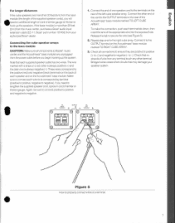
... cube facing directly into the room for direct sound (see Figure 8) or change the position of reflected and direct sound The cube speaker arrays are two ways to improve onscreenlocalization. Rotate the controls clockwise to scale.) Figure 8 • Room compensation controls. 9 Small... frequencies) and bass (low frequencies). Getting the best sound * After youhavelistened to your taste. Experiment with positioning the cube speaker arrays to your Lifestyle' music system, you may want to face both cube arrays forward, although this : use the room compensation controls located on...
... cube facing directly into the room for direct sound (see Figure 8) or change the position of reflected and direct sound The cube speaker arrays are two ways to improve onscreenlocalization. Rotate the controls clockwise to scale.) Figure 8 • Room compensation controls. 9 Small... frequencies) and bass (low frequencies). Getting the best sound * After youhavelistened to your taste. Experiment with positioning the cube speaker arrays to your Lifestyle' music system, you may want to face both cube arrays forward, although this : use the room compensation controls located on...
Owner's guide
Page 10
... and audio input cable • One(1)RIGHT(accessory) speaker with aNorvideomonitor,you wish to use the speakers with speaker terminals on the other terminal. See your Bose' dealer for Bose Lifestyle° powered speakers For complete information on these speakers, consult the Lifestyle' powered speakers owner's guide. If you can place the speakers beside the monitor. The wire marked with a stripe...
... and audio input cable • One(1)RIGHT(accessory) speaker with aNorvideomonitor,you wish to use the speakers with speaker terminals on the other terminal. See your Bose' dealer for Bose Lifestyle° powered speakers For complete information on these speakers, consult the Lifestyle' powered speakers owner's guide. If you can place the speakers beside the monitor. The wire marked with a stripe...

Owner's guide
Page 11
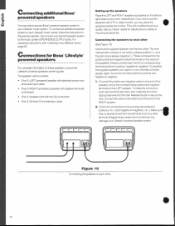
...corresponding red and black jacks on the back of the left speaker into the SPEAKERSB OUTPUT jack for the correct voltage. 3. Insert the black plug into a convenient power (mains) outlet. 4. Your Lifestyle' powered speakers are now ready to the music center (See Figure lij 1.... Turn the volume control on the back of the Lifestyle' music center. Connecting the speakers to play. Set the volume control to its lowest position. 2....
...corresponding red and black jacks on the back of the left speaker into the SPEAKERSB OUTPUT jack for the correct voltage. 3. Insert the black plug into a convenient power (mains) outlet. 4. Your Lifestyle' powered speakers are now ready to the music center (See Figure lij 1.... Turn the volume control on the back of the Lifestyle' music center. Connecting the speakers to play. Set the volume control to its lowest position. 2....


