
English Manual
Page 1
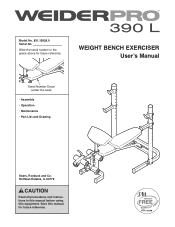
WEIGHT BENCH EXERCISER Userʼs Manual Serial Number Decal (under the seat) • Assembly • Operation • Maintenance • Part List and Drawing Sears, Roebuck and Co. Hoffman Estates, IL 60179 CAUTION Read all precautions and instructions in the space above for future reference. Model No. 831.15928.0 Serial No. Save this equipment. Write the serial number in this manual before using this manual for future reference.
WEIGHT BENCH EXERCISER Userʼs Manual Serial Number Decal (under the seat) • Assembly • Operation • Maintenance • Part List and Drawing Sears, Roebuck and Co. Hoffman Estates, IL 60179 CAUTION Read all precautions and instructions in the space above for future reference. Model No. 831.15928.0 Serial No. Save this equipment. Write the serial number in this manual before using this manual for future reference.
English Manual
Page 3
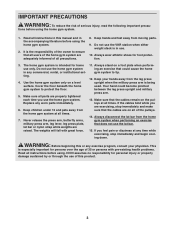
... around the weight bench to support a maximum user weight of 300 lbs. (136 kg) and a maximum total weight of all parts regularly. Do not use the weight bench, make sure that the large pins are adequately informed of 610 lbs (277 kg). Place the weight bench on the weight bench. Before you experience pain while exercising, stop immediately and cool down. 3 Inspect and properly tighten all precautions. 4. Replace any exercise program, consult...
... around the weight bench to support a maximum user weight of 300 lbs. (136 kg) and a maximum total weight of all parts regularly. Do not use the weight bench, make sure that the large pins are adequately informed of 610 lbs (277 kg). Place the weight bench on the weight bench. Before you experience pain while exercising, stop immediately and cool down. 3 Inspect and properly tighten all precautions. 4. Replace any exercise program, consult...
English Manual
Page 4
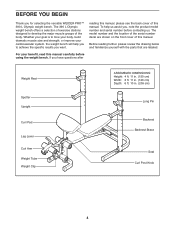
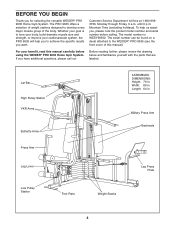
... review the drawing below and familiarize yourself with the parts that are shown on the front cover of this manual. For your cardiovascular system, the weight bench will help us assist you want. If you for selecting the versatile WEIDER PRO™ 390 L Olympic weight bench. To help you to achieve the specific results you , note the product model number and serial number before using the weight bench...
... review the drawing below and familiarize yourself with the parts that are shown on the front cover of this manual. For your cardiovascular system, the weight bench will help us assist you want. If you for selecting the versatile WEIDER PRO™ 390 L Olympic weight bench. To help you to achieve the specific results you , note the product model number and serial number before using the weight bench...

English Manual
Page 6
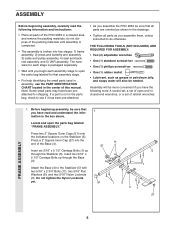
...; Place all assembly steps. • To identify small parts, see page 5. • The following tools (not included) may be required for assembly: two adjustable wrenches one rubber mallet one standard screwdriver one Phillips screwdriver Assembly will be more convenient if you assemble it will be used. Attach the Front Leg (4) to walk around the weight bench as you have a socket set, a set of open-end or...
...; Place all assembly steps. • To identify small parts, see page 5. • The following tools (not included) may be required for assembly: two adjustable wrenches one rubber mallet one standard screwdriver one Phillips screwdriver Assembly will be more convenient if you assemble it will be used. Attach the Front Leg (4) to walk around the weight bench as you have a socket set, a set of open-end or...
English Manual
Page 13
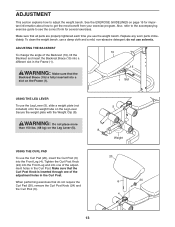
ADJUSTMENT This section explains how to get the most benefit from your exercise program. To clean the weight bench, use the weight bench. Replace any worn parts immediately. Tighten the Curl Post Knob (24) into the Front Leg and into a slot on the Frame (1). 19 15 1 Slot USING THE LEG LEVER To use the Leg Lever (5), slide a weight plate (not included) onto the weight tube on the Leg Lever (5). 5 8 Weight USING THE CURL...
ADJUSTMENT This section explains how to get the most benefit from your exercise program. To clean the weight bench, use the weight bench. Replace any worn parts immediately. Tighten the Curl Post Knob (24) into the Front Leg and into a slot on the Frame (1). 19 15 1 Slot USING THE LEG LEVER To use the Leg Lever (5), slide a weight plate (not included) onto the weight tube on the Leg Lever (5). 5 8 Weight USING THE CURL...
English Manual
Page 15
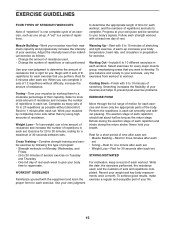
... your life. 15 Complete as many sets of 15 to your bodyʼs signals. Weight Loss-To lose weight, use a low amount of resistance and increase the number of repetitions in each exercise and move only the appropriate parts of the body. Working Out-Include 6 to prevent post-exercise problems. EXERCISE FORM Move through the full range of motion for each set . Stretching increases the flexibility of your...
... your life. 15 Complete as many sets of 15 to your bodyʼs signals. Weight Loss-To lose weight, use a low amount of resistance and increase the number of repetitions in each exercise and move only the appropriate parts of the body. Working Out-Include 6 to prevent post-exercise problems. EXERCISE FORM Move through the full range of motion for each set . Stretching increases the flexibility of your...
English Manual
Page 17
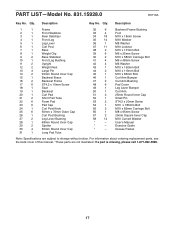
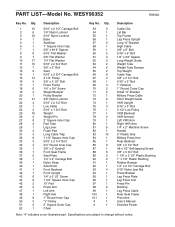
.... Grease Packet Note: Specifications are not illustrated. PART LIST-Model No. 831.15928.0 R0710A Key No. Qty. Userʼs Manual * - Description 1 1 Frame 2 1 Front Stabilizer 3 1 Rear Stabilizer 4 1 Front Leg 5 1 Leg Lever 6 1 Curl Post 7 1 Base 8 1 Weight Clip 9 2 Base Stabilizer 10 1 Front Leg Bushing 11 2 Upright 12 2 Weight Rest 13 4 Large Pin 14 2 95mm Round Inner Cap 15 1 Backrest Brace 16 2 Backrest Frame 17 11 ST4.2 x 10mm Screw 18 1 Seat 19...
.... Grease Packet Note: Specifications are not illustrated. PART LIST-Model No. 831.15928.0 R0710A Key No. Qty. Userʼs Manual * - Description 1 1 Frame 2 1 Front Stabilizer 3 1 Rear Stabilizer 4 1 Front Leg 5 1 Leg Lever 6 1 Curl Post 7 1 Base 8 1 Weight Clip 9 2 Base Stabilizer 10 1 Front Leg Bushing 11 2 Upright 12 2 Weight Rest 13 4 Large Pin 14 2 95mm Round Inner Cap 15 1 Backrest Brace 16 2 Backrest Frame 17 11 ST4.2 x 10mm Screw 18 1 Seat 19...
English Manual
Page 20
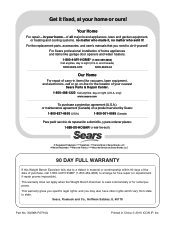
... night (U.S.A. Get it ! For Sears professional installation of your home or ours! This warranty gives you specific legal rights, and you need to state. Your Home For repair-in items like vacuums, lawn equipment, and electronics, call 1-800-4-MY-HOME® (1-800-469-4663) to arrange for free repair (or replacement if repair proves impossible). For the replacement parts, accessories, and user's manuals that you may also...
... night (U.S.A. Get it ! For Sears professional installation of your home or ours! This warranty gives you specific legal rights, and you need to state. Your Home For repair-in items like vacuums, lawn equipment, and electronics, call 1-800-4-MY-HOME® (1-800-469-4663) to arrange for free repair (or replacement if repair proves impossible). For the replacement parts, accessories, and user's manuals that you may also...
English Manual
Page 2
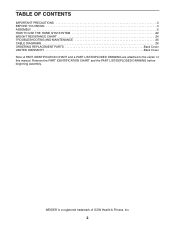
WEIDER is a registered trademark of this manual. Remove the PART IDENTIFICATION CHART and the PART LIST/EXPLODED DRAWING before beginning assembly. TABLE OF CONTENTS IMPORTANT PRECAUTIONS 3 BEFORE YOU BEGIN 4 ASSEMBLY 5 HOW TO USE THE HOME GYM SYSTEM 22 WEIGHT RESISTANCE CHART 24 TROUBLESHOOTING AND MAINTENANCE 25 CABLE DIAGRAMS 26 ORDERING REPLACEMENT PARTS Back Cover LIMITED WARRANTY Back Cover Note: A PART IDENTIFICATION CHART and a PART LIST/EXPLODED DRAWING are attached to the center of ICON Health & Fitness, Inc. 2
WEIDER is a registered trademark of this manual. Remove the PART IDENTIFICATION CHART and the PART LIST/EXPLODED DRAWING before beginning assembly. TABLE OF CONTENTS IMPORTANT PRECAUTIONS 3 BEFORE YOU BEGIN 4 ASSEMBLY 5 HOW TO USE THE HOME GYM SYSTEM 22 WEIGHT RESISTANCE CHART 24 TROUBLESHOOTING AND MAINTENANCE 25 CABLE DIAGRAMS 26 ORDERING REPLACEMENT PARTS Back Cover LIMITED WARRANTY Back Cover Note: A PART IDENTIFICATION CHART and a PART LIST/EXPLODED DRAWING are attached to the center of ICON Health & Fitness, Inc. 2
English Manual
Page 3
... responsibility of the owner to tip. 12. Replace any exercise program, consult your hands away from moving parts. 9. Always disconnect the lat bar from the home gym system at all times. 7. ICON assumes no responsibility for home use the VKR station when either weight stack is in any time while exercising, stop immediately and make sure that could become pinched between the leg press upright and military press arm. 13. IMPORTANT...
... responsibility of the owner to tip. 12. Replace any exercise program, consult your hands away from moving parts. 9. Always disconnect the lat bar from the home gym system at all times. 7. ICON assumes no responsibility for home use the VKR station when either weight stack is in any time while exercising, stop immediately and make sure that could become pinched between the leg press upright and military press arm. 13. IMPORTANT...
English Manual
Page 4
... review the drawing below and familiarize yourself with the parts that are labeled. If you , please note the product model number and serial number before using the WEIDER® PRO 9635 Home Gym System. Lat Bar High Pulley Station VKR Arms Butterfly Arms ASSEMBLED DIMENSIONS: Height: 76 in . BEFORE YOU BEGIN Thank you want. Whether your benefit, read this manual). Customer Service Department toll-free at 1-800-9993756, Monday through Friday, 6 a.m. The serial number...
... review the drawing below and familiarize yourself with the parts that are labeled. If you , please note the product model number and serial number before using the WEIDER® PRO 9635 Home Gym System. Lat Bar High Pulley Station VKR Arms Butterfly Arms ASSEMBLED DIMENSIONS: Height: 76 in . BEFORE YOU BEGIN Thank you want. Whether your benefit, read this manual). Customer Service Department toll-free at 1-800-9993756, Monday through Friday, 6 a.m. The serial number...
English Manual
Page 5
...: Some small parts may have read the following information and instructions: • Place all parts as you have the following tools: A socket set, a set of open-end or closed-end wrenches, or a set of the PRO 9635 in the center of the Base (4). Press a 2" Square Inner Cap (27) into five stages: 1) frame assembly, 2) press and butterfly arm assembly, 3) cable and pulley assembly, 4) seat and backrest assembly, and 5) VKR assembly. do otherwise...
...: Some small parts may have read the following information and instructions: • Place all parts as you have the following tools: A socket set, a set of open-end or closed-end wrenches, or a set of the PRO 9635 in the center of the Base (4). Press a 2" Square Inner Cap (27) into five stages: 1) frame assembly, 2) press and butterfly arm assembly, 3) cable and pulley assembly, 4) seat and backrest assembly, and 5) VKR assembly. do otherwise...

English Manual
Page 6
Slide the VKR Upright (74) and the Leg Press Upright (56) onto the indicated 5/16" x 2 1/2" Carriage Bolts (1) in the Base (4). 3 Hand-tighten a 5/16" Nylon Locknut (3) onto each Carriage Bolt. Press two 2" Square Inner Caps (27) into the Front Upright (42). Attach the Rubber Bumper (91) to the Leg Press Upright (56) with the #8 x 1/2" Self-tapping Screw (87). 2 27 87 91 74 27 3 27 High Sides...
Slide the VKR Upright (74) and the Leg Press Upright (56) onto the indicated 5/16" x 2 1/2" Carriage Bolts (1) in the Base (4). 3 Hand-tighten a 5/16" Nylon Locknut (3) onto each Carriage Bolt. Press two 2" Square Inner Caps (27) into the Front Upright (42). Attach the Rubber Bumper (91) to the Leg Press Upright (56) with the #8 x 1/2" Self-tapping Screw (87). 2 27 87 91 74 27 3 27 High Sides...
English Manual
Page 12
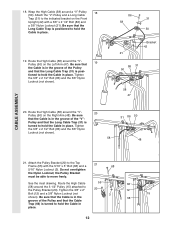
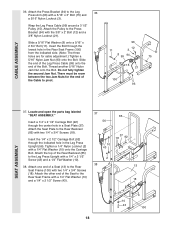
... bracket on the Front Upright (42) with the 5/16" x 5" Bolt (68) and a 68 5/16" Nylon Locknut (3). Tighten the 3/8" x 2 1/2" Bolt (86) and the 3/8" Nylon Locknut (not shown). 58 31 86 50 48 CABLE ASSEMBLY 21. Be sure that the Cable is in place. 12 Attach the Pulley Bracket (20) to hold the Cable in the groove of the Pulley and that the...
... bracket on the Front Upright (42) with the 5/16" x 5" Bolt (68) and a 68 5/16" Nylon Locknut (3). Tighten the 3/8" x 2 1/2" Bolt (86) and the 3/8" Nylon Locknut (not shown). 58 31 86 50 48 CABLE ASSEMBLY 21. Be sure that the Cable is in place. 12 Attach the Pulley Bracket (20) to hold the Cable in the groove of the Pulley and that the...
English Manual
Page 18
... Pulley to the Rear Seat Frame (100) with two 1/4" x 3/4" Screws (18). Slide the end of the Leg Press Cable (99) onto the end of the Seat to the Rear Backrest (85) with a 1/4" Flat Washer (10) onto the Carriage Bolt. Thread another 5/16" Nylon Jam Nut onto the Bolt. Locate and open the parts bag labeled "SEAT ASSEMBLY." Insert a 1/4" x 2 1/2" Carriage Bolt (92) through the indicated hole in the Leg Press Upright...
... Pulley to the Rear Seat Frame (100) with two 1/4" x 3/4" Screws (18). Slide the end of the Leg Press Cable (99) onto the end of the Seat to the Rear Backrest (85) with a 1/4" Flat Washer (10) onto the Carriage Bolt. Thread another 5/16" Nylon Jam Nut onto the Bolt. Locate and open the parts bag labeled "SEAT ASSEMBLY." Insert a 1/4" x 2 1/2" Carriage Bolt (92) through the indicated hole in the Leg Press Upright...

English Manual
Page 19
... 1/4" x 3/4" Screws (18). Attach the Leg Lever (29) to the Front Seat Frame (36) with two 1/4" x 2 1/2" Screws (43) and two 1/4" Flat Washers (10). Attach 40 the Seat Plate to the Front Upright with a 5/16" x 2 3/4" Carriage Bolt (14) and the Seat Knob (40). Tighten a 1/4" Nylon Locknut (2) with a 3/8" Flat Washer (9) onto the Eyebolt. 42. Press a 1 1/2" Square Inner Cap (32) into the Leg Lever (29). 41 Lubricate the 5/16" x 2 1/4" Bolt...
... 1/4" x 3/4" Screws (18). Attach the Leg Lever (29) to the Front Seat Frame (36) with two 1/4" x 2 1/2" Screws (43) and two 1/4" Flat Washers (10). Attach 40 the Seat Plate to the Front Upright with a 5/16" x 2 3/4" Carriage Bolt (14) and the Seat Knob (40). Tighten a 1/4" Nylon Locknut (2) with a 3/8" Flat Washer (9) onto the Eyebolt. 42. Press a 1 1/2" Square Inner Cap (32) into the Leg Lever (29). 41 Lubricate the 5/16" x 2 1/4" Bolt...
English Manual
Page 22
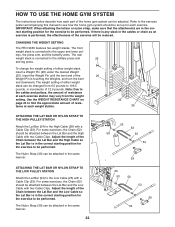
... exercise is connected to the cables and pulleys, the amount of resistance at each weight station. 25 26 ATTACHING THE LAT BAR OR NYLON STRAP TO THE HIGH PULLEY STATION Attach the Lat Bar (54) to find the approximate amount of resis- leys, the press arm, and the butterfly arms. The rear weight stack is performed, the effectiveness of the exercise will be changed from the weight setting. The weight setting of either weight stack, insert a Weight Pin...
... exercise is connected to the cables and pulleys, the amount of resistance at each weight station. 25 26 ATTACHING THE LAT BAR OR NYLON STRAP TO THE HIGH PULLEY STATION Attach the Lat Bar (54) to find the approximate amount of resis- leys, the press arm, and the butterfly arms. The rear weight stack is performed, the effectiveness of the exercise will be changed from the weight setting. The weight setting of either weight stack, insert a Weight Pin...
English Manual
Page 23
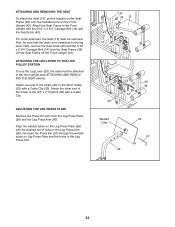
..." x 2 3/4" Carriage Bolt (14) and the Seat Knob (40). ATTACHING THE LEG LEVER TO THE LOW PULLEY STATION To use the Leg Lever (29), the seat must be removed. Align the welded tubes on Leg Press Plate and the holes in the Leg Press Arm (96). For some exercises, the Seat (13) must be sure that the chain is not attached to the Front Upright with the desired set the bracket...
..." x 2 3/4" Carriage Bolt (14) and the Seat Knob (40). ATTACHING THE LEG LEVER TO THE LOW PULLEY STATION To use the Leg Lever (29), the seat must be removed. Align the welded tubes on Leg Press Plate and the holes in the Leg Press Arm (96). For some exercises, the Seat (13) must be sure that the chain is not attached to the Front Upright with the desired set the bracket...
English Manual
Page 31
... Military Press Cable Short Weight Guide VKR Upright 5/16" x 3" Bolt 3 1/2" Low Pulley VKR Backrest VKR Armrest Left VKR Arm Right VKR Arm 1/4" x 2" Machine Screw Handle 5" Plastic Grip Military Press Arm Rear Backrest 3/8" x 2 1/2" Bolt #8 x 1/2" Self-tapping Screw 3/8" x 3 3/4" Bolt 1 1/8" x 2 1/2" Plastic Bushing 1" x 7/8" Plastic Bushing Rubber Bumper 1/4" x 2 1/2" Carriage Bolt 5/16" Nylon Jam Nut Press Bracket Leg Press Plate Leg Press Arm Press Pin Bushing Leg Press Cable Rear Seat Frame Pivot Arm User's Manual Exercise Poster Note: "#" indicates a non-illustrated part. Specifications...
... Military Press Cable Short Weight Guide VKR Upright 5/16" x 3" Bolt 3 1/2" Low Pulley VKR Backrest VKR Armrest Left VKR Arm Right VKR Arm 1/4" x 2" Machine Screw Handle 5" Plastic Grip Military Press Arm Rear Backrest 3/8" x 2 1/2" Bolt #8 x 1/2" Self-tapping Screw 3/8" x 3 3/4" Bolt 1 1/8" x 2 1/2" Plastic Bushing 1" x 7/8" Plastic Bushing Rubber Bumper 1/4" x 2 1/2" Carriage Bolt 5/16" Nylon Jam Nut Press Bracket Leg Press Plate Leg Press Arm Press Pin Bushing Leg Press Cable Rear Seat Frame Pivot Arm User's Manual Exercise Poster Note: "#" indicates a non-illustrated part. Specifications...
English Manual
Page 33
... cover of this manual). 4. or products used for which vary from state to any product or damage to a product caused by ICON. Some states do not allow limitations on how long an implied warranty lasts. ICON HEALTH & FITNESS, INC., 1500 S. 1000 W., LOGAN, UT 84321-9813 Part No. 190003 R0902A Printed in connection with respect to state. The MODEL NUMBER of the product (WEIDER® PRO 9635 Home Gym...
... cover of this manual). 4. or products used for which vary from state to any product or damage to a product caused by ICON. Some states do not allow limitations on how long an implied warranty lasts. ICON HEALTH & FITNESS, INC., 1500 S. 1000 W., LOGAN, UT 84321-9813 Part No. 190003 R0902A Printed in connection with respect to state. The MODEL NUMBER of the product (WEIDER® PRO 9635 Home Gym...


