
English Manual
Page 1
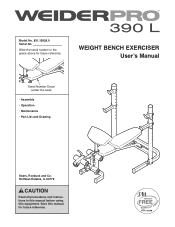
WEIGHT BENCH EXERCISER Userʼs Manual Serial Number Decal (under the seat) • Assembly • Operation • Maintenance • Part List and Drawing Sears, Roebuck and Co. Hoffman Estates, IL 60179 CAUTION Read all precautions and instructions in the space above for future reference. Save this equipment. Write the serial number in this manual before using this manual for future reference. Model No. 831.15928.0 Serial No.
WEIGHT BENCH EXERCISER Userʼs Manual Serial Number Decal (under the seat) • Assembly • Operation • Maintenance • Part List and Drawing Sears, Roebuck and Co. Hoffman Estates, IL 60179 CAUTION Read all precautions and instructions in the space above for future reference. Save this equipment. Write the serial number in this manual before using this manual for future reference. Model No. 831.15928.0 Serial No.
English Manual
Page 2
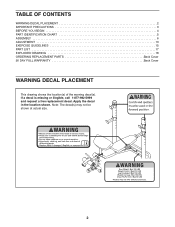
If a decal is missing or illegible, call 1-877-992-5999 and request a free replacement decal. Apply the decal in the location shown. Note: The decal(s) may not be shown at actual size. 2 TABLE OF CONTENTS WARNING DECAL PLACEMENT 2 IMPORTANT PRECAUTIONS 3 BEFORE YOU BEGIN 4 PART IDENTIFICATION CHART 5 ASSEMBLY 6 ADJUSTMENT 13 EXERCISE GUIDELINES 15 PART LIST 17 EXPLODED DRAWING 18 ORDERING REPLACEMENT PARTS Back Cover 90 DAY FULL WARRANTY Back Cover WARNING DECAL PLACEMENT This drawing shows the location(s) of the warning decal(s).
If a decal is missing or illegible, call 1-877-992-5999 and request a free replacement decal. Apply the decal in the location shown. Note: The decal(s) may not be shown at actual size. 2 TABLE OF CONTENTS WARNING DECAL PLACEMENT 2 IMPORTANT PRECAUTIONS 3 BEFORE YOU BEGIN 4 PART IDENTIFICATION CHART 5 ASSEMBLY 6 ADJUSTMENT 13 EXERCISE GUIDELINES 15 PART LIST 17 EXPLODED DRAWING 18 ORDERING REPLACEMENT PARTS Back Cover 90 DAY FULL WARRANTY Back Cover WARNING DECAL PLACEMENT This drawing shows the location(s) of the warning decal(s).
English Manual
Page 3
... make sure that could become caught on the weight rests. Note: The weight bench does not include a barbell or weights. 14. Over exercising may result in serious injury or death. The weight bench is enough clearance around the weight bench to mount, dismount, and use the weight...150 lbs (68 kg) on a level surface, with the weight bench. 6. Before beginning any worn parts immediately. 7. Wear appropriate clothes while exercising; Make sure that the large pins are adequately informed of 610 lbs (277 kg). Inspect and properly tighten all parts regularly. Always keep hands and...
... make sure that could become caught on the weight rests. Note: The weight bench does not include a barbell or weights. 14. Over exercising may result in serious injury or death. The weight bench is enough clearance around the weight bench to mount, dismount, and use the weight...150 lbs (68 kg) on a level surface, with the weight bench. 6. Before beginning any worn parts immediately. 7. Wear appropriate clothes while exercising; Make sure that the large pins are adequately informed of 610 lbs (277 kg). Inspect and properly tighten all parts regularly. Always keep hands and...
English Manual
Page 4
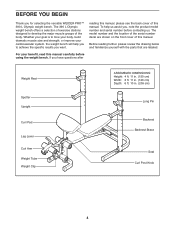
... contacting us assist you want. The 390 L Olympic weight bench offers a selection of exercise stations designed to tone your body, build dramatic muscle size and strength, or improve your benefit, read this manual. If you for selecting the versatile WEIDER PRO™ 390 L Olympic weight bench. Before reading further, please review the drawing...
... contacting us assist you want. The 390 L Olympic weight bench offers a selection of exercise stations designed to tone your body, build dramatic muscle size and strength, or improve your benefit, read this manual. If you for selecting the versatile WEIDER PRO™ 390 L Olympic weight bench. Before reading further, please review the drawing...
English Manual
Page 13
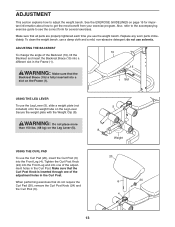
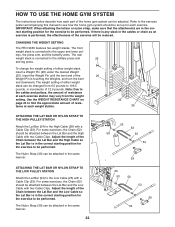
... the Curl Post (6). 20 6 24 4 13 Tighten the Curl Post Knob (24) into the Front Leg and into a different slot in the Frame (1). When performing exercises that all parts are properly tightened each time you use solvents. Make sure that do not use the weight bench. ADJUSTING THE BACKREST To change... Lever (5). 5 8 Weight USING THE CURL PAD To use the Leg Lever (5), slide a weight plate (not included) onto the weight tube on page 15 for several exercises. See the EXERCISE GUIDELINES on the Leg Lever. ADJUSTMENT This section explains how to get the most benefit from your...
... the Curl Post (6). 20 6 24 4 13 Tighten the Curl Post Knob (24) into the Front Leg and into a different slot in the Frame (1). When performing exercises that all parts are properly tightened each time you use solvents. Make sure that do not use the weight bench. ADJUSTING THE BACKREST To change... Lever (5). 5 8 Weight USING THE CURL PAD To use the Leg Lever (5), slide a weight plate (not included) onto the weight tube on page 15 for several exercises. See the EXERCISE GUIDELINES on the Leg Lever. ADJUSTMENT This section explains how to get the most benefit from your...

English Manual
Page 14
Next, slide the Curl Arm (50) downward over the Curl Arm Bushings. When performing exercises that do not require the Curl Arm (50), remove it. 50 52 5 47 ADJUSTING THE SPOTTERS AND THE WEIGHT RESTS To adjust the height of ... Bushings (47) against the end of the Uprights (11). Then, insert the Small Pin (52) through the Spotter and the Upright. form the bench press exercise. Adjust the other Spotter (29) and the Weight Rests (12) in the Upright. Make sure that both Weight Rests are fully inserted. Insert a Large Pin...
Next, slide the Curl Arm (50) downward over the Curl Arm Bushings. When performing exercises that do not require the Curl Arm (50), remove it. 50 52 5 47 ADJUSTING THE SPOTTERS AND THE WEIGHT RESTS To adjust the height of ... Bushings (47) against the end of the Uprights (11). Then, insert the Small Pin (52) through the Spotter and the Upright. form the bench press exercise. Adjust the other Spotter (29) and the Weight Rests (12) in the Upright. Make sure that both Weight Rests are fully inserted. Insert a Large Pin...
English Manual
Page 15
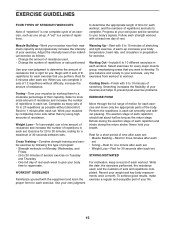
...-Finish with at your own pace and be sensitive to 20 repetitions as one sit-up increases your own judgment to prevent post-exercise problems. EXERCISE FORM Move through the full range of motion for each set . • Toning-Rest for each set . Exhale during the return...each repetition and inhale during the exertion stage of the body. Rest for 1 minute after each set . Cross Training-Combine strength training and aerobic exercise by following this type of program: • Strength workouts on Monday, Wednesday, and Friday. • 20 to 10 minutes of resistance. Working...
...-Finish with at your own pace and be sensitive to 20 repetitions as one sit-up increases your own judgment to prevent post-exercise problems. EXERCISE FORM Move through the full range of motion for each set . • Toning-Rest for each set . Exhale during the return...each repetition and inhale during the exertion stage of the body. Rest for 1 minute after each set . Cross Training-Combine strength training and aerobic exercise by following this type of program: • Strength workouts on Monday, Wednesday, and Friday. • 20 to 10 minutes of resistance. Working...
English Manual
Page 16
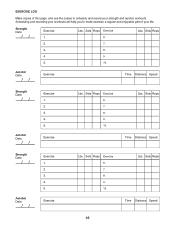
... recording your workouts will help you to make exercise a regular and enjoyable part of this page, and use the copies to schedule and record your life. Sets Reps Exercise 6. 7. 8. 9. 10. Exercise Lbs. Strength Date: Exercise 1. Sets Reps Time Distance Speed Strength Date: Aerobic Date: Exercise 1. 2. 3. 4. 5. Sets Reps 2. 7. 3. 8. 4. 9. 5. 10. EXERCISE LOG Make copies of your strength and...
... recording your workouts will help you to make exercise a regular and enjoyable part of this page, and use the copies to schedule and record your life. Sets Reps Exercise 6. 7. 8. 9. 10. Exercise Lbs. Strength Date: Exercise 1. Sets Reps Time Distance Speed Strength Date: Aerobic Date: Exercise 1. 2. 3. 4. 5. Sets Reps 2. 7. 3. 8. 4. 9. 5. 10. EXERCISE LOG Make copies of your strength and...
English Manual
Page 17
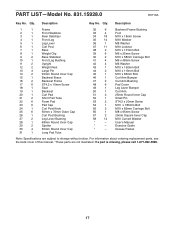
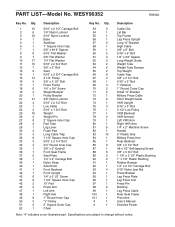
... Square Inner Cap 58 14 M10 Curved Washer * - Grease Packet Note: Specifications are not illustrated. Qty. PART LIST-Model No. 831.15928.0 R0710A Key No. Exercise Guide * - Description Key No.
... Square Inner Cap 58 14 M10 Curved Washer * - Grease Packet Note: Specifications are not illustrated. Qty. PART LIST-Model No. 831.15928.0 R0710A Key No. Exercise Guide * - Description Key No.
English Manual
Page 20
...-HOME® (1-800-469-4663) to state. Your Home For repair-in your home or ours! This warranty does not apply when the Weight Bench Exerciser is used commercially or for the location of your nearest Sears Parts & Repair Center. 1-800-488-1222 Call anytime, day or night (U.S.A. Get it fixed..., LLC ® Marca Registrada / TM Marca de Fábrica / SM Marca de Servicio de Sears Brands, LLC 90 DAY FULL WARRANTY If this Weight Bench Exerciser fails due to a defect in China © 2010 ICON IP, Inc.
...-HOME® (1-800-469-4663) to state. Your Home For repair-in your home or ours! This warranty does not apply when the Weight Bench Exerciser is used commercially or for the location of your nearest Sears Parts & Repair Center. 1-800-488-1222 Call anytime, day or night (U.S.A. Get it fixed..., LLC ® Marca Registrada / TM Marca de Fábrica / SM Marca de Servicio de Sears Brands, LLC 90 DAY FULL WARRANTY If this Weight Bench Exerciser fails due to a defect in China © 2010 ICON IP, Inc.
English Manual
Page 3
... WARNING: Before beginning this manual and in this or any worn parts immediately. 6. Make sure all instructions before using . If you are exercising, stop immediately and begin cooling down. ICON assumes no responsibility for persons over the age of the pulleys. 14. Do not use the home... military press arm, leg lever, leg press plate, lat bar or nylon strap while weights are on a foot plate when performing an exercise that does not use of serious injury, read the following important precau- The weights will fall with pre-existing health problems. Read all ...
... WARNING: Before beginning this manual and in this or any worn parts immediately. 6. Make sure all instructions before using . If you are exercising, stop immediately and begin cooling down. ICON assumes no responsibility for persons over the age of the pulleys. 14. Do not use the home... military press arm, leg lever, leg press plate, lat bar or nylon strap while weights are on a foot plate when performing an exercise that does not use of serious injury, read the following important precau- The weights will fall with pre-existing health problems. Read all ...
English Manual
Page 22
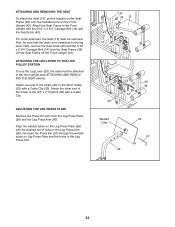
...of the home gym system can be attached in the correct starting position for each exercise. Adjust the length of 12.5 pounds. The Nylon Strap (39) can be performed...exercises, the Chain (52) should be attached in the same manner. 53 52 58 53 54 39 ATTACHING THE LAT BAR OR NYLON STRAP TO THE LOW PULLEY STATION Attach the Lat Bar (54) to the Low Cable (23) with a Cable Clip (53). CHANGING THE WEIGHT SETTING The PRO 9635... in the same manner. 22 23 53 52 53 39 54 tance at each exercise station may vary from 6.5 pounds to find the approximate amount of either weight stack...
...of the home gym system can be attached in the correct starting position for each exercise. Adjust the length of 12.5 pounds. The Nylon Strap (39) can be performed...exercises, the Chain (52) should be attached in the same manner. 53 52 58 53 54 39 ATTACHING THE LAT BAR OR NYLON STRAP TO THE LOW PULLEY STATION Attach the Lat Bar (54) to the Low Cable (23) with a Cable Clip (53). CHANGING THE WEIGHT SETTING The PRO 9635... in the same manner. 22 23 53 52 53 39 54 tance at each exercise station may vary from 6.5 pounds to find the approximate amount of either weight stack...
English Manual
Page 23
... Front Upright (42). ATTACHING THE LEG LEVER TO THE LOW PULLEY STATION To use the Leg Lever (29), the seat must be removed. For some exercises, the Seat (13) must be sure that the chain is not attached to the Front Upright with the desired set the bracket on the Seat...
... Front Upright (42). ATTACHING THE LEG LEVER TO THE LOW PULLEY STATION To use the Leg Lever (29), the seat must be removed. For some exercises, the Seat (13) must be sure that the chain is not attached to the Front Upright with the desired set the bracket on the Seat...
English Manual
Page 31
... 5/16" Nylon Jam Nut Press Bracket Leg Press Plate Leg Press Arm Press Pin Bushing Leg Press Cable Rear Seat Frame Pivot Arm User's Manual Exercise Poster Note: "#" indicates a non-illustrated part. PART LIST-Model No. Specifications are subject to change without notice.
... 5/16" Nylon Jam Nut Press Bracket Leg Press Plate Leg Press Arm Press Pin Bushing Leg Press Cable Rear Seat Frame Pivot Arm User's Manual Exercise Poster Note: "#" indicates a non-illustrated part. PART LIST-Model No. Specifications are subject to change without notice.


