

English Manual
Page 2
WEIDER is a registered trademark of this manual. TABLE OF CONTENTS IMPORTANT PRECAUTIONS 3 BEFORE YOU BEGIN 4 ASSEMBLY 5 HOW TO USE THE HOME GYM SYSTEM 22 WEIGHT RESISTANCE CHART 24 TROUBLESHOOTING AND MAINTENANCE 25 CABLE DIAGRAMS 26 ORDERING REPLACEMENT PARTS Back Cover LIMITED WARRANTY Back Cover Note: A PART IDENTIFICATION CHART and a PART LIST/EXPLODED DRAWING are attached to the center of ICON Health & Fitness, Inc. 2 Remove the PART IDENTIFICATION CHART and the PART LIST/EXPLODED DRAWING before beginning assembly.
WEIDER is a registered trademark of this manual. TABLE OF CONTENTS IMPORTANT PRECAUTIONS 3 BEFORE YOU BEGIN 4 ASSEMBLY 5 HOW TO USE THE HOME GYM SYSTEM 22 WEIGHT RESISTANCE CHART 24 TROUBLESHOOTING AND MAINTENANCE 25 CABLE DIAGRAMS 26 ORDERING REPLACEMENT PARTS Back Cover LIMITED WARRANTY Back Cover Note: A PART IDENTIFICATION CHART and a PART LIST/EXPLODED DRAWING are attached to the center of ICON Health & Fitness, Inc. 2 Remove the PART IDENTIFICATION CHART and the PART LIST/EXPLODED DRAWING before beginning assembly.
English Manual
Page 11
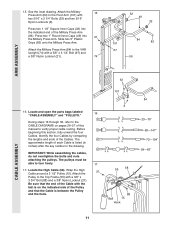
...1 1/2" Square Inner Caps (32) into 21 the Military Press Arm. Locate and open the parts bags labeled "CABLE ASSEMBLY" and "PULLEYS." 16 During steps 16 through 36, refer to the Top Frame (55) with a ...) and a 3/8" Nylon Locknut (21). 74 32 49 32 84 101 83 67 56 ARM ASSEMBLY CABLE ASSEMBLY 33 101 16. The pulleys must be able to the Pivot Arm (101) with the ball is ... 72-194" 99-63" 11 Wrap the High 21 Cable around a 3 1/2" Pulley (15). Attach the Pulley to the CABLE DIAGRAMS on the indicated side of the Cables. Attach the Military 15 Press Arm (84) to turn...
...1 1/2" Square Inner Caps (32) into 21 the Military Press Arm. Locate and open the parts bags labeled "CABLE ASSEMBLY" and "PULLEYS." 16 During steps 16 through 36, refer to the Top Frame (55) with a ...) and a 3/8" Nylon Locknut (21). 74 32 49 32 84 101 83 67 56 ARM ASSEMBLY CABLE ASSEMBLY 33 101 16. The pulleys must be able to the Pivot Arm (101) with the ball is ... 72-194" 99-63" 11 Wrap the High 21 Cable around a 3 1/2" Pulley (15). Attach the Pulley to the CABLE DIAGRAMS on the indicated side of the Cables. Attach the Military 15 Press Arm (84) to turn...
English Manual
Page 21
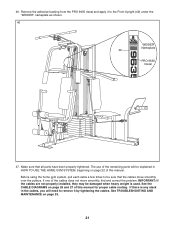
.... Before using the home gym system, pull each cable a few times to the Front Upright (42) under the "WEIDER" nameplate as shown. 46 WEIDER Nameplate 42 PRO 9635 Decal 47. If one of this manual for proper cable routing. See the CABLE DIAGRAMS on page 25. 21 IMPORTANT: If the cables are not properly installed, they may be explained...
.... Before using the home gym system, pull each cable a few times to the Front Upright (42) under the "WEIDER" nameplate as shown. 46 WEIDER Nameplate 42 PRO 9635 Decal 47. If one of this manual for proper cable routing. See the CABLE DIAGRAMS on page 25. 21 IMPORTANT: If the cables are not properly installed, they may be explained...
English Manual
Page 26
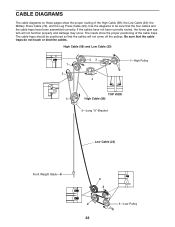
...damage may occur. Use the diagrams to be positioned so that the four cables and the cable traps have not been correctly routed, the home gym system will not come off the pulleys. If the cables have been assembled correctly. CABLE DIAGRAMS The cable diagrams on these pages show the proper... positioning of the High Cable (58), the Low Cable (23), the Military Press Cable (72), and the Leg Press Cable (99). Be sure that the cable traps do not touch or bind...
...damage may occur. Use the diagrams to be positioned so that the four cables and the cable traps have not been correctly routed, the home gym system will not come off the pulleys. If the cables have been assembled correctly. CABLE DIAGRAMS The cable diagrams on these pages show the proper... positioning of the High Cable (58), the Low Cable (23), the Military Press Cable (72), and the Leg Press Cable (99). Be sure that the cable traps do not touch or bind...


